BMH 1000
English
7
Application
The Pneumatic Drill Hammer can be used universally
for impact drilling, for light chiselling work in masonry
and for drilling as well as screwdriving in wood, metal
and plastic.
Before putting the machine into operation, read
through these operating instructions completely and
observe the safety instructions contained therein as
well as those in the enclosed booklet on general
safety instructions for electro-tools.
If the mains cable is damaged while working, pull
the mains plug immediately.
Never work with a damaged mains cable.
Wear protective glasses, hearing protection, pro-
tective gloves and sturdy shoes.
1
Safety Instructions and
Accident Prevention
2
Illustration
3
Technical Data
Pneumatic Drill
Hammer
BMH 1000
Article number
0428 3512
Input power
1000 W
Output power
600 W
Electronic control
•
Full wave electronic
•
No-load speed
1st Gear
125-875 RPM
2nd Gear
250-2000 RPM
Speed under load
1st Gear max.
800 RPM
2nd Gear max.
1850 RPM
No-load impact rate
4700/min max.
Load hammer blows
4300/min
Right/Left rotation
•
Clamping collar dia.
43 mm
Euro standard
Tool holder
SDS-Plus
Drill dia., max.
Steel
16 mm
Light metal
25 mm
Wood
50 mm
Hammer drilling in
conctrete
28 mm
Recommended
hammer drilling
range
4-16 mm
Screw dia., max.
Wood
8 mm
Sheet metal
6.3 mm
Corner measure
42 mm
Weight
2.8 kg
Protection class
II/
4
Noise/vibration information
BMH 1000 - Buch Seite7 Donnerstag 29. Mai 2006
Measured values determined according to
EN 60 745.
Typically the A-weighted noise levels of the machine
are: sound pressure level 96 dB (A); sound power level
107 dB (A). Measurement uncertainty
K = 3 dB.
Wear hearing protection!
The typically weighted acceleration is 7,8 m/s².
Do not work with materials containing asbestos.
Do not carry the machine by the cable.
The mains receptacles in the working area must be
protected by a residual current circuit breaker (RC).
For the attachment of identification markings on the
machine, do not drill into the housing. The protec-
tive insulation would be shorted. Use stickers.
When the drill unexpectedly jams, the machine
kicks back. Therefore, always take a secure stance
and hold the machine firmly with both hands.
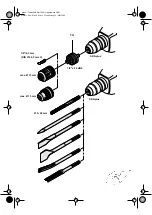
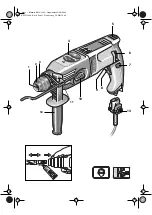
1 Tool holder
2 Dust protection cap
3 Unlocking collar
4 Gear selector/Rotation stop switch
5 Ventilation slots
6 Rotational direction switch
7 Locking button for on/off switch
8 On/Off switch
9 Speed selection knob
10 Drilling/Impact drilling selector
11 Holder for depth stop
12 Auxiliary handle
13 Latch for mains cable module
14 Adapter for screwdriver bits/drill chuck
Accessories illustrated or described are not
always included as standard delivery items.
Wear hearing protection.
Exposure to noise
can cause hearing loss.
Use the auxiliary handles supplied with the
machine.
Loss of control can cause personal


