126
Sequencer
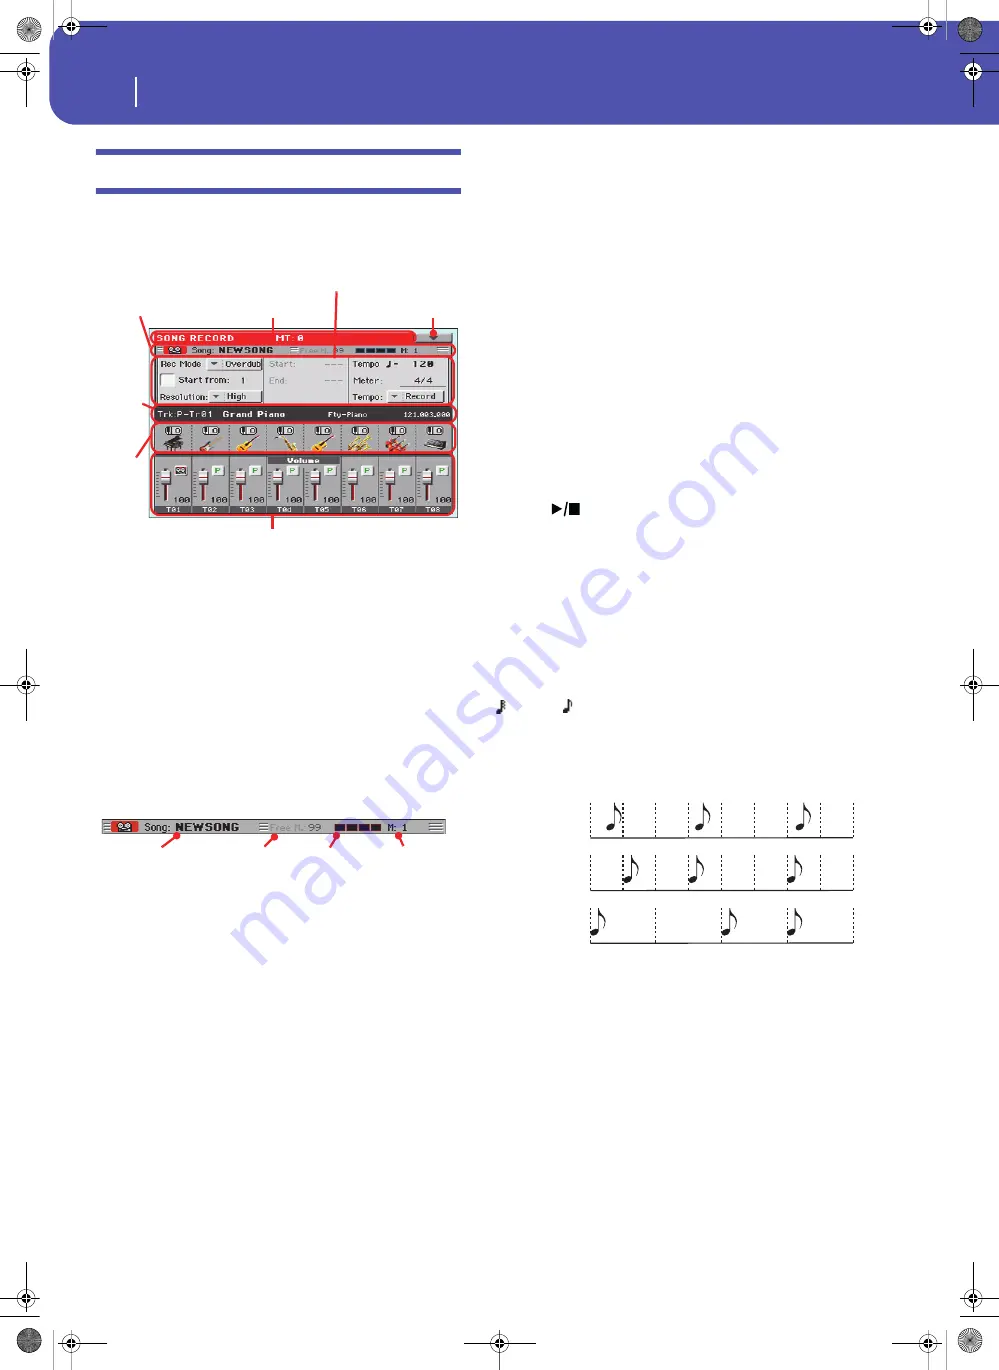
Record mode: Multitrack Sequencer page
Record mode: Multitrack Sequencer page
While in Sequencer mode, press the RECORD button and select
the “Multitrack Sequencer” option. The Multitrack Sequencer
page appears.
See “Multitrack recording procedure” on page 127 for informa-
tion on the record procedure.
Page header
See “Page header” on page 123.
Page menu icon
See “Page menu icon” on page 123.
Page sub-header
This area shows some performing info on the Song.
Song name
Name of the Song in record.
Free memory %
Percentage of remaining memory available for recording.
Beat counter
This indicator shows the current beat inside the current mea-
sure.
Measure number
Current measure you are recording.
Recording parameters area
Rec mode (Recording mode)
Set this parameter before starting record, to select a recording
mode.
Overdub
The newly recorded events will be mixed to any
existing events.
Overwrite
The newly recorded events will replace any exist-
ing events.
Auto Punch
Recording will automatically begin at the “Start”
position, and stop at the “End” position.
Note:
The Auto Punch function will not work on
an empty Song. At least one track must already be
recorded.
PedalPunch
Recording will begin when pressing a pedal set to
the “Punch In/Out” function, and will finish
when pressing the same pedal again.
Note:
The Pedal Punch function will not work on an
empty Song. At least one track must already be recorded.
Start from
When checked, the measure shown by this parameter is a tem-
porary start point of the song, instead of measure 1. When you
press the
(START/STOP) button to stop recording, or use
the << (REWIND) button to go back to the beginning, the Song
returns to this point.
Resolution
Use this parameter to set the quantization during recording.
Quantization is a way of correcting timing errors; notes played
too soon or too late are moved to the nearest axis of a rhythmic
“grid”, set with this parameter, thus playing perfectly in time.
High
No quantization applied.
(1/32)… (1/8)
Grid resolution, in musical values. For example,
when you select 1/16, all notes are moved to the
nearest 1/16 division. When you select 1/8, all
notes are moved to the nearest 1/8 division.
Start/End
Start and End locators. These parameters area available only
when the “Auto Punch” recording mode is selected. They set the
starting and ending points of the Punch recording.
Tempo
Select this parameter, and use the TEMPO controls to set the
Tempo value.
Meter
This is the basic meter (or time signature) of the Song. You can
edit this parameter only when the Song is empty, i.e., before you
begin recording anything. To insert a meter change in the mid-
dle of the Song, use the “Insert Measure” function (see
page 142).
Page header
Page menu icon
Selected
track
info area
Sounds
area
Tracks volume/status area
Recording parameters area
Page sub-header
Song name
Beat counter
Measure number
Free memory %
No quantiza-
tion
1/16
1/8
Pa300 User Manual v150 (English).book Page 126 Saturday, March 29, 2014 5:29 PM
Summary of Contents for Pa300
Page 2: ...Pa300 User Manual v150 English book Page II Saturday March 29 2014 5 29 PM ...
Page 9: ...Pa300 User Manual v150 English book Page 5 Saturday March 29 2014 5 29 PM ...
Page 31: ...Pa300 User Manual v150 English book Page 27 Saturday March 29 2014 5 29 PM ...
Page 85: ...Pa300 User Manual v150 English book Page 81 Saturday March 29 2014 5 29 PM ...
Page 265: ...Pa300 User Manual v150 English book Page 261 Saturday March 29 2014 5 29 PM ...
Page 376: ...372 Index Pa300 User Manual v150 English book Page 372 Saturday March 29 2014 5 29 PM ...
Page 377: ...Pa300 User Manual v150 English book Page III Saturday March 29 2014 5 29 PM ...


