background image

3

Network Settings

3-20

Printer Controller Pi3505e Pi3505e/PS

7

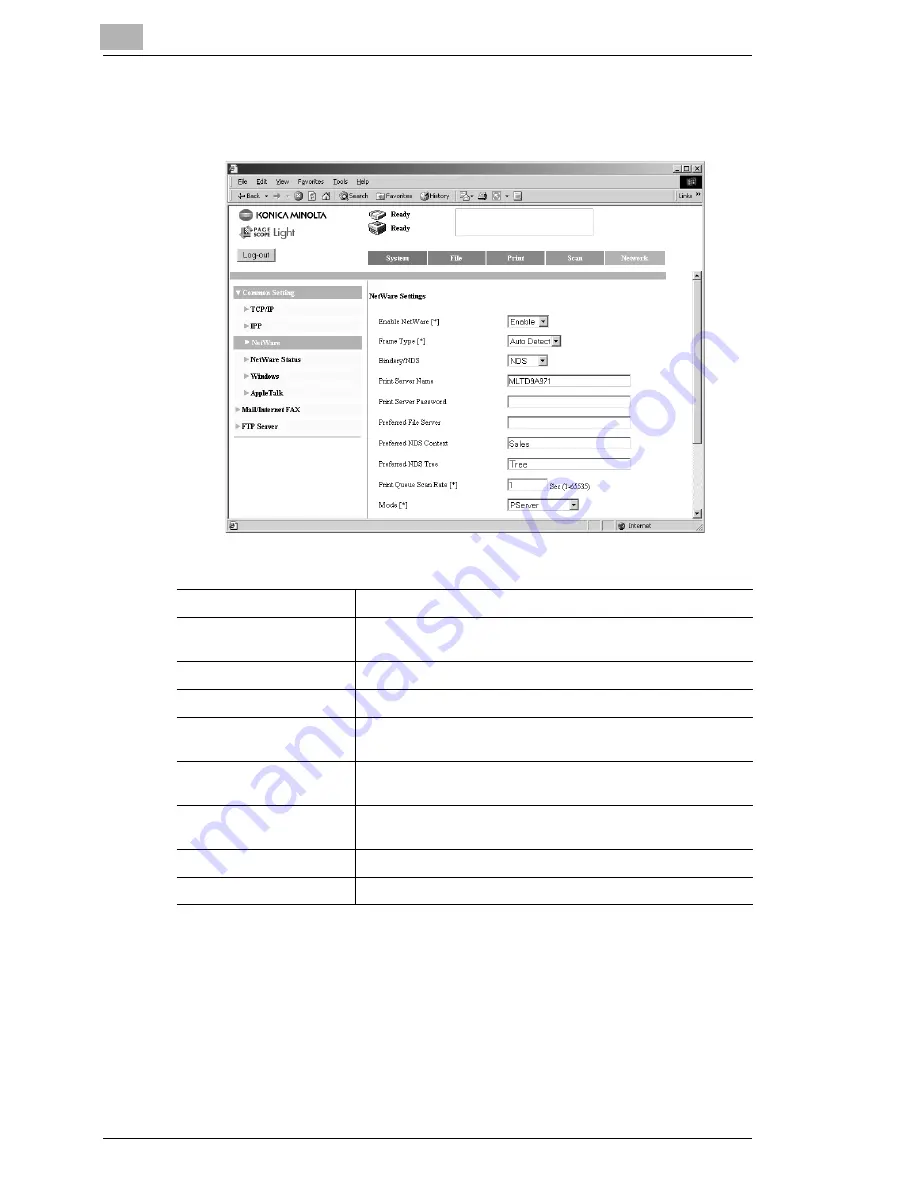
Select the connection information. In the active connection field, check 
to make sure that the Pserver you created is connected.

Enable Netware*:

Yes

Frame Type*:

Auto Detect (Select the frame type in accordance with your 
network environment.)

Bindery/NDS:

NDS

Print Server Name:

Name of print server created in step 4

Print Server Password:

Use this setting only when configuring settings on the NetWare 
Server.

Preferred NDS Context 
Name:

Name of context that connects Pserver

Preferred NDS Tree 
Name:

Name of tree that Pserver logs in to

Print Queue Scan Rate:

1 (Change in accordance with needs.)

Mode*:

Pserver

Summary of Contents for Pi3505e

Page 1: ...Printer Controller Pi3505e Pi3505e PS User Manual 4513 7734 01 www konicaminolta net ...

Page 2: ...ing Environment 2 1 Installing a Windows 98 Me Printer Driver 2 2 Displaying Printer Driver Properties 2 5 To display a Properties dialog box from the Printers folder 2 6 To display a Properties dialog box from an application menu 2 6 2 2 Windows 2000 XP Server 2003 2 7 Operating Environment 2 7 Installing a Windows 2000 XP Server 2003 Printer Driver 2 7 Displaying Printer Driver Settings 2 12 To ...

Page 3: ...ontroller 3 10 Configuring Printer Driver Settings Windows 98 Me 3 11 Configuring Printer Driver Settings Windows NT 4 0 2000 XP Server 2003 3 11 3 6 IPP Printing 3 12 Requirements 3 12 Configuration Procedure 3 12 Installing the printer 3 13 3 7 NetWare Printing 3 15 Configuring Print Settings on a PC Used for Printing 3 15 Configuring NetWare 4 x NDS Print Server Mode settings 3 15 Configuring N...

Page 4: ...ce Dialog Box 4 12 Output Setting Dialog Box 4 14 4 5 Paper Tab 4 17 Custom Paper Dialog Box 4 19 4 6 Quality tab 4 20 4 7 Job Management Tab 4 21 4 7 1 Kind of Job 4 24 Account Code 4 24 Configuring print driver setting 4 24 Lock Job 4 24 Configuring print driver settings 4 25 Performing the required operation on the machine 4 25 Reprint 4 25 Configuring print driver settings 4 25 Performing the ...

Page 5: ...guring PostScript Printer Driver Properties for Windows 98 and Me 6 1 Using PostScript Printer Driver Properties Tabs 6 1 6 2 Device Options Tab 6 2 6 3 Paper Tab 6 11 7 Configuring PostScript Printer Driver Properties for Windows NT 4 0 7 1 Using PostScript Printer Driver Properties Tabs 7 1 7 2 Device Settings Tab 7 2 7 3 Page Setup Tab 7 3 7 4 Advanced Tab 7 4 8 Printer Driver for Macintosh 8 1...

Page 6: ...allable Options 8 21 General 8 23 Background Printing 8 24 Color Matching 8 25 Cover Page 8 27 Layout 8 28 Font Settings 8 30 Job Logging 8 31 Save as File 8 32 Printer Specific Options 8 33 Finishing 8 34 Cover Page OHP Interleaving 8 37 Imaging 8 39 Watermark 1 8 40 Watermark 2 8 42 Job Management 8 43 Conflicts Dialog Box 8 45 8 3 2 Mac OS X Print Options 8 46 Copies Pages 8 47 Layout 8 48 Dupl...

Page 7: ...Panel to Configure Printer Settings 10 1 Printer Settings Screen 10 1 Accessing the Printer Settings Screen 10 2 10 2 Local Interface Settings 10 10 10 3 To Delete All Lock Jobs 10 11 10 4 Access Lock Caused by Unauthorized Access 10 12 Allowing a Lock Job to be accessed again 10 12 11 Troubleshooting 11 1 Unable to Print 11 1 11 2 Unable to Make Correct Settings Unable to Print Exactly as Set 11 ...

Page 8: ...d radiate radio frequency energy and if not installed and used in accordance with the instruction manual may cause harmful interference to radio communications Operation of this equipment in a residential area is likely to cause harmful interference in which case the user will be required to correct the interference at his own expense WARNING The design and production of this unit conform to FCC R...

Page 9: ... result in interference with radio communications and is prohibited under EU directives This device must be used with shielded interface cables The use of non shielded cables is likely to result in interference with radio communications and is prohibited under CISPR 22 rules and local rules WARNING This is a Class A product In a domestic environment this product may cause radio interference in whi...

Page 10: ...rademark of KONICA MINOLTA BUSINESS TECHNOLOGIES INC Ethernet is a registered trademark of Xerox Corporation PCL is registered trademarks of Hewlett Packard Company Microsoft Windows and Windows NT are registered trademarks of Microsoft Corporation Netscape Communications the Netscape Communications logo Netscape Navigator Netscape Communicator and Netscape are trademarks of Netscape Communication...

Page 11: ...x Printer Controller Pi3505e Pi3505e PS ...

Page 12: ...ine is On Line when you are using the controller Some functions of the machine such as stapling and hole punching cannot be used in combination Other functions may not be available when printing on certain paper sizes Any functions that are not currently disabled appear dimmed on the printer driver dialog box Specifying functions that are not compatible with each other will display the Conflicts d...

Page 13: ...ed into uncollated groups each containing prints of one original G Prints two pages of originals on both front and back sides of a single sheet of paper G Enlarges or reduces the image on the original G Prints two pages or four pages of originals on a single sheet of paper Maximum of 16 pages of originals can be printed on a single sheet of paper Left Binding Top Binding 2 up 4 up ...

Page 14: ... G Places text in the background G Makes prints of complete sets of the originals stapled together or punched for filing By combining Collate with other finishing capabilities you can make complete sets of documents for immediate delivery without having to do any further processing G Adds a reference number Distribution Number to each document set during printing ...

Page 15: ... Controller Pi3505e Pi3505e PS G Prints only the cover on a different type of paper such as colored pa per G Capable of printing on OHP transparencies You can also insert inter leaves blank on the OHP transparencies G Folds copies during finishing ...

Page 16: ...2MB G Printer Controller Pi3505e PS Makes it possible to use the machine as a PCL PS printer Printer Memory Circuit Board 128MB CompactFlash Card Reference Other related options G Network Interface Card NC 4 Makes it possible to use the machine as printer Equipped with a USB port and LAN cable port G Parallel Interface Kit Enables printing over a parallel connection IEEE1284 Note The Network Inter...

Page 17: ...re Using the Printer Driver 1 6 Printer Controller Pi3505e Pi3505e PS Note The Network Interface Card NC 4 must be installed in order to use the Network Scan Kit SU 2 or the Internet Fax Network Scan Kit SU 3 ...

Page 18: ...of the machine 2 USB port LAN cable port Use these ports to connect the machine to a computer These ports are located on the back of the machine Use the USB port when connecting the machine directly to a computer Use the LAN cable port when connecting the machine as a network computer 3 Parallel port Use the Parallel port when connecting the machine directly to a computer The Parallel Interface Ki...

Page 19: ...e completes its power up routine before trying to print Connecting directly to a computer with an IEEE1284 cable Available only if the Parallel Interface Kit is installed 1 Find the machine s parallel port The parallel port is located on the left side of the machine 2 Plug one end of the IEEE1284 cable into the machine s parallel port 3 Install a printer driver on your computer See Installing a Wi...

Page 20: ...entation that came with your computer for information about where its USB port is located Important Make sure you install the printer driver before you connect the USB cable to the computer Connecting to a network with a LAN cable Note Use Fast Ethernet 100BASE TX Category 5 cable for a LAN connection To use the machine on a network you also need to configure network settings for the machine and c...

Page 21: ...cle only after it has received the all of data of a particular print job The machine can be used for copying while it is receiving data since it starts printing only after it has received all the data of the print job With this setting more time is available for copying but print jobs take longer to print G Printer This setting specifies that the machine is used mainly as a printer With this setti...

Page 22: ...rs Windows 98 Me Windows NT 4 0 Windows 2000 XP Server 2003 G PS3 printer driver only with Pi3505e PS Windows 98 Me Windows NT 4 0 Windows 2000 XP Mac OS 8 6 9 2 Mac OS X 10 2 Install the proper printer driver for the operating system that your computer is running See the pages referenced below for more information about driver installation procedure To install a printer driver on a machine runnin...

Page 23: ...1 Before Using the Printer Driver 1 12 Printer Controller Pi3505e Pi3505e PS ...

Page 24: ...e minimum requirements If it doesn t the printer driver may not function properly G Windows 2000 XP Server 2003 For minimum system requirements and the installation procedure for a Windows 2000 XP Server 2003 printer driver see page 2 7 G Windows NT 4 0 For minimum system requirements and the installation procedure for Windows NT 4 0 printer drivers see page 2 15 Personal computer IBM PC or compat...

Page 25: ...evice driver be installed in the PC For the procedure to install the USB device driver see Installation through Plug and Play on page 2 20 and Connecting the USB Cable on page 2 20 Tip The following sample procedure shows how to install the PCL6 printer driver The text that appears on the screens will differ slightly when installing a different printer driver type 1 Click the Start button On the m...

Page 26: ... Next button Note When installing the printer driver from a computer connected to the machine over a network contact your network administrator Your system administrator needs to select Network printer and then click the Next button On the dialog box that appears prompting entry of the network path type in the correct path 5 On the screen that appears asking you to select the manufacturer and mode...

Page 27: ...ver you want to install and click the Next button 9 On the port selection screen that appears Select USB001 if the connection is made through the USB cable and LPT1 if the connection is made through the IEEE1284 cable Then click the Next button Note For information about connecting to a network see Network Settings on page 3 1 10 On the next screen that appears check the name of the printer If you...

Page 28: ...ry well be able to use the default settings as they are However you can modify the printer driver settings to suit your particular needs There are two different ways to display a Properties dialog box The contents of a particular dialog box differ slightly depending on how you access it Select the appropriate one according to your need G To display a Properties dialog box from the Printers folder ...

Page 29: ... printer driver KONICA MINOLTA Di3510 PCL6 for example is displayed If the name of your KONICA MINOLTA printer driver is not displayed click M and then select it from the menu that appears 3 Click the Properties button This displays a properties dialog box that lets you configure local print settings The settings you configure here will be valid only for the application you are currently running T...

Page 30: ...m requirements and the installation procedure for Windows NT 4 0 printer drivers see page 2 15 Installing a Windows 2000 XP Server 2003 Printer Driver Perform the steps below to install a Windows 2000 XP Server 2003 printer driver Note In order to install a printer driver you must be logged into with administrator privileges Before starting to install a printer driver be sure first to quit all oth...

Page 31: ...at appears point to Settings and then click Printers 2 On the Printers window that appears double click the Add Printer icon 3 On the Add Printer Wizard screen that appears click the Next button 4 On the screen that appears asking how the printer is connected to your computer select Local if your computer is directly connected to the machine Then click the Next button Note When installing the prin...

Page 32: ...9 5 On the port selection screen that appears Select USB001 if the connection is made through the USB cable and LPT1 if the connection is made through the IEEE1284 cable Then click the Next button Note For information about connecting to a network see Network Settings on page 3 1 ...

Page 33: ...e that corresponds to the of printer driver that matches the operating system your computer is running and then click the OK button 9 On the list of printers that appears select the driver you want to install and click the Next button 10 On the next screen that appears check the name of the printer If you want to designate this printer as the default printer select Yes Finally click the Next butto...

Page 34: ...ing a Windows Printer Driver 2 Printer Controller Pi3505e Pi3505e PS 2 11 13 Installation is complete when all the files have been copied from the CD ROM and the applicable icon is added to the Printers window ...

Page 35: ...ent steps to take to display a properties dialog box The contents of a particular properties dialog box slightly differ depending on how you access it Select the appropriate one according to your need G To display a properties dialog box from the Printers window G To display a properties dialog box from an application menu Below are the detailed procedures for each approach Note The following proc...

Page 36: ... box on the General tab to make sure that the name your KONICA MINOLTA printer driver KONICA MINOLTA Di3510 PCL6 for example is displayed If the name of your KONICA MINOLTA printer driver is not displayed click M and then select it from the menu that appears The properties dialog box that appears here lets you configure local printer driver settings The settings you configure here will be valid on...

Page 37: ...r may not function properly G Windows 98 Me For minimum system requirements and the installation procedure for Windows 98 Me printer drivers see page 2 2 G Windows 2000 XP Server 2003 For minimum system requirements and the installation procedure for a Windows 2000 XP Server 2003 printer driver see page 2 7 Personal computer IBM PC or compatible with Pentium 200MHz or higher CPU Operating system W...

Page 38: ...er driver be sure first to quit all other applications Tip The following sample procedure shows how to install the PCL6 printer driver The text that appears on the screens will differ slightly when installing a different type of driver 1 Click the Start button On the menu that appears point to Settings and then click Printers 2 On the Printers window that appears double click the Add Printer icon ...

Page 39: ...twork administrator if you are installing the printer driver from a computer that is connected to the machine via a network 4 On the port selection screen that appears select the LPT port and then click the Next button Note For information about connecting to a network see Network Settings on page 3 1 ...

Page 40: ...le that corresponds to the of printer driver that matches the operating system your computer is running and then click the OK button 8 On the list of printers that appears select the driver you want to install and click the Next button 9 On the next screen that appears check the name of the printer If you want to designate this printer as the default printer select Yes Finally click the Next butto...

Page 41: ...r driver settings to suit your particular needs There are two different steps to take to display a properties dialog box The contents of a particular properties dialog box slightly differ depending on how you access it Select the appropriate one according to your need G To display a properties dialog box from the Printers window G To display a properties dialog box from an application menu Below a...

Page 42: ...ke sure that the name your KONICA MINOLTA printer driver KONICA MINOLTA Di3510 PCL6 for example is displayed If the name of your KONICA MINOLTA printer driver is not displayed click M and then select it from the menu that appears 3 Click the Properties button The properties dialog box that appears here lets you configure local printer driver properties The settings you configure here will be valid...

Page 43: ... the lock springs on both sides of the connector 3 Connect the other end of the cable to the PC 4 The copier and PC are turned ON in that order Windows is started the installation guide for the printer driver through Plug and Play is automatically started on the PC 5 Install the printer driver according as instructed by the Add New Hardware Wizard Connecting the USB Cable Windows 98 and 98SE Follo...

Page 44: ...omatically appear after the USB device driver has been installed install the printer driver Windows Me 2000 XP and Windows Server 2003 1 Connect the USB cable to the copier and PC with the Power Switch ON 2 The installation of the printer driver through Plug and Play is automatically started on the PC 3 Install the printer driver according as instructed by the Add New Hardware Wizard Note Windows ...

Page 45: ...inter Driver 1 Click the Start button point to Settings and then click Printers 2 Click the icon of the printer to be deleted 3 Press the Delete key to delete the driver 4 When the uninstalling procedure is completed the printer icon disappears from the Printers window This completes the uninstalling procedure ...

Page 46: ...ns Windows 98 Me G Peer to peer printing Refer to the PageScope Network Setup User Manual for details G Windows printing See Windows Printing on page 3 10 Windows NT 4 0 G LPR printing See LPR Printing on page 3 6 G Windows printing See Windows Printing on page 3 10 Windows 2000 XP Server 2003 G LPR printing See LPR Printing on page 3 6 G Windows printing See Windows Printing on page 3 10 G IPP pr...

Page 47: ...ter Controller Pi3505e Pi3505e PS 3 2 Specifying the IP Address From the Copier s Touch Panel Setting procedure 1 Press the Utility key 2 Touch Admin Management and input the Administrator code 3 Touch Admin 2 4 Touch Network Set ...

Page 48: ...Network Settings 3 Printer Controller Pi3505e Pi3505e PS 3 3 5 Touch Basic Setting 6 Touch IP Address ...

Page 49: ...Controller Pi3505e Pi3505e PS 7 With the keypad in the control panel type in the IP address and then touch Enter 8 Touch Subnet Mask 9 With the keypad in the control panel type in the subnet mask and then touch Enter 10 Touch Gateway ...

Page 50: ...dress settings turn the printer off then on again 3 3 Peer to Peer Printing When you want to print directly to a network printer from Windows 98 Me without going through the server install PageScope Network Setup from the PageScope CD for administrators and configure the Peer to Peer print setup See 5 Peer to Peer Print Setup in the PageScope Network Setup User Manual for details ...

Page 51: ...re Windows NT 4 0 1 Install TCP IP and Microsoft TCP IP Printing service under Windows NT Click the Start button point to Control Panel and then click Network Click the Services tab click the Add button and install the Microsoft TCP IP print service 2 Assign the IP parameters See Specifying the IP Address From the Copier s Touch Panel on page 3 2 for more information 3 Use the procedure below to i...

Page 52: ... then click New Port Note If LPR Port is not available in the list install the Microsoft TCP IP print service 7 On the Add LPR compatible printer dialog box type the IP address of the Network Card into the Name or address of server providing lpd box If the network you are on uses DNS Domain Name Services type in the DNS name instead of the IP address 8 Type print into the Name of printer or print ...

Page 53: ... See Specifying the IP Address From the Copier s Touch Panel on page 3 2 for more information 3 Use the procedure below to install the printer Installing the printer Windows 2000 XP Server 2003 1 Install the printer driver following the instructions that come with the installer Make the new printer the default printer 2 Right click the new printer icon and select Properties from the menu 3 Display...

Page 54: ... Name box Note Make sure that the SNMP Status Enabled check box is cleared 12 Click OK to return to the Additional Port Information Required page 13 Click Next to display the next wizard page and then click Finish 14 Click the Close button of the Printer Ports dialog box and then click the Apply button of the Properties dialog box 15 Display the General tab and then print a test page 16 If the tes...

Page 55: ...cope Light See Using PageScope Light on page 3 23 2 Input the correct password and log in to the Admin mode 3 Click the Network tab and then select Common Settings and then Windows 4 Configure the settings described below Changes in these settings do not go into effect until you turn the machine off and then back on again Enable Windows Printing Service Turns Windows Printing Service on or off Net...

Page 56: ...configuration that appears click the icon of the applicable printer Configuring Printer Driver Settings Windows NT 4 0 2000 XP Server 2003 1 On the Start menu point to Settings and then click Printers 2 Select the icon of the printer you want to configure right click the icon and then select Properties from the shortcut menu that appears 3 Click the Ports tab and then click Add Port 4 Input the fo...

Page 57: ...etwork Card must have valid IP parameters assigned Configuration Procedure 1 Install TCP IP under Windows 2000 XP Server 2003 Refer to the applicable Windows documentation for more information 2 Assign the IP parameters See Specifying the IP Address From the Copier s Touch Panel on page 3 2 for more information 3 Use the procedure below to install the printer Digital Copier Network Card TCP IP Win...

Page 58: ...L field as shown below and then click Next http IP address of the controller ipp Example When the IP address of the Digital Copier is 192 9 200 200 http 192 9 200 200 ipp 7 Click OK on the confirmation dialog box that appears 8 In the Manufacturers and Printers lists select the printer you want to use and then click OK If the name of the printer you want to use does not appear in the lists load th...

Page 59: ...close the Properties dialog box After you finish installing a printer with the above procedure you can use it just as you would any standard local printer The printer can also be used as a network printer by other Windows computers on your network whose Windows 2000 XP Server 2003 systems are configured the same way as described above ...

Page 60: ...er data for Print Server Name Printer Name Print Queue Name and Volume Name specify Other Unknown for the printer Type Name and then save the settings For information about configuring settings for queue user privileges printer alert options multiple queues and passwords see NetWare documentation 5 Start up PageScope Light and log in to the Admin mode On the Network tab select Common Settings and ...

Page 61: ...ack on again Enable Netware Yes Frame Type Auto Detect Select the frame type in accordance with your network environment Bindery NDS NDS Print Server Name Name of print server created in step 4 Print Server Password Use this setting only when configuring settings on the NetWare Server Preferred NDS Context Name Name of context that connects Pserver Preferred NDS Tree Name Name of tree that Pserver...

Page 62: ...rinter Type Name and then save the settings For information about configuring settings for queue user privileges printer alert options multiple queues and passwords see NetWare documentation 5 Start up PageScope Light and log in to the Admin mode On the Network tab select Common Settings and then NetWare Configure the settings described below For more information see Using PageScope Light on page ...

Page 63: ...ble Netware Yes Frame Type Auto Detect Select the frame type in accordance with your network environment Bindery NDS NDS Print Server Name Name of print server created in step 4 Print Server Password Use this setting only when configuring settings on the NetWare Server Preferred NDS Context Name Name of context loaded by the Pserver Preferred NDS Tree Name Name of tree loaded by the Pserver Print ...

Page 64: ... NDPS on the Tools menu 4 Enter data for Print Server Name Printer Name Print Queue Name and Volume Name specify Other Unknown for the printer Type Name and then save the settings For information about configuring settings for queue user privileges printer alert options multiple queues and passwords see NetWare documentation 5 Start up PageScope Light and log in to the Admin mode On the Network ta...

Page 65: ...ect Select the frame type in accordance with your network environment Bindery NDS NDS Print Server Name Name of print server created in step 4 Print Server Password Use this setting only when configuring settings on the NetWare Server Preferred NDS Context Name Name of context that connects Pserver Preferred NDS Tree Name Name of tree that Pserver logs in to Print Queue Scan Rate 1 Change in accor...

Page 66: ...department container where you want to create the Printer Agent and then select NDPS Printer 4 In the NDPS Printer Name field input the printer name 5 In the Printer Agent Source field select Create New Printer Agent and then click Create 6 Check the printer agent name browse for the NDPS Manager in the NDPS Manager Name field 7 Under Gateway Types select Novell Printer Gateway 8 On the Novell DPS...

Page 67: ...s For Netware 6 configure the same settings as those for NetWare 5 x Configuring client print settings 1 Click Start Settings and Printer and then double click the Add Printer icon 2 For the printer port browse the network and specify the name of the queue or the name of the NDPS printer you created 3 On the printer model list select the printer driver on the CD ROM 4 Follow the instructions provi...

Page 68: ...ion 1 Start up your Web browser 2 Use the following format to input the IP address of the machine into the browser s address bar and then click Enter http controller IP address Example When the IP address of your machine is 192 168 0 10 http 192 168 0 10 3 The PageScope Light initial screen appears Note If your Web browser is set to use a proxy server it may not be able to access PageScope Light I...

Page 69: ... to the link destination and the Back and Forward buttons scroll through pages backwards and forward Logging in to the Admin mode After you log in to PageScope Light in the Admin mode you can configure and check printer scanner controller system settings 1 Type the administrator password into the Admin Password box 2 Click Log In to log in to the Admin Mode ...

Page 70: ... password as the admin password of the machine Contact your machine administrator for more information PageScope Light automatically logs out of the Admin mode if no operation is performed for about 10 minutes All operations on the machine s control panel are disabled while anyone is logged in to the PageScope Light Admin mode ...

Page 71: ...ly button Penalty for Incorrect Attempts to Access Administrator Mode If the Access Lock function is set to On access is denied after three incorrect attempts to access Administrator mode even if the correct password is finally entered For more details on the Access Lock function refer to the Advanced Operations volume of the copier s User Manual Note Access to the copier is denied after a total o...

Page 72: ...er settings that can be configured depends on the printer driver you are using When you want to do this Select this tab Reference page Specify what options are installed on the machine Configure mailbin settings when the Mail Bin Kit option is installed Device Options p 4 2 Specify the paper input source and output tray Configure advanced printer functions such as two sided printing booklet creati...

Page 73: ... the upper right hand corner of the window and then click on the item you want to know about 4 2 Device Options Setting Tab This tab lets you specify the options that are currently installed on the machine Important Make sure you configure device options correctly If you don t you may not be able to use certain functions or printing errors may occur The settings you configure here must match the c...

Page 74: ...t FLS as 216 330 mm Set FLS as 220 330 mm Add Click to add the option selected in the Installable Options list to the list under Installed Options Remove Click to remove the option selected in the Installed Options list and return it to the Installable Options list Installed Options This is a list of currently installed options Use this list to select an option when you want to remove it Mailbox S...

Page 75: ... on the Device Options tab p 4 2 You can use it assign names to each of the Mailbin Unit mailbins 1 Mailbox Name Type in up to 20 characters here when inputting a mailbin name 2 Apply Click this button to apply changes you have made to a mailbin name 3 Bin list This is a list of the names that are currently assigned to each bin To rename a mailbin select its current name in this list 1 2 3 ...

Page 76: ...om the list automatically configures those settings Save Delete This button is a Save button when Untitled is displayed in the East Set name box a Delete button when any setup name displayed in the box Clicking the Save button displays the Save Easy Set Name dialog box for naming the current tab setup See Save Easy Set Name Dialog Box on page 4 6 for more information Clicking Delete deletes the se...

Page 77: ...ick the Save button in the Easy Set group Use it to assign a name to the setup that you want to save Page Layout The Page Layout image shows what the printed document will look like using the current PCL printer driver settings The Page Layout image changes as you select different settings Printer Figure The Printer Figure images shows a graphic image of what types trays drawers and other options ...

Page 78: ...tiple pages of the document should be printed on a single sheet of paper N up Specify the number of document pages that should be printed on each sheet Selecting Off prints one page per sheet Available settings Off 2up 4up 6up 9up 16up Border line Select this option to print a border around the print image N up Style Click this button to display a dialog box for specifying the N up Style p 4 11 Th...

Page 79: ...te For U S A and Canada users only When using Di2010 Di2010f this setting is available only when the Duplex Unit AD 16 and Switchback Unit SB 1 is installed on the machine Off Turns off duplex booklet printing printing is performed on one side only Top Binding Prints on both sides of each sheet allowing for binding along the top edge Left Binding Prints on both sides of each sheet allowing for bin...

Page 80: ...age Layout image 3 Paper Source Use the settings in this group to specify the source for printing paper You can also configure settings that control cover pages and OHP interleaving Paper Source Select the paper source for printing Available paper sizes are limited by the types of paper trays installed on the machine Available settings Auto Manual Feed Tray1 Tray 2 Tray 3 Tray 4 LCC Media Type Spe...

Page 81: ...ct here depends on the type of finisher currently installed on the machine Available settings Default Mailbin Mailbin name list When Mailbin is selected as the output destination above use this setting to specify the bin to which you wish to output the printed pages Detail of Output Setting Click this button to display a dialog box for configuring settings for stapling punching and folding See Det...

Page 82: ...roller Pi3505e Pi3505e PS 4 11 N up Style Dialog Box This dialog box appears when you click the N up Style button on the Setup tab Click the style you want to use as graphically indicated on the dialog box Horiz Discending Horiz Ascending Vert Ascending Vert Discending ...

Page 83: ... You can print on covers or leave them blank Front Cover Page Select this check box to turn on the front cover function with Image Select this check box to print an image on the front cover Cover Paper Source Select the source for the front and back cover paper Available settings Manual Feed Tray1 Tray 2 Tray 3 Tray 4 LCC Back Cover Page Select this check box to add a back cover with Image Select ...

Page 84: ... interleaving OHP Interleaving Paper Source Click the down arrow button and select the source tray of the interleaving paper Available settings Manual Feed Tray 1 Tray 2 Tray 3 Tray 4 LCC Note Always specify 1 for the number of copies when using OHP interleaving You cannot specify the same source for both Paper Source on the Setup tab and Interleaving Paper Source on this dialog box You cannot use...

Page 85: ...document at a time Off No page stapling Auto 2 points Pages are stapled at two points along the top edge when landscape orientation is selected or along the left edge when portrait orientation is selected Top 2 points Pages are stapled at two points along the top edge Left 2 points Pages are stapled at two points along the left edge Corner Pages are stapled in upper left corner If you have the Sad...

Page 86: ...p tab Tip The current stapling locations are reflected in the graphic icon shown on the dialog box 2 Punch These settings are available only when the Punch Kit PK 6 is installed on the machine They control the punching of holes in a document Off No page punching Auto Pages are punch along the top edge when landscape orientation is selected or along the left edge when portrait orientation is select...

Page 87: ...pported for certain types of paper and for certain locations on a page For more information refer to the User Manual that comes with the machine Punch and OHP Interleaving and Punch and Booklet cannot be selected at the same time Tip The current punch locations are reflected in the graphic icon shown on the dialog box 3 Folding Select the paper folding setting you want Off No page folding Crease P...

Page 88: ... Envelope B5 Envelope 10 Envelope C5 Envelope DL Envelope Monarch 8K 16K ISO B4 ISO B5 custom sizes Edit Custom Click this button do display a dialog box for configuring custom paper size settings See Custom Paper Dialog Box on page 4 19 for more information 2 Output Paper Size Specify the size of paper you want to use for printing Paper size Select the size of the printing paper Available setting...

Page 89: ...rinting the machine will use the paper size specified by the application 3 Copies Type a value or click the arrow buttons to specify the number of copies you want to print in the range of 1 to 999 Note Specify 1 for the Copies when OHP interleaving is enabled 4 Collate Use this setting when printing multiple copies of the same document to specify whether printing should be performed by printing ea...

Page 90: ...ing you specify is reflected in the Page Layout image Portrait Selecting this option orients the print image vertically Landscape Selecting this option orients the print image horizontally 1 Paper Name This is a list all currently configured custom paper names and sizes Select the name of the paper you want to edit 2 New Click this button to display settings for configuring custom paper size setti...

Page 91: ...r Properties for Windows 4 20 Printer Controller Pi3505e Pi3505e PS 4 6 Quality tab Use the settings on this tab to control the quality of the printed output 1 Resolution This setting can be configured for 600 600 dpi printing only 1 ...

Page 92: ...ount code is to each print job and facilitates machine management Note that the copy tracking function must be enabled on the machine in order to use this function Enabling the copy tracking function on the machine can make printing impossible unless the access code designated for the machine is correctly configured Access Number For 100 account management Type an access number that is set on the ...

Page 93: ...ck Job check box If there is no number in the Password box when you try to clear the Lock Job check box the message Password Error will appear and you may not be able to disable the Lock Job function 2 Distribution The settings in this area control printing of distribution numbers A distribution number is provided for each set of prints Distribution Number Select this check box to enable distribut...

Page 94: ...sing the Lock Job Store to HDD and Reprint functions because it lets you search for print jobs on the machine s control panel 4 Job Schedule This setting specifies what should be done with a print job after it is printed Job Life Post Rip Specify whether a print job should be deleted stored to the hard disk or reprinted after printing is complete Available settings Delete after printing Store to H...

Page 95: ...count Code check box 2 If you are using 100 account management input a valid access number up to six digits long into the Access Number box If you are using 1 000 account management input a three digit account number into the Access Number box 3 Send the print job 4 The job prints if the input access number is correct Lock Job This setting can be used to configure lock job settings from the printe...

Page 96: ...uch To Be Printed PC 3 Use and to select the job you want to unlock 4 Touch Unlock 5 Use the 10 key pad to input the password and then touch Enter 6 The job prints if the input password is correct Reprint This setting can be used to configure reprint settings from the printer driver After checking the printed results of a job you can perform a machine control panel operation to print additional co...

Page 97: ...to select the job you want to reprint 4 Touch Reprint 5 Use the 10 key pad to input the number of copies and then touch Enter 6 The copies are printed Store to HDD After saving a print job from your PC to the hard disk drive you can select the job on the control panel and print it Important The optional Hard Disk Drive Kit HDD 6 must be installed on the machine in order to use this function HDD Se...

Page 98: ...st on the Job Management tab select Store to HDD If you cannot find Store to HDD in the list go to the Device Options Setting tab and add HDD 6 to Installed Options 2 Send the print job Performing the required operation on the machine 1 Touch Job List and then select the Doc tab 2 Touch HDD 3 Select the job you want to print 4 Touch Print to print the job ...

Page 99: ...termark text from the list that appears Available settings NONE CONFIDENTIAL TOP SECRET COPY DO NOT COPY DRAFT FINAL PROOF and text specified by you 1st Page Only Select this check box when you want the watermark to be printed on the first page only Clear the check box to print the watermark on all pages Front or Back Use this setting to specify whether the watermark text should be placed on the f...

Page 100: ...termark printing may not be possible with some computer applications Tip The watermark settings you configure reflected in the Page Layout image 1 Preview This image shows what the currently selected watermark will look like when printed 2 Watermark text list This is a list of all of the watermark text that is currently configured To edit a watermark select it in this list first Available settings...

Page 101: ...formation 4 Edit Click this button to display the watermark detailed settings dialog box for editing the watermark that is selected in the watermark text list See Watermark Detailed Settings Dialog Box on page 4 30 for more information 5 Delete Click this button to delete the watermark that is selected in the watermark text list 1 Name Type up to 20 characters for the name you want to assign to th...

Page 102: ... Use them to configure settings that control the angle of the watermark text The setting range is 180 to 180 A negative value rotates the characters clockwise 0 specifies the text should be parallel to the paper and a positive value rotates the characters counter clockwise 8 Position Specify the position where the watermark text should be printed Center Selecting this setting prints the watermark ...

Page 103: ...ttings After reading the information on the dialog box you can click the Resolve button to resolve the conflict automatically or the Cancel button to close the dialog box without resolving the conflict Note Sometimes the printer driver will allow you combine functions that are not allowed by the machine Executing the print command while an illegal combination of machine functions is selected will ...

Page 104: ...operties Note that the settings that can be configured on the properties dialog box depends on the printer driver you are using Note For information about any printer driver or dialog box setting not covered in this manual click the Help button question mark in the upper right hand corner of the window and then click on the item you want to know about When you want to do this Select this tab Refer...

Page 105: ...onfiguration of your machine To configure device settings click an underlined setting click the down arrow button and then select the setting you want from the list that appears 1 Installable Options This is a list of all the options that can be installed on the machine For most of the options you can select either Installed or Not installed The Punch Unit option and FLS Size option however let yo...

Page 106: ...r settings as you configure them 1 Page preview This image reflects the settings that are currently configured on this tab 2 Orientation Select the orientation of the print image The setting you specify is reflected in the page preview image Portrait Selecting this option orients the print image vertically Landscape Selecting this option orients the print image horizontally Rotated Landscape Selec...

Page 107: ...ttings in this group control whether printing is performed from the first page to the last or from the last page to the first Front to Back Prints the document from the first page to the last page Back to Front Prints the document from the last page to the first page 5 Pages Per Sheet Specify the number of document pages should be printed on each sheet Available settings 1 2 4 6 9 16 Booklet The B...

Page 108: ... Available paper sizes are limited by the types of paper trays installed on the machine Available settings Automatically Select Tray1 Tray 2 Tray 3 Tray 4 Manual Feed LCC Media Specify the type of media that will be used for printing Available settings Plain Transparency OHP Thick Envelope 2 Advanced button Click this button to display the Advanced Options dialog box for configuring advanced print...

Page 109: ...hes an account code is to each print job and facilitates machine management Note that the copy tracking function must be enabled on the machine in order to use this function Enabling the copy tracking function on the machine can make printing impossible unless the access code designated for the machine is correctly configured Access Number For 100 account management Type an access number that is s...

Page 110: ...ng the Lock Job check box If there is no number in the Password box when you try to clear the Lock Job check box the message Password Error will appear and you may not be able to disable the Lock Job function 2 Distribution The settings in this area control printing of distribution numbers A distribution number is provided for each set of prints Distribution Number Select this check box to enable ...

Page 111: ...d Job Life Post Rip Specify whether a print job should be deleted stored to the hard disk or reprinted after printing is complete Available settings Delete after printing Store to HDD Reprint Note Store to HDD can be selected only when the Hard Disk Drive Kit HDD 6 is installed on the machine For information about using the Account Code Lock Job Reprint and Store to HDD functions see Kind of Job o...

Page 112: ...e collection of advanced settings that provide you with detailed control over printing operations Note that the settings of the Advanced Options dialog box are divided between two types general options and printer feature options To configure settings click an underlined setting click the down arrow button and then select the setting you want from the list that appears Note For information about t...

Page 113: ...A6 JIS B4 JIS B5 JIS B6 Invoice Ledger 11 14 FLS 203 330mm FLS 210 330mm FLS 216 330mm FLS 220 330mm Envelope B5 Envelope Comm 10 Envelope C5 Envelope DL Envelope Monarch 16K 8K ISO B4 ISO B5 PostScript custom Page Size Copy Count Specify the number of copies you want to print in the range of 1 to 9999 2 Graphics Use these settings to control the graphic properties of the print image Scaling Speci...

Page 114: ...ou want to fit the print image Available settings Off Letter Legal Executive A3 A4 A5 A6 JIS B4 JIS B5 JIS B6 Invoice Ledger 11 14 FLS 203 330mm FLS 210 330mm FLS 216 330mm FLS 220 330mm Staple This setting is available only when the Built in Finisher FN 117 is installed on the machine You can use it to staple the pages of one printed document at a time Off No page stapling Auto 2 point Pages are ...

Page 115: ... edge Top Pages are punched along the top edge Punch Holes Specify the number of holes to be punched Available settings When a PK 6 2 holes is installed 2 When a PK 6 2 or 3 holes is installed 2 or 3 When a PK 6 4 holes is installed 4 Note The number of punch holes setting is available only when a Punch Kit PK 6 is installed Folding Select the paper folding setting you want Off No page folding Cre...

Page 116: ...cify whether you want to include a back cover and specify whether or not the back cover should be printed on or left blank Off No back cover On Blank Blank back cover On With image Back cover with printing OHP Interleaving OHP interleaving function inserts sheets of paper interleaving sheets between the sheets of film when you are printing on overhead projector transparencies Available settings Of...

Page 117: ...hould be printed as a set Uncollated Select this setting when you want all copies of each page are printed as a set If you have 5 specified for Copy Count for example this setting would print five copies of page one followed by five copies of page two etc Collated Select this setting to print each copy of the document separately if you have 5 specified for Copy Count for example this setting would...

Page 118: ...he angle of the watermark text relative to the paper in the range of 90 to 90 15 degree steps A negative value rotates the characters clockwise 0 specifies the text should be parallel to the paper and a positive value rotates the characters counter clockwise Watermark Font Shading Specify the relative density of the watermark text in the range of 5 to 100 10 steps Watermark Position Horizontal Spe...

Page 119: ...Script Custom Paper Size under Paper Output on the Advanced Options dialog box Use this dialog box to configure settings for custom paper sizes 1 Custom Page Size Dimensions Type in the width and the height of the custom paper 2 Unit Select inches millimeters or points as the custom paper measurement unit 3 Paper Feed Direction Specify the custom paper feed direction of the print job 4 Paper Type ...

Page 120: ...vides details of the conflicting settings After reading the information on the dialog box you can either restore previous settings or maintain the current settings and change them later Note Sometimes the printer driver will allow you combine functions that are not allowed by the machine Executing the print command while an illegal combination of machine functions is selected will cause the machin...

Page 121: ...5 Configuring PostScript Printer Driver Properties for Windows 2000 and XP 5 18 Printer Controller Pi3505e Pi3505e PS ...

Page 122: ...then clicking on an item This will display a window that describes that item 6 1 Using PostScript Printer Driver Properties Tabs The following table explains which tab you should select to perform specific tasks For a detailed description of all the settings on a tab go to the indicated reference page Note See Chapter 2 for information about how to display printer driver properties Note that the s...

Page 123: ... item you want to know about 6 2 Device Options Tab This tab lets you configure printer features and to specify the options that are currently installed on the machine Make sure you configure the options on this tab correctly If you don t you may not be able to use certain functions or printing errors may occur The settings you configure here must match the configuration of your machine Configure ...

Page 124: ...m FLS 220 330mm Job Life Specify whether a print job should be locked stored to the hard disk or reprinted after printing is complete Available settings Delete after Printing Lock Job Store to HDD Reprint Note Store to HDD can be selected only when the Hard Disk Drive Kit HDD 6 is installed on the machine Password 1 4 If you select Lock Job for Job Life specify the 4 digit password you want assign...

Page 125: ...e machine in the range of 0 to 999999 Max 6 digits For 1000 account management Specify an access number in the range of 001 to 999 Example To specify the Account Code 123456 you would input the following Account Code 1 1 Account Code 2 2 Account Code 3 3 Account Code 4 4 Account Code 5 5 Account Code 6 6 Staple This setting is available only when the Built in Finisher FN 117 is installed on the ma...

Page 126: ...hen portrait orientation is selected Left Pages are punched along the left edge Top Pages are punched along the top edge Note Hole punching is not supported for certain types of paper and for certain locations on a page For more information refer to the User Manual that comes with the machine Punch and OHP Interleaving and Punch and Booklet cannot be selected at the same time Note The number of pu...

Page 127: ...l Bin4 Front Cover Page Specify whether you want to include a front cover and specify whether or not the front cover should be printed on or left blank OFF No front cover ON Blank Blank front cover ON With Image Front cover with printing Cover Paper Source Specify the source of the cover paper Available settings Tray1 Tray 2 Tray 3 Tray 4 Manual Feed LCC Back Cover Page Specify whether you want to...

Page 128: ...me time OHP Interleaving Paper Source Select the source tray of the interleaving paper Available settings Tray 1 Tray 2 Tray 3 Tray 4 LCC Note You cannot specify the same source for both Paper Source on the Paper tab and OHP Interleaving Paper Source Distribution Number Specify where the distribution number should be printed in the document Off Distribution number is not printed 1st Page Only Prin...

Page 129: ...Select this setting to print each copy of the document separately If you have 5 specified for Copies for example this setting would print the document from the first page to the last page five times Uncollated Select this setting when you want all copies of each page are printed as a set If you have 5 specified for Copies for example this setting would print five copies of page one followed by fiv...

Page 130: ...ilable settings CONFIDENTIAL TOP SECRET COPY DO NOT COPY DRAFT FINAL PROOF Watermark Font Typeface Select the typeface you want to use for the watermark The following fonts can be used Arial BoldItalicMT Arial BoldMT Arial ItalicMT ArialMT Courier Courier Bold Courier BoldOblique Courier Oblique Helvetica Helvetica Bold Helvetica BoldOblique Helvetica Oblique Times Bold Times BoldItalic Times Ital...

Page 131: ...most of the options you can select either Installed or Not installed The Punch Unit option and FLS Size option however let you choose from multiple settings depending on the type of option installed Available settings FLS Size as 203 330 mm as 210 330 mm as 216 330 mm 220 330 mm Tray3 Tray4 LCC AD 16 HDD 6 JS 203 FN 117 Punch Unit PK 6 2 holes PK 6 2 or 3 holes PK 6 4 holes MK 1 SK 1 AK 1 To confi...

Page 132: ...ialog box so click the button in the upper right hand corner and then click on a dialog box item for an explanation of the item 1 Paper size Select the size of the paper to be used for printing Available settings Letter Legal Executive A3 A4 A5 A6 JIS B4 JIS B5 JIS B6 Invoice Ledger 11 14 FLS 203 330mm FLS 210 330mm FLS 216 330mm FLS 220 330mm Envelope B5 Envelope Comm 10 Envelope C5 Envelope DL E...

Page 133: ...the document should be printed on a single sheet of paper Pages Per Sheet Specify the number of document pages that should be printed on each sheet Available settings 1up 2up 4up 3 Paper source Select the paper source for printing Available paper sizes are limited by the types of paper trays installed on the machine Available settings Auto Select Tray Manual Feed Tray1 Tray 2 Tray 3 Tray 4 LCC ...

Page 134: ...dicated reference page Note See Chapter 2 for information about how to display printer driver properties Note that the settings that can be configured on the properties dialog box depends on the printer driver you are using Note For information about any printer driver or dialog box setting not covered in this manual click the Help button question mark in the upper right hand corner of the window ...

Page 135: ...ne 1 Installable Options This is a list of all the options that can be installed on the machine For most of the options you can select either Installed or Not installed The Punch Unit option and FLS Size option however let you choose from multiple settings depending on the type of option installed Available settings FLS Size as 203 330 mm as 210 330 mm as 216 330 mm 220 330 mm Tray3 Tray4 LCC AD 1...

Page 136: ...fic information about two of the settings on this dialog box 1 Paper size Select the size of the paper to be used for printing Available settings Letter Legal Executive A3 A4 A5 A6 JIS B4 JIS B5 JIS B6 Invoice Ledger 11 14 FLS 203 330mm FLS 210 330mm FLS 216 330mm FLS 220 330mm Envelope B5 Envelope Comm 10 Envelope C5 Envelope DL Envelope Monarch 16K 8K ISO B4 ISO B5 PostScript Custom Page Size 2 ...

Page 137: ...elect the item in the list click the Change setting for down arrow button and then select the setting you want from the list that appears Fit to Paper Select the paper size to which you want to fit the print image Available settings Off Letter Legal Executive A3 A4 A5 A6 JIS B4 JIS B5 JIS B6 Invoice Ledger 11 14 FLS 203 330mm FLS 210 330mm FLS 216 330mm FLS 220 330mm Job Life Specify whether a pri...

Page 138: ...t the password when unlocking the job Available settings 0 9 Set the 4 digit password you want to assign to the locked job in the range of 0000 to 9999 4digits Example To specify the password 1234 you would input the following Password 1 1 Password 2 2 Password 3 3 Password 4 4 Account Code Turn on this item to enable the copy tracking function which attaches an account code is to each print job a...

Page 139: ...Account Code 5 5 Account Code 6 6 Staple This setting is available only when the Built in Finisher is installed on the machine You can use it to staple the pages of one printed document at a time None No page stapling Auto 2 point Pages are stapled at two points along the top edge when landscape orientation is selected or along the left edge when portrait orientation is selected Corner Pages are s...

Page 140: ...Hole punching is not supported for certain types of paper and for certain locations on a page For more information refer to the User Manual that comes with the machine Punch and OHP Interleaving and Punch and Booklet cannot be selected at the same time Punch Holes Specify the number of holes to be punched Available settings When a PK 6 2 Holes is installed 2 When a PK 6 2 or 3 Holes is installed 2...

Page 141: ...ver ON Blank Blank front cover ON With Image Front cover with printing Cover Paper Source Specify the source of the front and back cover paper Available settings Tray1 Tray 2 Tray 3 Tray 4 Manual Feed LCC Back Cover Page Specify whether you want to include a back cover and specify whether or not the back cover should be printed on or left blank OFF No back cover ON Blank Blank back cover ON With I...

Page 142: ...per Source Distribution Number Specify where the distribution number should be printed in the document Off Distribution number is not printed 1st Page Only Prints the distribution number on the first page only All Pages Prints the distribution number on all the pages of the document Distribution Image Density Specify the relative density darkness of distribution number printing Available settings ...

Page 143: ...set If you have 5 specified for Copies for example this setting would print five copies of page one followed by five copies of page two etc Note Keep the Collate setting of the application you are using turned off at all times Booklet Turn booklet printing on or off and specify the binding edge Off Turns off booklet printing Right Binding Prints two pages on each side of the paper so the paper for...

Page 144: ... Size Select a font size in the range of 8 points to 200 points Watermark Angle Use this setting to specify the angle of the watermark text relative to the paper in the range of 90 to 90 15 degree steps A negative value rotates the characters clockwise 0 specifies the text should be parallel to the paper and a positive value rotates the characters counter clockwise Watermark Font Shading Specify t...

Page 145: ...7 Configuring PostScript Printer Driver Properties for Windows NT 4 0 7 12 Printer Controller Pi3505e Pi3505e PS ...

Page 146: ...Defective printing could result Installing the Printer Driver under Mac OS 8 9 This section explains the installation procedure for the Macintosh printer driver on a Macintosh running Mac OS 8 or 9 Note For information about the procedure for installing the printer driver on a Mac OS X refer to Installing the Printer Driver under Mac OS X on page 8 7 The following procedure shows installation unde...

Page 147: ...r computer 4 Double click the Macintosh HD icon on the desktop 5 Double click the System Folder 6 Double click Extensions folder Copy the following file s you need from the Printer Controller CD ROM to the Extensions folder HosenNDLlrpLib Required for printing to the LPR port HosenNDLUSBLib Required for printing to the USB port HosenNDLPAPLib Required for printing with AppleTalk 7 Double click Pri...

Page 148: ...ser from the Apple menu Note The following steps apply if the LaserWriter printer driver is already installed on the Macintosh 2 On the Chooser dialog box that appears click the LaserWriter icon The printer name set up with the NIC appears in the list under Select a PostScript Printer 3 Select the printer and click the Create button ...

Page 149: ...escription File dialog box that appears select the appropriate PPD file from the dialog box and click the Select button 5 After the installation is complete a small printer icon will appear to the left of the printer name in the Select a PostScript Printer list 6 Click the Setup button 7 Click the Configure button ...

Page 150: ...ter Controller Pi3505e Pi3505e PS 8 5 8 Set the controller operating environment and then click the OK button 9 Click the OK button 10 When the Chooser dialog box reappears close it You should be able to see a printer icon on the desktop ...

Page 151: ...ction click Change to specify your printer Enter your printer s IP address for Printer Address and print for Queue 5 Click Create 6 If necessary change the name of the printer Then click Save USB Connection 1 Start Desktop Printer Utility 2 Select Printer USB and then click OK 3 In the PostScript Printer Description PPD File section click Change and select the PPD for the Pi3505e PS 4 In the USB P...

Page 152: ...rn on the machine 2 Start up your computer 3 Place the printer controller CD ROM into the CD ROM drive of your computer 4 Copy Pi3505e_PS_Install mpkg Package1 pkg Package2 pkg to the desktop from the PPD folder on the CD ROM 5 Double click Pi3505e_PS_Install mpkg which was copied to the desktop Pi3505e PS Installer starts up 6 Enter the Administrator name and password in the Authenticate dialog b...

Page 153: ...e Agreement Click the Continue button 10 Click the Agree button to continue the installation 11 Select the partition where the software will be installed and then click the Continue button 12 Click the Install button 13 Click the Continue Installation button 14 Click the Restart button to restart the computer ...

Page 154: ... AppleTalk or IP Printing or USB to match your printer connection AppleTalk Select the zone then select your printer IP Printing LPR Enter the IP address If the User default queue on server box is checked click it to unselect it Type print for the Queue Name USB Select your printer 21 In the Printer Model section select Other and select appropriate PPD file e g KONICA MINOLTA Dixxxx PS ppd in Libr...

Page 155: ...troller Pi3505e Pi3505e PS 22 On the Printers menu click Show Info This displays the Printer Info dialog box 23 Select Installable Options 24 Configure the printer settings and then click the Apply Changes button 25 Close the PrintCenter dialog box ...

Page 156: ...iption of each function see the corresponding reference page Page Attributes Use the Page Attributes property sheet to configure basic settings for printing When you want to do this Select this print option Reference Page Configure basic settings for printing Page Attributes p 8 11 Configure settings for custom paper size Custom Paper Sizes p 8 13 Configure visual effect and font related settings ...

Page 157: ...narch 16K 8K ISO B4 ISO B5 Custom Page Sizes 3 Orientation Specify the orientation of the print image The setting you specify is reflected in the page image Available settings Portrait Landscape 4 Scale Specify the size of the print image in the range of 25 to 400 Note If the paper size you specify is not loaded in the machine or being fed manually the machine will display a message prompting you ...

Page 158: ... currently configured custom paper names and sizes Select the name of the paper you want to edit 2 New Click this button to display settings for configuring custom paper size settings 3 Edit Click this button to display a dialog box for editing the paper size settings of the custom paper currently selected in the list 4 Delete Click this button to delete the custom paper currently selected in the ...

Page 159: ...a negative image Invert Image 2 Image Text Use these check boxes to control the quality of output text and graphics and to control printing of fonts To do this Select this check box Perform font substitution if a printer font is similar to or has the same name as the screen font The initial default setting for this setting is enabled Substitute Fonts Smooth bitmapped fonts The initial default sett...

Page 160: ...Printer Driver for Macintosh 8 Printer Controller Pi3505e Pi3505e PS 8 15 Tip The functions of LaserWriter itself are being used See the documentation provided for LaserWriter ...

Page 161: ...on Reference Page Configure basic settings for printing Page Attributes p 8 16 Configure settings for custom paper sizes Custom Paper Size p 8 18 Display a list of setting Summary p 8 19 1 Format for Select the name that represents Pi3505e PS set up with the Network Interface Card 2 Paper Size Select the size of the paper you want to use for printing Available settings Letter Legal Executive A3 A4...

Page 162: ...eflected in the page image Available settings Portrait Landscape 4 Scale Specify the size of the print image in the range of 1 to 400 Note If the paper size you specify is not loaded in the machine or being fed manually the machine will display a message prompting you to add paper to Tray1 Tray2 or the manual bypass port and then it will enter a standby state ...

Page 163: ...aper you want to edit 2 New Click this button to create the new custom paper size 3 Duplicate Click this button to duplicate the paper size settings of the custom paper currently selected in the list 4 Delete Click this button to delete the custom paper currently selected in the list 5 Save Click this button to save the new settings that were specified 6 Paper Size Type in the width and the height...

Page 164: ...Printer Driver for Macintosh 8 Printer Controller Pi3505e Pi3505e PS 8 19 Summary Displays a list of the current Page Setup settings ...

Page 165: ... you want to do this Select this print option Reference Page Specify options currently installed on the machine Installable Options p 8 21 Specify the pages and the number of copies for printing General p 8 23 Configure settings for background printing Background Printing p 8 24 Configure color data output settings Color Matching p 8 25 Print out a page of descriptive data about each print job Cov...

Page 166: ...tions that can be installed on the machine After installing an option use this dialog box to configure the appropriate settings For most of the options you can select either Installed or Not installed The Punch Unit option and FLS Size option however let you choose from multiple settings depending on the type of option installed ...

Page 167: ...ou may not be able to use certain functions or printing errors may occur The settings you configure here must match the configuration of your machine Available settings FLS Size as 203 330 mm as 210 330 mm as 216 330 mm 220 330 mm Tray3 Tray4 LCC AD 16 HDD 6 JS 203 FN 117 Punch Unit PK 6 2 holes PK 6 2 or 3 holes PK 6 4 holes MK 1 SK 1 AK 1 ...

Page 168: ...next copy is printed Left unselected the printing is uncollated 3 Pages Specify which pages of the document that you want to print All Prints all pages From To Prints all pages in the specified range 4 Paper Source Select the tray that the printer uses for the print job and choose a different tray for the first page of the document Available settings Auto Select Manual Feed Tray1 Tray2 Tray3 Tray4...

Page 169: ...x Print in the foreground which makes it impossible to use the application while printing is in progress Foreground no spool file Print in the background which allows use of the application while printing is in progress Background 2 Print Time Use these settings to control the timing of background printing To do this Select this check box Give the print job priority over other print jobs Urgent Pu...

Page 170: ...ng Color Grayscale Print with gray scale Grayscale This function is not supported Black and White Print in monochrome ColorSync Color Matching Print with color reproduction data PostScript Color Matching Print with printer color characteristics 2 Intent Specify a matching style Available settings Auto selection Perceptual matching Relative colorimetric Saturation matching Absolute colorimetric 3 P...

Page 171: ...8 Printer Driver for Macintosh 8 26 Printer Controller Pi3505e Pi3505e PS Tip The functions of LaserWriter itself are being used See the documentation provided for LaserWriter ...

Page 172: ...int Cover Page Use these settings to specify whether the cover page should be at the front or the back of the document or to turn off cover page printing To do this Select this check box Turn off cover page printing None Put the cover page at the beginning of the document Before Document Put the cover page at the end of the document After Document 2 Cover Page Paper Source Select the paper tray co...

Page 173: ...ttings 1 2 4 6 9 16 4 Down Before Across 6 Down Before Across 9 Down Before Across 16 Down Before Across 2 Layout Direction Click the icon that shows the layout direction you want to use Tip The layout direction you select is reflected in the page image on this property sheet 3 Border Use this setting to turn borderline printing on and off and to specify the borderline type Available settings None...

Page 174: ...th Sides Select this check box to turn on two sided printing Note For U S A and Canada users only When using Di2010 Di2010f this setting is available only when the Duplex Unit AD 16 and Switchback Unit SB 1 is installed on the machine 5 Binding This setting becomes available only when the Print on Both Sides check box is selected Click the icon that shows the binding edge you want to use ...

Page 175: ...on To do this Select this check box Annotate font keys in the PostScript output Annotate Font Keys 2 Font Downloading To do this Select this check box Type 1 Type 1 fonts will be preferred over TrueType fonts TrueType TrueType fonts are preferred over Type 1 fonts Preferred Format Fonts in the printer are ignored Always download needed fonts Type 42 fonts are not generated Never generate Type 42 f...

Page 176: ...or Set the method for handling error information To do this Select this check box Does not display Error information No special reporting Displays Error information on the screen Summarize on screen Prints Error information Print detailed report 2 Job Documentation To do this Select this check box Job copy is generated Generate Job Copy Font log is generated Generate Job Log 3 Job Documentation Fo...

Page 177: ...LaserWriter 1 Format Specify the file format Available settings PostScript Job EPS Mac Standard Preview EPS Mac Enhanced Preview EPS No Preview Acrobat PDF 2 PostScript Level Specify the PostScript version Available settings Level 1 Compatible Level 2 and 3 3 Data Format Specify the data format ASCII Saves data as a text file Binary Saves data as a binary file 4 Font inclusion Specify the fonts to...

Page 178: ...Printer Driver for Macintosh 8 Printer Controller Pi3505e Pi3505e PS 8 33 Printer Specific Options 1 1 Choose Resolution This setting can be configured for 600 dpi printing only ...

Page 179: ...ted or along the left edge when portrait orientation is selected Top 2 points Pages are stapled at two points along the top edge Left 2 points Pages are stapled at two points along the left edge Center Pages are stapled in the center Corner Pages are stapled in the corner Note Stapling may be canceled automatically if a print job is made up of pages of different sizes The stapling position is dete...

Page 180: ... for certain types of paper and for certain locations on a page For more information refer to the User Manual that comes with the machine If you select Long Edge in the manual bypass take up mode the paper may sometimes fail to be punched 3 Punch Holes Specify the number of holes to be punched Available settings When a PK 6 2 Holes is installed 2 When a PK 6 2 or 3 Holes is installed 2 or 3 When a...

Page 181: ...ly when the Build in Finisher FN 117 and the Mail Bin Kit MK 1 are installed on the machine Available settings Default Bin1 Bin2 Bin3 Bin4 Note Some options are not available when certain paper sizes are selected For more information see the machine s user documentation When printing on thick paper and other special paper the output may sometimes fail to be distributed to the output destination yo...

Page 182: ...u want to include a front cover and specify whether or not the front cover should be printed on or left blank Off No front cover On Blank Blank front cover On With image Front cover with printing 2 Cover Paper Source Specify the source of the front and back cover paper Available settings Tray1 Tray 2 Tray 3 Tray 4 Manual Feed LCC Note The front cover configured here is different from LaserWriter s...

Page 183: ...ng 4 OHP Interleaving Turn on this function when using OHP Interleaving 5 OHP Interleaving Paper Source Click the down arrow button and select the source tray of the interleaving paper Available settings Tray 1 Tray 2 Tray 3 Tray 4 LCC Note Always specify 1 for the number of copies when using OHP interleaving You cannot specify the same source for both Paper Source and Interleaving Paper Source Yo...

Page 184: ...ng this check box causes the printed image to be resized automatically so it matches the size of the paper being printed on Available settings OFF Letter Legal Executive A3 A4 A5 A6 JIS B4 JIS B5 JIS B6 Invoice Ledger 11 14 FLS1 FLS2 FLS3 FLS4 2 Booklet Turn booklet printing on or off and specify the binding edge Off Turns off booklet printing Right Binding Prints two pages on each side of the pap...

Page 185: ...u select Custom you can input the watermark string you want into the box to the right Available settings CONFIDENTIAL TOP SECRET COPY DO NOT COPY DRAFT FINAL PROOF 3 Watermark Font Typeface Select the typeface you want to use for the watermark The following fonts can be used Arial BoldItalicMT Arial BoldMT Arial ItalicMT ArialMT Courier Courier Bold Courier BoldOblique Courier Oblique Helvetica He...

Page 186: ...rk text relative to the paper in the range of 90 to 90 15 degree steps A negative value rotates the characters clockwise 0 specifies the text should be parallel to the paper and a positive value rotates the characters counter clockwise 6 Watermark Font Shading Specify the relative density of the watermark text in the range of 5 to 100 10 steps ...

Page 187: ...on the water mark off center select Offset and then input a value in the range of 1 to 999 to specify the offset amount Available Settings Center Offset 3 Watermark Offset Dir Specify the offset direction of the vertical position of the watermark Available Settings Up Down 4 Watermark Position Vertical Select Center if you want to position the watermark in the vertical center of the paper To posit...

Page 188: ...the distribution number on all the pages of the document 2 Distribution Image Density Specify the relative density darkness of distribution number printing Available settings Middle Lighter Darker 3 Distribution Starting Number Specify the starting value of the distribution number in the range of 001 to 999 4 Job Life Specify whether a print job should be locked stored to the hard disk or reprinte...

Page 189: ...tion which attaches an account code is to each print job and facilitates machine management Note that the copy tracking function must be enabled on the machine in order to use this function Enabling the copy tracking function on the machine can cause printing to can make printing impossible unless the access code designated for the machine is correctly configured If you Select On for Account Code ...

Page 190: ... conflicts dialog box appears to let you know when certain printer driver settings have been found to be in conflict with each other The dialog box provides details of the conflicting settings After reading the information on the dialog box click the Continue button or the Cancel button to close it ...

Page 191: ...p 8 47 Configure the printing layout Layout p 8 48 Configure settings for duplex two sided printing Duplex p 8 49 Configure output options for print data Output Options p 8 50 Specify how error information is handled Error Handling p 8 51 Select the paper source for printing Paper Feed p 8 52 Sets the copy track function Allows you to lock a printing job Also allows you to print the distribution n...

Page 192: ... whether printing should be performed by printing each copy of the document individually or if all copies of each page should be printed as a set Not selected Prints all copies of each page as a set If you have 5 specified for Copies for example this setting would print five copies of page one followed by five copies of page two etc Selected Prints each copy of the document separately If you have ...

Page 193: ...ngs will affect the page layout 2 Pages per Sheet Specify the number of document pages should be printed on each sheet Available settings 1 2 4 6 9 16 3 Layout Direction Click the icon that shows the layout direction you want to use 4 Border Use this setting to turn borderline printing on and off and to specify the borderline type Available settings None Single hairline Single thin line Double hai...

Page 194: ...y When using Di2010 Di2010f this setting is available only when the Duplex Unit AD 16 and Switchback Unit SB 1 are installed on the machine 1 Print on Both Sides Select this check box to turn on two sided printing 2 Binding This setting becomes available only when the Print on Both Sides check box is selected Click the icon that shows the binding edge you want to use 1 2 ...

Page 195: ... these settings to configure output options for print data 1 Save as File Select this check box to save data as a file without printing it 2 Format This setting becomes available when the Save as File check box is selected Use it to specify the file format Available settings PostScript PDF 1 2 ...

Page 196: ...505e PS 8 51 Error Handling Use this setting to make settings for handling error information 1 PostScript Errors Set the method for handling error information No special reporting Does not display Error information Print detailed report Prints Error information 1 ...

Page 197: ...5e Pi3505e PS Paper Feed Use this setting to select the paper source for printing Available paper sizes are limited by the types of paper trays installed on the machine 1 Feed pages from Available settings Auto Select Manual Feed Tray1 Tray 2 Tray 3 Tray 4 LCC 1 ...

Page 198: ... each print job and facilitates machine management Note that the copy tracking function must be enabled on the machine in order to use this function Enabling the copy tracking function on the machine can make printing impossible unless the access code designated for the machine is correctly configured Access Number For 100 account management Type an access number that is set on the machine in the ...

Page 199: ...box If there is no number in the Password box when you try to clear the Lock Job check box the message Password Error will appear and you may not be able to disable the Lock Job function 2 Distribution The settings in this area control printing of distribution numbers A distribution number is provided for each set of prints Distribution Number Select this check box to enable distribution numbers 1...

Page 200: ...pecify whether a print job should be deleted stored to the hard disk or reprinted after printing is complete Available settings Delete after printing Store to HDD Reprint Note Store to HDD can be selected only when the Hard Disk Drive Kit HDD 6 is installed on the machine For information about using the Account Code Lock Job Reprint and Store to HDD functions see Kind of Job on page 4 24 ...

Page 201: ...e this setting to configure staple punch folding and other finishing functions Set 1 1 Choose Resolution This setting can be configured for 600 dpi printing only 2 Media Type Specify the type of media that will be used for printing Available settings Plain Transparency OHP Thick 1 Envelope 1 2 ...

Page 202: ...u want to include a front cover and specify whether or not the front cover should be printed on or left blank Off No front cover On Blank Blank front cover On With image Front cover with printing 2 Cover Paper Source Specify the source of the front and back cover paper Available settings Tray1 Tray 2 Tray 3 Tray 4 Manual Feed LCC Note The front cover configured here is different from LaserWriter s...

Page 203: ...ng 4 OHP Interleaving Turn on this function when using OHP Interleaving 5 OHP Interleaving Paper Source Click the down arrow button and select the source tray of the interleaving paper Available settings Tray 1 Tray 2 Tray 3 Tray 4 LCC Note Always specify 1 for the number of copies when using OHP interleaving You cannot specify the same source for both Paper Source and Interleaving Paper Source Yo...

Page 204: ... printed document at a time Off No page stapling Auto 2 points Pages are stapled at two points along the top edge when landscape orientation is selected or along the left edge when portrait orientation is selected Top 2 points Pages are stapled at two points along the top edge Left 2 points Pages are stapled at two points along the left edge Center Pages are stapled in the center Corner Pages are ...

Page 205: ...ng the top edge when landscape orientation is selected or along the left edge when portrait orientation is selected Top Pages are punched along the top edge Left Pages are punched along the left edge Note Hole punching is not supported for certain types of paper and for certain locations on a page For more information refer to the User Manual that comes with the machine If you select Long Edge in ...

Page 206: ...e of finisher currently installed on the machine This setting is available only when the Build in Finisher FN 117 and the Mail Bin Kit MK 1 are installed on the machine Available settings Default Bin1 Bin2 Bin3 Bin4 Note Some options are not available when certain paper sizes are selected For more information see the machine s user documentation When printing on thick paper and other special paper...

Page 207: ... document to specify whether printing should be performed by printing each copy of the document individually or if all copies of each page should be printed as a set Not selected Prints all copies of each page as a set If you have 5 specified for Copies for example this setting would print five copies of page one followed by five copies of page two etc 1 ...

Page 208: ...gs OFF Letter Legal Executive A3 A4 A5 A6 JIS B4 JIS B5 JIS B6 Invoice Ledger 11 14 FLS1 FLS2 FLS3 FLS4 2 Booklet Turn booklet printing on or off and specify the binding edge OFF Turns off booklet printing Right Binding Prints two pages on each side of the paper so the paper forms a booklet with right binding when folded Left Binding Prints two pages on each side of the paper so the paper forms a ...

Page 209: ... 6 is installed on the machine For U S A and Canada users only When using Di2010 Di2010f this setting is available only when the Duplex Unit AD 16 and Switchback Unit SB 1 are installed on the machine 3 Mirror Print Select this check box to print a mirror image of your document 4 Negative Print Select this check box to print a negative of the image ...

Page 210: ...ttings CONFIDENTIAL TOP SECRET COPY DO NOT COPY DRAFT FINAL PROOF 3 Watermark Font Typeface Select the typeface you want to use for the watermark Any of the fonts that are resident on your machine can be used 4 Watermark Font Size Select a font size in the range of 8 points to 200 points 5 Watermark Angle Use this setting to specify the angle of the watermark text relative to the paper in the rang...

Page 211: ... steps 2 Watermark Position Horizontal Specify the horizontal position of the watermark as a value from 999 left to 999 right Specifying a value of 0 positions the watermark in the horizontal center 3 Watermark Position Vertical Specify the vertical position of the watermark as a value from 999 left to 999 right Specifying a value of 0 positions the watermark in the vertical center 1 2 3 ...

Page 212: ...Printer Driver for Macintosh 8 Printer Controller Pi3505e Pi3505e PS 8 67 Summary Displays a list of the current settings for printitng ...

Page 213: ...Punch Unit option and FLS Size option however let you choose from multiple settings depending on the type of option installed Important Make sure you select the options correctly If you don t you may not be able to use certain functions or printing errors may occur The settings you configure here must match the configuration of your machine Available settings FLS Size as 203 330 mm as 210 330 mm a...

Page 214: ... NDLPDF ini JilFontList ps JilFontDelete ps and Resource ps files from the Printer Controller CD ROM to it 2 Create a shortcut to Pdfdirect exe on your Windows desktop 3 Use a text editor to open the NDLPDF ini file and change the printer name in the file to the name shown on the icon of the printer you are using e g Name KONICA MINOLTA Di3510 PS If the copy tracking function is enabled on the mac...

Page 215: ... icon of the printer you are using e g Name KONICA MINOLTA Di3510 PS If the copy tracking function is enabled on the machine input the Account Code 6 digits maximum into the NDLPDF ini file e g Code 123456 If the copy tracking function is disabled on the machine input Code nocode 5 Drop the Resource ps file onto MacPDFDir or MacDLX alias 6 Turn the printer off then on again Using PDF Direct Print ...

Page 216: ...FontList ps file onto the pdfdirect exe shortcut or MacPDFDir MacDLX alias causes a font list including downloaded fonts to be printed Deleting Downloaded Fonts Dropping the JilFontDelete ps file onto the pdfdirect exe shortcut or MacPDFDir MacDLX alias causes all downloaded fonts to be deleted ...

Page 217: ...9 PS Utility 9 4 Printer Controller Pi3505e Pi3505e PS ...

Page 218: ...ttings Screen The following lists the settings you can configure on the Printer Settings screen G MFP Set Screen Hold after Reprint Re print Hold Time Overwrite A4 Letter Document Hold Time PostScript Error Report Available only if the printer controller Pi3505e PS is installed G Default Set Screen Basic Font G PDL Set Screen Available only if the printer controller Pi3505e PS is installed G Test ...

Page 219: ...ng the Touch Panel to Configure Printer Settings 10 2 Printer Controller Pi3505e Pi3505e PS Accessing the Printer Settings Screen 1 Press the Utility key 2 Touch Printer Settings 3 Select the setting function ...

Page 220: ... for the function continue touching Enter to return to the Utility screen and then touch Exit to return to the standby screen initial screen G MFP Set Screen Hold after Reprint Select whether or not the print data is saved after reprinting is finished Reprint Hold Time Specifying the length of time that the reprint data is saved ...

Page 221: ...per when Letter A4 size printing is specified while there is no Letter A4 size paper loaded in the printer Document Hold Time This setting specifies how much time should be allowed to pass before print data is cleared when memory capacity is exceeded during spooling of print data PostScript Error Report Select whether or not an error report is printed if an error occurs during PS printing ...

Page 222: ...ch Panel to Configure Printer Settings 10 Printer Controller Pi3505e Pi3505e PS 10 5 G Default Set Screen Basic Setting Screen Default Tray Specify the default paper source Paper Size Specify the default paper size ...

Page 223: ...h Panel to Configure Printer Settings 10 6 Printer Controller Pi3505e Pi3505e PS Orientation Specify the default paper orientation Print Method Specify the default print method Sets Specify the default number of copies ...

Page 224: ...ouch Panel to Configure Printer Settings 10 Printer Controller Pi3505e Pi3505e PS 10 7 G Default Set Screen Font Setting Screen Font Number Specify the default font number Symbol Set Specify the default symbol set ...

Page 225: ...r Controller Pi3505e Pi3505e PS Number Lines Specify the default number of lines per page Font Size Use these settings to select either Bit Map Font or Scalable Font and to specify the default font size G PDL Set Screen Select default PDL Printer Description Language ...

Page 226: ...Using the Touch Panel to Configure Printer Settings 10 Printer Controller Pi3505e Pi3505e PS 10 9 G Test Print Screen Touching a button performs the corresponding type of test printing ...

Page 227: ...y 2 Touch Admin Management and input the Administrator code 3 Touch Admin 2 4 Touch Print Set 5 Make the following settings Parallel Interface Set the mode for use of parallel interface Compatible Nibble ECP Timeout Set the communications timeout 10 to 300 sec The timeout time specified here is applied when print data is received over a parallel or USB connection as well as when print data is rece...

Page 228: ...er Settings 10 Printer Controller Pi3505e Pi3505e PS 10 11 10 3 To Delete All Lock Jobs 1 Press the Utility key 2 Touch Admin Management and input the Administrator code 3 Touch Admin 2 4 Touch Job Delete 5 Select Yes to delete all lock jobs ...

Page 229: ...empts to access a Lock Job even if the correct password is finally entered For more details on the Access Lock function refer to the Advanced Operations volume of the copier s User Manual Allowing a Lock Job to be accessed again 1 On the machine s contral panel press the Utility key 2 Touch Admin Management 3 Input the Administrator code and then touch Enter 4 Touch Admin 2 5 Touch Unlock 6 Select...

Page 230: ...nd controller Printing does not start despite the completion of printing setup on the PC An error is probably present in the copier Check the control panel of the copier The printer cable or network cable is disconnected Check that the printer cable or network cable is connected properly to the PC and controller The printer driver selected for printing is not compatible with the controller Check t...

Page 231: ...he completion of printing setup on the PC The print job is locked Check with the job list on the copier control panel to see if the print job in question is locked If so unlock it The connection of the controller to the network is yet to be established Consult the network administrator If the copy track function is active an illegal access number might have been entered Enter the correct access nu...

Page 232: ...iver is invalid on the copier The paper size paper direction and other settings made on the application takes precedence over those made in the printer driver Make correct settings on the application The watermark cannot be printed The watermark is not correctly set Check the watermark setting The watermark density is set to a low level Check the Shading setting Watermark may not be printed in gra...

Page 233: ...er driver property sheet Unable to specify Folding FN 117 and SK 1 is necessary for Folding FN 117 and SK 1 must be selected on Device Option Specify FN 117 and SK 1 for Device Option Folding cannot be specified together with OHP Thick or Envelope Check the setting for each item of the printer driver Unable to print image properly Memory space available is not sufficient Simplify the image to redu...

Page 234: ...Appendix 12 Printer Controller Pi3505e Pi3505e PS 12 1 12 Appendix 12 1 Function Conbination Matrix ...

Page 235: ...12 Appendix 12 2 Printer Controller Pi3505e Pi3505e PS 12 2 Limitation between Paper Size and Functions ...

Page 236: ...g 1 6 1 Marunouchi Chiyoda ku Tokyo 100 0005 Japan Copyright 2003 KONICA MINOLTA BUSINESS TECHNOLOGIES INC 2004 1 The information contained in this manual is subject to change without notice to incorporate improvements made on the product or products the manual covers ...

Reviews: