TOOLS AND MATERIALS REQUIRED (Not
supplied)
·
·
·
·
·
·
·
·
Adjustable Wrench
Tape measure
Masking tape
Knife
Supply stop(with filter)
Assorted screwdrivers
Plastic anchor
Screw
·
·
·
·
·
·
·
·
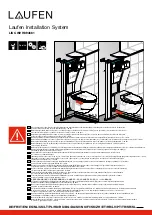
Fig.#1
1
Unit: mm
:
Wall
300
305
70
184
625
422
359
305
168
403
184
111
19
Front of Bowl
Supply Stop (with filter)
(
)
of Outlet
GFCI-Protected Receptacle(water proof)
Floor Flange
T-Bolts
T
Maximum Height
Both the electrical and water supplies
can be installed on either the wall or
the floor. Follow the information for
your particular installation.
Supply Stop
9.5 Compression Supply
Hardwire Electrical Supply
19
19
70
Note:
Plastic Anchor: Recommend use outside dia
10mm.
Screw: Recommend use M6 screw match the plastic anchor.
10mm
M6
O
O
1061926-T01-A