KLIPPO Champion Instruction Manual Download Page 12

6

7

Instruction manual for 

KLIPPO LAWNMOWERS

Models: Triumph, Champion, Excellent, Excellent GCV, Pro 17 and Pro 19 GCV.

Engines: Briggs & Stratton; Sprint XT, Quantum XLS, Quantum XRQ ReadyStart

Honda; GCV 135

Congratulations on purchasing a Klippo Lawnmower!

Before starting, we recommend that you carefully read instruction manual in order to obtain the best from your mower.

  .   Keep hand and feet clear of the rotating blades and never 

put your hand or foot into any ejector opening without 
first making sure that the blade is not moving and the 
ignition cable is disconected from the spark plug.

  2.   Do not touch the blade until the ignition cable has been 

disconected from the spark plug. Rotating the blades 
may cause the engine to start.

  3.   Do not leave the machine unattended without stopping 

the engine.

  4.   The engine speed regulator must not be disabled. The 

pre-adjusted number of revolutions may not be chan-
ged. Protections and safety devices may not be taken 
away or be set out of function.

  5.   Do not top up with fuel when the engine is warm. Don´t 

smoke while filling up with fuel or in the near of the 
tank. WARNING! Petrol is very flammable! Store the fuel 
in containers intended for petrol. Don´t remove the fuel 
filler or fill up with fuel while the engine is running.

  6.  Never allow children or other persons whom are not 

familiar with the machine to operate the lawnmower. 
Even if the machine has very effective protections it 
could throw out solid objects that can cause injurys.

  7.  Keep the lawn as clear as possible of stones or other 

objects that the lawnmower can strike. Avoid driving 
over gravel paths etc.

  8.  Famillarize  lawnmower  operators  with  the  risks  and 

explain how accident are to be avoided.

  9.  The machine may not be used for any other purpose 

than cutting grass.

0.  Wear pants and suitable shoes while cutting grass. Be 

aware that a lawn could be slippery!

.  Never touch anything under the cutting deck, as for in-

stance dismount or mount the mulching insert, without 
disconnecting the spark plug cable first.

2.  Do not use the lawnmower if any protection or safety 

device is damaged. Inspect the machine before every 
use. Control regularly that all screws and nuts are faste 
ned, especially blade and engine.

These instructions are to be carfully studied before the lawnmower is used.

UPPER HANDLE 

Fitted without tools, with a strong nut on the articulated plate.

HANDLE POSITION 

When required, the handle can be rotated laterally to some 
extent by means of the handle joint, e.g., when mowing 
close to hedges or house walls. The handle can be set to 
different  positions  for  the  best  operating  position.  The 
handle can be altered (not Triumph and Pro 7) in height 
at the chassis mount by turning the nylon knobs (fig. ). 
On Triumph and Pro 7 the heigth of the handle is changed 
by moving the fastening screws of the under part of the 
handle to the other hole nearby.

SETTING THE CUTTING HEIGHT (fig. 2)

Move the lever forwards for taller grass. The lever positions 
correspond to  3-6 mm grass height. (2,5 - 5,5 cm on the 

Triumph and 3,0-5,0 on the Pro 7).
All the weels are set simultaneously in one operation. Make 
use of the efficient height setting of the KLIPPO lawn-mo-
wers when mowing edges or trimming.
Never cut grass unnecessarily short. This makes spreading  
more difficult and increases the risk of “scalping“.
Discharge protection for Klippo Pro 4 SD, please look at 
the enclosed assembly instruction.

Mulching insert Excellent-,Champion and Pro 19-models

This  insert  is  mounted  on  the  Excellent-models  and  is 
dismounted  on  the  Pro  9-models  by  delivery.  This  is 
mounted/dismounted by the two screws on the rear/upper 
part of the cutting deck (fig. ). 

Beware that the spark plug 

cable is disconnected before dismounting/mounting!

Unscrew the dipstick and fill up with approx. 0,55 lit. of 
engine oil, viscosity SAE 30, Klippo oil no. 50287350 or 
accor-ding to the engine manual. Fill up to the full gradua-
tion mark on the dipstick (do not fill above it).
NB. THE OIL IS DRAINED PRIOR TO DELIVERY!
When operated for the first time, the silencer will change 
colour and may smoke briefly.

OILCHECK

Check  the  oil  level  before  starting  and  every  five  hours. 
Take off the dipstick and dry it up. Screw the dipstick into 
the tube completely and make sure that the oil reaches 
the FULL mark (fig. 3).

RUNNING-IN and FIRST OIL CHANGE

The engine has already been adjusted and require no run-
ning-in as such, although you should run it at no more than 
moderate load for the first few hours. Remeber to change 
the oil the first time after five hours of operation (fig. 9), 
and then every twenty-five hours.

PETROL

Use  leadfree  95  octane  petrol.  Stop  the  engine  before 
filling. Do not overfill the tank so much that it overflows. 
Leave around 6 mm for the fuel to expand.
Don´t let the machine stay over the winter with petrol in the 
tank. This could cause starting problems in spring. 

Before starting engines for the first time: fill with oil (fig 3.) and READ THE ENCLOSED INSTRUCTION MANUAL FOR THE ENGINE!

Safety instructions for power lawnmower with horizontally rotating blades

Fitting and adjustment

Before starting the engine

GB

Allekirjoittanut, Roger Klotz, c/o Klippo AB, Knivgatan 3 - 7, SE-22 28 Malmö, Ruotsi, vakuutamme, että seuraava 
ruohonleikkuri täyttää olennaiset turvallisuus- ja terveysvaatimukset EU:n Konedirektiivissä 98/37/EEC ja EN 836 ja 
täyttää vaatimukset EU:n melua koskeva direktiivi 2000/4/EY. Direktiivin 2000/4/EY mukaisen yhdenmukaisuuden 
arviointi  on  tehty  kyseisen  direktiivin  liitteen  VI  sekä  EU:n  sähkömagneettista  yhteensopivuutta  koskevan  direktiivin 
89/336 mukaisesti. Testattu normien EN 836 ja ISO 094 mukaisesti. 
Tyyppi: Polttomoottorilla varustettu roottoriruohonleikkuri.
Valmistaja: Klippo AB
Valmiste: Klippo. 
Tekniikasta vastaava: Hans Nilsson
Tämä selvitetty: Svensk Maskinprovning AB, Fyrisborgsgatan 3, SE-754 50 Uppsala, Ruotsi. Notified body 0404

Yhdenmukaisuusvakuutus

Julkistettu Malmössä 2007-11-04

.....................................................................................
Roger Klotz, Toimitusjohtaja,  Klippo AB
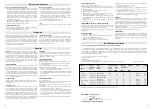
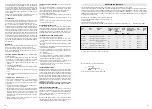
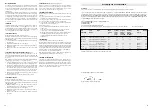
Malli  

Sarja no 

 Mootori 

Moottorin-  Mitattu-  Vahvistettu  Käyttäjään 

Terätyyppi 

Leikkuu-


-tilavuus/  äänite- 

enimmäis-  kohdistuva 

melutaso 

leveys


cc 

hotaso, 

dB(A) 

melutaso 


cm 


dB(A) 


dB(A)

Triumph       

96522960   B&S Sprint XT  

58 

  92 


96 

    78 

Mulcher 


42

Champion     

96522390   B&S Quantum XLS  90 

  92            96   

    79 

Mulcher 


48  

Excellent 

96522760 

B&S Quantum XRQ


ReadyStart 

90 

  92 

     96 

    82 

Mulcher 


48

Excellent GCV  96522770 

Honda GCV 35 

35 

  89 

     96 

    77 

Mulcher 


48

Pro 7     

9652300 

Honda GCV 35 

35 

  89 

     96  

    79  

Mulcher 


42  

Pro 9 GCV 

96522900 

Honda GCV 35 

35 

  89 

     96 

    78 

Mulcher 


48

Tärinätaso: Kats tekninen erittely, sivu 43!

MALLIKOHTAINEN POLTTOAINEEN KULUTUS 50 % KUORMITUKSELLA:

Honda GCV 35: 455 g/kWh (keskikorkea Joutsenmerkin luokituksen mukaan, ver. 4.)
Honda GCV60: 462 g/kWh (keskikorkea Joutsenmerkin luokituksen mukaan, ver. 4.)
Briggs & Stratton DOV Ready Start: 467 g/kWh (keskikorkea Joutsenmerkin luokituksen mukaan, ver. 4.)

Polttoainejärjestelmä on suojattu haihtumispäästöjä vastaan siten, että polttoainesäiliön korkissa on kellonmuotoinen 
suojas ja kumikalvo. Ilmanvaihto tapahtuu spiraalimaisesti. Tästä syystä on tärkeää, että polttoainesäiliön korkin vaurio-
ituessa se vaihdetaan tähän moottoriin tarkoitettuun alkuperäiseen varaosaan. Käytä bensiinikanisteria, joka ehkäisee 
bensiini läikkymisen. 
Klippo AB pidättää oikeuden teknisiin muutoksiin ilman ennakkoilmoitusta.


Malmö syyskuu 2007


 KLIPPO AB

Summary of Contents for Champion

Page 1: ...dkerzen stecker abgezogen haben ATTENTION Lire les Attention à la Attention aux objets Tenir les Personnes à Avant de toucher de au Attention à la lame Ne pas introduire la main ou instructions projetés distance couteau debranches le en rotation le pied dans l ouverture de Câble lame en de la bougie l éjecteur tant que le câble d allumage n est pas retiré UWAGA Zapoznaj się z Ostrzezenie przed Zac...

Page 2: ...ego Startsnoer Cavodiavvio Acelerador E Articulation Nakrętkaśrubymocującejuchwyt Handelmoer Articolazionedell impugnatura Cuerdadearranque F Réglageenhauteur Dźwigniaregulacjiwysokościkoszenia Hoogteinstelling Regolatoredell altezza Articulacióndelmanillar G Bouchondíessence Wiewpaliwa Brandstofvullen Serbatoiodellabenzina Ajustedealtura H Jaugedíhuile Miarkaoleju Oliepeilsto Astadicontrollodell ...

Page 3: ...Champion Excellent GCV A E H F J I D G K A C E D G H J I F ...

Page 4: ...enligt motorns bruksanvisning Fyll upp till fullmärket på oljestickan fyll inte över märket OBS OLJAN ÄR AVTAPPAD UNDER TRANSPORTEN Vid första körning ändrar ljuddämparen färg och det kan ryka en kort stund OLJEKONTROLL Kontrollera oljenivån före start och efter var 5 e driftstimme Tag av och torka oljestickan och skruva den sedan helt på röret Tag av den igen och se till att oljan når upp till fu...

Page 5: ...r upp den i olika material som vi sedan lämnar för återvinning Det mesta i denna gräsklippare går nämligen att återvinna Den är dessutom till stor del byggd av återvunnet material Motorerna Quantum XLS och Sprint XT 1 Tryck in Prime gummiblåsan bild 4 ordentligt 3 ggr Den är placerad framtill på motorn Quantum motorer eller på motorns högra sida Sprint Vid kall väderlek kan proceduren behöva att u...

Page 6: ...11 Sørg for at tændkablet er blevet fjernet fra tændrøret før evt montering demontering Skru oliepinden af og påfyld ca 0 55 l motorolie viskositet SAE 30 Klippo olie nr 502873501 eller ifølge motorens brugsanvisning Påfyld til mærket på oliepinden fyld ikke over mærket OBS OLIEN ER AFTAPPET UNDER TRANSPORT Ved den første kørsel ændrer lyd dæmperen farve og kan ryge et kort stykke tid OLIEKONTROL ...

Page 7: ...l Klippo AB Vi afmonterer da maskinen og deler den op i forskelligt materiale som vi siden afleverer til genbrug Det meste på denne plæneklipper kan nämlig genbruges Den er desuden i en stor del bygget af genbrugsmateriale Start av motoren Motorer Quantum XLS och Sprint XT 1 Tryk Prime gummihætten billedet 4 i bund 3 gange Den er placeret foran på motoren Quantum motorer eller pa motorens højre si...

Page 8: ... løst til Pro modellene Monteres og demonteres med to skruer fra klipperpannens overside bak se bilde 11 Sørg for at tennpluggledningen fjernes fra tennpluggen før ev montering demontering Skru ut oljepeilestaven og fyll på ca 0 55 liter motorolje SAE 30 Klippo olje nr 502873501 eller ifølge motorens brugsanvisning Fyll opp til fullmerket på oljepeilestaven fyll ikke over merket OBS OLJEN ER AVTAP...

Page 9: ...toren Quantum motorer og på motorens høyre side Sprint I kaldt vær kan det være nødvendig å gjenta prosedyren men ikke så mye at motoren blir sur Hvis motoren blir sur forsøk å starte med gasshån dtaget i tomgangsstilling skildpadde Hvis motoren fortsatt ikke starter ta ut tennpluggen og tørk den ren fra bensin og evt smuss Ved start av varm motor behø ver man vanligvis ingen pumping med primeknap...

Page 10: ...ytyskaapeli on irrotettu sytytystulpasta Ennen käynnistystä kiinnitä akku Vaakasuoran pyöröterän sisältävän moottoroidun ruohonleikkurin turvallisuusohjeet Kokoonpano ja säädöt Kierrä öljytikku irti ja lisää n 0 55 l moottoriöljyä viskosi teetti SAE 30 Klippo öljy n o 502873501 taimoottorin käyttöohjekirjan mukaisesti Täytä mittatikun merkkiin asti älä kaada merkin yli HUOM ÖLJYSÄILIÖ ON TY HJENNE...

Page 11: ...e puramme koneen ja lajittelemme nimittäin kierrätyskelpoisia ja sitä paitsi suurelta osin jo muutenkin valmistettu kierrätys materiaaleista Moottorin käynnistys Moottoreilla Quantum XLS Sprint XT 1 Kylmän moottorin käynnistäminen Aseta kaasuvipu täysiasentoon jänis Paina kumipumpusta Primer kuva 4 kolme kertaa Se sijaitsee moottorin etuosassa Quantum moottorit tai moottorin oikealla puolella Spri...

Page 12: ... This is mounted dismounted by the two screws on the rear upper part of the cutting deck fig 11 Beware that the spark plug cable is disconnected before dismounting mounting Unscrew the dipstick and fill up with approx 0 55 lit of engine oil viscosity SAE 30 Klippo oil no 502873501 or accor ding to the engine manual Fill up to the full gradua tion mark on the dipstick do not fill above it NB THE OI...

Page 13: ...rm engine normally pushing the prime starter is unnecessary 2 The security bail fig 5b must be in operating posi tion by starting and operating 3 Give the starting string a powerful lug By cold weather it could be necessary to repeat the pro cedure If the engine still doesn t start try to start with the throttle control in idle position turtle If the engine still doesn t start take off the spark p...

Page 14: ... dem Rasenmäher Zündkabel von der Kerze abziehen und Tank leer laufen 21 Der Rasenmäher darf nur zum Rasen Mähen benutzt werden 22 Niemals mit beschädigten Schutz oder Sicherheitsanord nungen betreiben Den Rasenmäher vor jedem Betrieb in spektieren Regelmässig kontrollieren dass alle Schraubenund Muttern angezogen sind besonders am Messer und Motor Diese Vorschriften sind von jedem Anwender der Ma...

Page 15: ... und wieder herausziehen Das Öl muss bis zur Marke FULL reichen Abb 3 Einfahren erster Ölwechsel Der Motor ist nachgeregelt und braucht nicht direkt eingefah ren zu werden Fahren Sie jedoch anfangs nur mit mässiger Belast ung und vergessen Sie nicht den ersten Ölwechsel bereits nach 5 Betriebs stunden vorzunehmen und dann alle 25 Betriebsstunden Benzin Nur neues bleifreies 95 Oktan Benzin verwende...

Page 16: ...née se fait en déplaçant les vis de fixation supérieures de la poignée inférieure dans les trous de fixation adjacents REGLAGE DE LA HAUTEUR DE COUPE image 2 Pousser le revier vers l avant pour obtenir une coupe plus haute vers l arrière sur le modèle Compact Cobra et Brilliant La position du levier correspond á une hauter d herbe de 3 á 6 cm 2 5 5 5 sur Triumph 3 0 5 0 sur Pro 17 Toutes les roues...

Page 17: ...nt ramene en arriére 2 Tirer sur le câble de démarrage d un coup sec Modèles avec moteur Honda 1 Lors du démarrage moteur froid mettre l accélérateur en position starter en poussant en avant le plus loin possible et ouvrir le robinet d essence derrière le filtre à air sur le côté gauche du moteur Dans le cas où le moteur est noyé essayer de démarrer avec le l accélérateur en position ralenti tortu...

Page 18: ...eglądzie w autoryzowanym serwisie po każdym sezonie Maszyny ż katalizatorem spalin powinny być na przeglądzie w autoryzowanym serwisle Klippo przynajmniej co każde 3 lata lub co 100 godzin pracy w zależności co nastąpi wcześniej INSTRUKCJA KONSERWACJI Utrzymuj korpus i spód kosiarki czysty i usuwaj resztki trawy przed jej wyschnięciem Aby zapobiec przypadkowemu uruchomieniu podczas oględzin lub my...

Page 19: ...ść wklad poprzez delikatne opukanie go powierzchnią filtrującą w dół Jeśli jest silnie zabrudzony lub zaolejony wymień go na nowy 4 U mieść z powrotem wkład zamknij pokrywę i dokręć śrubę z wyczuciem II Silniki Briggs Stratton Sprint rys 9 Oczyść i nasącz wkład gąbczasty co 25 godzin pracy lub co 3 miesiące w zalezności co nastąpi wcześniej Uwaga Czyść gąbkę częściej jesli pracujesz w środowisku z...

Page 20: ...n Pro 17 en Pro 19 model len Voor de Excellent modellen hebben we een mulchermes met cross cut mes Fig 6 Starten van de motor Gebruiksaanwijzing voor KLIPPO maaimachines Modellen Triump Champion Excellent Excellent GCV Pro 19 en Pro 19 GCV Motoren Briggs Stratton Sprint XT Quantum XLS en Quantum XRQ ReadyStart Honda GCV 135 Gefeliciteerd met de aankoop van een KLIPPO maaimachine Teneinde de best r...

Page 21: ...drie maanden of na 25 draaiuren afhankelijk welke interval het eerst is bereikt Na het schoonmaken dient u het element iets in te vetten met motorolie NB Reinig het element vaker als de werkomstandigheden erg stoffig zijn bijvoorbeeld in een erg droge periode 1 Draai de bevestigingsbout los en demonteer het luchtfilter voorzichtig zodanig dat er geen vuilin de carburateur valt 2 Neem het luchtfilt...

Page 22: ...nalmente la macchina dovrà venir sottoposta ad un servizio di routine dopo una cinquantina di ore di lavoro Si devono usare solo pezzi di riserva e accessori originali della Klippo In caso di manutenzione e servizio staccare il cavetto dela candela eseguire un normale avviamento per liberare la molla relativa ed estrarre la chiave arancione Messa in moto del motore Manuntenzione Istruzioni per l u...

Page 23: ...ermente contro una parte piana Se è troppo sporco bisognerà cambiarlo NON VERSARE MAI OLIO SUL FILTRO NON USARE MAI ARIA COMPRESSA PER PULIRLO O PER ASCIUGARLO 4 Rimettere a posto il filtro chiudere il coperchio e avvitare con cura la vite MANUTENZIONE DEL FILTRO ARIA figura 9 motori Briggs Stratton Sprint Pulire e oliare il filtro in gommapiuma ogni tre mesi oppure dopo un 25 ore di lavoro a seco...

Page 24: ...RA LIMPIARLO NI SECARLO 4 Colóquelo nuevamente cierre la tapa y apriete los bien tornillos Mantenimiento Generalidades Arranque del motor Montaje y ajuste Instrucciones de uso del cortacéspedes Klippo Modelos Triumph Champion Excellent Excellent GCV Pro 17 y Pro 19 GCV Motores Briggs Stratton Sprint XT Quantum XLS Quantum XRQ ReadyStart Honda GCV 135 Felicitaciones por su nuevo cortacéspedes Antes...

Page 25: ... Coloque la máquina preferentemente con la bujía hacia arriba Utilice primero la máquina hasta consumir la gasolina de lo con trario se derramará gasolina por el orificio de ventilación de la tapa del depósito de gasolina Cuide el medio ambiente y esté atento al peligro de inflamación ATENCIÓN No limpie nunca la máquina con agua a presión ni tampoco utilice agua directamente sobre el motor Almacen...

Page 26: ... 135 Excellent GCV Pro 19 GCV Pro 17 15 I 1 12 2 6 11 II 7 3 9 10 4 III 2 12 8 11 7 9 3 10 4 6 5 S 1 Modell typnummer 5 Tändstift 9 Vevhus 2 Skyddsgaller 6 Förgasare 10 Oljesump 3 Oljesticka 7 Starthandtag 11 Luftfilter 4 Ljuddämpare 8 Bensintank 12 Bensinpåfyllning DK 1 Model typenummer 5 Tændrør 9 Krumtaphus 2 Beskyttelsegitter 6 Karburator 10 Oliesump 3 Oliepind 7 Starthåndtag 11 Luftfilter 4 L...

Page 27: ...46 Fig 11 ...

Reviews: