116
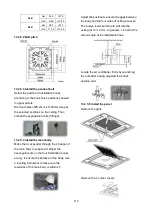
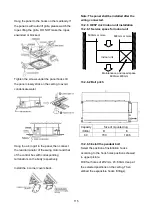
13.2.6.4 Install the main body
Make the 4 suspender through the 4 hanger of
the main body to suspend it. Adjust the
hexangular nuts on the four installation hooks
evenly, to ensure the balance of the body. Use
a leveling instrument to make sure the
levelness of the main body is within ±1°.
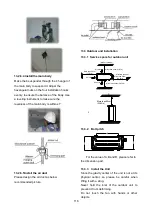
13.2.6.5 Install the air duct
Please design the air duct as below
recommended picture
13.3 Outdoor unit installation
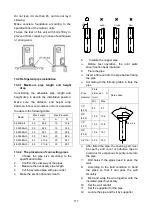
13.3.1 Service space for outdoor unit
More than 30cm
(11.81in)
More than 60cm
(23.62in)
More than 200cm(78.74in)
Air inlet
Air inlet
More than 30cm(11.81in)
Air outlet
(Wall or obstacle)
Maintain channel
More than 60cm
(23.62in)
13.3.2 Bolt pitch
W
H
W1
A
B
D
For the value of A,B and D, please refer to
the dimension part.
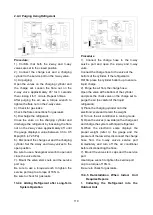
13.3.3 Install the Unit
Since the gravity center of the unit is not at its
physical center, so please be careful when
lifting it with a sling.
Never hold the inlet of the outdoor unit to
prevent it from deforming.
Do not touch the fan with hands or other
objects.
Summary of Contents for KDIP012-H2
Page 8: ...5 2 2 Part names of Indoor Outdoor units Cassette Units ...
Page 9: ...6 KDIR Duct Units ...
Page 10: ...7 KDIP Duct Units ...
Page 11: ...9 Ceiling floor Units ...
Page 12: ...10 HESP DUCT Units ...
Page 19: ...19 2 3 4 7 Outside Water Pump for Optional When Ceiling Installation ...
Page 31: ...33 KSIE024 H220 O KSIR036 H218 inch 37 2 16 1 31 9 40 6 26 5 15 9 ...
Page 34: ...36 Ceiling floor Units ...
Page 39: ...41 KTIR036 H2G1 KTIR048 H2G1 ...
Page 40: ...43 KUIR18 H2 KUIR24 H2 ...
Page 41: ...44 KFUF036 H2G1 KFUF048 H2G1 ...
Page 42: ...45 KFUF060 H2G1 ...
Page 43: ...46 KFUF036 H2G1 KFUF048 H2G1 ...
Page 44: ...47 KDIP090 H2 KDIP012 H2 KDIP018 H2 KDIP24 H2 ...
Page 69: ...74 6 2 Outdoor Unit KSIE018 H220 O KSIE024 H220 O ...
Page 70: ...75 KSIE009 H221 O KSIE012 H220 O ...
Page 71: ...77 KSIR036 H218 ...
Page 77: ...83 KDIR09 H2 Code 0 Code 1 Code 2 Code 3 Code 4 ...
Page 78: ...84 KDIR12 H2 Code 0 Code 1 Code 2 Code 3 Code 4 ...
Page 79: ...85 KDIR18 H2 Code 0 Code 1 Code 2 Code 3 Code 4 ...
Page 80: ...86 KDIR24 H2 Code 0 Code 1 Code 2 Code 3 Code 4 ...
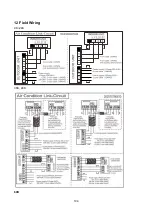
Page 96: ...104 12 Field Wiring 9K 24K 36K 48K 60K ...
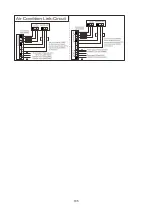
Page 97: ...105 ...
Page 147: ...155 P U P V ...
Page 148: ...156 P W P N ...
Page 181: ...191 4 Remove the evaporator fixing clamps to disassemble the evaporator Fixing clamps 1 screw ...
Page 188: ...221 5 Remove the four fixing screws of the fan motor then remove the motor 5 ...

