


pg two of assembly moved to pg. 122
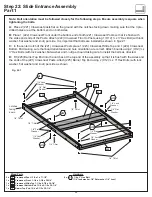
Step 22: Slide Entrance Assembly
Part 1
Note: Bolt orientation must be followed closely for the following steps. Ensure assembly is square when
tightening the bolts.
A:
Place 2 (221) Crowsnest posts flat on the ground with the notches facing down, making sure that the 3 pre-
drilled holes are at the bottom end on both sides.
B:
Place 1 (222) Crowsnest Front under the bottom end of both (221) Crowsnest Posts so that it’s flush with
the sides and ends of the Posts. Attach (222) Crowsnest Front to Posts using 1 (H12) ¼ x 3” Hex Bolt (with lock
washer, flat washer and t-nut) per side. It is important that bolts are installed as shown in fig.22.1.
C:
In the center notch of the (221) Crowsnest Posts place 1 (223) Crowsnest Slide Top and 1 (224) Crowsnest
Bottom End making sure that board orientation and hole orientation are correct. Attach boards using 2 (H12) ¼ x
3” Hex Bolts (with lock washer, flat washer and t-nut) per board taking care to install the bolts as directed.
D:
Fit (225) Barrier Top End into the notches at the top end of the assembly so that it is flush with the sides and
the ends of the (221) Crowsnest Posts. Attach (225) Barrier Top End using 2 (H12) ¼ x 3” Hex Bolts (with lock
washer, flat washer and t-nut) per side as shown.
Fig. 22.1
notches
facing
down
H12
H12
H12
H12
H12
221
223
224
222
225
1/4” T-Nut
1/4” T-Nut
1/4” T-Nut
1/4” T-Nut
1/4” T-Nut
1/4” Lock
Washer
1/4” Lock
Washer
1/4” Lock
Washer
1/4” Flat
Washer
1/4” Flat
Washer
1/4” Flat
Washer
1/4” Lock
Washer
1/4” Flat
Washer
Wood Parts
2 x
Crowsnest Post 1-1/4 x 3 x 71-1/2”
1 x
Crowsnest Front 1-1/4 x 3-1/8 x 38-1/4”
1 x
Crowsnest Slide Top 1-1/4 x 4-7/8 x 38-1/4”
1 x
Crownest Bottom End 1-1/4 x 5-1/2 x 38-1/4”
1 x
Barrier Top End 1-1/4 x 2-1/2 x 38-1/4”
221
222
223
224
225
8 x
1/4 x 3” Hex Bolt
(1/4” lock washer, 1/4” flat washer, 1/4” t-nut)
H12
Hardware
54
Summary of Contents for Cedar Summit COPPER RIDGE PLAYSET
Page 111: ...NOTES ...