


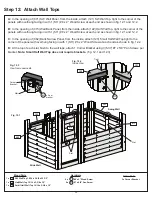


Step 12: Attach Wall Tops
A:
In the opening of (071) SW Wall Panel, from the inside, attach (121) SW Wall Top, tight to the corner of the
panels with overhang facing in with 1 (S11) #8 x 2” Wood Screw at each end as shown in fig. 12.1 and 12.2.
B:
In the opening of (073) Wall Back Panel, from the inside, attach (122) Half Wall Top, tight to the corner of the
panels with overhang facing in with 1 (S11) #8 x 2” Wood Screw at each end as shown in fig. 12.1 and 12.2.
C:
In the opening of (062) Back Narrow Panel, from the inside, attach (123) Small Half Wall Top tight to the
corner of the panel with overhang facing in with 1 (S11) #8 x 2” Wood Screw at each end as shown in fig. 12.2.
D:
At the top of each slat, flush to the wall tops, attach 1 Corner Bracket using 3 (S37) #7 x 5/8” Pan Screws per
bracket.
Note: Small Half Wall Top does not require brackets.
(fig. 12.1 and 12.3)
Hardware
Fig. 12.1
Fig. 12.2
1 x
SW Wall Top 15/16 x 2-3/8 x 33-1/2”
1 x
Half Wall Top 15/16 x 2-3/8 x 39”
1 x
Small Half Wall Top 15/16 x 2-3/8 x 19”
Wood Parts
121
6 x
#8 x 2” Wood Screw
9 x
#7 x 5/8” Pan Screw
S11
Inside View
Other Parts
3 x Corner Bracket
S37
122
123
Fig. 12.3
View from underneath
121
121
15
15
15
Slat
Slat
Corner
Bracket
Slat
S37
x 3 per
bracket
Tight
S11
071
073
123
122
122
062
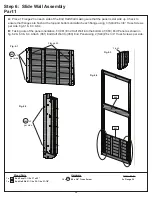
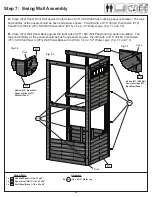
Swing Wall
Slide Wall
35
Summary of Contents for Cedar Summit COPPER RIDGE PLAYSET
Page 111: ...NOTES ...