


30
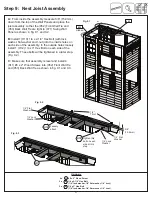
C:
From inside the assembly, tight to both (072) Front Wall Panel and (063) Narrow Front Panel, halfway up the
assembly, 5/8” below the panel, loosely attach 1 (082) Side Joist to (072) Front Wall Panel and (063) Narrow Front
Panel Back with 3 (WB10) 5/16 x 2-5/8” Wafer Bolts (with flat washer and t-nut). Bolts are installed from inside
the assembly. Make sure (082) Side Joist is level then attach with 2 (S3) #8 x 2-1/2” Wood Screws and tighten
bolts. (fig. 8.3, 8.4 and 8.5)
D:
From inside the assembly insert 3 t-nuts into the (073) Wall Back Panel as shown in fig. 8.4 then repeat Step
C to attach 1 (082) Side Joist to (062) Back Panel Narrow and (073) Wall Back Panel. (fig. 8.3 & 8.4)
4 x
#8 x 2-1/2” Wood Screw
6 x
5/16 x 2-5/8” Wafer Bolt
(5/16” flat washer, 5/16” t-nut)
3 x 5/16” t-nut
Hardware
S3
2 x
Side Joist 1-1/2 x 1-1/2 x 63”
Wood Parts
082
Fig. 8.4
WB10
Fig. 8.5
082
Panel
5/8”
Step 8: Join Swing and Slide Assemblies
Part 2
8
Fig. 8.3
060
082
071
072
063
062
073
S3
S3
5/16” Flat
Washer
5/16” Flat
Washer
5/16”
T-Nut(hidden)
5/16”
T-Nut
5/16”
T-Nut
WB10
082
Note these 3 x 5/16” t-nuts
go into the back wall before
installing the joist
30
Summary of Contents for Cedar Summit COPPER RIDGE PLAYSET
Page 111: ...NOTES ...