


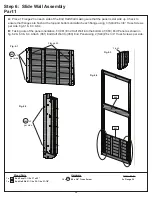


Step 6: Slide Wall Assembly
Part 1
A:
Place 1 Flange 20 on each side of the End Half Wall making sure that the panel is slat side up. Check to
ensure that flanges are flush at the top and bottom and attach each flange using 3 (S40) #6 x 3/4” Truss Screws
per side. fig.6.1 & 6.3 & 6.4.
B:
Taking note of the panel orientation, fit (061) End Half Wall into the bottom of (060) End Panel as shown in
fig.6.2 & 6.3 & 6.4. Attach (061) End Half Wall to (060) End Panel using 2 (S40) #6 x 3/4” Truss Screws per side.
Other Parts
2 x Flange 20
Flange 20
Flush
S40
per side
x 3
S40
per side
x 2
Fig. 6.1
Fig. 6.3
Fig. 6.2
Fig. 6.4
060
061
Hardware
10 x
#6 x 3/4” Truss Screw
S40
1 x
End Panel 1-1/2 x 37 x 92”
1 x
End Half Wall 1-1/4 x 20-1/4 x 31-7/8”
Wood Parts
060
061
26
Summary of Contents for Cedar Summit COPPER RIDGE PLAYSET
Page 111: ...NOTES ...