background image

5

઱̣̈́௤૊ʒ௢ಙᑵ዇Ԧ஀ăਢ෋Ƅˀ෋Ƅඟࡌјࡖಙᑵ዇Ą̣۔Ϛ઱ڄԆԾՙ֌īঝଶڄࡖ
ᛏĬ̛ߍé

ࡍ࠲!

ϩشલϛԇԿϰ༬ʓ௣ಚᑶወԧ஁èቂᇨׇ̤ʔ౧ᓮê

Ϩ಍࿌׿Ε௤૊ಙᑵ዇Ԧ஀é

• 

՟·Ԧ஀˃ۮçζጒޥ˜Ꮑႎു֜ྖζ௎׆ቱະڄ

HPF/LPF

ă̈́·ఛਢᏁ୊Ƅ̈́·ఛјᏁ୊Ą

ăॐѤݵ

HPF

ĄìѴ۱ç̈́͟঻๡๑ᖢಙᑵ዇é

• 

੉ኌ՟·იاएڄ୶

18 

֜

19 

ࡗЉᘕ௎໯ڄஅ໢é

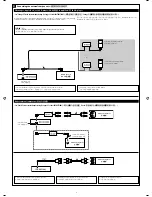
You can enjoy a world of “pure audio” in your car by connecting 3-way network speaker system 
(high-range/mid-range/subwoofer).

IMPORTANT:

If you have installed the 3-way network speaker system in the car, make sure of the 
following.

•  Connect the speaker system as illustrated below.
•  Before using the system, activate crossover network and preset the appropriate cutoff frequencies for 

HPF/LPF (especially for HPF); otherwise, it may damage the speakers.

•  For details about the setting, see pages 18 and 19 of the INSTRUCTIONS.

C

Speaker connections for 3-way network speaker system / 

ʓ௣ಚᑶወԧ஁څಚᑶወ௥ો

Right high-range speaker

͆ਢ෋ಙᑵ዇

Remote lead (Blue with white stripe)

ჲ૆዗ለăᕇиઘЉΎи଍ঙĄ

Y-connector (not supplied for this unit) 
Y

ܓ௤૊዗ለăʿᎲʹጅಏաĄ

Left high-range speaker

ͣਢ෋ಙᑵ዇

Connecting subwoofer / 

௥ોචࡍљࡗಚᑶወ

Remote lead

ჲ૆዗ለ

White with black stripe

ΎиઘЉ෨и଍ঙ

White

Ύи

Gray with black stripe

НиઘЉ෨и଍ঙ

Gray

Ни

Green with black stripe

ႋиઘЉ෨и଍ঙ

Green

ႋи

Purple with black stripe

ാиઘЉ෨и଍ঙ

Purple

ാи

Left mid-range speaker

ͣˀ෋ಙᑵ዇

Right mid-range speaker

͆ˀ෋ಙᑵ዇

When connecting the speakers (high-range/mid-range) through the speaker output

ັ௣ཬಚᑶወ᎕̴௥ોಚᑶወĄਣ෌ƅˁ෌ą

When connecting the speakers (high-range/mid-range) through the external amplifiers—to 
obtain more powerful sound

ັ௣ཬ͚ોᓽࡗወ௥ોಚᑶወĄਣ෌ƅˁ෌ą

— 

̤ᐻધӧઢʩڅࡗᛐ

Subwoofer

ඟࡌјࡖಙᑵ዇

To subwoofer out

௤૊вඟࡌјࡖಙᑵ
዇᎔̳

To LINE OUT (REAR)

௤૊в

LINE OUT (REAR)

To LINE OUT (FRONT)

௤૊в

LINE OUT (FRONT)

*

3

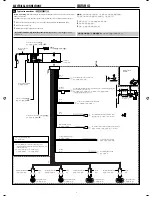
  Firmly attach the ground wire to the metallic body or to the chassis of the car—to the place uncoated with paint (if coated with paint, remove the paint before attaching the 

wire). Failure to do so may cause damage to the unit.

*

3


અϙለႩہᚙԾᝂ׻ږԆԾנᇟႌં௤૊ç௤૊ளᏻ༳ԅЉூٛွᕒႵϨسʵดʕٛွçϚ௤૊ྐለۮçઅٛွս̓éϨسʿ௠ᆟਭç̈́঻๡๑ᖢʹጅé

*

4

  Signal cord (not supplied for this unit)

*

4


ۑ༙ྐងʿᎲʹጅಏա

JVC Amplifier

JVC


̸ୋ؟ʩወ

JVC Amplifier

JVC


̸ୋ؟ʩወ

JVC Amplifier

JVC


̸ୋ؟ʩወ

Right high-range speaker

͆ਢ෋ಙᑵ዇

Left high-range speaker

ͣਢ෋ಙᑵ዇

Left mid-range speaker

ͣˀ෋ಙᑵ዇

Right mid-range speaker

͆ˀ෋ಙᑵ዇

E-C Instal4-6_SH100#16CE4D.indd   5

E-C Instal4-6_SH100#16CE4D.indd   5

2/14/06   4:54:53 PM

2/14/06   4:54:53 PM

Summary of Contents for KD SH1000 - Radio / CD

Page 1: ...z vous à la page 8 For installation and connections refer to the separate manual Para la instalación y las conexiones refiérase al manual separado Pour l installation et les raccordements se référer au manuel séparé INSTRUCTIONS MANUAL DE INSTRUCCIONES MANUEL D INSTRUCTIONS For customer Use Enter below the Model No and Serial No which are located on the top or bottom of the cabinet Retain this inf...

Page 2: ...rticular installation If this equipment does cause harmful interference to radio or television reception which can be determined by turning the equipment off and on the user is encouraged to try to correct the interference by one or more of the following measures Reorient or relocate the receiving antenna Increase the separation between the equipment and receiver Connect the equipment into an outl...

Page 3: ...lume level too much as this will block outside sounds making driving dangerous Stop the car before performing any complicated operations CONTENTS Control panel 5 Remote controller RM RK300 6 Getting started 7 Basic operations 7 Radio operations 8 Disc SD card USB memory operations 11 Playing a disc in the unit 11 Playing discs in the CD changer 11 Playing from an SD card 11 Playing from a USB memo...

Page 4: ... 1 2 Select a menu you want 3 Enter the selected menu To go back to the previous screen or exit the MENU screen press BACK repeatedly 4 Operate as instructed on the screen To go back to the MENU screen press MENU How to detach attach the control panel How to change the control panel angle When using the remote controller Caution Detaching Attaching Time countdown indicator ...

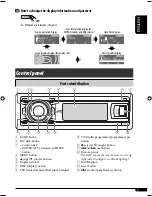
Page 5: ...niversal Serial Bus input terminal Parts identification Controlpanel 9 angle button p 0 eject button q 4 buttons w Remote sensor DO NOT expose the remote sensor to strong light direct sunlight or artificial lighting e BACK button r Reset button t control panel release button Source operation display Clock time display Small graphic display Large graphic display full display size Ex When tuner is s...

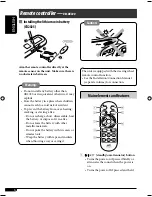
Page 6: ...ing a fire Do not recharge short disassemble heat the battery or dispose of it in a fire Do not leave the battery with other metallic materials Do not poke the battery with tweezers or similar tools Wrap the battery with tape and insulate when throwing away or saving it Caution Main elements and features 1 standby on attenuator button Turns the power on if pressed briefly or attenuates the sound w...

Page 7: ...if pressed or skips frequencies after pressed and held For SIRIUS XM Changes the channels if pressed briefly or changes the channels rapidly if pressed and held For CD CD Text MP3 WMA SD USB Changes the tracks if pressed or fast forwards or reverses the track if pressed and held While listening to an iPod or a D player in menu selecting mode Selects an item if pressed briefly Then press to confirm...

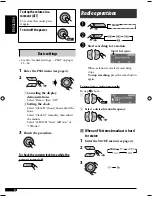
Page 8: ...en adjust the minute Select 24H 12H then 24Hours or 12Hours 3 Finish the procedure To check the current clock time while the power is turned off Radiooperations Ÿ Start searching for a station When a station is received searching stops To stop searching press the same button again To tune in to a station manually In step above 1 2 Select a desired station frequency Selected band appears Caution on...

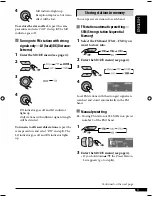
Page 9: ...be detected To tune in to all receivable stations repeat the same procedure and select DX in step 3 The LO indicator goes off and DX indicator lights up Storing stations in memory You can preset six stations for each band FM station automatic presetting SSM Strong station Sequential Memory 1 Select the FM band FM1 FM3 you want to store into 2 Enter the MODE menu see page 4 3 4 Local FM stations wi...

Page 10: ...e lists of the other FM bands by turning the control dial 7 Store the station When using the remote controller After tuning in to a station you want to preset Listening to a preset station 1 2 When using the remote controller Directly select the preset number ...

Page 11: ...the CD changer All discs in the magazine will be played repeatedly until you change the source Ejecting the magazine will also stop playback If you have changed the external input setting to Ext In see page 22 you cannot select the CD changer Playing from an SD card Before detaching the control panel turn off the power Ÿ Press in the SD card until you hear a clicking sound To eject the SD card pre...

Page 12: ...memory has been attached Playback starts from where it has been stopped previously If a different SD card or USB memory is currently attached playback starts from the beginning About MP3 and WMA tracks MP3 and WMA tracks words file and track are used interchangeably are recorded in folders About the CD changer It is recommended to use a JVC MP3 compatible CD changer with your unit You can also con...

Page 13: ...Confirm the selection The selected list appears on the display You can move to the other list by turning the control dial 5 Select a disc folder file from the list Only for MP3 WMA SD USB If you select the current disc folder highlighted on the screen its Folder File List appears 6 Starts playback When using the remote controller To directly select a disc To directly select a track of an audio CD ...

Page 14: ...table 4 Finish the procedure Intro Plays the beginning 15 seconds of Track All tracks of the current playback media Folder 1 First track of all folders of the current playback media Disc 2 First track of all the inserted discs Off Cancels Repeat Plays repeatedly Track The current track Folder 1 All tracks of the current folder Disc 2 All tracks of the inserted discs Off Cancels Random Plays at ran...

Page 15: ... Selecting the DSP modes DSP You can create a more acoustic sound field such as in a theater hall etc When crossover network see page 18 is activated the DSP mode is fixed to Defeat DSP modes Defeat No acoustic effect is applied Theater Hall Club Dome Studio V Cancel Voice Cancel Reduces the vocal sounds Good for mastering your favorite songs Karaoke Enter the DSP menu see page 4 Ÿ Select one of t...

Page 16: ...ition selected in step 3 The memorized setting is recalled next time you select the seat position To change the measuring unit 6 Repeat steps 4 and 5 to adjust the distance for the other speakers 7 Finish the procedure Activating BBE Digital BBE Digital is a digital processing method to restore the brilliance and clarity of the original live sound in recording broadcasts etc When a speaker reprodu...

Page 17: ...and width Q To adjust the other bands press BACK Then repeat steps 3 to 6 7 Finish the procedure Once you have made adjustments it is memorized The memorized setting is recalled next time you select Parametric EQ Storing your own sound modes 1 Select a sound mode 2 Select a frequency band 3 Adjust the enhanced level for the selected frequency band 4 Repeat steps 2 and 3 to adjust the other frequen...

Page 18: ...peaker balance Bal balance Adjust the left and right speaker balance Activating crossover network By activating crossover network you can allocate different frequency range of sound signals to different speakers to match their characteristic If you have installed the 3 way network speaker system in the car make sure of the following Before using the system activate crossover network and preset the...

Page 19: ...g to the connected speakers 1 6kHz 16 0kHz Front HPF and Rear LPF 31 5 Hz 200 0Hz Rear HPF 4 Adjust the continuity of the sound among speakers slope To adjust subwoofer output S woofer 1 Adjust the output level 2 Select a cut off frequency according to the connected subwoofer 3 Adjust the continuity of the sound among speakers slope To adjust the input level of each source Vol Adj This setting is ...

Page 20: ...on On Initial Off An animation screen appears when you turn on or off the power change the source and when you select an EQ MENU or DSP Cancels Clock H Hour adjustment 1 12 0 23 Initial 1 1 00AM See also page 8 for setting Clock M Minute adjustment 00 59 Initial 00 1 00AM See also page 8 for setting 24H 12H Time display mode 12Hours Initial 24Hours See also page 8 for setting Clock Adj 1 Time disp...

Page 21: ...tion display while playing MP3 WMA tracks Cancels Theme Display theme Large 1 Initial or 2 Small 1 Initial or 2 Select the display theme for large graphic display 5 See page 23 for setting Select the display theme for small graphic display 5 See page 23 for setting IF Band Intermediate frequency band Auto Initial Wide Increases the tuner selectivity to reduce interference noises between close stat...

Page 22: ...ove 31 Tel Telephone muting Muting 1 Muting 2 Off Initial Select either one which mutes the sounds while using a cellular phone If CD CD CH SD USB iPod D player has been selected as the source playback pauses during telephone muting Cancels Amp Gain Amplifier gain control High PWR Low PWR Off Volume 00 Volume 50 Volume 00 Volume 30 Select this if the maximum power of the speaker is less than 50 W ...

Page 23: ...t the dimmer end time 24Hours 0 23 12Hours 1A 1AM 12A 12AM 1P 1PM 12P 12PM 4 Finish the procedure Selecting the graphic theme You can select the graphic theme for large and small display sizes see also page 5 1 Select Theme from the PSM menu 2 Select the size of the display 3 Select the theme 4 Repeat steps 2 and 3 to select the other display size and theme 5 Finish the procedure To show the selec...

Page 24: ...M AM tuner Select a station For CDs in this unit Insert a CD For CDs in the CD changer Select CD CH then select a disc number For external component Select LINE IN or EXT IN 2 Enter the TITLE menu see page 4 3 Assign a title 1 Select a character set A A Z upper case a a z lower case 0 numbers and symbols Á Accented letters upper case á Accented letters lower case back to the beginning For availabl...

Page 25: ... Information update If channels are updated after subscription updating starts automatically The following appears and no sound can be heard For SIRIUS Satellite radio Channels Updating XX Completed For XM Satellite radio UPDATING Update takes a few minutes to complete During update you cannot operate your satellite radio Changes every 20 of update is completion ex 20 40 60 Activate your SIRIUS su...

Page 26: ...n is done for about 15 seconds Category Search is canceled 4 Contact XM Satellite radio on the internet at http xmradio com activation to activate your subscription or you can call 1 800 XM RADIO 1 800 967 2346 Once completed the unit tunes in to one of the available channels Channel 4 or higher Listening to the SIRIUS Satellite radio 1 2 3 Select a category You can tune in to all the channels of ...

Page 27: ...hannels for each band Ex Storing a SIRIUS channel into preset number 4 of the SR1 band 1 2 Holding the button displays the User Preset Channel List see step 6 on the right column 3 Enter the MODE menu see page 4 4 Select Preset In Channel Search channel name and channel number appear on the display during search While searching invalid and unsubscribed channels are skipped Checking the XM Satellit...

Page 28: ...hted on the display its channel list appears Holding 5 also shows the Category List while listening to a channel Selecting a channel from the list 1 Enter the MODE menu see page 4 2 Select Channel 3 4 Select a channel you want You can move to the other lists by turning the control dial 5 Finish the procedure To change the display information while listening to a channel Category name and channel n...

Page 29: ...ils refer also to the manual supplied with the interface adapter Caution Make sure to turn off this unit or turn off the vehicle s ignition switch before connecting or disconnecting the iPod or D player Preparations Make sure Changer is selected for the external input setting see page 22 Ÿ Playback starts automatically from where it has been paused 1 or stopped 2 previously Adjust the volume Adjus...

Page 30: ...ts automatically If the selected item has another layer you will enter the layer Repeat steps 2 and 3 until the desired track is played Holding 4 can skip 10 items at a time Selecting the playback modes 1 Enter the MODE menu see page 4 2 Select one of the playback modes 3 Select an item see table below 4 Finish the procedure Repeat play One Functions the same as Repeat One of the iPod or Repeat Mo...

Page 31: ...recording surface When storing a disc into its case gently insert the disc around the center holder with the printed surface facing up Make sure to store discs into the cases after use Otherexternalcomponent operations You can connect an external component to the LINE IN plugs on the rear or to the CD changer jack on the rear using the Line Input Adapter KS U57 not supplied or AUX Input Adapter KS...

Page 32: ...URCE on the unit you can also turn on the power If the source is ready playback also starts Turning off the power If you turn off the power while listening to a disc disc play will start from where playback has been stopped previously next time you turn on the power Tuner operations Storing stations in memory During SSM search All previously stored stations are erased and stations are stored newly...

Page 33: ... pickup lens inside the unit is dirty CD R CD RW on which the files are written with Packet Write method There are improper recording conditions missing data etc or media conditions stained scratched warped etc CD RWs may require a longer readout time since the reflectance of CD RWs is lower than that of regular CDs Do not use the following CD Rs or CD RWs Discs with stickers labels or protective ...

Page 34: ...ttached properly or the connection might be loose It is not recommended to use a USB memory wider than 20 mm as it will block you from pressing some buttons on the control panel If the connected USB memory does not have the correct files No Files appears and the unit returns to the previous source This unit can show Tag Version 1 0 1 1 2 2 2 3 or 2 4 for MP3 WMA files This unit can play back MP3 f...

Page 35: ...ect may not be obtained You cannot adjust the effect level and speaker number when Defeat is selected with crossover network activated Storing your own sound modes If you do not want to store your current adjustment but only to apply the adjustment to the current playback source press MENU to go back to the operation screen of the current source Adjustment you made remains effective until you sele...

Page 36: ...llite radio visit http www xmradio com iPod or D player operations When you turn on this unit the iPod or D player is charged through this unit While the iPod or D player is connected all operations from the iPod or D player are disabled Perform all operations from this unit The text information may not be displayed correctly Some characters such as accented letters cannot be shown correctly on th...

Page 37: ...z 250 Hz 500 Hz 1 kHz 2 kHz 4 kHz 8 kHz 12 5kHz Flat 00 00 00 00 00 00 00 00 00 Hard Rock 06 06 04 02 00 00 02 04 02 R B 06 04 04 04 00 02 02 02 06 Pop 00 04 02 00 00 02 02 02 04 Jazz 06 04 02 02 02 02 02 06 04 Dance 08 04 02 00 04 02 00 02 02 Country 04 02 00 00 00 00 00 02 04 Reggae 06 02 00 00 02 04 04 04 06 Classic 04 06 04 02 00 00 02 04 00 User 1 00 00 00 00 00 00 00 00 00 User 2 00 00 00 00...

Page 38: ...he CD R CD RW cannot be skipped Insert a finalized CD R CD RW Finalize the CD R CD RW with the component which you used for recording Disc can be neither played back nor ejected Unlock the disc see page 14 Eject the disc forcibly see page 2 Disc cannot be recognized No Disc Loading Error or Eject Error appears Eject the disc forcibly see page 2 Disc sound is sometimes interrupted Stop playback whi...

Page 39: ...p to another file Do not add the extension code mp3 or wma to non MP3 or WMA tracks File Check keeps flashing on the display Readout time varies depending on the device Do not use too many hierarchy and folders Turn off the power then on again No Files appears on the display Play a device that contains tracks encoded in an appropriate format Not Support appears on the display and track skips The t...

Page 40: ...el information and it takes a few minutes to complete Either No Signal or NO SIGNAL appears on the display Move to an area where signals are stronger Either No Antenna or CHECK ANTENNA appears on the display Connect the antenna firmly Invalid Channel appears on the display for about 5 seconds then returns to the previous display while listening to the SIRIUS Satellite radio No broadcast on the sel...

Page 41: ... during playback Restart the playback operation using the control panel see page 29 No sound can be heard when connecting an iPod nano Disconnect the headphones from the iPod nano No sound can be heard ERROR 01 appears on the display when connecting a D player Disconnect the adapter from the D player Then connect it again No Files or No Track appears on the display No tracks are stored Import trac...

Page 42: ...es Level 10 dB Frequency Response 40 Hz to 20 000 Hz Level Impedance Line In 1 5 V 20 kΩ load full scale Line Out 5 0 V 20 kΩ load full scale Output Impedance 1 kΩ Subwoofer Out Level Impedance 2 0 V 20 kΩ load full scale Other Terminals LINE IN CD changer TUNER SECTION Frequency Range FM 87 5 MHz to 107 9 MHz with channel interval set to 200 kHz 87 5 MHz to 108 0 MHz with channel interval set to ...

Page 43: ...Frequency 48 kHz 44 1 kHz 32 kHz USB MEMORY Format FAT 12 16 32 Storage Less than 4 GB 1 partition type Playable Audio Format MP3 WMA Max Current Less than 500 mA MP3 Bit Rate 32 kbps 320 kbps Sampling Frequency MPEG 1 48 kHz 44 1 kHz 32 kHz MPEG 2 24 kHz 22 05 kHz 16 kHz MPEG 2 5 12 kHz 11 025 kHz 8 kHz WMA Bit Rate 5 kbps 320 kbps Sampling Frequency 8 kHz 48 kHz GENERAL Power Requirement Operati...

Page 44: ...th operation Please reset your unit Refer to page of How to reset your unit Still having trouble USA ONLY Call 1 800 252 5722 http www jvc com We can help you EN SP FR 0206DTSMDTJEIN 2006 Victor Company of Japan Limited ...

Page 45: ...tion à la batterie sinon l appareil serait sérieusement endommagé AVANT de connecter les fils d enceintes du cordon d alimentation aux enceintes vérifiez le câblage des enceintes de votre voiture 2006 Victor Company of Japan Limited Heat sink Sumidero térmico Dissipateur de chaleur WARNINGS To prevent short circuits we recommend that you disconnect the battery s negative terminal and make all elec...

Page 46: ...no dañar el fusible provisto en la parte posterior 1 Lorsque vous mettez l appareil à la verticale faire attention de ne pas endommager le fusible situé sur l arrière Bend the appropriate tabs to hold the sleeve firmly in place Doble las lengüetas apropiadas para retener firmemente la manga en su lugar Tordez les languettes appropriées pour maintenir le manchon en place Insert the two handles then...

Page 47: ...n du porte fusible connectée à la batterie de la voiture en dérivant l interrupteur d allumage 12 V constant To an accessory terminal in the fuse block A un terminal accesorio del bloque de fusibles Vers borne accessoire du porte fusible To the remote lead of other equipment or automatic antenna if any 200 mA max Al conductor remoto de otro equipo o de la antena automática si hubiere máx 200 mA Au...

Page 48: ...amente al los amplificador es externo s para obtener sonidos nítidos y evitar que se caliente el interior de la unidad Consulte la página 22 del MANUAL DE INSTRUCCIONES volumen separado El nivel de salida de línea de esta unidad permanece alto para que corresponda con los sonidos de alta fidelidad reproducidos por esta unidad Cuando conecte un amplificador externo a esta unidad disminuya el contro...

Page 49: ...Right high range speaker Altavoz de rango alto derecho Haut parleur hautes fréquences droit Left high range speaker Altavoz de rango alto izquierdo Haut parleur hautes fréquences gauche Left mid range speaker Altavoz de rango medio izquierdo Haut parleur moyennes fréquences gauche Right mid range speaker Altavoz de rango mediano derecho Haut parleur moyennes fréquences droit To subwoofer out A sal...

Page 50: ...io you can also connect XMDirectTM Universal Tuner Box separately purchased through this unit using JVC Smart Digital Adapter XMDJVC100 not supplied Para escuchar la radio satelital XM también puede conectar el Sintonizador universal XMDirect adquirido por separado al receptor mediante un adaptador Smart Digital XMDJVC100 de JVC no suministrado Pour écouter la radio satellite XM vous pouvez aussi ...

Page 51: ...ENGLISH For canceling the display demonstration see page 8 For installation and connections refer to the separate manual INSTRUCTIONS GET0365 001A U UH KD SH1000 CD RECEIVER KD SH1000 ...

Page 52: ...D OUTSIDE THE UNIT Warning If you need to operate the unit while driving be sure to look ahead carefully or you may be involved in a traffic accident Caution on volume setting Discs produce very little noise compared with other sources Lower the volume before playing a disc to avoid damaging the speakers by the sudden increase of the output level Notice The display window built in this unit has be...

Page 53: ...op the car before performing any complicated operations Temperature inside the car If you have parked the car for a long time in hot or cold weather wait until the temperature in the car becomes normal before operating the unit CONTENTS Control panel 5 Remote controller RM RK300 6 Getting started 7 Basic operations 7 Radio operations 8 Disc SD card USB memory operations 11 Playing a disc in the un...

Page 54: ... 1 2 Select a menu you want 3 Enter the selected menu To go back to the previous screen or exit the MENU screen press BACK repeatedly 4 Operate as instructed on the screen To go back to the MENU screen press MENU How to detach attach the control panel How to change the control panel angle When using the remote controller Caution Detaching Attaching Time countdown indicator ...

Page 55: ...niversal Serial Bus input terminal Parts identification Controlpanel 9 angle button p 0 eject button q 4 buttons w Remote sensor DO NOT expose the remote sensor to strong light direct sunlight or artificial lighting e BACK button r Reset button t control panel release button Source operation display Clock time display Small graphic display Large graphic display full display size Ex When tuner is s...

Page 56: ...accident To prevent the battery from over heating cracking or starting a fire Do not recharge short disassemble heat the battery or dispose of it in a fire Do not leave the battery with other metallic materials Do not poke the battery with tweezers or similar tools Wrap the battery with tape and insulate when throwing away or saving it Caution Main elements and features 1 standby on attenuator but...

Page 57: ...the band 8 4 buttons For FM AM Searches for stations if pressed or skips frequencies after pressed and held For CD CD Text MP3 WMA SD USB Changes the tracks if pressed or fast forwards or reverses the track if pressed and held While listening to an iPod or a D player in menu selecting mode Selects an item if pressed briefly Then press to confirm the selection Skips 10 items at a time if pressed an...

Page 58: ...t the hour Select Clock M minute then adjust the minute Select 24H 12H then 24Hours or 12Hours 3 Finish the procedure To check the current clock time while the power is turned off Radiooperations Ÿ Start searching for a station When a station is received searching stops To stop searching press the same button again To tune in to a station manually In step above 1 2 Select a desired station frequen...

Page 59: ...tations repeat the same procedure and select DX in step 3 The LO indicator goes off and DX indicator lights up Storing stations in memory You can preset six stations for each band FM station automatic presetting SSM Strong station Sequential Memory 1 Select the FM band FM1 FM3 you want to store into 2 Enter the MODE menu see page 4 3 4 Local FM stations with the strongest signals are searched and ...

Page 60: ...e lists of the other FM bands by turning the control dial 7 Store the station When using the remote controller After tuning in to a station you want to preset Listening to a preset station 1 2 When using the remote controller Directly select the preset number ...

Page 61: ...the CD changer All discs in the magazine will be played repeatedly until you change the source Ejecting the magazine will also stop playback If you have changed the external input setting to Ext In see page 21 you cannot select the CD changer Playing from an SD card Before detaching the control panel turn off the power Ÿ Press in the SD card until you hear a clicking sound To eject the SD card pre...

Page 62: ...memory has been attached Playback starts from where it has been stopped previously If a different SD card or USB memory is currently attached playback starts from the beginning About MP3 and WMA tracks MP3 and WMA tracks words file and track are used interchangeably are recorded in folders About the CD changer It is recommended to use a JVC MP3 compatible CD changer with your unit You can also con...

Page 63: ...Confirm the selection The selected list appears on the display You can move to the other list by turning the control dial 5 Select a disc folder file from the list Only for MP3 WMA SD USB If you select the current disc folder highlighted on the screen its Folder File List appears 6 Starts playback When using the remote controller To directly select a disc To directly select a track of an audio CD ...

Page 64: ...table 4 Finish the procedure Intro Plays the beginning 15 seconds of Track All tracks of the current playback media Folder 1 First track of all folders of the current playback media Disc 2 First track of all the inserted discs Off Cancels Repeat Plays repeatedly Track The current track Folder 1 All tracks of the current folder Disc 2 All tracks of the inserted discs Off Cancels Random Plays at ran...

Page 65: ... Selecting the DSP modes DSP You can create a more acoustic sound field such as in a theater hall etc When crossover network see page 18 is activated the DSP mode is fixed to Defeat DSP modes Defeat No acoustic effect is applied Theater Hall Club Dome Studio V Cancel Voice Cancel Reduces the vocal sounds Good for mastering your favorite songs Karaoke Enter the DSP menu see page 4 Ÿ Select one of t...

Page 66: ...ition selected in step 3 The memorized setting is recalled next time you select the seat position To change the measuring unit 6 Repeat steps 4 and 5 to adjust the distance for the other speakers 7 Finish the procedure Activating BBE Digital BBE Digital is a digital processing method to restore the brilliance and clarity of the original live sound in recording broadcasts etc When a speaker reprodu...

Page 67: ...and width Q To adjust the other bands press BACK Then repeat steps 3 to 6 7 Finish the procedure Once you have made adjustments it is memorized The memorized setting is recalled next time you select Parametric EQ Storing your own sound modes 1 Select a sound mode 2 Select a frequency band 3 Adjust the enhanced level for the selected frequency band 4 Repeat steps 2 and 3 to adjust the other frequen...

Page 68: ...cel the procedure press and hold POWER ATT ENTER The power turns off Finish the procedure indicator lights up in sequence with other indicators To cancel Crossover repeat the same procedure Make sure that X Over Off OK appears on the display indicator goes off Setting the sound modes SEL You can adjust the sound characteristics to your preference Enter the SEL menu see page 4 Ÿ Select a setting it...

Page 69: ...g to the connected speakers 1 6kHz 16 0kHz Front HPF and Rear LPF 31 5 Hz 200 0Hz Rear HPF 4 Adjust the continuity of the sound among speakers slope To adjust subwoofer output S woofer 1 Adjust the output level 2 Select a cut off frequency according to the connected subwoofer 3 Adjust the continuity of the sound among speakers slope To adjust the input level of each source Vol Adj This setting is ...

Page 70: ...urn on or off the power change the source and when you select an EQ MENU or DSP Cancels Clock H Hour adjustment 1 12 0 23 Initial 1 1 00AM See also page 8 for setting Clock M Minute adjustment 00 59 Initial 00 1 00AM See also page 8 for setting 24H 12H Time display mode 12Hours Initial 24Hours See also page 8 for setting Scroll 1 Once Initial Auto Off Scrolls the track information once Repeats scr...

Page 71: ...s but sound quality will not be degraded and the stereo effect will remain Beep Key touch tone On Initial Off Activates the key touch tone Deactivates the key touch tone Ext In 2 External input Changer Initial Ext In To use a JVC CD changer 14 or an Apple iPod or a JVC D player 24 To use any other external component 26 Tel Telephone muting Muting 1 Muting 2 Off Initial Select either one which mute...

Page 72: ...t the dimmer end time 24Hours 0 23 12Hours 1A 1AM 12A 12AM 1P 1PM 12P 12PM 4 Finish the procedure Selecting the graphic theme You can select the graphic theme for large and small display sizes see also page 5 1 Select Theme from the PSM menu 2 Select the size of the display 3 Select the theme 4 Repeat steps 2 and 3 to select the other display size and theme 5 Finish the procedure To show the selec...

Page 73: ...M AM tuner Select a station For CDs in this unit Insert a CD For CDs in the CD changer Select CD CH then select a disc number For external component Select LINE IN or EXT IN 2 Enter the TITLE menu see page 4 3 Assign a title 1 Select a character set A A Z upper case a a z lower case 0 numbers and symbols Á Accented letters upper case á Accented letters lower case back to the beginning For availabl...

Page 74: ...ils refer also to the manual supplied with the interface adapter Caution Make sure to turn off this unit or turn off the vehicle s ignition switch before connecting or disconnecting the iPod or D player Preparations Make sure Changer is selected for the external input setting see page 21 Ÿ Playback starts automatically from where it has been paused 1 or stopped 2 previously Adjust the volume Adjus...

Page 75: ...ts automatically If the selected item has another layer you will enter the layer Repeat steps 2 and 3 until the desired track is played Holding 4 can skip 10 items at a time Selecting the playback modes 1 Enter the MODE menu see page 4 2 Select one of the playback modes 3 Select an item see table below 4 Finish the procedure Repeat play One Functions the same as Repeat One of the iPod or Repeat Mo...

Page 76: ...t touch its recording surface When storing a disc into its case gently insert the disc around the center holder with the printed surface facing up Make sure to store discs into the cases after use Otherexternalcomponent operations You can connect an external component to the LINE IN plugs on the rear or to the CD changer jack on the rear using the Line Input Adapter KS U57 not supplied or AUX Inpu...

Page 77: ...it you can also turn on the power If the source is ready playback also starts Turning off the power If you turn off the power while listening to a disc disc play will start from where playback has been stopped previously next time you turn on the power Tuner operations Storing stations in memory During SSM search All previously stored stations are erased and stations are stored newly Received stat...

Page 78: ...rding conditions missing data etc or media conditions stained scratched warped etc CD RWs may require a longer readout time since the reflectance of CD RWs is lower than that of regular CDs Do not use the following CD Rs or CD RWs Discs with stickers labels or protective seal stuck to the surface Discs on which labels can be directly printed by an ink jet printer Using these discs under high tempe...

Page 79: ...w Tag Version 1 0 1 1 2 2 2 3 or 2 4 for MP3 WMA files This unit can play back MP3 files recorded in VBR variable bit rate Continued on the next page For SD card The maximum number of characters for folder name is 8 characters file names is 12 characters This unit cannot recognize folder with period on the folder name For USB memory The maximum number of characters for folder and file names is 25 ...

Page 80: ...rrectly on some vehicles particularly on those having a control dial for dimming In this case change the Dimmer setting to any one other than Auto If you change the Amp Gain setting from High PWR to Low PWR while the volume level is set higher than Volume 30 the unit automatically changes the volume level to Volume 30 Title assignment If you try to assign titles to more than 30 station frequencies...

Page 81: ...z 250 Hz 500 Hz 1 kHz 2 kHz 4 kHz 8 kHz 12 5kHz Flat 00 00 00 00 00 00 00 00 00 Hard Rock 06 06 04 02 00 00 02 04 02 R B 06 04 04 04 00 02 02 02 06 Pop 00 04 02 00 00 02 02 02 04 Jazz 06 04 02 02 02 02 02 06 04 Dance 08 04 02 00 04 02 00 02 02 Country 04 02 00 00 00 00 00 02 04 Reggae 06 02 00 00 02 04 04 04 06 Classic 04 06 04 02 00 00 02 04 00 User 1 00 00 00 00 00 00 00 00 00 User 2 00 00 00 00...

Page 82: ...hile listening to the radio Connect the antenna firmly Disc playback Disc cannot be played back Insert the disc correctly CD R CD RW cannot be played back Tracks on the CD R CD RW cannot be skipped Insert a finalized CD R CD RW Finalize the CD R CD RW with the component which you used for recording Disc can be neither played back nor ejected Unlock the disc see page 14 Eject the disc forcibly see ...

Page 83: ...in an appropriate format or to the next non copy protected WMA track No Music appears on the display Change the disc that contains MP3 WMA tracks Correct characters are not displayed e g album name This unit can only display letters capital A Z small a z numbers and a limited number of symbols and special characters see page 31 SD card USB memory playback Noise is generated The track played back i...

Page 84: ...er correctly and press the reset button of the CD changer Reset 1 Reset 7 appears on the display Press the reset button of the CD changer The CD changer does not work at all Reset the unit see page 2 Sounds DSP mode cannot be selected other modes than Defeat Only high range sound or low range sound is reproduced though full range speakers are connected Deactivate crossover network see page 18 iPod...

Page 85: ...from both the unit and iPod D player Then connect it again Reset 8 appears on the display Check the connection between the adapter and this unit The iPod s or D player s controls do not work after disconnecting from this unit Reset the iPod or D player Microsoft and Windows Media are either registered trademarks or trademarks of Microsoft Corporation in the United States and or other countries SD ...

Page 86: ...y Response 40 Hz to 20 000 Hz Signal to Noise Ratio 70 dB Level Impedance Line In 1 5 V 20 kΩ load full scale Line Out 5 0 V 20 kΩ load full scale Output Impedance 1 kΩ Subwoofer Out Level Impedance 2 0 V 20 kΩ load full scale Other Terminals LINE IN CD changer TUNER SECTION Frequency Range FM 87 5 MHz to 108 0 MHz AM 531 kHz to 1 602 kHz FM Tuner Usable Sensitivity 11 3 dBf 1 0 μV 75 Ω 50 dB Quie...

Page 87: ...ormat FAT 12 16 32 Storage Less than 4 GB 1 partition type Playable Audio Format MP3 WMA Max Current Less than 500 mA MP3 Bit Rate 32 kbps 320 kbps Sampling Frequency MPEG 1 48 kHz 44 1 kHz 32 kHz MPEG 2 24 kHz 22 05 kHz 16 kHz MPEG 2 5 12 kHz 11 025 kHz 8 kHz WMA Bit Rate 5 kbps 320 kbps Sampling Frequency 8 kHz 48 kHz GENERAL Power Requirement Operating Voltage DC 14 4 V 11 V to 16 V allowance G...

Page 88: ... 2006 Victor Company of Japan Limited EN TH 0206DTSMDTJEIN Having TROUBLE with operation Please reset your unit Refer to page of How to reset your unit ...

Page 89: ...ar and at the front with an impedance of 4 Ω to 8 Ω If the maximum power is less than 50 W change Amp Gain setting to prevent the speakers from being damaged see page 21 of the INSTRUCTIONS To prevent short circuit cover the terminals of the UNUSED leads with insulating tape The heat sink becomes very hot after use Be careful not to touch it when removing this unit PRECAUTIONS on power supply and ...

Page 90: ... Dashboard ºßÀπÈ ª á Install the unit at an angle of less than 30 µ µ Èß ÿ ª Õ Ë ÿ µË Ë 30 Õß 2 Bracket 3 Ëπ Õß 3 Pocket ª Flat type screws M5 8 mm 3 ŸÀ M5 8 3 Bracket 3 Ëπ Õß 3 Flat type screws M5 8 mm 3 ŸÀ M5 8 3 Do the required electrical connections µËÕ øµ Ë Àπ È ÈßÀ 1 When you stand the unit be careful not to damage the fuse on the rear 1 ËÕ ÿ µ Èß ÿ ª Õ Èπ ßÕ Ë ÀÈø Ï Ë π È À Bend the appropr...

Page 91: ...rple with black stripe Ë ß Left speaker rear æß È À ß Green 4 Not supplied for this unit 4 Ë È ÀÈ ÿ ª Õ π ô Ignition switch Ï ÿ Fuse block ºßø Red ß Yellow 5 À Õß 5 Black To metallic body or chassis of the car µËÕ ß À À Õ Õß πµá To a live terminal in the fuse block connecting to the car battery bypassing the ignition switch constant 12 V µËÕ È Ë øøÈ π ºßø Ï ËßµËÕ µ µÕ Ë πµ ˵ÈÕß È Ï ÿ 12 Ï ß Ë To ...

Page 92: ...ted No sound from the speakers Is the speaker output lead short circuited Sound is distorted Is the speaker output lead grounded Are the terminals of L and R speakers grounded in common Noise interfere with sounds Is the rear ground terminal connected to the car s chassis using shorter and thicker cords This unit becomes hot Is the speaker output lead grounded Are the terminals of L and R speakers...

Page 93: ... with black stripe White Gray with black stripe Gray Green with black stripe Green Purple with black stripe Ë ß Purple Ë ß Left mid range speaker æßæ í ß È π ô Right mid range speaker æßæ í ß È π When connecting the speakers high range mid range through the speaker output ËÕ µËÕ æß æ Ÿß æ ß ºË π È Ëß ÕÕ æß When connecting the speakers high range mid range through the external amplifiers to obtain ...

Page 94: ...ÿª Ï πÕ 3 5 mm stereo mini plug È π µÕ Õ π 3 5 D External component Õÿª Ï πÕ Set Changer for the external input setting See page 21 of the INSTRUCTIONS µ Èß Ë Changer ªìπ Ë Õÿª Ï πÕ ŸÀπÈ 21 π π CD changer jack ËÕß µËÕ Õß ËÕß Ëπ CD 7 Line Input Adapter KS U57 not supplied for this unit 7 Õ ª µÕ Ï È KS U57 Ë È ÀÈ ÿ ª Õ π È 6 Connecting cord supplied for your CD changer 6 µËÕ Ë ÀÈ À CD π Õ Ï External...

Page 95: ...or canceling the display demonstration see page 8 Untuk membatalkan tampilan demonstrasi lihat halaman 8 For installation and connections refer to the separate manual Untuk instalasi dan penyambungan lihat buku pedoman terpisah INSTRUCTIONS BUKU PETUNJUK GET0365 004A UN ...

Page 96: ...D OUTSIDE THE UNIT Warning If you need to operate the unit while driving be sure to look ahead carefully or you may be involved in a traffic accident Caution on volume setting Discs produce very little noise compared with other sources Lower the volume before playing a disc to avoid damaging the speakers by the sudden increase of the output level Notice The display window built in this unit has be...

Page 97: ...op the car before performing any complicated operations Temperature inside the car If you have parked the car for a long time in hot or cold weather wait until the temperature in the car becomes normal before operating the unit CONTENTS Control panel 5 Remote controller RM RK300 6 Getting started 7 Basic operations 7 Radio operations 8 Disc SD card USB memory operations 11 Playing a disc in the un...

Page 98: ... 1 2 Select a menu you want 3 Enter the selected menu To go back to the previous screen or exit the MENU screen press BACK repeatedly 4 Operate as instructed on the screen To go back to the MENU screen press MENU How to detach attach the control panel How to change the control panel angle When using the remote controller Caution Detaching Attaching Time countdown indicator ...

Page 99: ...niversal Serial Bus input terminal Parts identification Controlpanel 9 angle button p 0 eject button q 4 buttons w Remote sensor DO NOT expose the remote sensor to strong light direct sunlight or artificial lighting e BACK button r Reset button t control panel release button Source operation display Clock time display Small graphic display Large graphic display full display size Ex When tuner is s...

Page 100: ...accident To prevent the battery from over heating cracking or starting a fire Do not recharge short disassemble heat the battery or dispose of it in a fire Do not leave the battery with other metallic materials Do not poke the battery with tweezers or similar tools Wrap the battery with tape and insulate when throwing away or saving it Caution Main elements and features 1 standby on attenuator but...

Page 101: ...the band 8 4 buttons For FM AM Searches for stations if pressed or skips frequencies after pressed and held For CD CD Text MP3 WMA SD USB Changes the tracks if pressed or fast forwards or reverses the track if pressed and held While listening to an iPod or a D player in menu selecting mode Selects an item if pressed briefly Then press to confirm the selection Skips 10 items at a time if pressed an...

Page 102: ...t the hour Select Clock M minute then adjust the minute Select 24H 12H then 24Hours or 12Hours 3 Finish the procedure To check the current clock time while the power is turned off Radiooperations Ÿ Start searching for a station When a station is received searching stops To stop searching press the same button again To tune in to a station manually In step above 1 2 Select a desired station frequen...

Page 103: ...tations repeat the same procedure and select DX in step 3 The LO indicator goes off and DX indicator lights up Storing stations in memory You can preset six stations for each band FM station automatic presetting SSM Strong station Sequential Memory 1 Select the FM band FM1 FM3 you want to store into 2 Enter the MODE menu see page 4 3 4 Local FM stations with the strongest signals are searched and ...

Page 104: ...e lists of the other FM bands by turning the control dial 7 Store the station When using the remote controller After tuning in to a station you want to preset Listening to a preset station 1 2 When using the remote controller Directly select the preset number ...

Page 105: ...the CD changer All discs in the magazine will be played repeatedly until you change the source Ejecting the magazine will also stop playback If you have changed the external input setting to Ext In see page 21 you cannot select the CD changer Playing from an SD card Before detaching the control panel turn off the power Ÿ Press in the SD card until you hear a clicking sound To eject the SD card pre...

Page 106: ...memory has been attached Playback starts from where it has been stopped previously If a different SD card or USB memory is currently attached playback starts from the beginning About MP3 and WMA tracks MP3 and WMA tracks words file and track are used interchangeably are recorded in folders About the CD changer It is recommended to use a JVC MP3 compatible CD changer with your unit You can also con...

Page 107: ...Confirm the selection The selected list appears on the display You can move to the other list by turning the control dial 5 Select a disc folder file from the list Only for MP3 WMA SD USB If you select the current disc folder highlighted on the screen its Folder File List appears 6 Starts playback When using the remote controller To directly select a disc To directly select a track of an audio CD ...

Page 108: ...table 4 Finish the procedure Intro Plays the beginning 15 seconds of Track All tracks of the current playback media Folder 1 First track of all folders of the current playback media Disc 2 First track of all the inserted discs Off Cancels Repeat Plays repeatedly Track The current track Folder 1 All tracks of the current folder Disc 2 All tracks of the inserted discs Off Cancels Random Plays at ran...

Page 109: ... Selecting the DSP modes DSP You can create a more acoustic sound field such as in a theater hall etc When crossover network see page 18 is activated the DSP mode is fixed to Defeat DSP modes Defeat No acoustic effect is applied Theater Hall Club Dome Studio V Cancel Voice Cancel Reduces the vocal sounds Good for mastering your favorite songs Karaoke Enter the DSP menu see page 4 Ÿ Select one of t...

Page 110: ...ition selected in step 3 The memorized setting is recalled next time you select the seat position To change the measuring unit 6 Repeat steps 4 and 5 to adjust the distance for the other speakers 7 Finish the procedure Activating BBE Digital BBE Digital is a digital processing method to restore the brilliance and clarity of the original live sound in recording broadcasts etc When a speaker reprodu...

Page 111: ...and width Q To adjust the other bands press BACK Then repeat steps 3 to 6 7 Finish the procedure Once you have made adjustments it is memorized The memorized setting is recalled next time you select Parametric EQ Storing your own sound modes 1 Select a sound mode 2 Select a frequency band 3 Adjust the enhanced level for the selected frequency band 4 Repeat steps 2 and 3 to adjust the other frequen...

Page 112: ...cel the procedure press and hold POWER ATT ENTER The power turns off Finish the procedure indicator lights up in sequence with other indicators To cancel Crossover repeat the same procedure Make sure that X Over Off OK appears on the display indicator goes off Setting the sound modes SEL You can adjust the sound characteristics to your preference Enter the SEL menu see page 4 Ÿ Select a setting it...

Page 113: ...g to the connected speakers 1 6kHz 16 0kHz Front HPF and Rear LPF 31 5 Hz 200 0Hz Rear HPF 4 Adjust the continuity of the sound among speakers slope To adjust subwoofer output S woofer 1 Adjust the output level 2 Select a cut off frequency according to the connected subwoofer 3 Adjust the continuity of the sound among speakers slope To adjust the input level of each source Vol Adj This setting is ...

Page 114: ...urn on or off the power change the source and when you select an EQ MENU or DSP Cancels Clock H Hour adjustment 1 12 0 23 Initial 1 1 00AM See also page 8 for setting Clock M Minute adjustment 00 59 Initial 00 1 00AM See also page 8 for setting 24H 12H Time display mode 12Hours Initial 24Hours See also page 8 for setting Scroll 1 Once Initial Auto Off Scrolls the track information once Repeats scr...

Page 115: ...s but sound quality will not be degraded and the stereo effect will remain Beep Key touch tone On Initial Off Activates the key touch tone Deactivates the key touch tone Ext In 2 External input Changer Initial Ext In To use a JVC CD changer 14 or an Apple iPod or a JVC D player 24 To use any other external component 26 Tel Telephone muting Muting 1 Muting 2 Off Initial Select either one which mute...

Page 116: ...t the dimmer end time 24Hours 0 23 12Hours 1A 1AM 12A 12AM 1P 1PM 12P 12PM 4 Finish the procedure Selecting the graphic theme You can select the graphic theme for large and small display sizes see also page 5 1 Select Theme from the PSM menu 2 Select the size of the display 3 Select the theme 4 Repeat steps 2 and 3 to select the other display size and theme 5 Finish the procedure To show the selec...

Page 117: ...M AM tuner Select a station For CDs in this unit Insert a CD For CDs in the CD changer Select CD CH then select a disc number For external component Select LINE IN or EXT IN 2 Enter the TITLE menu see page 4 3 Assign a title 1 Select a character set A A Z upper case a a z lower case 0 numbers and symbols Á Accented letters upper case á Accented letters lower case back to the beginning For availabl...

Page 118: ...ils refer also to the manual supplied with the interface adapter Caution Make sure to turn off this unit or turn off the vehicle s ignition switch before connecting or disconnecting the iPod or D player Preparations Make sure Changer is selected for the external input setting see page 21 Ÿ Playback starts automatically from where it has been paused 1 or stopped 2 previously Adjust the volume Adjus...

Page 119: ...ts automatically If the selected item has another layer you will enter the layer Repeat steps 2 and 3 until the desired track is played Holding 4 can skip 10 items at a time Selecting the playback modes 1 Enter the MODE menu see page 4 2 Select one of the playback modes 3 Select an item see table below 4 Finish the procedure Repeat play One Functions the same as Repeat One of the iPod or Repeat Mo...

Page 120: ...t touch its recording surface When storing a disc into its case gently insert the disc around the center holder with the printed surface facing up Make sure to store discs into the cases after use Otherexternalcomponent operations You can connect an external component to the LINE IN plugs on the rear or to the CD changer jack on the rear using the Line Input Adapter KS U57 not supplied or AUX Inpu...

Page 121: ...it you can also turn on the power If the source is ready playback also starts Turning off the power If you turn off the power while listening to a disc disc play will start from where playback has been stopped previously next time you turn on the power Tuner operations Storing stations in memory During SSM search All previously stored stations are erased and stations are stored newly Received stat...

Page 122: ...rding conditions missing data etc or media conditions stained scratched warped etc CD RWs may require a longer readout time since the reflectance of CD RWs is lower than that of regular CDs Do not use the following CD Rs or CD RWs Discs with stickers labels or protective seal stuck to the surface Discs on which labels can be directly printed by an ink jet printer Using these discs under high tempe...

Page 123: ...w Tag Version 1 0 1 1 2 2 2 3 or 2 4 for MP3 WMA files This unit can play back MP3 files recorded in VBR variable bit rate Continued on the next page For SD card The maximum number of characters for folder name is 8 characters file names is 12 characters This unit cannot recognize folder with period on the folder name For USB memory The maximum number of characters for folder and file names is 25 ...

Page 124: ...rrectly on some vehicles particularly on those having a control dial for dimming In this case change the Dimmer setting to any one other than Auto If you change the Amp Gain setting from High PWR to Low PWR while the volume level is set higher than Volume 30 the unit automatically changes the volume level to Volume 30 Title assignment If you try to assign titles to more than 30 station frequencies...

Page 125: ...z 250 Hz 500 Hz 1 kHz 2 kHz 4 kHz 8 kHz 12 5kHz Flat 00 00 00 00 00 00 00 00 00 Hard Rock 06 06 04 02 00 00 02 04 02 R B 06 04 04 04 00 02 02 02 06 Pop 00 04 02 00 00 02 02 02 04 Jazz 06 04 02 02 02 02 02 06 04 Dance 08 04 02 00 04 02 00 02 02 Country 04 02 00 00 00 00 00 02 04 Reggae 06 02 00 00 02 04 04 04 06 Classic 04 06 04 02 00 00 02 04 00 User 1 00 00 00 00 00 00 00 00 00 User 2 00 00 00 00...

Page 126: ...hile listening to the radio Connect the antenna firmly Disc playback Disc cannot be played back Insert the disc correctly CD R CD RW cannot be played back Tracks on the CD R CD RW cannot be skipped Insert a finalized CD R CD RW Finalize the CD R CD RW with the component which you used for recording Disc can be neither played back nor ejected Unlock the disc see page 14 Eject the disc forcibly see ...

Page 127: ...in an appropriate format or to the next non copy protected WMA track No Music appears on the display Change the disc that contains MP3 WMA tracks Correct characters are not displayed e g album name This unit can only display letters capital A Z small a z numbers and a limited number of symbols and special characters see page 31 SD card USB memory playback Noise is generated The track played back i...

Page 128: ...er correctly and press the reset button of the CD changer Reset 1 Reset 7 appears on the display Press the reset button of the CD changer The CD changer does not work at all Reset the unit see page 2 Sounds DSP mode cannot be selected other modes than Defeat Only high range sound or low range sound is reproduced though full range speakers are connected Deactivate crossover network see page 18 iPod...

Page 129: ...from both the unit and iPod D player Then connect it again Reset 8 appears on the display Check the connection between the adapter and this unit The iPod s or D player s controls do not work after disconnecting from this unit Reset the iPod or D player Microsoft and Windows Media are either registered trademarks or trademarks of Microsoft Corporation in the United States and or other countries SD ...

Page 130: ...y Response 40 Hz to 20 000 Hz Signal to Noise Ratio 70 dB Level Impedance Line In 1 5 V 20 kΩ load full scale Line Out 5 0 V 20 kΩ load full scale Output Impedance 1 kΩ Subwoofer Out Level Impedance 2 0 V 20 kΩ load full scale Other Terminals LINE IN CD changer TUNER SECTION Frequency Range FM 87 5 MHz to 108 0 MHz AM 531 kHz to 1 602 kHz FM Tuner Usable Sensitivity 11 3 dBf 1 0 μV 75 Ω 50 dB Quie...

Page 131: ...ormat FAT 12 16 32 Storage Less than 4 GB 1 partition type Playable Audio Format MP3 WMA Max Current Less than 500 mA MP3 Bit Rate 32 kbps 320 kbps Sampling Frequency MPEG 1 48 kHz 44 1 kHz 32 kHz MPEG 2 24 kHz 22 05 kHz 16 kHz MPEG 2 5 12 kHz 11 025 kHz 8 kHz WMA Bit Rate 5 kbps 320 kbps Sampling Frequency 8 kHz 48 kHz GENERAL Power Requirement Operating Voltage DC 14 4 V 11 V to 16 V allowance G...

Page 132: ...imited EN IN 0206DTSMDTJEIN Having TROUBLE with operation Please reset your unit Refer to page of How to reset your unit Ada MASALAH dengan cara pengoperasian Setel kembali unit Anda Lihat halaman mengenai Bagaimana mereset unit anda ...

Page 133: ...er leads of the power cord to the car battery otherwise the unit will be seriously damaged BEFORE connecting the speaker leads of the power cord to the speakers check the speaker wiring in your car 2006 Victor Company of Japan Limited INDONESIA Alat penerima ini didisain untuk beroperasi hanya pada 12 V DC sistem listrik tanah NEGATIVE Jika kendaraan anda tidak memiliki sistem ini sebuah pembalik ...

Page 134: ... screws M5 8 mm 3 Sekrup sekrup tipe rata M5 8 mm 3 Bracket 3 Breket 3 Flat type screws M5 8 mm 3 Sekrup sekrup tipe rata M5 8 mm 3 Do the required electrical connections Lakukan penyambungan penyambungan listrik yang diperlukan 1 When you stand the unit be careful not to damage the fuse on the rear 1 Ketika anda memberdirikan alat penerima hati hati untuk tidak merusak sekring di belakang Bend th...

Page 135: ...ker kanan belakang Purple with black stripe Ungu dengan strip hitam Left speaker rear Speaker kiri belakang Green Hijau 4 Not supplied for this unit 4 Tidak disediakan untuk alat penerima Ignition switch Saklar kontak Fuse block Blok sekring Red Merah Yellow 5 Kuning 5 Black Hitam To metallic body or chassis of the car Ke besi bodi atau casis dari mobil tersebut To a live terminal in the fuse bloc...

Page 136: ... work at all Have you reset your unit PEMECAHAN MASALAH Sekring meledak Apakah ujung ujung merah dan hitam tersambung dengan benar Power tidak dapat dihidupkan Apakah ujung kuning sudah tersambung Tidak ada suara dari speaker Apakah ujung keluaran speaker terhubung pendek Suara terdistorsi Apakah ujung keluaran speaker sudah ditanahkan Apakah terminal terminal dari speaker speaker L dan R sudah di...

Page 137: ...ite with black stripe Putih dengan strip hitam White Putih Gray with black stripe Abu abu dengan strip hitam Gray Abu abu Green with black stripe Hijau dengan strip hitam Green Hijau Purple with black stripe Ungu dengan strip hitam Purple Ungu Left mid range speaker Speaker kiri cakupan sedang Right mid range speaker Speaker kanan cakupan sedang When connecting the speakers high range mid range th...

Page 138: ...Set Changer for the external input setting See page 21 of the INSTRUCTIONS Aturlah Changer untuk pengaturan input eksternal Lihat halaman 21 dari BUKU PETUNJUK CD changer jack Konektor CD changer 7 Line Input Adapter KS U57 not supplied for this unit 7 Adapter Input Saluran KS U57 tidak disediakan untuk alat penerima ini 6 Connecting cord supplied for your CD changer 6 Penyambung sinyal disediakan...

Page 139: ...ENGLISH CD RECEIVER KD SH1000 KD SH1000 For canceling the display demonstration see page 8 For installation and connections refer to the separate manual INSTRUCTIONS GET0365 005A UT ...

Page 140: ...D OUTSIDE THE UNIT Warning If you need to operate the unit while driving be sure to look ahead carefully or you may be involved in a traffic accident Caution on volume setting Discs produce very little noise compared with other sources Lower the volume before playing a disc to avoid damaging the speakers by the sudden increase of the output level Notice The display window built in this unit has be...

Page 141: ...op the car before performing any complicated operations Temperature inside the car If you have parked the car for a long time in hot or cold weather wait until the temperature in the car becomes normal before operating the unit CONTENTS Control panel 5 Remote controller RM RK300 6 Getting started 7 Basic operations 7 Radio operations 8 Disc SD card USB memory operations 11 Playing a disc in the un...

Page 142: ... 1 2 Select a menu you want 3 Enter the selected menu To go back to the previous screen or exit the MENU screen press BACK repeatedly 4 Operate as instructed on the screen To go back to the MENU screen press MENU How to detach attach the control panel How to change the control panel angle When using the remote controller Caution Detaching Attaching Time countdown indicator ...

Page 143: ...niversal Serial Bus input terminal Parts identification Controlpanel 9 angle button p 0 eject button q 4 buttons w Remote sensor DO NOT expose the remote sensor to strong light direct sunlight or artificial lighting e BACK button r Reset button t control panel release button Source operation display Clock time display Small graphic display Large graphic display full display size Ex When tuner is s...

Page 144: ...accident To prevent the battery from over heating cracking or starting a fire Do not recharge short disassemble heat the battery or dispose of it in a fire Do not leave the battery with other metallic materials Do not poke the battery with tweezers or similar tools Wrap the battery with tape and insulate when throwing away or saving it Caution Main elements and features 1 standby on attenuator but...

Page 145: ...the band 8 4 buttons For FM AM Searches for stations if pressed or skips frequencies after pressed and held For CD CD Text MP3 WMA SD USB Changes the tracks if pressed or fast forwards or reverses the track if pressed and held While listening to an iPod or a D player in menu selecting mode Selects an item if pressed briefly Then press to confirm the selection Skips 10 items at a time if pressed an...

Page 146: ...t the hour Select Clock M minute then adjust the minute Select 24H 12H then 24Hours or 12Hours 3 Finish the procedure To check the current clock time while the power is turned off Radiooperations Ÿ Start searching for a station When a station is received searching stops To stop searching press the same button again To tune in to a station manually In step above 1 2 Select a desired station frequen...

Page 147: ...tations repeat the same procedure and select DX in step 3 The LO indicator goes off and DX indicator lights up Storing stations in memory You can preset six stations for each band FM station automatic presetting SSM Strong station Sequential Memory 1 Select the FM band FM1 FM3 you want to store into 2 Enter the MODE menu see page 4 3 4 Local FM stations with the strongest signals are searched and ...

Page 148: ...e lists of the other FM bands by turning the control dial 7 Store the station When using the remote controller After tuning in to a station you want to preset Listening to a preset station 1 2 When using the remote controller Directly select the preset number ...

Page 149: ...the CD changer All discs in the magazine will be played repeatedly until you change the source Ejecting the magazine will also stop playback If you have changed the external input setting to Ext In see page 21 you cannot select the CD changer Playing from an SD card Before detaching the control panel turn off the power Ÿ Press in the SD card until you hear a clicking sound To eject the SD card pre...

Page 150: ...memory has been attached Playback starts from where it has been stopped previously If a different SD card or USB memory is currently attached playback starts from the beginning About MP3 and WMA tracks MP3 and WMA tracks words file and track are used interchangeably are recorded in folders About the CD changer It is recommended to use a JVC MP3 compatible CD changer with your unit You can also con...

Page 151: ...Confirm the selection The selected list appears on the display You can move to the other list by turning the control dial 5 Select a disc folder file from the list Only for MP3 WMA SD USB If you select the current disc folder highlighted on the screen its Folder File List appears 6 Starts playback When using the remote controller To directly select a disc To directly select a track of an audio CD ...

Page 152: ...table 4 Finish the procedure Intro Plays the beginning 15 seconds of Track All tracks of the current playback media Folder 1 First track of all folders of the current playback media Disc 2 First track of all the inserted discs Off Cancels Repeat Plays repeatedly Track The current track Folder 1 All tracks of the current folder Disc 2 All tracks of the inserted discs Off Cancels Random Plays at ran...

Page 153: ... Selecting the DSP modes DSP You can create a more acoustic sound field such as in a theater hall etc When crossover network see page 18 is activated the DSP mode is fixed to Defeat DSP modes Defeat No acoustic effect is applied Theater Hall Club Dome Studio V Cancel Voice Cancel Reduces the vocal sounds Good for mastering your favorite songs Karaoke Enter the DSP menu see page 4 Ÿ Select one of t...

Page 154: ...ition selected in step 3 The memorized setting is recalled next time you select the seat position To change the measuring unit 6 Repeat steps 4 and 5 to adjust the distance for the other speakers 7 Finish the procedure Activating BBE Digital BBE Digital is a digital processing method to restore the brilliance and clarity of the original live sound in recording broadcasts etc When a speaker reprodu...

Page 155: ...and width Q To adjust the other bands press BACK Then repeat steps 3 to 6 7 Finish the procedure Once you have made adjustments it is memorized The memorized setting is recalled next time you select Parametric EQ Storing your own sound modes 1 Select a sound mode 2 Select a frequency band 3 Adjust the enhanced level for the selected frequency band 4 Repeat steps 2 and 3 to adjust the other frequen...

Page 156: ...cel the procedure press and hold POWER ATT ENTER The power turns off Finish the procedure indicator lights up in sequence with other indicators To cancel Crossover repeat the same procedure Make sure that X Over Off OK appears on the display indicator goes off Setting the sound modes SEL You can adjust the sound characteristics to your preference Enter the SEL menu see page 4 Ÿ Select a setting it...

Page 157: ...g to the connected speakers 1 6kHz 16 0kHz Front HPF and Rear LPF 31 5 Hz 200 0Hz Rear HPF 4 Adjust the continuity of the sound among speakers slope To adjust subwoofer output S woofer 1 Adjust the output level 2 Select a cut off frequency according to the connected subwoofer 3 Adjust the continuity of the sound among speakers slope To adjust the input level of each source Vol Adj This setting is ...

Page 158: ...urn on or off the power change the source and when you select an EQ MENU or DSP Cancels Clock H Hour adjustment 1 12 0 23 Initial 1 1 00AM See also page 8 for setting Clock M Minute adjustment 00 59 Initial 00 1 00AM See also page 8 for setting 24H 12H Time display mode 12Hours Initial 24Hours See also page 8 for setting Scroll 1 Once Initial Auto Off Scrolls the track information once Repeats scr...

Page 159: ...s but sound quality will not be degraded and the stereo effect will remain Beep Key touch tone On Initial Off Activates the key touch tone Deactivates the key touch tone Ext In 2 External input Changer Initial Ext In To use a JVC CD changer 14 or an Apple iPod or a JVC D player 24 To use any other external component 26 Tel Telephone muting Muting 1 Muting 2 Off Initial Select either one which mute...

Page 160: ...t the dimmer end time 24Hours 0 23 12Hours 1A 1AM 12A 12AM 1P 1PM 12P 12PM 4 Finish the procedure Selecting the graphic theme You can select the graphic theme for large and small display sizes see also page 5 1 Select Theme from the PSM menu 2 Select the size of the display 3 Select the theme 4 Repeat steps 2 and 3 to select the other display size and theme 5 Finish the procedure To show the selec...

Page 161: ...M AM tuner Select a station For CDs in this unit Insert a CD For CDs in the CD changer Select CD CH then select a disc number For external component Select LINE IN or EXT IN 2 Enter the TITLE menu see page 4 3 Assign a title 1 Select a character set A A Z upper case a a z lower case 0 numbers and symbols Á Accented letters upper case á Accented letters lower case back to the beginning For availabl...

Page 162: ...ils refer also to the manual supplied with the interface adapter Caution Make sure to turn off this unit or turn off the vehicle s ignition switch before connecting or disconnecting the iPod or D player Preparations Make sure Changer is selected for the external input setting see page 21 Ÿ Playback starts automatically from where it has been paused 1 or stopped 2 previously Adjust the volume Adjus...

Page 163: ...ts automatically If the selected item has another layer you will enter the layer Repeat steps 2 and 3 until the desired track is played Holding 4 can skip 10 items at a time Selecting the playback modes 1 Enter the MODE menu see page 4 2 Select one of the playback modes 3 Select an item see table below 4 Finish the procedure Repeat play One Functions the same as Repeat One of the iPod or Repeat Mo...

Page 164: ...t touch its recording surface When storing a disc into its case gently insert the disc around the center holder with the printed surface facing up Make sure to store discs into the cases after use Otherexternalcomponent operations You can connect an external component to the LINE IN plugs on the rear or to the CD changer jack on the rear using the Line Input Adapter KS U57 not supplied or AUX Inpu...

Page 165: ...it you can also turn on the power If the source is ready playback also starts Turning off the power If you turn off the power while listening to a disc disc play will start from where playback has been stopped previously next time you turn on the power Tuner operations Storing stations in memory During SSM search All previously stored stations are erased and stations are stored newly Received stat...

Page 166: ...rding conditions missing data etc or media conditions stained scratched warped etc CD RWs may require a longer readout time since the reflectance of CD RWs is lower than that of regular CDs Do not use the following CD Rs or CD RWs Discs with stickers labels or protective seal stuck to the surface Discs on which labels can be directly printed by an ink jet printer Using these discs under high tempe...

Page 167: ...w Tag Version 1 0 1 1 2 2 2 3 or 2 4 for MP3 WMA files This unit can play back MP3 files recorded in VBR variable bit rate Continued on the next page For SD card The maximum number of characters for folder name is 8 characters file names is 12 characters This unit cannot recognize folder with period on the folder name For USB memory The maximum number of characters for folder and file names is 25 ...

Page 168: ...rrectly on some vehicles particularly on those having a control dial for dimming In this case change the Dimmer setting to any one other than Auto If you change the Amp Gain setting from High PWR to Low PWR while the volume level is set higher than Volume 30 the unit automatically changes the volume level to Volume 30 Title assignment If you try to assign titles to more than 30 station frequencies...

Page 169: ...z 250 Hz 500 Hz 1 kHz 2 kHz 4 kHz 8 kHz 12 5kHz Flat 00 00 00 00 00 00 00 00 00 Hard Rock 06 06 04 02 00 00 02 04 02 R B 06 04 04 04 00 02 02 02 06 Pop 00 04 02 00 00 02 02 02 04 Jazz 06 04 02 02 02 02 02 06 04 Dance 08 04 02 00 04 02 00 02 02 Country 04 02 00 00 00 00 00 02 04 Reggae 06 02 00 00 02 04 04 04 06 Classic 04 06 04 02 00 00 02 04 00 User 1 00 00 00 00 00 00 00 00 00 User 2 00 00 00 00...

Page 170: ...hile listening to the radio Connect the antenna firmly Disc playback Disc cannot be played back Insert the disc correctly CD R CD RW cannot be played back Tracks on the CD R CD RW cannot be skipped Insert a finalized CD R CD RW Finalize the CD R CD RW with the component which you used for recording Disc can be neither played back nor ejected Unlock the disc see page 14 Eject the disc forcibly see ...

Page 171: ...in an appropriate format or to the next non copy protected WMA track No Music appears on the display Change the disc that contains MP3 WMA tracks Correct characters are not displayed e g album name This unit can only display letters capital A Z small a z numbers and a limited number of symbols and special characters see page 31 SD card USB memory playback Noise is generated The track played back i...

Page 172: ...er correctly and press the reset button of the CD changer Reset 1 Reset 7 appears on the display Press the reset button of the CD changer The CD changer does not work at all Reset the unit see page 2 Sounds DSP mode cannot be selected other modes than Defeat Only high range sound or low range sound is reproduced though full range speakers are connected Deactivate crossover network see page 18 iPod...

Page 173: ...from both the unit and iPod D player Then connect it again Reset 8 appears on the display Check the connection between the adapter and this unit The iPod s or D player s controls do not work after disconnecting from this unit Reset the iPod or D player Microsoft and Windows Media are either registered trademarks or trademarks of Microsoft Corporation in the United States and or other countries SD ...

Page 174: ...y Response 40 Hz to 20 000 Hz Signal to Noise Ratio 70 dB Level Impedance Line In 1 5 V 20 kΩ load full scale Line Out 5 0 V 20 kΩ load full scale Output Impedance 1 kΩ Subwoofer Out Level Impedance 2 0 V 20 kΩ load full scale Other Terminals LINE IN CD changer TUNER SECTION Frequency Range FM 87 5 MHz to 108 0 MHz AM 531 kHz to 1 602 kHz FM Tuner Usable Sensitivity 11 3 dBf 1 0 μV 75 Ω 50 dB Quie...

Page 175: ...ormat FAT 12 16 32 Storage Less than 4 GB 1 partition type Playable Audio Format MP3 WMA Max Current Less than 500 mA MP3 Bit Rate 32 kbps 320 kbps Sampling Frequency MPEG 1 48 kHz 44 1 kHz 32 kHz MPEG 2 24 kHz 22 05 kHz 16 kHz MPEG 2 5 12 kHz 11 025 kHz 8 kHz WMA Bit Rate 5 kbps 320 kbps Sampling Frequency 8 kHz 48 kHz GENERAL Power Requirement Operating Voltage DC 14 4 V 11 V to 16 V allowance G...

Page 176: ... 2006 Victor Company of Japan Limited EN CT 0206DTSMDTJEIN Having TROUBLE with operation Please reset your unit Refer to page of How to reset your unit ...

Page 177: ...dealer It is recommended to connect to the speakers with maximum power of more than 50 W both at the rear and at the front with an impedance of 4 Ω to 8 Ω If the maximum power is less than 50 W change Amp Gain setting to prevent the speakers from being damaged see page 21 of the INSTRUCTIONS To prevent short circuit cover the terminals of the UNUSED leads with insulating tape The heat sink becomes...

Page 178: ...lied for this unit 3 ʿᎲʹጅಏաé Screw option ᒘീਐ ڄ Stay option ᆉ ށ ڄ Fire wall Վ ػ Dashboard ᄭ ػڷ Install the unit at an angle of less than 30 અʹጅϯ Ϛ ؠ 30 ڄ Դܾé 2 Bracket 3 Ёࣙ 3 Pocket ڏ ೋ Flat type screws M5 8 mm 3 Ꮓᒘീਐ M5 8 mm 3 Bracket 3 Ёࣙ 3 Flat type screws M5 8 mm 3 Ꮓᒘീਐ M5 8 mm 3 Do the required electrical connections නм ᄔ ྐڄ པ é 1 When you stand the unit be careful not to damage the fuse on t...

Page 179: ... ළᘕ Fuse block ۘᎳീవ Red и Yellow 5 ෦и 5 Black ෨и To metallic body or chassis of the car в ہ ᚙᝂ ԆԾ נ ᇟ To a live terminal in the fuse block connecting to the car battery bypassing the ignition switch constant 12 V вۘᎳീవ ۈڄ ᚙၷʪçۘᎳീవ ؠ Ծ ྐЖߟ ؠ अཔᓭ ළᘕ ݔ 12 V To an accessory terminal in the fuse block вۘᎳീవ ۈڄ ᚙၷʪ Blue with white stripe ᕇиઘЉΎи ঙ To the remote lead of other equipment 200 mA max вմ ʕ ڄ ჲ...

Page 180: ... B ENGLISH ˁ TROUBLESHOOTING The fuse blows Are the red and black leads connected correctly Power cannot be turned on Is the yellow lead connected No sound from the speakers Is the speaker output lead short circuited Sound is distorted Is the speaker output lead grounded Are the terminals of L and R speakers grounded in common Noise interfere with sounds Is the rear ground terminal connected to th...

Page 181: ...ࡍљࡗಚᑶወ Remote lead ჲ ለ White with black stripe ΎиઘЉ෨и ঙ White Ύи Gray with black stripe НиઘЉ෨и ঙ Gray Ни Green with black stripe ႋиઘЉ෨и ঙ Green ႋи Purple with black stripe ാиઘЉ෨и ঙ Purple ാи Left mid range speaker ˀ ಙᑵ Right mid range speaker ˀ ಙᑵ When connecting the speakers high range mid range through the speaker output ັ ཬಚᑶወ ોಚᑶወ Ąਣ ƅˁ ą When connecting the speakers high range mid range throu...

Page 182: ...ponents ોյ ોஈέ External component ોஈέ 3 5 mm stereo mini plug 3 5 mm Θᝂᑵਁі ࣙ D External component ોஈέ Set Changer for the external input setting See page 21 of the INSTRUCTIONS આ ʉ ׇ г Changer ಘၫወ ኍՠΈკ ب ऐ څ 21 ࡘê CD changer jack CD ಗၪ ࣙ 7 Line Input Adapter KS U57 not supplied for this unit 7 ྐཔ ʈቱ KS U57 ʿᎲʹጅಏա 6 Connecting cord supplied for your CD changer 6 ڄ CD ಗၪ క ڄ ྐង External component ોஈ...

Page 183: ...ctions refer to the separate manual Pour l installation et les raccordements se référer au manuel séparé INSTRUCTIONS MANUEL D INSTRUCTIONS GET0366 003A EX EU For canceling the display demonstration see page 8 Pour annuler la démonstration des affichages référez vous à la page 8 ...

Page 184: ...ic accident Caution on volume setting Discs produce very little noise compared with other sources Lower the volume before playing a disc to avoid damaging the speakers by the sudden increase of the output level Notice The display window built in this unit has been produced with high precision but it may have some ineffective dots This is inevitable and is not malfunction Note Only for EX model use...

Page 185: ...perations Temperature inside the car If you have parked the car for a long time in hot or cold weather wait until the temperature in the car becomes normal before operating the unit CONTENTS Control panel 5 Remote controller RM RK300 6 Getting started 7 Basic operations 7 Radio operations 8 FM RDS operations 11 Searching for your favorite FM RDS programme 11 Disc SD card USB memory operations 14 P...

Page 186: ... 2 Select a menu you want 3 Enter the selected menu To go back to the previous screen or exit the MENU screen press BACK repeatedly 4 Operate as instructed on the screen To go back to the MENU screen press MENU How to detach attach the control panel How to change the control panel angle 1 2 When using the remote controller Caution Detaching Attaching Time countdown indicator ...

Page 187: ...cation Controlpanel 9 T P traffic programme programme type button p 0 eject angle button q 4 buttons w Remote sensor DO NOT expose the remote sensor to strong light direct sunlight or artificial lighting e BACK button r Reset button t control panel release button Source operation display Text information display for FM RDS stations and DAB services Clock time display Small graphic display Large gr...

Page 188: ...acking or starting a fire Do not recharge short disassemble heat the battery or dispose of it in a fire Do not leave the battery with other metallic materials Do not poke the battery with tweezers or similar tools Wrap the battery with tape and insulate when throwing away or saving it Caution The unit is equipped with the steering wheel remote control function See the Installation Connection Manua...

Page 189: ... Selects the band 8 4 buttons For FM AM DAB Searches for stations or ensembles if pressed or skips frequencies after pressed and held For CD CD Text MP3 WMA SD USB Changes the tracks if pressed or fast forwards or reverses the track if pressed and held While listening to an iPod or a D player in menu selecting mode Selects an item if pressed briefly Then press to confirm the selection Skips 10 ite...

Page 190: ...t the hour Select Clock M minute then adjust the minute Select 24H 12H then 24Hours or 12Hours 3 Finish the procedure To check the current clock time while the power is turned off Radiooperations Ÿ Start searching for a station When a station is received searching stops To stop searching press the same button again To tune in to a station manually In step above 1 2 Select a desired station frequen...

Page 191: ...tations repeat the same procedure and select DX in step 3 The LO indicator goes off and DX indicator lights up Storing stations in memory You can preset six stations for each band FM station automatic presetting SSM Strong station Sequential Memory 1 Select the FM band FM1 FM3 you want to store into 2 Enter the MODE menu see page 4 3 4 Local FM stations with the strongest signals are searched and ...

Page 192: ...e station When using the remote controller After tuning in to a station you want to preset Listening to a preset station 1 2 Enter the MODE menu see page 4 3 4 5 Select a preset number You can move to the lists of the other FM bands by turning the control dial When using the remote controller Directly select the preset number ...

Page 193: ... PTY code of your favorite programmes PTY codes NEWS AFFAIRS INFO SPORT EDUCATE DRAMA CULTURE SCIENCE VARIED POP M music ROCK M music EASY M music LIGHT M music CLASSICS OTHER M music WEATHER FINANCE CHILDREN SOCIAL RELIGION PHONE IN TRAVEL LEISURE JAZZ COUNTRY NATION M music OLDIES FOLK M music DOCUMENT 1 Pop M 4 Classics 2 Rock M 5 Affairs 3 Easy M 6 Varied PTY Preset List appears Ÿ Select a PTY...

Page 194: ... in to another station or DAB service providing the related signals The TP indicator will stop flashing and remain lit Repeat steps 2 to 5 To deactivate the TA Standby Reception The TP indicator goes off PTY Standby Reception PTY Standby Reception allows the unit to switch temporarily to your favorite PTY programme from any source other than AM If DAB tuner is connected Standby Reception also work...

Page 195: ...n using programme search See also page 24 Using the message service RDS Radiotext RT What is RDS Radiotext RDS Radiotext is part of the RDS data signal to transmit various text information e g programme information phone numbers e mail and web addresses artist title information and news headlines The text service is part of the RDS broadcast One message may contain up to 64 characters The message ...

Page 196: ...ying discs in the CD changer All discs in the magazine will be played repeatedly until you change the source Ejecting the magazine will also stop playback If you have changed the external input setting to Ext In see page 25 you cannot select the CD changer Playing from an SD card Before detaching the control panel turn off the power Ÿ Press in the SD card until you hear a clicking sound To eject t...

Page 197: ... card or USB memory has been attached Playback starts from where it has been stopped previously If a different SD card or USB memory is currently attached playback starts from the beginning About MP3 and WMA tracks MP3 and WMA tracks words file and track are used interchangeably are recorded in folders About the CD changer It is recommended to use a JVC MP3 compatible CD changer with your unit You...

Page 198: ...Confirm the selection The selected list appears on the display You can move to the other list by turning the control dial 5 Select a disc folder file from the list Only for MP3 WMA SD USB If you select the current disc folder highlighted on the screen its Folder File List appears 6 Starts playback When using the remote controller To directly select a disc To directly select a track of an audio CD ...

Page 199: ...table 4 Finish the procedure Intro Plays the beginning 15 seconds of Track All tracks of the current playback media Folder 1 First track of all folders of the current playback media Disc 2 First track of all the inserted discs Off Cancels Repeat Plays repeatedly Track The current track Folder 1 All tracks of the current folder Disc 2 All tracks of the inserted discs Off Cancels Random Plays at ran...

Page 200: ...ndadjustments Selecting the DSP modes DSP You can create a more acoustic sound field such as in a theater hall etc When crossover network see page 21 is activated the DSP mode is fixed to Defeat DSP modes Defeat No acoustic effect is applied Theater Hall Club Dome Studio V Cancel Voice Cancel Reduces the vocal sounds Good for mastering your favorite songs Karaoke Enter the DSP menu see page 4 Ÿ Se...

Page 201: ...ition selected in step 3 The memorized setting is recalled next time you select the seat position To change the measuring unit 6 Repeat steps 4 and 5 to adjust the distance for the other speakers 7 Finish the procedure Activating BBE Digital BBE Digital is a digital processing method to restore the brilliance and clarity of the original live sound in recording broadcasts etc When a speaker reprodu...

Page 202: ...and width Q To adjust the other bands press BACK Then repeat steps 3 to 6 7 Finish the procedure Once you have made adjustments it is memorized The memorized setting is recalled next time you select Parametric EQ Storing your own sound modes 1 Select a sound mode 2 Select a frequency band 3 Adjust the enhanced level for the selected frequency band 4 Repeat steps 2 and 3 to adjust the other frequen...

Page 203: ...cel the procedure press and hold POWER ATT ENTER The power turns off Finish the procedure indicator lights up in sequence with other indicators To cancel Crossover repeat the same procedure Make sure that X Over Off OK appears on the display indicator goes off Setting the sound modes SEL You can adjust the sound characteristics to your preference Enter the SEL menu see page 4 Ÿ Select a setting it...

Page 204: ...g to the connected speakers 1 6kHz 16 0kHz Front HPF and Rear LPF 31 5 Hz 200 0Hz Rear HPF 4 Adjust the continuity of the sound among speakers slope To adjust subwoofer output S woofer 1 Adjust the output level 2 Select a cut off frequency according to the connected subwoofer 3 Adjust the continuity of the sound among speakers slope To adjust the input level of each source Vol Adj This setting is ...

Page 205: ... 0 23 1 12 Initial 0 0 00 See also page 8 for setting Clock M Minute adjustment 00 59 Initial 00 0 00 See also page 8 for setting 24H 12H Time display mode 12Hours 24Hours Initial See also page 8 for setting CLK Adj Clock adjustment Auto Initial Off The built in clock is automatically adjusted using the CT clock time data in the RDS signal Cancels Scroll 1 Once Initial Auto Off For track informati...

Page 206: ... the currently received signals become weak the unit switches to another station or service the programme may differ from the one currently received 13 31 When the currently received signals become weak the unit switches to another station broadcasting the same programme Cancels not selectable when DAB AF is set to ON TA Vol Traffic announcement volume 0 30 or 50 2 Initial 15 When a traffic progra...

Page 207: ...e playback pauses during telephone muting Cancels Amp Gain Amplifier gain control High PWR Low PWR Off Volume 00 Volume 50 Volume 00 Volume 30 Select this if the maximum power of the speaker is less than 50 W to avoid damaging the speakers Deactivates the built in amplifier 1 Some characters or symbols will not be shown correctly or will be blanked on the display 2 Depends on the amplifier gain co...

Page 208: ... For external component Select LINE IN or EXT IN 2 Enter the TITLE menu see page 4 3 Assign a title 1 Select a character set A A Z upper case a a z lower case 0 numbers and symbols Á Accented letters upper case á Accented letters lower case back to the beginning 2 Select a character Selecting the graphic theme You can select the graphic theme for large and small display sizes see also page 5 1 Sel...

Page 209: ...perating your iPod or D player Connect either one of the following separately purchased to the CD changer jack on the rear of this unit Interface adapter for iPod KS PD100 for controlling an iPod D player interface adapter KS PD500 for controlling a D player For connection see Installation Connection Manual separate volume For details refer also to the manual supplied with the interface adapter Ca...

Page 210: ... Ô Genre Ô Track Ô back to the beginning 3 Confirm the selection To move back to the previous menu press 5 If a track is selected playback starts automatically If the selected item has another layer you will enter the layer Repeat steps 2 and 3 until the desired track is played Holding 4 can skip 10 items at a time Adjust the volume Adjust the sound as you want See pages 18 22 Make sure the equali...

Page 211: ...nd without any annoying interference and signal distortion Furthermore it can carry text pictures and data When transmitting DAB combines several programmes called services to form one ensemble In addition each service called primary service can also be divided into its components called secondary service A typical ensemble has six or more programmes services broadcast at the same time By connecti...

Page 212: ...lect a service you want 2 Enter the MODE menu see page 4 3 Select List 4 Select a preset number You can move to the lists of the other DAB bands but cannot store a service for the other bands Select a service either primary or secondary to listen to To tune in to an ensemble manually Start searching for an ensemble as in step 1 2 Select a desired ensemble frequency When surrounding sounds are nois...

Page 213: ...volume level see page 24 PTY Standby Reception Operations are exactly the same as explained on page 11 for FM RDS stations PTY Standby Reception for DAB tuner works only using a dynamic PTY code You can neither store your favorite PTY nor activate PTY Standby Reception separately for the DAB tuner and for the FM tuner You can activate and deactivate PTY Standby Reception when the source is either ...

Page 214: ...vice providing these signals The ANN indicator will stop flashing and remain lit To deactivate the Announcement Standby Reception Select Off in step 3 above The ANN indicator goes off Tracing the same programme Alternative Frequency Reception You can keep listening to the same programme by activating the Alternative Frequency Reception While receiving a DAB service When driving in an area where a ...

Page 215: ... 22 Maintenance How to clean the connectors Frequent detachment will deteriorate the connectors To minimize this possibility periodically wipe the connectors with a cotton swab or cloth moistened with alcohol being careful not to damage the connectors Moisture condensation Moisture may condense on the lens inside the CD player in the following cases After starting the heater in the car If it becom...

Page 216: ...a correctly Network Tracking Reception will not operate correctly If a Traffic Announcement is received by TA Standby Reception the volume level automatically changes to the preset level TA VOL if the current level is lower than the preset level When Alternative Frequency Reception is activated with AF selected Network Tracking Reception is also activated automatically On the other hand Network Tr...

Page 217: ...detected if a disc includes both audio CD CD DA files and MP3 WMA files This unit can play back multi session discs however unclosed sessions will be skipped while playing Some CD Rs or CD RWs may not play back on this unit because of their disc characteristics or for the following reasons Discs are dirty or scratched Moisture condensation occurs on the lens inside the unit The pickup lens inside ...

Page 218: ...It is not recommended to use a USB memory wider than 20 mm as it will block you from pressing some buttons on the control panel If the connected USB memory does not have the correct files No Files appears and the unit returns to the previous source This unit can show Tag Version 1 0 1 1 2 2 2 3 or 2 4 for MP3 WMA files This unit can play back MP3 files recorded in VBR variable bit rate For SD card...

Page 219: ...ming In this case change the Dimmer setting to any one other than Auto If you change the Amp Gain setting from High PWR to Low PWR while the volume level is set higher than Volume 30 the unit automatically changes the volume level to Volume 30 Title assignment If you try to assign titles to more than 30 discs Name Full appears Delete unwanted titles before assignment Titles assigned to discs in th...

Page 220: ...eak Check the Network Tracking Reception see page 13 Loading does not disappear The receiving signal is temporarily too weak to receive a complete message although the service is available Check the Network Tracking Reception see page 13 Troubleshooting What appears to be trouble is not always serious Check the following points before calling a service center Preset frequency level settings for ea...

Page 221: ... code mp3 or wma to the file names Noise is generated Skip to another track or change the disc Do not add the extension code mp3 or wma to non MP3 or WMA tracks A longer readout time is required File Check keeps flashing on the display Do not use too many hierarchies and folders Tracks do not play back in the order you have intended them to play Playback order is determined when the files are reco...

Page 222: ... playing tracks from an SD card Detach the control panel and reinsert the SD card The control panel goes back to initial position Angle 1 While playing a track sound is sometimes interrupted MP3 WMA tracks have not been properly copied into the device Copy MP3 WMA tracks again into the device and try again Correct characters are not displayed e g album name This unit can only display letters capit...

Page 223: ...splay No tracks are stored Import tracks to the iPod or D player Reset 1 Reset 7 appears on the display Disconnect the adapter from both the unit and iPod D player Then connect it again Reset 8 appears on the display Check the connection between the adapter and this unit The iPod s or D player s controls do not work after disconnecting from this unit Reset the iPod or D player DAB tuner No DAB Sig...

Page 224: ... 2 kHz 2 5 kHz 3 2 kHz 4 kHz 5 kHz 6 3 kHz 8 kHz 10 kHz 12 5 kHz 16 kHz 20 kHz 31 frequencies Level 10 dB Frequency Response 40 Hz to 20 000 Hz Signal to Noise Ratio 70 dB Level Impedance Line In 1 5 V 20 kΩ load full scale Line Out 5 0 V 20 kΩ load full scale Output Impedance 1 kΩ Subwoofer Out Level Impedance 2 0 V 20 kΩ load full scale Other Terminals LINE IN CD changer TUNER SECTION Frequency ...

Page 225: ... 44 1 kHz 33 kHz MPEG 2 24 kHz 22 05 kHz 16 kHz WMA Bit Rate 8 kbps 192 kbps Sampling Frequency 48 kHz 44 1 kHz 32 kHz USB MEMORY Format FAT 12 16 32 Storage Less than 4 GB 1 partition type Playable Audio Format MP3 WMA Max Current Less than 500 mA MP3 Bit Rate 32 kbps 320 kbps Sampling Frequency MPEG 1 48 kHz 44 1 kHz 32 kHz MPEG 2 24 kHz 22 05 kHz 16 kHz MPEG 2 5 12 kHz 11 025 kHz 8 kHz WMA Bit ...

Page 226: ...ation Please reset your unit Refer to page of How to reset your unit Vous avez des PROBLÈMES de fonctionnement Réinitialisez votre appareil Référez vous à la page intitulée Comment réinitialiser votre appareil 2006 Victor Company of Japan Limited ...

Page 227: ...an 50 W both at the rear and at the front with an impedance of 4 Ω to 8 Ω If the maximum power is less than 50 W change Amp Gain setting to prevent the speakers from being damaged see page 25 of the INSTRUCTIONS To prevent short circuit cover the terminals of the UNUSED leads with insulating tape The heat sink becomes very hot after use Be careful not to touch it when removing this unit PRECAUTION...

Page 228: ... installation de l appareil sur le support de montage s assurer d utiliser des vis d une longueur de 8 mm Si des vis plus longues sont utilisées elles peuvent endommager l appareil 3 Not supplied for this unit 3 Non fourni avec cet autoradio Screw option Vis en option Stay option Hauban en option Fire wall Cloison Dashboard Tableau de bord Install the unit at an angle of less than 30 Installez l a...

Page 229: ...ion below 3 Connect the aerial cord 4 Finally connect the wiring harness to the unit If you have installed 3 way network speaker system in your car see diagram for speaker connection Connections without using the ISO connectors Connexions sans l utilisation des connecteurs ISO Avant de commencer la connexion Vérifiez attentivement le câblage du véhicule Une connexion incorrecte peut endommager sér...

Page 230: ... with white stripe Fil d alimentation à distance Bleu avec bande blanche To the remote lead of other equipment or power aerial if any Au fil de télécommande de l autre appareil ou à l antenne automatique s il y en a une Front speakers Enceintes avant JVC Amplifier JVC Amplificateur Front speakers see diagram Enceintes avant voir le diagramme Rear speakers Enceintes arrière 2 Cut the rear speaker l...

Page 231: ...te with black stripe Blanc avec bande noire White Blanc Gray with black stripe Gris avec bande noire Gray Gris Green with black stripe Vert avec bande noire Green Vert Purple with black stripe Violet avec bande noire Purple Violet Left mid range speaker Haut parleur moyennes fréquences gauche Right mid range speaker Haut parleur moyennes fréquences droit When connecting the speakers high range mid...

Page 232: ...anger for the external input setting See page 25 of the INSTRUCTIONS Choisissez Changer pour le réglage de l entrée extérieure Référez vous à la page 25 du MANUEL D INSTRUCTIONS CD changer jack Prise du changeur de CD Apple iPod separately purchased iPod Apple vendu séparément JVC D player separately purchased Lecteur D JVC vendu séparément JVC DAB tuner Tuner DAB JVC CD changer jack Prise du chan...

Page 233: ...u und die Anschlüsse siehe das eigenständige Handbuch Указания по установке и выполнению соединений приводятся в отдельной инструкции INSTRUCTIONS BEDIENUNGSANLEITUNG ИНСТРУКЦИИ ПО ЭКСПЛУАТАЦИИ GET0366 006A EY For canceling the display demonstration see page 8 Zum Abbrechen der Displaydemonstration siehe Seite 8 Информацию об отмене демонстрации функций дисплея см на стр 8 ...

Page 234: ...ou may be involved in a traffic accident Caution on volume setting Discs produce very little noise compared with other sources Lower the volume before playing a disc to avoid damaging the speakers by the sudden increase of the output level Notice The display window built in this unit has been produced with high precision but it may have some ineffective dots This is inevitable and is not malfuncti...

Page 235: ...perations Temperature inside the car If you have parked the car for a long time in hot or cold weather wait until the temperature in the car becomes normal before operating the unit CONTENTS Control panel 5 Remote controller RM RK300 6 Getting started 7 Basic operations 7 Radio operations 8 FM RDS operations 11 Searching for your favorite FM RDS programme 11 Disc SD card USB memory operations 14 P...

Page 236: ... 2 Select a menu you want 3 Enter the selected menu To go back to the previous screen or exit the MENU screen press BACK repeatedly 4 Operate as instructed on the screen To go back to the MENU screen press MENU How to detach attach the control panel How to change the control panel angle 1 2 When using the remote controller Caution Detaching Attaching Time countdown indicator ...

Page 237: ...cation Controlpanel 9 T P traffic programme programme type button p 0 eject angle button q 4 buttons w Remote sensor DO NOT expose the remote sensor to strong light direct sunlight or artificial lighting e BACK button r Reset button t control panel release button Source operation display Text information display for FM RDS stations and DAB services Clock time display Small graphic display Large gr...

Page 238: ...acking or starting a fire Do not recharge short disassemble heat the battery or dispose of it in a fire Do not leave the battery with other metallic materials Do not poke the battery with tweezers or similar tools Wrap the battery with tape and insulate when throwing away or saving it Caution The unit is equipped with the steering wheel remote control function See the Installation Connection Manua...

Page 239: ... Selects the band 8 4 buttons For FM AM DAB Searches for stations or ensembles if pressed or skips frequencies after pressed and held For CD CD Text MP3 WMA SD USB Changes the tracks if pressed or fast forwards or reverses the track if pressed and held While listening to an iPod or a D player in menu selecting mode Selects an item if pressed briefly Then press to confirm the selection Skips 10 ite...

Page 240: ...t the hour Select Clock M minute then adjust the minute Select 24H 12H then 24Hours or 12Hours 3 Finish the procedure To check the current clock time while the power is turned off Radiooperations Ÿ Start searching for a station When a station is received searching stops To stop searching press the same button again To tune in to a station manually In step above 1 2 Select a desired station frequen...

Page 241: ...tations repeat the same procedure and select DX in step 3 The LO indicator goes off and DX indicator lights up Storing stations in memory You can preset six stations for each band FM station automatic presetting SSM Strong station Sequential Memory 1 Select the FM band FM1 FM3 you want to store into 2 Enter the MODE menu see page 4 3 4 Local FM stations with the strongest signals are searched and ...

Page 242: ...e station When using the remote controller After tuning in to a station you want to preset Listening to a preset station 1 2 Enter the MODE menu see page 4 3 4 5 Select a preset number You can move to the lists of the other FM bands by turning the control dial When using the remote controller Directly select the preset number ...

Page 243: ... PTY code of your favorite programmes PTY codes NEWS AFFAIRS INFO SPORT EDUCATE DRAMA CULTURE SCIENCE VARIED POP M music ROCK M music EASY M music LIGHT M music CLASSICS OTHER M music WEATHER FINANCE CHILDREN SOCIAL RELIGION PHONE IN TRAVEL LEISURE JAZZ COUNTRY NATION M music OLDIES FOLK M music DOCUMENT 1 Pop M 4 Classics 2 Rock M 5 Affairs 3 Easy M 6 Varied PTY Preset List appears Ÿ Select a PTY...

Page 244: ... in to another station or DAB service providing the related signals The TP indicator will stop flashing and remain lit Repeat steps 2 to 5 To deactivate the TA Standby Reception The TP indicator goes off PTY Standby Reception PTY Standby Reception allows the unit to switch temporarily to your favorite PTY programme from any source other than AM If DAB tuner is connected Standby Reception also work...

Page 245: ...n using programme search See also page 24 Using the message service RDS Radiotext RT What is RDS Radiotext RDS Radiotext is part of the RDS data signal to transmit various text information e g programme information phone numbers e mail and web addresses artist title information and news headlines The text service is part of the RDS broadcast One message may contain up to 64 characters The message ...

Page 246: ...ying discs in the CD changer All discs in the magazine will be played repeatedly until you change the source Ejecting the magazine will also stop playback If you have changed the external input setting to Ext In see page 25 you cannot select the CD changer Playing from an SD card Before detaching the control panel turn off the power Ÿ Press in the SD card until you hear a clicking sound To eject t...

Page 247: ... card or USB memory has been attached Playback starts from where it has been stopped previously If a different SD card or USB memory is currently attached playback starts from the beginning About MP3 and WMA tracks MP3 and WMA tracks words file and track are used interchangeably are recorded in folders About the CD changer It is recommended to use a JVC MP3 compatible CD changer with your unit You...

Page 248: ...Confirm the selection The selected list appears on the display You can move to the other list by turning the control dial 5 Select a disc folder file from the list Only for MP3 WMA SD USB If you select the current disc folder highlighted on the screen its Folder File List appears 6 Starts playback When using the remote controller To directly select a disc To directly select a track of an audio CD ...

Page 249: ...table 4 Finish the procedure Intro Plays the beginning 15 seconds of Track All tracks of the current playback media Folder 1 First track of all folders of the current playback media Disc 2 First track of all the inserted discs Off Cancels Repeat Plays repeatedly Track The current track Folder 1 All tracks of the current folder Disc 2 All tracks of the inserted discs Off Cancels Random Plays at ran...

Page 250: ...ndadjustments Selecting the DSP modes DSP You can create a more acoustic sound field such as in a theater hall etc When crossover network see page 21 is activated the DSP mode is fixed to Defeat DSP modes Defeat No acoustic effect is applied Theater Hall Club Dome Studio V Cancel Voice Cancel Reduces the vocal sounds Good for mastering your favorite songs Karaoke Enter the DSP menu see page 4 Ÿ Se...

Page 251: ...ition selected in step 3 The memorized setting is recalled next time you select the seat position To change the measuring unit 6 Repeat steps 4 and 5 to adjust the distance for the other speakers 7 Finish the procedure Activating BBE Digital BBE Digital is a digital processing method to restore the brilliance and clarity of the original live sound in recording broadcasts etc When a speaker reprodu...

Page 252: ...and width Q To adjust the other bands press BACK Then repeat steps 3 to 6 7 Finish the procedure Once you have made adjustments it is memorized The memorized setting is recalled next time you select Parametric EQ Storing your own sound modes 1 Select a sound mode 2 Select a frequency band 3 Adjust the enhanced level for the selected frequency band 4 Repeat steps 2 and 3 to adjust the other frequen...

Page 253: ...cel the procedure press and hold POWER ATT ENTER The power turns off Finish the procedure indicator lights up in sequence with other indicators To cancel Crossover repeat the same procedure Make sure that X Over Off OK appears on the display indicator goes off Setting the sound modes SEL You can adjust the sound characteristics to your preference Enter the SEL menu see page 4 Ÿ Select a setting it...

Page 254: ...g to the connected speakers 1 6kHz 16 0kHz Front HPF and Rear LPF 31 5 Hz 200 0Hz Rear HPF 4 Adjust the continuity of the sound among speakers slope To adjust subwoofer output S woofer 1 Adjust the output level 2 Select a cut off frequency according to the connected subwoofer 3 Adjust the continuity of the sound among speakers slope To adjust the input level of each source Vol Adj This setting is ...

Page 255: ... 0 23 1 12 Initial 0 0 00 See also page 8 for setting Clock M Minute adjustment 00 59 Initial 00 0 00 See also page 8 for setting 24H 12H Time display mode 12Hours 24Hours Initial See also page 8 for setting CLK Adj Clock adjustment Auto Initial Off The built in clock is automatically adjusted using the CT clock time data in the RDS signal Cancels Scroll 1 Once Initial Auto Off For track informati...

Page 256: ... the currently received signals become weak the unit switches to another station or service the programme may differ from the one currently received 13 31 When the currently received signals become weak the unit switches to another station broadcasting the same programme Cancels not selectable when DAB AF is set to ON TA Vol Traffic announcement volume 0 30 or 50 2 Initial 15 When a traffic progra...

Page 257: ...e playback pauses during telephone muting Cancels Amp Gain Amplifier gain control High PWR Low PWR Off Volume 00 Volume 50 Volume 00 Volume 30 Select this if the maximum power of the speaker is less than 50 W to avoid damaging the speakers Deactivates the built in amplifier 1 Some characters or symbols will not be shown correctly or will be blanked on the display 2 Depends on the amplifier gain co...

Page 258: ... For external component Select LINE IN or EXT IN 2 Enter the TITLE menu see page 4 3 Assign a title 1 Select a character set A A Z upper case a a z lower case 0 numbers and symbols Á Accented letters upper case á Accented letters lower case back to the beginning 2 Select a character Selecting the graphic theme You can select the graphic theme for large and small display sizes see also page 5 1 Sel...

Page 259: ...perating your iPod or D player Connect either one of the following separately purchased to the CD changer jack on the rear of this unit Interface adapter for iPod KS PD100 for controlling an iPod D player interface adapter KS PD500 for controlling a D player For connection see Installation Connection Manual separate volume For details refer also to the manual supplied with the interface adapter Ca...

Page 260: ... Ô Genre Ô Track Ô back to the beginning 3 Confirm the selection To move back to the previous menu press 5 If a track is selected playback starts automatically If the selected item has another layer you will enter the layer Repeat steps 2 and 3 until the desired track is played Holding 4 can skip 10 items at a time Adjust the volume Adjust the sound as you want See pages 18 22 Make sure the equali...

Page 261: ...nd without any annoying interference and signal distortion Furthermore it can carry text pictures and data When transmitting DAB combines several programmes called services to form one ensemble In addition each service called primary service can also be divided into its components called secondary service A typical ensemble has six or more programmes services broadcast at the same time By connecti...

Page 262: ...lect a service you want 2 Enter the MODE menu see page 4 3 Select List 4 Select a preset number You can move to the lists of the other DAB bands but cannot store a service for the other bands Select a service either primary or secondary to listen to To tune in to an ensemble manually Start searching for an ensemble as in step 1 2 Select a desired ensemble frequency When surrounding sounds are nois...

Page 263: ...volume level see page 24 PTY Standby Reception Operations are exactly the same as explained on page 11 for FM RDS stations PTY Standby Reception for DAB tuner works only using a dynamic PTY code You can neither store your favorite PTY nor activate PTY Standby Reception separately for the DAB tuner and for the FM tuner You can activate and deactivate PTY Standby Reception when the source is either ...

Page 264: ...vice providing these signals The ANN indicator will stop flashing and remain lit To deactivate the Announcement Standby Reception Select Off in step 3 above The ANN indicator goes off Tracing the same programme Alternative Frequency Reception You can keep listening to the same programme by activating the Alternative Frequency Reception While receiving a DAB service When driving in an area where a ...

Page 265: ... 22 Maintenance How to clean the connectors Frequent detachment will deteriorate the connectors To minimize this possibility periodically wipe the connectors with a cotton swab or cloth moistened with alcohol being careful not to damage the connectors Moisture condensation Moisture may condense on the lens inside the CD player in the following cases After starting the heater in the car If it becom...

Page 266: ...a correctly Network Tracking Reception will not operate correctly If a Traffic Announcement is received by TA Standby Reception the volume level automatically changes to the preset level TA VOL if the current level is lower than the preset level When Alternative Frequency Reception is activated with AF selected Network Tracking Reception is also activated automatically On the other hand Network Tr...

Page 267: ...detected if a disc includes both audio CD CD DA files and MP3 WMA files This unit can play back multi session discs however unclosed sessions will be skipped while playing Some CD Rs or CD RWs may not play back on this unit because of their disc characteristics or for the following reasons Discs are dirty or scratched Moisture condensation occurs on the lens inside the unit The pickup lens inside ...

Page 268: ...It is not recommended to use a USB memory wider than 20 mm as it will block you from pressing some buttons on the control panel If the connected USB memory does not have the correct files No Files appears and the unit returns to the previous source This unit can show Tag Version 1 0 1 1 2 2 2 3 or 2 4 for MP3 WMA files This unit can play back MP3 files recorded in VBR variable bit rate For SD card...

Page 269: ...ming In this case change the Dimmer setting to any one other than Auto If you change the Amp Gain setting from High PWR to Low PWR while the volume level is set higher than Volume 30 the unit automatically changes the volume level to Volume 30 Title assignment If you try to assign titles to more than 30 discs Name Full appears Delete unwanted titles before assignment Titles assigned to discs in th...

Page 270: ...eak Check the Network Tracking Reception see page 13 Loading does not disappear The receiving signal is temporarily too weak to receive a complete message although the service is available Check the Network Tracking Reception see page 13 Troubleshooting What appears to be trouble is not always serious Check the following points before calling a service center Preset frequency level settings for ea...

Page 271: ... code mp3 or wma to the file names Noise is generated Skip to another track or change the disc Do not add the extension code mp3 or wma to non MP3 or WMA tracks A longer readout time is required File Check keeps flashing on the display Do not use too many hierarchies and folders Tracks do not play back in the order you have intended them to play Playback order is determined when the files are reco...

Page 272: ... playing tracks from an SD card Detach the control panel and reinsert the SD card The control panel goes back to initial position Angle 1 While playing a track sound is sometimes interrupted MP3 WMA tracks have not been properly copied into the device Copy MP3 WMA tracks again into the device and try again Correct characters are not displayed e g album name This unit can only display letters capit...

Page 273: ...splay No tracks are stored Import tracks to the iPod or D player Reset 1 Reset 7 appears on the display Disconnect the adapter from both the unit and iPod D player Then connect it again Reset 8 appears on the display Check the connection between the adapter and this unit The iPod s or D player s controls do not work after disconnecting from this unit Reset the iPod or D player DAB tuner No DAB Sig...

Page 274: ... 2 kHz 2 5 kHz 3 2 kHz 4 kHz 5 kHz 6 3 kHz 8 kHz 10 kHz 12 5 kHz 16 kHz 20 kHz 31 frequencies Level 10 dB Frequency Response 40 Hz to 20 000 Hz Signal to Noise Ratio 70 dB Level Impedance Line In 1 5 V 20 kΩ load full scale Line Out 5 0 V 20 kΩ load full scale Output Impedance 1 kΩ Subwoofer Out Level Impedance 2 0 V 20 kΩ load full scale Other Terminals LINE IN CD changer TUNER SECTION Frequency ...

Page 275: ... 44 1 kHz 33 kHz MPEG 2 24 kHz 22 05 kHz 16 kHz WMA Bit Rate 8 kbps 192 kbps Sampling Frequency 48 kHz 44 1 kHz 32 kHz USB MEMORY Format FAT 12 16 32 Storage Less than 4 GB 1 partition type Playable Audio Format MP3 WMA Max Current Less than 500 mA MP3 Bit Rate 32 kbps 320 kbps Sampling Frequency MPEG 1 48 kHz 44 1 kHz 32 kHz MPEG 2 24 kHz 22 05 kHz 16 kHz MPEG 2 5 12 kHz 11 025 kHz 8 kHz WMA Bit ...

Page 276: ...unit Haben Sie PROBLEME mit dem Betrieb Bitte setzen Sie Ihr Gerät zurück Siehe Seite Zurücksetzen des Geräts Затруднения при эксплуатации Пожалуйста перезагрузите Ваше устройство Для получения информации о перезагрузке Вашего устройства обратитесь на соответствующую страницу 2006 Victor Company of Japan Limited ...

Page 277: ...le elektrischen Anschlüsse herstellen bevor das Gerät eingebaut wird Sicherstellen daß das Gerät nach dem Einbau a Chassis des Fahrzeugs geerdet wird Hinweise Die Sicherung mit einer der entsprechenden Nennleistung ersetzen Brennt die Sicherung häufig durch wenden Sie sich an ihren JVC Autoradiohändler Es wird empfohlen Lautsprecher mit einer Maximalleistung von mehr als 50 W anzuschließen sowohl ...

Page 278: ...bbildung gezeigt so daß das Gerät entfernt werden kann Вставьте два рычажка затем потяните их как показано на рисунке чтобы вынуть устройство Удаление устройства Перед удалением устройства освободите заднюю часть When installing the unit without using the sleeve Beim Einbau des Geräts ohne Halterung При установке устройства без использования муфты In a Toyota car for example first remove the car r...

Page 279: ... need to modify the wiring of the supplied power cord as illustrated Contact your authorized car dealer before installing this unit Es kann erforderlich sein die Verdrahtung des mitgelieferten Stromkabels zu modifizieren wie in der Abbildung gezeigt Wenden Sie sich vor dem Einbau dieses Receivers an Ihre Auto Fachwerkstatt Возможно потребуется изменить схему соединений для прилагаемого шнура питан...

Page 280: ...ie Lautsprecherleitungen dieses Geräts unbenutzt lassen Sie können den eingebauten Verstärker abschalten und die Audiosignale nur zu dem n externen Verstärker n ausgeben um scharfen Ton zu erhalten und Hitzestau im Unit zu vermeiden siehe Seite 25 der BEDIENUNGSANLEITUNG Der Ausgangspegel dieses Geräts wird auf einem hohen Wert gehalten um den Hifi Klang zu unterstützen den dieses Gerät reproduzie...

Page 281: ...рез выход динамиков When connecting the speakers high range mid range through the external amplifiers to obtain more powerful sound Beim Anschließen der Lautsprecher Hochtöner Mitteltöner über die externen Verstärker für kräftigeren Klang При подключении динамиков высокого или среднего диапазона частот через внешние усилители для получения более мощного звука JVC Amplifier JVC Verstärker JVC усили...

Page 282: ...ck Buchse für CD Wechsler Разъем устройства автоматической смены компакт дисков CD changer jack Buchse für CD Wechsler Разъем устройства автоматической смены компакт дисков Apple iPod separately purchased Apple iPod getrennt gekauft Apple iPod продается отдельно JVC D player separately purchased JVC D Player getrennt gekauft Проигрыватель JVC D продается отдельно JVC DAB tuner DAB Tuner von JVC Тю...

Reviews: