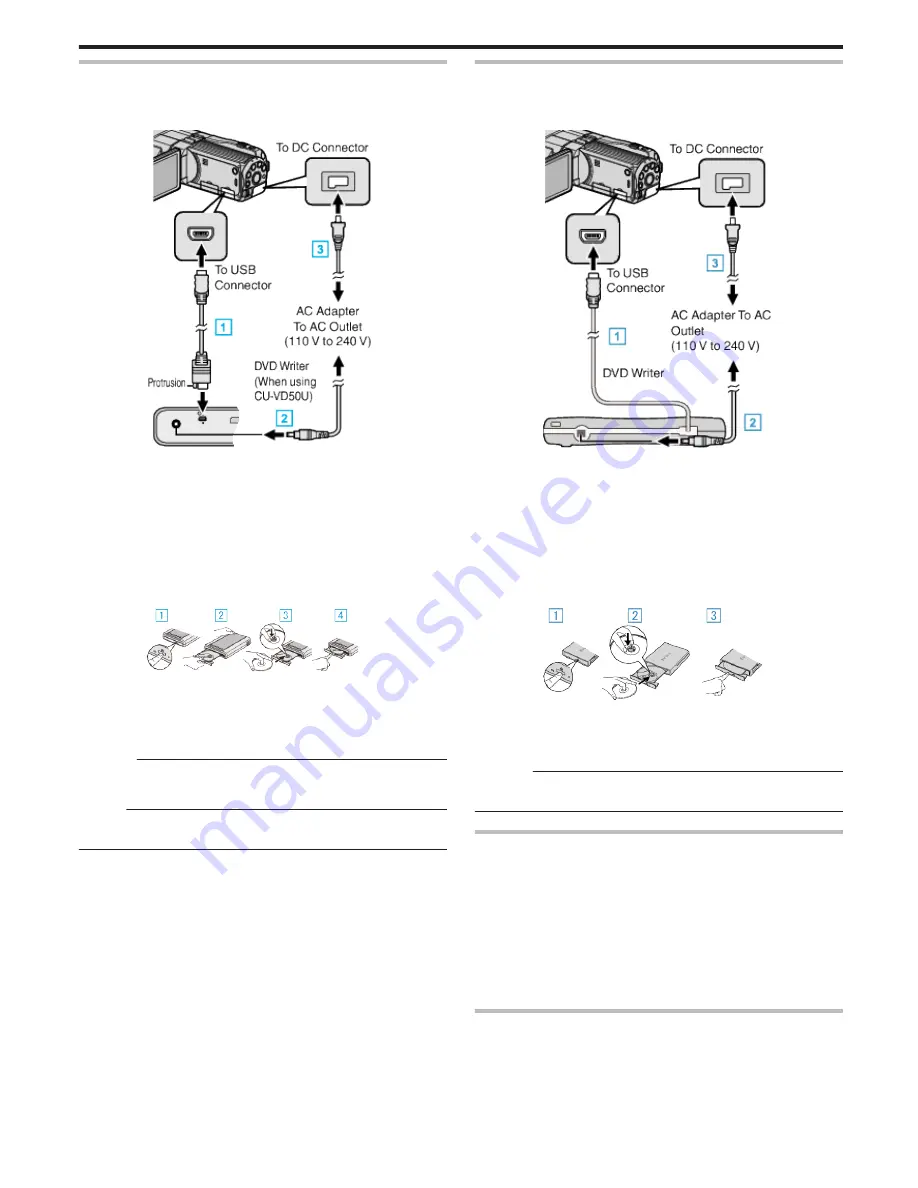
Preparing a DVD Writer (CU-VD50U)
1
Connect the USB cable and the AC adapter.
0
Turn off the camcorder by pressing the
M
button for about 2 seconds.
.
A
Connect the USB cable provided with the DVD writer.
B
Connect the AC adapter of the DVD writer.
C
Connect the AC adapter to this unit.
0
This unit powers on automatically when the AC adapter is connected.
0
This unit turns on and the “BACK-UP” menu appears.
0
While the USB cable is connected, the “BACK-UP” menu is
displayed.
0
Refer also to the instruction manual of the DVD writer.
2
Turn on the DVD writer and insert a new disc.
.
A
Press the power button to turn on the power.
B
Press the eject button to open the disc tray.
C
Pull out the tray completely and load a new disc properly.
D
Push the disc tray in until it clicks into place.
Caution :
0
Be sure to turn off the power when connecting the devices.
Otherwise, electric shocks or malfunctions may occur.
Memo :
0
When connected to this unit, all buttons on the DVD writer CU-VD50, other
than the power and eject buttons, will not work.
Preparing a DVD Writer (CU-VD3U)
1
Connect the USB cable and the AC adapter.
0
Turn off the camcorder by pressing the
M
button for about 2 seconds.
.
A
Connect the USB cable of the DVD writer to this unit.
B
Connect the AC adapter of the DVD writer.
C
Connect the AC adapter to this unit.
0
This unit powers on automatically when the AC adapter is connected.
0
This unit turns on and the “BACK-UP” menu appears.
0
While the USB cable is connected, the “BACK-UP” menu is
displayed.
0
Refer also to the instruction manual of the DVD writer.
2
Insert a new disc.
.
A
Press the eject button to open the disc tray.
B
Pull out the tray completely and load a new disc properly.
C
Push the disc tray in until it clicks into place.
Caution :
0
Be sure to turn off the power when connecting the devices.
Otherwise, electric shocks or malfunctions may occur.
Creating a Disc
1
Prepare a DVD writer.
0
Insert a new disc into the DVD writer.
“Preparing a DVD Writer (CU-VD50U)” (
A
p. 73)
“Preparing a DVD Writer (CU-VD3U)” (
A
p. 73)
2
Copy files to the disc with the following methods.
“Copying All Files” (
A
p. 73)
“Copying Files by Date (2D mode only)” (
A
p. 75)
“Copying Selected Files” (
A
p. 76)
Copying All Files
All videos or still images recorded on this unit will be copied.
You can also select and copy only the videos or still images that have never
been copied.
1
Select 3D or 2D mode.
Copying
73
Summary of Contents for GS-TD1BUS
Page 1: ...HD MEMORY CAMERA LYT2327 002A Detailed User Guide GS TD1 ...
Page 146: ......


