background image

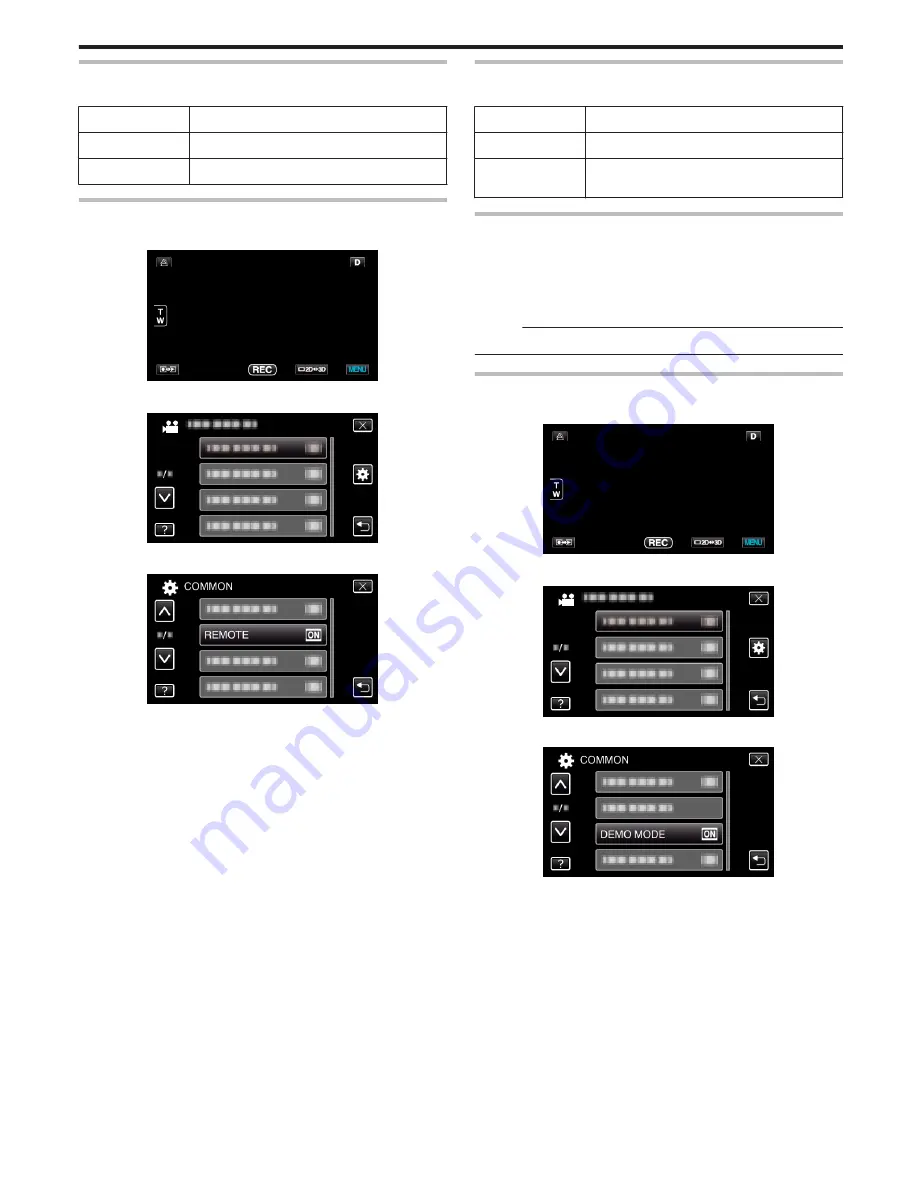
REMOTE

Enables remote control operation.

Setting

Details

OFF

Disables remote control operation.

ON

Enables remote control operation.

Displaying the Item

1

Tap “MENU”.

.

2

Tap “

Q

”.

.

3

Tap “REMOTE”.

.

DEMO MODE

Plays a demonstration of the special features of this unit.

Setting

Details

OFF

Deactivates the function.

ON

Plays a demonstration of the special features of

this unit.

Displaying Demo Mode

Remove the battery pack and SD card.

Connect the AC adapter.

Open the LCD monitor and turn on the power.

0

Demonstration starts playing after 3 minutes.

0

To stop playback, tap on the screen.

Memo : 

0

This mode is not available in the playback mode.

Displaying the Item

1

Tap “MENU”.

.

2

Tap “

Q

”.

.

3

Tap “DEMO MODE”.

.

Menu Settings

125

Summary of Contents for GS-TD1BUS

Page 1: ...HD MEMORY CAMERA LYT2327 002A Detailed User Guide GS TD1 ...

Page 2: ... to and Viewing on TV 58 Playing Back 3D Images 58 Playing Back 2D Images 60 Playing Back a DVD or Blu ray Disc Created on this Unit 63 Digest Playback on a Blu ray or DVD Player 64 Editing Deleting Unwanted Files 65 Deleting the Currently Displayed File 65 Deleting Selected Files 65 Protecting Files 66 Protecting Releasing Protection of the Currently Displayed File 66 Protecting Releasing Protect...

Page 3: ...117 TRIMMING 117 UPLOAD SETTINGS 117 PLAYBACK OTHER FILE 117 3D MOTION RELIEF 3D mode only 117 Main Menu for Still Image Playback 118 SEARCH DATE 118 PROTECT CANCEL 118 COPY 118 MOVE 118 Common Menu 119 CLOCK ADJUST 121 DATE DISPLAY STYLE 121 LANGUAGE 122 MONITOR BRIGHTNESS 122 REC MEDIA FOR VIDEO 122 REC MEDIA FOR IMAGE 123 OPERATION SOUND 123 AUTO POWER OFF 124 QUICK RESTART 124 REMOTE 125 DEMO ...

Page 4: ...pen your feet to the width of your shoulders B Extend your right hand and hold the camcorder over your head C Hold the LCD monitor with your left hand and adjust the angle accordingly Caution 0 Use this way of shooting only as a last resort as it is difficult to achieve stable images 0 Set to the wide angle as much as possible as the image will be prone to camera shake 0 Be considerate Do not inco...

Page 5: ...ion No Derivative Works 3 0 Record the scenes as everyone helps to prepare the feast of the night You can film the mother who is cooking the children who are helping and of course the process of making a cake Recording the Christmas Party Photo by InnerSpirit Creative Commons Attribution No Derivative Works 3 0 After all preparations it is finally the Christmas party itself Not only should you rec...

Page 6: ...changing or during the entertainment programs Closing Up on the Bride s Face During the Thank You Speech The climax of the event finally comes during the bride and groom s thank you speechandpresentationofflowers Thetouchingwordsofappreciationfrom the bride and tears of joy from the parents are scenes that must not be missed Start by closing up on the bride s face using zoom As the tears start to ...

Page 7: ...e the battery pack while sleeping so that you can record with full battery power the next day o Power Plug Adapter The shape of the power plug varies according to countries Be sure to check the shape of the power plug beforehand and bring the appropriate power plug adapter Charging the Battery Pack Overseas A p 24 o Battery Charger Recording cannot be performed when an AC adapter is connected to t...

Page 8: ...ooting Tips found in this website on how to use panning effectively In addition you may also like to take a shot of the signs or monuments that can often be found at the tourist spots Showing Everyone Having a Good Time When taking a video it is rather dull to shoot only the scenery or historical sites Talk about your feelings while recording the breath taking scenery of an attraction so that it w...

Page 9: ...arousal ferris wheel fun bicycle rides etc Inducing Responses by Calling Out Videos with no waving of hands nor laughter are not only dull when you view them later but also put the capability of the audio recording function of the camcorder to a waste When recording induce more reactions by enthusiastically waving your hands or shouting out Is it fun and the like Capturing the Best Moment in a Vid...

Page 10: ...n of this unit automatically increases its brightness for recording If Intelligent Auto fails to function as expected or if the brightness correction is insufficient you can increase the brighness by using backlight compensation in the Manual mode Setting Details A p 41 o Without backlight compensation o With backlight compensation Useful Shooting Techniques 10 ...

Page 11: ...the following when recording 3D images o Basic Way to Hold a Camcorder During 3D Recording Recording Stable Images o Shooting Distance During 3D Recording Achieving Comfortable 3D Images Memo 0 Make sure that you have stable footing during recording 0 Do not swing the camera horizontally or vertically during recording 0 If the subject is not recorded within the recommended shooting distance 3D eff...

Page 12: ...n appropriately before viewing the 3D images 0 Stop recording or viewing of the 3D images if you experience fatigue or discomfort Continual recording or viewing of the 3D images may result in health problems Take an adequate rest Recording or viewing of the 3D images in an environment where shaking of the monitor is expected such as while riding in a vehicle or during walking may result in fatigue...

Page 13: ... to supply power Remote Control RM V760U 0 Operates certain functions from a distance HDMI Mini Cable 0 Connects this unit to a TV to play back recorded images on the TV in a better quality AV Cable 0 Connects this unit to a TV to play back recorded images on the TV USB Cable Type A Mini Type B 0 Connects this unit to a computer Basic User Guide 0 Read well and keep in a safe place where it can be...

Page 14: ...rately Types of Usable SD Card A p 17 When using the AC adapter overseas please prepare a commercially available converter plug for the country or region of visit Charging the Battery Pack Overseas A p 24 Getting Started 14 ...

Page 15: ...unction properly When using this unit outdoors in the winter weather warm the battery such as by placing it in the pocket before attaching it Keep away from direct contact with a warm pack 0 Do not expose the battery to excessive heat such as direct sunlight or fire 0 After removing the battery store it in a dry place between 15 C to 25 C 59 F to 77 F 0 Keep a 30 battery level X if the battery pac...

Page 16: ...power 3 Open the cover 4 Insert an SD card 0 Insert with the label facing upwards Warning 0 Make sure not to insert the card in the wrong direction It may cause damage to the unit and card 0 Turn off the power of this unit before inserting or removing a card 0 Do not touch the metal contact area when inserting the card Memo 0 To record to the card it is necessary to perform media settings When no ...

Page 17: ...ring reading or writing of data 0 You can also use a Class 10 compliant SDHC SDXC card 0 To protect the data do not touch the terminals of the SD card 0 Both videos and still images can be recorded on one SD card When your computer cannot recognize the SDXC card Confirm and update the OS of your computer Windows XP Windows XP SP1 Necessary to update to SP2 or higher Windows XP SP2 Windows XP SP3 N...

Page 18: ...yback Mode Button 0 Switches between recording and playback modes 4 Recording Start Stop Button 0 g Video Recording Start Button 0 a Video Recording Stop Button 0 Q Still Image Recording Button 5 LCD Monitor 3D 2D Display Switching Button 0 Switches the display on the LCD monitor between 3D and 2D The image will be recorded in 3D even if the display on the LCD monitor is set to 2D 6 Menu Button Op...

Page 19: ...Buttons for Video Playback A p 53 Operation Buttons for Still Image Playback A p 55 Menu Screen 1 Help Button 2 Menu Items 3 Return Button 4 Common Menu Button 5 Close Button Operating the Menu A p 99 Clock Setting The SET DATE TIME screen appears when you turn on this unit for the first time after purchase when it has not been used for a long time or when the clock is not set yet Set the clock be...

Page 20: ...internalclock battery of this unit before setting the clock Charging the Battery Pack A p 15 Resetting the Clock Set the clock with CLOCK ADJUST from the menu 1 Tap MENU 2 Tap Q 3 Tap CLOCK ADJUST 0 Tap or to move upward or downward for more selection 4 Tap CLOCK SETTING 5 Set the date and time 0 When the year month day hour or minute item is tapped and will be displayed 0 Tap or to adjust the yea...

Page 21: ... 0 Tap or to select the city name Changing the Display Language The language on the display can be changed 1 Tap MENU 2 Tap Q 3 Tap LANGUAGE 0 Tap or to move upward or downward for more selection 4 Tap to the desired language 0 Tap or to move upward or downward for more selection Getting Started 21 ...

Page 22: ... falls off read the instruction manual of the tripod or monopod to be used and make sure that it is securely attached Memo 0 It is recommended to use a tripod or monopod when recording in conditionspronetocamerashake suchasindarkplacesorwhenzoomed to the telephoto end 0 Set the digital image stabilizer to Z OFF when using a tripod for recording Reducing Camera Shake A p 44 Using the Remote Control...

Page 23: ...playback T Button N 0 Zooms in during pause 0 Turns up the volume during video playback W Button O 0 Zooms out during pause 0 Turns down the volume during video playback 5 Index Button 0 Stops playback and returns to thumbnail display 6 Info Button 0 Recording Displays the remaining time for video only and battery power 0 Playback Displays file information such as recording date Attaching Headphon...

Page 24: ...p 108 Using this Unit Overseas The shape of the power outlet varies according to countries and regions To charge the battery pack you need a converter plug that matches the shape of the outlet Charging the Battery Pack Overseas A p 24 Change the date and time display to the local time by selecting your travel destination in AREA SETTING of CLOCK ADJUST Setting the Clock to Local Time when Travelin...

Page 25: ...g AREASETTING changestheclocktimesuchthattimedifference is accounted for After returning to your country re select the region that was set initially to restore the original clock settings Setting Daylight Saving Time When ON is selected in DST SETTING of CLOCK ADJUST the time is set 1 hour ahead 1 Tap MENU 2 Tap Q 3 Tap CLOCK ADJUST 0 Tap or to move upward or downward for more selection 4 Tap DST ...

Page 26: ... Battery Pack Actual Recording Time Continuous Recording Time 3D Recording MP4 MVC 3D Recording AVCHD 3D Recording MP4 MVC 3D Recording AVCHD BN VF815U Supplied 55 m 1 h 1 h 45 m 2 h BN VF823U 1 h 20 m 1 h 35 m 2 h 40 m 3 h 5 m o 2D Display on LCD Monitor Battery Pack Actual Recording Time 3D Recording MP4 MVC 3D Recording AVCHD 2D Recording BN VF815U Supplied 55 m 1 h 5 m 1 h 20 m BN VF823U 1 h 2...

Page 27: ... change the display on the LCD monitor between 3D and 2D during recording by tapping on the 3D 2D icon The image will be recorded in 3D even if the display on the LCD monitor is set to 2D To record 2D images press the 3D button to switch to the 2D mode before recording Taking Videos in Intelligent Auto Mode A p 29 0 If the microphone level is frequently displayed in red lower the setting in MIC LE...

Page 28: ...ll images will be saved in both 3D and 2D formats 0 3D still images are saved as MP files mpo 0 3D still images cannot be printed To print make use of the 2D still image that is captured at the same time 0 Use the provided software Everio Media Browser 3D to transfer 3D still images to a computer for playback Copying to Windows PC A p 91 0 Torecord3Dimages referalsoto PrecautionsonRecordingandPlay...

Page 29: ...ecording 3 Video Quality Displays the icon of the VIDEO QUALITY setting selected in the recording menu VIDEO QUALITY A p 105 4 3D 2D Mode Displays the current recording mode of 3D or 2D 3D is displayed during 3D recording while 2D is displayed during 2D recording 5 Image Stabilizer Displays the icon of the DIS setting selected in the recording menu Reducing Camera Shake A p 44 6 Recording Media Di...

Page 30: ... shooting conditions Operation Buttons for Video Recording Operation Button Description 1 Parallax Adjustment Adjusts the 3D effect when 3D images are displayed on the LCD monitor Adjusting Parallax During Recording A p 34 2 3 T W Zoom Allows the same functions as the zoom lever to be performed Camera shake that often occurs when using the zoom lever can be minimized Zooming A p 31 4 Recording Pla...

Page 31: ...re recording an important scene it is recommended to conduct a trial recording 0 Checktheremainingrecording timeinthemediabeforeyoustartshooting If there is not enough space move copy the data to a computer or disc 0 Do not forget to make copies after recording 0 Recording stops automatically as it cannot be performed for 12 or more consecutive hours according to specifications It may take some ti...

Page 32: ...ears when a still image is being captured 5 Remaining Number of Shots Displays the remaining number of shots for still image recording 6 Recording Mode Press the i AUTO button to switch the recording mode between P Intelligent Auto and H Manual 7 Display Button n Some displays disappear after approximately 3 seconds Use the n button to change the displays as shown below 0 Tap n button Displays app...

Page 33: ...on changes from n to m Tap m to release the displays Useful Settings for Recording 0 When QUICK RESTART is set to ON this unit turns on immediately if you open the LCD monitor within 5 minutes after the power is turned off by closing the monitor QUICK RESTART A p 124 0 When AUTO POWER OFF is set to ON this unit turns itself off automatically to conserve power when it is not operated for 5 minutes ...

Page 34: ...n the unit s LCD monitor 3D VIDEO REC FORMAT 3D mode only A p 104 1 Tap k 2 Tap MANUAL 0 The parallax adjustment screen appears 0 To set parallax adjustment to auto default tap AUTO 3 Adjust the parallax 0 To increase the amount of correction tap Doing so increases the value of the parallax display 0 To reduce the amount of correction tap Doing so decreases the value of the parallax display 4 Tap ...

Page 35: ... modes 1 Open the lens cover 2 Open the LCD monitor and select the video or still image mode 0 The video A or still image B icon appears 3 Select the Manual recording mode 0 If the mode is P Intelligent Auto press the H T button to switch to H Manual The mode changes between Intelligent Auto and Manual with every press 4 Tap MENU 5 Tap the item to set manually 0 For details on the various manual s...

Page 36: ...pture an image with only the subject in focus while blurring the surroundings Setting Aperture A p 39 WHITE BALANCE 0 Overall color on the screen can be adjusted 0 Use this when the color on the screen appears differently from the actual color Setting White Balance A p 40 BACKLIGHT COMP 0 Corrects the image when the subject appears dark due to backlight 0 Use this when shooting against the light S...

Page 37: ...when the focus is not clear in Intelligent Auto or when manual focusing is desired 1 Tap MENU 2 Tap FOCUS 0 Tap or to move upward or downward for more selection 0 Tap L to exit the menu 0 Tap J to return to the previous screen 3 Tap MANUAL 4 Adjust the focus 0 Tap E to focus on a distant subject 0 Tap p to focus on a near subject 5 Tap SET to confirm 0 When focus is confirmed the focusing frame di...

Page 38: ... color Change outline color if it becomes difficult to see FOCUS ASSIST COLOR A p 112 Adjusting Brightness You can adjust the brightness to your preferred level 1 Tap MENU 2 Tap BRIGHTNESS ADJUST 0 Tap or to move upward or downward for more selection 0 Tap L to exit the menu 0 Tap J to return to the previous screen 3 Tap MANUAL 4 Adjust the brightness value 0 Compensation range during video record...

Page 39: ...k the brightness of the LCD monitor and set SHUTTER SPEED accordingly Setting Aperture You can adjust the aperture to capture an image with only the subject in focus 1 Tap MENU 2 Tap APERTURE PRIORITY 0 Tap or to move upward or downward for more selection 0 Tap L to exit the menu 0 Tap J to return to the previous screen 3 Tap MANUAL 4 Adjust the aperture 0 Aperture can be set from F1 2 to F5 6 0 I...

Page 40: ...is not resolved FINE Set this when shooting outdoors on a sunny day CLOUD Set this when shooting on a cloudy day or inside a shade HALOGEN Set this when shooting under illumination such as a video light MARINE BLUE Set this when shooting the sea at deep water area water appears blue MARINE GREEN Set this when shooting the sea at shallow water area water appears green Using MWB 1 Hold a sheet of pl...

Page 41: ...on The image is only an impression 1 Tap MENU 2 Tap TELE MACRO 0 Tap or to move upward or downward for more selection 0 Tap L to exit the menu 0 Tap J to return to the previous screen 3 Tap ON 0 After setting the tele macro icon o appears Setting Details OFF Enables close up shots up to 1 m at the telephoto T end Enables close up shots up to 5 cm at the wide angle W end ON Enables close up shots u...

Page 42: ...H PRIORITY AE AF FOCUS BRIGHTNESS ADJUST SHUTTER SPEED APERTURE PRIORITY BACKLIGHT COMP WHITE BALANCE FOCUS ASSIST SELF TIMER Making Adjustments with the USER Button Operate as follows 0 In the case of functions that are turned on or off NIGHTALIVE BRIGHTNESS ADJUST SHUTTER SPEED APERTURE PRIORITY BACKLIGHT COMP DIS FOCUS ASSIST SELF TIMER Press the USER button to turn on or off the function 0 In ...

Page 43: ...n appears 4 Adjust the assigned function and record 0 Change the setting using the control dial 0 Press the ADJ button to set to AUTO or activate an assigned function 0 To change the setting of a different function press the ADJ button for about 3 seconds The control menu appears Go back to step 2 and select a different function Memo 0 By assigning BRIGHTNESS ADJUST FOCUS SHUTTER SPEED or APERTURE...

Page 44: ...nges with every press of the button Setting the USER Button A p 42 0 OFF F ON F ON AIS F OFF F The setting changes as above with every press of the USER button Capturing Subjects Clearly TOUCH PRIORITY AE AF TOUCH PRIORITY AE AF is a function that adjusts focus and brightness based on a tapped position This function is available for both videos and still images 1 Select video or still image mode 0...

Page 45: ... subjects with no contrast when recording subjects that are moving at high speed when recording in a dark place when the surrounding brightness changes 0 When FACE TRACKING is set the subject may be lost if the camera is moved vertically or horizontally very fast To track back the subject tap on it again Capturing Smiles Automatically SMILE SHOT SMILE SHOT automatically captures a still image upon...

Page 46: ...useful for making observations such as the opening of a flower bud 1 Open the LCD monitor and select the video mode 0 The video mode icon A appears 2 Tap MENU 3 Tap TIME LAPSE RECORDING 0 Tap or to move upward or downward for more selection 0 Tap L to exit the menu 0 Tap J to return to the previous screen 4 Tap to select a recording interval 1 to 80 seconds 0 The greater the number of seconds the ...

Page 47: ...rame at 10 second intervals Recorded videos will be played back at 300 times speed 80SEC INTERVAL Takes a frame at 80 second intervals Recorded videos will be played back at 2 400 times speed Caution 0 Audio cannot be recorded during time lapse recording 0 Zooming simultaneous still image recording and image stabilizer are not available in time lapse recording 0 When recording is stopped with the ...

Page 48: ... to return to the previous screen 4 Tap 2SEC or 10SEC 5 Set the focus on the subject 0 When focused the focus icon lights up in green 6 Take a still image 0 A timer appears and countdown to shooting starts 0 To stop the self timer press the SNAPSHOT button again Using the Face Detection Self timer Pressing the SNAPSHOT button starts face detection and shooting is performed three seconds after anot...

Page 49: ...r 1 Open the LCD monitor and select the video or still image mode 0 The video A or still image B icon appears 2 Press the INFO button 0 If in the still image mode go directly to step 4 3 Display the remaining recording time 0 The remaining recording time is displayed only in the video recording mode 0 Press the INFO button to check the remaining recording time of each recording media 0 To display ...

Page 50: ... 40 m 1 h 20 m 2 h 50 m 5 h 50 m 8 h 40 m 11 h 50 m EP 29 h 10 m 1 h 40 m 3 h 40 m 7 h 10 m 14 h 50 m 21 h 50 m 29 h 50 m 0 The actual recording time may shorten depending on the shooting environment Approximate Number of Still Images Unit Number of Shots o 3D Mode Image Size SDHC Card Built in Memory 64 GB 4 GB 8 GB 16 GB 32 GB 1920X1080 2M 16 9 1 000 2 200 4 400 4 999 4 999 o 2D Mode Image Size ...

Page 51: ... 1 h 20 m BN VF823U 1 h 25 m 1 h 40 m 1 h 55 m Battery Pack Continuous Recording Time 3D Recording MP4 MVC 3D Recording AVCHD 2D Recording BN VF815U Supplied 1 h 50 m 2 h 10 m 2 h 35 m BN VF823U 2 h 45 m 3 h 15 m 3 h 50 m 0 The above are values when MONITOR BRIGHTNESS is set to STANDARD 0 The actual recording time may be shorter if zooming is used or if recording is stopped repeatedly It is recomm...

Page 52: ...ges recorded in 2D mode cannot be displayed as 3D images 0 3D images may be played back when the 3D button lights up 0 Images recorded in 3D mode and 2D mode are displayed on the index screen separately Press the 3D button to switch to the desired mode for playback 0 3D images recorded in MP4 MVC format and AVCHD format are displayed on the index screen separately Change the setting of 3D VIDEO RE...

Page 53: ... playback while 2D is displayed during 2D playback 2 Pointer Displays the current estimated playback position within the scene 3 k Enables manual parallax adjustment 4 h Returns to the beginning of the scene 5 j Reverse search 6 d e Playback pause 7 i Forward search 8 g Advances to the next video 9 Recording Playback Mode q Switches between recording and playback modes 0 u Stop returns to index sc...

Page 54: ...ctive management information 1 Select video mode 2 Tap q to select the playback mode 3 Tap MENU 4 Tap PLAYBACK OTHER FILE 5 Tap on the file to start playback Playing Back Videos A p 53 Memo 0 An MTS file is created in the EXTMOV folder when management information is corrupted 0 The thumbnails of the 3D files in the EXTMOV folder will be shown as images separated into left and right on the index sc...

Page 55: ... lights up 0 You can search for a specific file by the recording date This is useful when searching from a large number of files Date Search A p 58 Caution 0 To play back 3D images refer also to Precautions on Recording and Playing Back 3D Images Precautions on Recording and Playing Back 3D Images A p 11 Operation Buttons for Still Image Playback During Index Screen Display Display Description 1 D...

Page 56: ...ected file Adjusting Parallax During Playback When playing back 3D images of scenes where there are multiple objects arrayed in a line from near to far or objects that are extremely close to the camera you can change the way they appear to the eye 0 Parallax can only be adjusted when 3D images are displayed on the unit s LCD monitor 1 Tap k 2 Tap MANUAL 0 The parallax adjustment screen appears 0 T...

Page 57: ...ect still image mode 2 Tap q to select the playback mode 3 Press the 3D button to select 3D or 2D mode 0 Imagesrecordedin3Dmodeand2Dmodearedisplayedontheindex screen separately Press the 3D button to switch to the desired mode for playback 0 During 3D mode 3D is displayed on the LCD monitor 0 During 2D mode 2D is displayed on the LCD monitor 4 Tap on the thumbnail and tap d Operation Buttons for S...

Page 58: ...just the TV s screen accordingly The color of images looks strange 0 If the video was recorded with x v Color set to ON set the x v Color setting of the TV to on x v Color 2D mode only A p 106 0 Adjust the TV s screen accordingly HDMI CEC functions do not work properly and the TV does not work in conjunction with this unit 0 TVs may operate differently depending on the specifications even if they ...

Page 59: ...ience fatigue or discomfort while viewing 3D images set HDMI OUTPUT in the COMMON menu to 2D OUTPUT In addition set the TV to 2D display accordingly HDMI OUTPUT A p 128 Memo 0 When connected to the TV via the provided HDMI mini cable images and sounds may not be output properly depending on the TV connected In such cases perform the following operations 1 Disconnect the HDMI mini cable and connect...

Page 60: ... HDMI cable 0 TV turns on automatically and switches to HDMI input mode when this unit is turned on Operation Method 2 1 Turn off the TV 0 This unit turns off automatically Memo 0 Depending on the TV connected the display language of this unit will automatically switch to the language that is selected for the TV when this unit is turned on This is applicable only if this unit supports the language...

Page 61: ...ned 4 Press the external input button on the TV to switch to the input from this unit via the connected connector 5 Play back a file Playing Back Videos A p 52 Playing Back Still Images A p 55 Memo 0 Change the settings in HDMI OUTPUT according to the connection HDMI OUTPUT A p 128 0 When connected to the TV via the HDMI mini cable images and sounds may not be output properly depending on the TV c...

Page 62: ...n off the power 2 Connect to a TV A Connect using the provided AV cable B Connect the AC adapter to this unit 0 This unit powers on automatically when the AC adapter is connected 3 Press the external input button on the TV to switch to the input from this unit via the connected connector 4 Play back a file Playing Back Videos A p 52 Playing Back Still Images A p 55 Memo 0 For questions about the T...

Page 63: ...le of the provided Everio MediaBrowser 3D software to operate Memo 0 When AVCHD files recorded in 3D are played back on a normal recorder or player the left and right images will be displayed separately 0 When there are many files in the disc it may take time for them to be displayed on the screen Wait for a while as the access lamp appears blinking which indicates normal operation o 3D MP4 MVC Fi...

Page 64: ...aution 0 DVDs that are created in AVCHD format cannot be played back on DVD players with standard quality You may not be able to remove the disc from the player Digest Playback on a Blu ray or DVD Player You can play back a few seconds from each scene of the recorded videos in the created disc 1 Load the created disc on a player 2 Select DIGEST PLAYBACK on the TV 0 The digest is played back contin...

Page 65: ...mode is shown in the image the same operations apply for the still image mode 2 Tap YES 0 Tap h g to select the previous or next file 0 When no file remains the screen returns to the index screen Memo 0 Files that are protected cannot be deleted Release protection before deleting the file Protecting Files A p 66 Deleting Selected Files Deletes the selected files Caution 0 Deleted files cannot be r...

Page 66: ...tecting Releasing Protection of Selected Files A p 66 Caution 0 When the recording media is formatted even the protected files will be deleted Protecting Releasing Protection of the Currently Displayed File Protects or releases protection of the currently displayed file 1 Tap MENU 2 Tap PROTECT CANCEL 3 Tap YES 0 Tap h g to select the previous or next file 0 After setting tap OK Protecting Releasi...

Page 67: ...of the grouped files appears Tap on the files to protect or release protection of then tap J 6 Tap SET 0 Protect marks I appear on the selected files Protect marks I disappear from the deselected files Capturing a Still Image in the Video during Playback You can capture still images of the scenes you like in the recorded videos 1 Select video mode 2 Tap q to select the playback mode 3 Tap on the d...

Page 68: ... move upward or downward for more selection 5 Tap on the video to edit 6 Tap e to pause playback at the desired start point then tap A 7 Tap e to pause playback at the desired end point then tap B 0 To reset the start or end point tap A or B at the desired scene position 8 Tap SET 9 Tap SET 0 When copying finishes the copied file is added to the index screen 0 After copying tap OK Memo 0 The divis...

Page 69: ... videos for YouTube the duration cannot be longer than 15 minutes 9 Tap SET 10 Tap YES 0 After copying tap OK 0 When copying finishes the copied file is added to the index screen 0 To exit upload settings tap STOP on the upload settings screen 0 After copying tap OK Memo 0 The division point may deviate slightly from the selected scene Uploading Videos to YouTube You can upload your videos to YouT...

Page 70: ...n a normal recorder or player the left and right images will be displayed separately 0 3D images cannot be copied to a VHS tape Copy them to a Blu ray disc DVD or USB external hard disk drive 0 To record to discs with a computer a recordable DVD or Blu ray drive is required for the computer in use o 3D MP4 MVC Files P Can be copied Cannot be copied Recording Device DVD AVCHD Blu ray Disc Device s ...

Page 71: ... Recorder A p 83 P P 1 P DVD recorder Dubbing Files by Connecting to a DVD Recorder A p 83 P P USB external hard disk drive Using a USB External Hard Disk Drive A p 84 P VCR Dubbing Files to a VHS Tape Using a VCR A p 88 P Computer Copying to Windows PC A p 91 2 2 2 P 1 Only on AVCHD compatible devices 2 Use Everio MediaBrowser 3D to record to discs on the computer Refer to the help file of the pr...

Page 72: ...Memo 0 When there are many files to back up it may take time for the backup to be completed Wait for a while as the access lamp appears blinking which indicates normal operation 0 Recording date and time will not be displayed when playing back a disc that contains videos recorded in 3D mode Caution 0 3D images in MP4 MVC format cannot be copied to a DVD writer Changing the Media of the DVD Writer ...

Page 73: ...and the AC adapter 0 Turn off the camcorder by pressing the M button for about 2 seconds A Connect the USB cable of the DVD writer to this unit B Connect the AC adapter of the DVD writer C Connect the AC adapter to this unit 0 This unit powers on automatically when the AC adapter is connected 0 This unit turns on and the BACK UP menu appears 0 While the USB cable is connected the BACK UP menu is d...

Page 74: ...ears change the disc 9 After copying tap OK 10 Press and hold the M button for 2 seconds or more to turn off this unit and disconnect the USB cable Caution 0 Do not turn off the power or remove the USB cable until copying is complete 0 Files that are not on the index screen during playback cannot be copied Memo 0 To check the created disc refer to Playing Back with a DVD Writer Playing Back with a...

Page 75: ... Prepare the discs accordingly 8 Tap YES or NO A mode only 0 When YES is selected videos with similar recording dates are displayed in groups 0 When NO is selected videos are displayed according to recording dates 9 Tap EXECUTE 0 When INSERT NEXT DISC appears change the disc 10 After copying tap OK 11 Press and hold the M button for 2 seconds or more to turn off this unit and disconnect the USB ca...

Page 76: ...e media to copy 5 Tap SELECT FROM SCENES video or SELECT FROM IMAGES still image 0 While the video mode is shown in the image the same operations apply for the still image mode 6 Tap on the videos or still images to copy 0 A check mark appears on the selected file To remove the check mark tap on the file again 0 Tap CHECK to check the file 0 While the video mode is shown in the image the same oper...

Page 77: ...u can play back the DVDs created on this unit 1 Prepare a DVD writer 0 Insert the DVD to play back into the DVD writer Preparing a DVD Writer CU VD50U A p 73 Preparing a DVD Writer CU VD3U A p 73 2 Tap PLAYBACK in the BACK UP menu 0 An index screen thumbnail display of the videos in the disc appears 0 Tap J to return to the BACK UP menu 0 Imagesrecordedin3Dmodeand2Dmodearedisplayedontheindex scree...

Page 78: ...Blu ray Drive A p 82 0 The recordable time on the disc varies according to the way of recording 0 When there are many files to back up it may take time for the backup to be completed Wait for a while as the access lamp appears blinking which indicates normal operation 0 Recording date and time will not be displayed when playing back a disc that contains videos recorded in 3D mode Changing the Medi...

Page 79: ...letely and load a new disc properly C Push the disc tray in until it clicks into place Caution 0 Be sure to turn off the power when connecting the devices Otherwise electric shocks or malfunctions may occur Creating a Disc Creating a Disc 1 Prepare an external Blu ray drive 0 Insert a new disc into the external Blu ray drive Preparing an External Blu ray Drive A p 79 2 Copy files to the disc with ...

Page 80: ...ack with an External Blu ray Drive Playing Back with an External Blu ray Drive A p 82 Copying Files by Date 2D mode only Videos or still images are sorted and copied according to the date on which they were recorded 1 Select 3D or 2D mode 2 Select video or still image mode 3 Tap SELECT AND CREATE video or SELECT AND SAVE still image 0 While the video mode is shown in the image the same operations ...

Page 81: ... copied Memo 0 To check the created disc refer to Playing Back with an External Blu ray Drive Playing Back with an External Blu ray Drive A p 82 Copying Selected Files Select and copy the desired videos or still images individually 1 Select 3D or 2D mode 2 Select video or still image mode 3 Tap SELECT AND CREATE video or SELECT AND SAVE still image 4 Tap on the media to copy 5 Tap SELECT FROM SCEN...

Page 82: ...rdedin3Dmodeand2Dmodearedisplayedonthe index screen separately Press the 3D button to switch to the desired mode for playback 0 During 3D mode 3D is displayed on the LCD monitor 0 During 2D mode 2D is displayed on the LCD monitor 3 Tap on the file to start playback 0 For details on video playback refer to Operation Buttons for Video Playback A p 53 Operation Buttons for Video Playback A p 53 0 To ...

Page 83: ...s by Connecting to a DVD Recorder You can dub videos in standard quality by connecting to a DVD recorder 0 Refer also to the instruction manuals of the TV and DVD recorder 1 Open the LCD monitor then press and hold the power button for 2 seconds or more to turn off the power 2 Connect to a DVD recorder A Connect using the provided AV cable B Connect the AC adapter to this unit 0 This unit powers o...

Page 84: ...unit or the USB external hard disk drive Disconnecting the USB cable 0 Do not format the USB external hard disk drive using the PC If you did format again using this unit All the data in the USB external hard disk drive will be erased 0 Avoid the following operations using the PC Deleting files or folders in the USB external hard disk drive Moving files or folders in the USB external hard disk dri...

Page 85: ...xternal Hard Disk Drive Videos or still images saved in an external hard disk drive can be played back on this unit 1 Select 3D or 2D mode 2 Select video or still image mode 3 Tap PLAYBACK 4 Tap on the folder to play back 0 Tap J to return to the BACK UP menu 5 Tap on the file to play back 0 Tap J to return to the folder index screen 0 For details on video playback refer to Operation Buttons for V...

Page 86: ...les on a PC Backing Up All Files A p 93 1 Select 3D or 2D mode 2 Select video or still image mode 3 Tap DELETE 4 Tap on the folder to delete 5 Tap YES 0 After deleting tap OK Memo 0 Images recorded in 3D mode and 2D mode are displayed on the index screen separately Press the 3D button to switch to the desired mode for deletion 0 3D images recorded in MP4 MVC format and AVCHD format are displayed o...

Page 87: ...disk drive to the built in memory of this unit or an SD card 1 Select 3D or 2D mode 2 Select video or still image mode 3 Tap IMPORT FROM DEVICE in BACK UP 4 Tap USB HDDFBUILT IN MEM or USB HDDFSD 0 Files will be imported to the selected media 5 Tap on the folder to import 6 Tap on the files to import 0 P appears on the selected files To remove P from a file tap on the file again 0 Tap SEL ALL to s...

Page 88: ...0 3D images cannot be copied to a VHS tape Images recorded in 3D mode cannot be copied as 2D images 1 Open the LCD monitor then press and hold the power button for 2 seconds or more to turn off the power 2 Connect to a VCR DVD recorder A Connect using the provided AV cable B Connect the AC adapter to this unit 0 This unit powers on automatically when the AC adapter is connected 3 Tap q to select t...

Page 89: ...s and still images in the SD card cannot be copied to the built in memory 1 Select 3D or 2D mode 2 Select video or still image mode 3 Tap q to select the playback mode 4 Tap MENU 5 Tap COPY 6 Tap on the files to copy 0 P appears on the selected files To remove P from a file tap on the file again 0 Tap SEL ALL to select all files 0 Tap REL ALL to release all selections 0 SET is deactivated when no ...

Page 90: ...he destination medium 0 Videos and still images in the SD card cannot be moved to the built in memory 1 Select 3D or 2D mode 2 Select video or still image mode 3 Tap q to select the playback mode 4 Tap MENU 5 Tap MOVE 6 Tap on the files to move 0 P appears on the selected files To remove P from a file tap on the file again 0 Tap SEL ALL to select all files 0 Tap REL ALL to release all selections 0...

Page 91: ...Trouble with Using the Provided Software Everio MediaBrowser 3D Consult the customer service center below 0 Pixela User Support Center Telephone USA and Canada English 1 800 458 4029 toll free Europe UK Germany France and Spain English German French Spanish 800 1532 4865 toll free Other Countries in Europe English German French Spanish 44 1489 564 764 Asia Philippines English 63 2 438 0090 China C...

Page 92: ...l Core 2 Duo CPU 2 13 GHz or higher recommended Video editing AVCHD 3D playback Intel Core i7 CPU 2 53 GHz or higher recommended Intel Core Duo CPU 1 66 GHz or higher Intel Core 2 Duo CPU 2 13 GHz or higher recommended Video editing AVCHD 3D playback Intel Core i7 CPU 2 53 GHz or higher recommended RAM At least 2 GB At least 1 GB o Other requirements 0 Display 1024 768 pixels or above 1280 1024 pi...

Page 93: ...efore making backup load the SD card in which the videos and still images are stored on this unit 0 If you encounter any problems with the provided software Everio MediaBrowser 3D please consult the Pixela User Support Center Telephone USA and Canada English 1 800 458 4029 toll free Europe UK Germany France and Spain English German French Spanish 800 1532 4865 toll free Other Countries in Europe E...

Page 94: ... the created user list Identifying Video or Still Image 0 You can select files using the SELECT menu on the top right of the screen 0 Check the video still image icon on the top right corner of the thumbnail Memo 0 If you encounter any problems with the provided software Everio MediaBrowser 3D please consult the Pixela User Support Center Telephone USA and Canada English 1 800 458 4029 toll free E...

Page 95: ...o MediaBrowser 3D DVD R DVD R DL DVD RW DVD R DVD R DL DVD RW BD R BD RE 0 The following formats are supported by the provided software Everio MediaBrowser 3D DVD Video AVCHD BD 0 When copying videos recorded in UXP recording mode to create an AVCHD disc the videos need to be converted to XP recording mode before copying Therefore it may take a longer time than copying videos recorded in other mod...

Page 96: ...t Computer Windows Vista My Computer Windows XP Computer Windows 7 from the Start menu then click on the JVCCAM_MEM or JVCCAM_SD icon 0 Open the folder with the desired files List of Files and Folders A p 97 5 Copy the files to any folder in the computer desktop etc Caution 0 When the folders or files are deleted moved renamed in the computer they cannot be played back on this unit anymore Memo 0 ...

Page 97: ...iles are created in the built in memory and SD card as shown below They are created only when necessary Caution 0 When the folders or files are deleted moved renamed in the computer they cannot be played back on this unit anymore Copying 97 ...

Page 98: ...LD HARMLESS JVC FROM ANY LOSS LIABILITY OR COST ARISING OUT OF OR IN ANY WAY CONNECTED TO CLAIMS FROM ANY THIRD PARTY RELATING TO THE USE OF THE PROGRAM 6 TERM This Agreement will become effective on the date when You install and use the Program on Your machine and continue to be in effect until the termination under the following provision Should You breach any provision of this Agreement JVC may...

Page 99: ... 0 Tap or to move upward or downward for more selection 3 Tap the desired setting Memo 0 To exit the screen Tap L quit 0 To return to the previous screen Tap J return 0 To display the help file Tap K help and tap the item 0 Help file may not be available for some items Operating the Common Menu You can configure common setting items regardless of the mode using the common menu 1 Tap MENU 0 The men...

Page 100: ...for more precise focus Using Focus Assist A p 38 Displayed only in the manual recording mode FOCUS ASSIST COLOR Sets the color of the outline of a focused object when Focus Assist is used FOCUS ASSIST COLOR A p 102 Displayed only in the manual recording mode BRIGHTNESS ADJUST Adjusts the overall brightness of the screen Adjusting Brightness A p 38 Displayed only in the manual recording mode SHUTTE...

Page 101: ...to be shown within a short time by taking frames of it at a certain interval Recording at Intervals TIME LAPSE RECORDING A p 46 3D VIDEO REC FORMAT You can select a recording format for 3D video recording 3D VIDEO REC FORMAT 3D mode only A p 104 Displayed only in the 3D recording mode VIDEO QUALITY Sets the video quality VIDEO QUALITY A p 105 ZOOM Sets the maximum zoom ratio ZOOM 2D mode only A p ...

Page 102: ...creen Operating Details Adjusting Brightness A p 38 SHUTTER SPEED Shutter speed can be adjusted Operating Details Setting Shutter Speed A p 39 APERTURE PRIORITY Adjusts the aperture value Operating Details Setting Aperture A p 39 WHITE BALANCE Adjusts the color according to the light source Operating Details Setting White Balance A p 40 BACKLIGHT COMP Corrects the image when the subject appears da...

Page 103: ...ens the scene more than ON movements of the subject may become unnatural 0 Setting can be adjusted separately for still images GAIN UP Still Image A p 113 Displaying the Item 1 Select video mode 2 Tap q to select the recording mode 3 Tap MENU 4 Tap GAIN UP WIND CUT Reduces the noise caused by wind Setting Details OFF Deactivates the function ON Activates the function Displaying the Item 1 Select v...

Page 104: ...ames of it at a certain interval This is useful for making observations such as the opening of a flower bud Operating Details Recording at Intervals TIME LAPSE RECORDING A p 46 3D VIDEO REC FORMAT 3D mode only You can select a recording format for 3D video recording Setting Details AVCHD Records in AVCHD format Set to this recording format for higher compatibility MP4 MVC Records in MP4 MVC format...

Page 105: ...y cannot be saved to DVDs XP Enables recording in high picture quality SP Enables recording in standard quality EP Enables long recordings Memo 0 To avoid noise when recording fast moving scenes or scenes with extreme changes of brightness set to THR or TXP during 3D mode or UXP or XP during 2D mode 0 Use an external Blu ray drive to save videos recorded in UXP mode 0 You can change to the desired...

Page 106: ...tally enlarged Displaying the Item 1 Select video mode 2 Tap q to select the recording mode 3 Tap MENU 4 Tap ZOOM x v Color 2D mode only Captures the true colors Use an x v Color compatible TV for playback Setting Details OFF Captures colors with the same standard as TV broadcasting ON Captures the true colors for TVs that supports x v Color Displaying the Item 1 Select video mode 2 Tap q to selec...

Page 107: ...ts such that MIC LEVEL does not turn red Setting Details OFF Hides display of microphone input level ON Shows display of microphone input level Caution 0 When 3D VIDEO REC FORMAT is set to MP4 MVC and recording is performed together with HDMI output the microphone input level will not be displayed It will be displayed after recording stops Displaying the Item 1 Select video mode 2 Tap q to select ...

Page 108: ...t the recording mode 3 Tap MENU 4 Tap MIC LEVEL SETTING HEADPHONE VOL ADJ Sets the volume level of the connected headphones Adjusting the Volume Level of Headphones During Recording 1 Select video mode 2 Tap q to select the recording mode 3 Tap MENU 4 Tap HEADPHONE VOL ADJ 0 The volume adjustment screen appears 5 Adjust the volume level of the headphones 0 To turn up the volume tap on the touch sc...

Page 109: ...p q to select the playback mode 3 Adjust the volume level of the headphones 0 To turn up the volume set the zoom lever to the T end 0 To turn down the volume set the zoom lever to the W end Menu Settings 109 ...

Page 110: ...color for more precise focus Using Focus Assist A p 38 Displayed only in the manual recording mode FOCUS ASSIST COLOR Sets the color of the outline of a focused object when Focus Assist is used FOCUS ASSIST COLOR A p 112 Displayed only in the manual recording mode BRIGHTNESS ADJUST Adjusts the overall brightness of the screen Adjusting Brightness A p 38 Displayed only in the manual recording mode ...

Page 111: ...A p 45 SMILE LEVEL Sets the items to display when faces are detected Setting SMILE LEVEL Display Still image only A p 46 SELF TIMER Use this when taking a group photo Taking Group Shots Self timer A p 48 GAIN UP Makes the subject appear bright automatically when recording in dark places GAIN UP A p 113 GRID Displays gridlines to make it easier to detect when the subject appears slanted GRID A p 11...

Page 112: ...Speed A p 39 APERTURE PRIORITY Adjusts the aperture value Operating Details Setting Aperture A p 39 WHITE BALANCE Adjusts the color according to the light source Operating Details Setting White Balance A p 40 BACKLIGHT COMP Corrects the image when the subject appears dark due to backlight Operating Details Setting Backlight Compensation A p 41 TELE MACRO 2D mode only Enables close up shots when us...

Page 113: ...ely for videos GAIN UP Video A p 103 Displaying the Item 1 Select still image mode 2 Tap q to select the recording mode 3 Tap MENU 4 Tap GAIN UP GRID Displays gridlines to make it easier to detect when the subject appears slanted Setting Details OFF Turns off grid display ON Turns on grid display Displaying the Item 1 Select still image mode 2 Tap q to select the recording mode 3 Tap MENU 4 Tap GR...

Page 114: ...elect still image mode 2 Tap q to select the recording mode 3 Tap MENU 4 Tap SHUTTER MODE CONT SHOOTING SPEED Sets the speed for continuous shooting Setting Details HIGH SPEED 0 Shoots up to 12 still images continuously in the 3D still image mode at approximately 12 images second 0 Shoots up to 40 still images continuously in the 2D still image mode at approximately 12 images second LOW SPEED Shoo...

Page 115: ...nd 2D images will be set to 1920X1080 2M 16 9 o 2D Mode Setting Details 2304X1296 2 9M 1920X1080 2M 16 9 Takes still images with aspect ratio 16 9 0 The sides of still images recorded in 16 9 aspect ratio may be cut off when printed 1728X1296 2 2M 640X480 0 3M 4 3 Takes still images with aspect ratio 4 3 Displaying the Item 1 Select still image mode 2 Tap q to select the recording mode 3 Tap MENU ...

Page 116: ...card COPY A p 117 MOVE Moves files from the built in memory to the SD card MOVE A p 117 TRIMMING Select the required part of a video and save it as a new video file Capturing a Required Part in the Video TRIMMING A p 68 UPLOAD SETTINGS Capture and copy a part of a recorded video maximum 15 minutes for uploading to YouTube UPLOAD SETTINGS A p 117 PLAYBACK OTHER FILE Plays videos with defective mana...

Page 117: ... a part of a recorded video maximum 15 minutes for uploading to YouTube Operating Details Capturing Videos for Uploading to YouTube A p 69 PLAYBACK OTHER FILE Plays videos with defective management information Operating Details Playing a Video with Defective Management Information A p 54 3D MOTION RELIEF 3D mode only Plays back in stop motion the scenes that are likely to cause motion sickness to ...

Page 118: ...om the built in memory to the SD card COPY A p 118 MOVE Moves files from the built in memory to the SD card MOVE A p 118 SEARCH DATE Narrows down the still image index screen according to recording dates Operating Details Date Search A p 58 PROTECT CANCEL Protects files from being deleted accidently Operating Details Protecting Releasing Protection of the Currently Displayed File A p 66 Protecting...

Page 119: ... MONITOR BRIGHTNESS Sets the brightness of the LCD monitor MONITOR BRIGHTNESS A p 122 REC MEDIA FOR VIDEO Sets the recording playback media of videos REC MEDIA FOR VIDEO A p 122 REC MEDIA FOR IMAGE Sets the recording playback media of still images REC MEDIA FOR IMAGE A p 123 OPERATION SOUND Turns on or off the operation sound OPERATION SOUND A p 123 AUTO POWER OFF Prevents the situation of forgett...

Page 120: ...MI OUTPUT A p 128 HDMI CONTROL Sets the linked operations ON OFF when the TV and this unit are connected using the HDMI mini connector HDMI CONTROL A p 129 AUTO FINALIZE Finalizes the discs created automatically so that they can be played back on compatible devices AUTO FINALIZE A p 129 FACTORY PRESET Returns all the settings to their default values FACTORY PRESET A p 130 UPDATE Updates the functi...

Page 121: ... bottom of DATE STYLE then tap or to set the order of year month and day 0 Tap the bottom of TIME then tap or to set the time display format 0 For date display set to any format from month day year year month day and day month year 0 For time display set to any format from 12h and 24h 0 After setting tap SET This confirms the setting of the order of year month day and the time display format 0 To ...

Page 122: ...nitor regardless of the surrounding conditions 1 Sets to dim brightness Helps to save battery life when selected AUTO Sets the brightness automatically to 4 when using outdoors and to 3 when using indoors Displaying the Item 1 Tap MENU 2 Tap Q 3 Tap MONITOR BRIGHTNESS REC MEDIA FOR VIDEO Sets the recording playback media of videos Setting Details BUILT IN MEMORY Records videos to this unit s built...

Page 123: ... built in memory SD CARD Records still images to the SD card Displaying the Item 1 Tap MENU 2 Tap Q 3 Tap REC MEDIA FOR IMAGE OPERATION SOUND Turns on or off the operation sound Setting Details OFF Turns off the operation sound ON Turns on the operation sound Displaying the Item 1 Tap MENU 2 Tap Q 3 Tap OPERATION SOUND Menu Settings 123 ...

Page 124: ...pter this unit goes into standby mode Displaying the Item 1 Tap MENU 2 Tap Q 3 Tap AUTO POWER OFF QUICK RESTART Enables the power to turn on quickly when the LCD monitor is opened again within 5 minutes Setting Details OFF Deactivates the function ON Enables the power to turn on quickly when the LCD monitor is opened again within 5 minutes Memo 0 The power consumption within 5 minutes after the LC...

Page 125: ...it Setting Details OFF Deactivates the function ON Plays a demonstration of the special features of this unit Displaying Demo Mode A Remove the battery pack and SD card B Connect the AC adapter C Open the LCD monitor and turn on the power 0 Demonstration starts playing after 3 minutes 0 To stop playback tap on the screen Memo 0 This mode is not available in the playback mode Displaying the Item 1 ...

Page 126: ... Keep tapping as its position changes with every tap 0 If areas on the adjustment screen other than the mark are tapped errors will occur In this case try again from step 4 6 Tap OK 0 Setting ends and returns to the menu screen Caution 0 Do not tap areas other than the mark during touch screen adjustment steps 4 5 Doing so may cause the touch screen to malfunction Memo 0 Adjust by lightly tapping ...

Page 127: ...a regular interval 3D warning icon y Displaying the Item 1 Tap MENU 2 Tap Q 3 Tap 3D DISPLAY WARNING VIDEO OUTPUT 2D mode only Sets the aspect ratio 4 3 or 16 9 according to the connecting TV Setting Details 4 3 Select this when connecting to a conventional TV 4 3 16 9 Select this when connecting to a widescreen TV 16 9 Displaying the Item 1 Tap MENU 2 Tap Q 3 Tap VIDEO OUTPUT Menu Settings 127 ...

Page 128: ...at Recorded 3D Video Format and Display on TV via HDMI Output o When HDMI OUTPUT is set to 2D OUTPUT 3D VIDEO REC FORMAT Video Output 2D TV 3D Compatible TV LCD Monitor of this Unit AVCHD 2D 2D 3D MP4 MVC 2D 2D 3D o When HDMI OUTPUT is set to AUTO 3D VIDEO REC FORMAT Video Output 2D TV 3D Compatible TV LCD Monitor of this Unit AVCHD 2D 3D 3D MP4 MVC 2D 3D 3D 0 If 3D images cannot be seen even when...

Page 129: ...e Item 1 Tap MENU 2 Tap Q 3 Tap HDMI CONTROL AUTO FINALIZE Finalizes the discs created automatically so that they can be played back on compatible devices Setting Details OFF Does not finalize the disc Data can be added to the disc later ON Finalizes the disc and sets it to a readable state Displaying the Item 1 Tap MENU 2 Tap Q 3 Tap AUTO FINALIZE Menu Settings 129 ...

Page 130: ...english global e html FORMAT BUILT IN MEM Deletes all files on the built in memory Setting Details FILE Deletes all files on the built in memory FILE MANAGEMENT NO Deletes all files on the built in memory and resets the folder and file numbers to 1 Caution 0 All data on the built in memory will be deleted when it is formatted Copy all files on the built in memory to a PC before formatting 0 Make s...

Page 131: ... PC before formatting 0 Make sure that the battery pack is fully charged or connect the AC adapter as the formatting process may take some time Displaying the Item 1 Tap MENU 2 Tap Q 3 Tap FORMAT SD CARD ERASE ALL DATA Execute this process when disposing of this unit or passing it to another person 1 Tap MENU 2 Tap Q 3 Tap ERASE ALL DATA 4 Tap YES 0 After deleting is complete tap OK Caution 0 Conn...

Page 132: ...ects to optional headphones Attaching Headphones A p 23 2 ACCESS Access Lamp 0 Lights up blinks during recording or playback Do not remove the battery pack AC adapter or SD card 3 POWER CHARGE Power Charge Lamp 0 Lights up Power ON 0 Blinks Charging in progress 0 Goes out Charging finished 4 HDMI Connector 0 Connects to an HDMI TV 5 DC Connector 0 Connects to an AC adapter to charge the battery 6 ...

Page 133: ...on lights up goes out 6 Remote Sensor 7 INFO Information Button 0 Recording Displays the remaining time for video only and battery power 0 Playback Displays file information such as recording date 8 ADJ Adjustment Button 0 Enables adjustment of FOCUS BRIGHTNESS ADJUST etc 9 Control Dial Using the Control Dial for Recording A p 43 10 M Power Button 0 Press and hold to turn the power on off while th...

Page 134: ...itor Backlight MONITOR BRIGHTNESS A p 122 15 Focus Adjusting Focus Manually A p 37 16 APERTURE PRIORITY Setting Aperture A p 39 17 Brightness Adjusting Brightness A p 38 18 Backlight Compensation Setting Backlight Compensation A p 41 19 Parallax Adjustment 3D mode only Adjusting Parallax During Recording A p 34 Video Recording 1 Video Mode A B Video Still Image Button A p 133 2 3D VIDEO REC FORMAT...

Page 135: ...g A p 19 5 3D 2D Mode 3D Button A p 133 6 Media REC MEDIA FOR VIDEO A p 122 7 Playback Time Playing Back Videos A p 52 8 Time Lapse Playback 0 Displays the recording interval of time lapse recording with an icon Time Lapse Setting A p 47 9 External Storage Playback Playing Back with a DVD Writer A p 77 Playing Back with an External Blu ray Drive A p 82 Playing Back Files in the USB External Hard D...

Page 136: ... 3D 2D Mode 3D Button A p 133 7 Media REC MEDIA FOR IMAGE A p 123 8 External Storage Playback Playing Back with a DVD Writer A p 77 Playing Back with an External Blu ray Drive A p 82 Playing Back Files in the USB External Hard Disk Drive A p 85 9 Output with 1080p HDMI OUTPUT A p 128 10 Parallax Adjustment 3D mode only Adjusting Parallax During Playback A p 56 Indications on the LCD monitor 136 ...

Page 137: ...nd Functions on the LCD Monitor A p 18 Recording stops automatically Recording stops automatically as it cannot be performed for 12 or more consecutive hours according to specifications It may take some time to resume recording Turn off this unit wait for a while and turn it on again This unit stops automatically to protect the circuit when the temperature rises The continuous shooting speed of st...

Page 138: ...fying System Requirements Guideline A p 92 Cannot find a recorded file Press the 3D button to switch to the desired mode for playback Playing Back Videos A p 52 Set 3D VIDEO REC FORMAT in the video recording menu to MP4 MVC or AVCHD 3D VIDEO REC FORMAT 3D mode only A p 104 Change the playback media by tapping I J on the index screen Operation Buttons for Video Playback A p 53 Operation Buttons for...

Page 139: ...D card If the SD card is write protected set it to off BACK UP menu does not disappear While the USB cable is connected the BACK UP menu is displayed Unable to turn off the BACK UP menu Turn off the power of this unit and the DVD writer or remove the AC adapter Computer Unable to copy files to DVD with a PC To record to discs a recordable DVD drive is required for the PC in use Troubleshooting 139...

Page 140: ...change the setting as desired on TV x v Color 2D mode only A p 106 Other Problems The buttons on the touch screen do not work Tap the buttons on the touch screen with your fingers The buttons may not respond if you touch them with your fingernails or with gloves on The unit operates slowly when switching between video mode and still image mode or when switching the power on or off It is recommende...

Page 141: ...e Management Information A p 54 UNSUPPORTED FILE Use files recorded with this unit Files recorded with other devices may not be playable THIS FILE IS PROTECTED Switch off the PROTECT CANCEL function in the EDIT menu Protecting Files A p 66 CHECK CARD S WRITE PROTECTION SWITCH Set the write protect switch of the SD card to off INSUFFICIENT AVAILABLE SPACE Delete files or move files to a PC or other...

Page 142: ...he body with it and then use a clean cloth to remove the detergent Caution 0 Do not use benzene or thinner Doing so may cause damage to the unit 0 When using a chemical cloth or cleaner be sure to observe the warning labels and instructions of the product 0 Do not leave the device in contact with rubber or plastic products for a long time Lens LCD Monitor 0 Use a lens blower commercially available...

Page 143: ... Still image 0 3D Mode 2 070 000 pixels 16 9 0 2D Mode 2 980 000 pixels 16 9 2 240 000 pixels 4 3 Item Details Lens 0 3D Mode F1 2 2 28 f 3 76 mm to 18 8 mm 35 mm conversion 44 8 mm to 224 mm when DIS is set to ON 35 mm conversion 42 mm to 210 mm when DIS is set to OFF 0 2D Mode F1 2 2 8 f 3 76 mm to 37 6 mm 35 mm conversion 37 3 mm to 373 mm when DIS is set to ON 35 mm conversion 37 3 mm to 373 m...

Page 144: ...mate 22 Mbps Sound quality Audio 48 kHz 192 kbps Max 192 kbps Average 128 kbps o 2D Mode Item Details Recording Playback format AVCHD standard Video MPEG 4 AVC H 264 Audio Dolby Digital 2ch Extension MTS Signal system Digital high definition system 1080 60i Image quality Video UXP 1920 x 1080 pixels Average Approximate 24 Mbps XP 1920 x 1080 pixels Average Approximate 17 Mbps SP 1920 x 1080 pixels...

Page 145: ... mm 30 5 x 32 5 x 52 1 1 4 x 1 5 16 x 2 1 8 W x H x D Mass Approx 85 g 0 19 lbs Remote Control RM V760U Item Details Power supply DC 3 V button battery CR2025 Battery life Approx 1 year depending on frequency of use Operating distance Approx 5 m facing up Allowable operating temperature 0 C to 40 C 32 F to 104 F Dimensions mm 32 5 x 15 6 x 68 1 5 16 x 5 8 x 2 3 4 W x H x D Mass Approx 16 g 0 04 lb...

Page 146: ......

Reviews: