NOTE:
Each power supply must be connected to a dedicated power source
outlet. We recommend that each power supply be connected to a different
power source for redundancy purposes.
To connect AC power to a TCX1000-RDM20:
1.
Prevent ESD damage to your equipment by attaching an ESD grounding strap to your
bare wrist, and then connecting the strap to an approved site ESD grounding point.
2.
Ensure that the power supplies are fully inserted in the chassis and the latches are
secure.
3.
Insert the coupler end of the power cord into the AC power cord inlet on the AC power
supply faceplate for each power supply.
4.
If the AC power source outlet has a power switch, set it to the off (
O
) position.
NOTE:
The TCX1000-RDM20 powers on as soon as power is provided to
the power supply.
5.
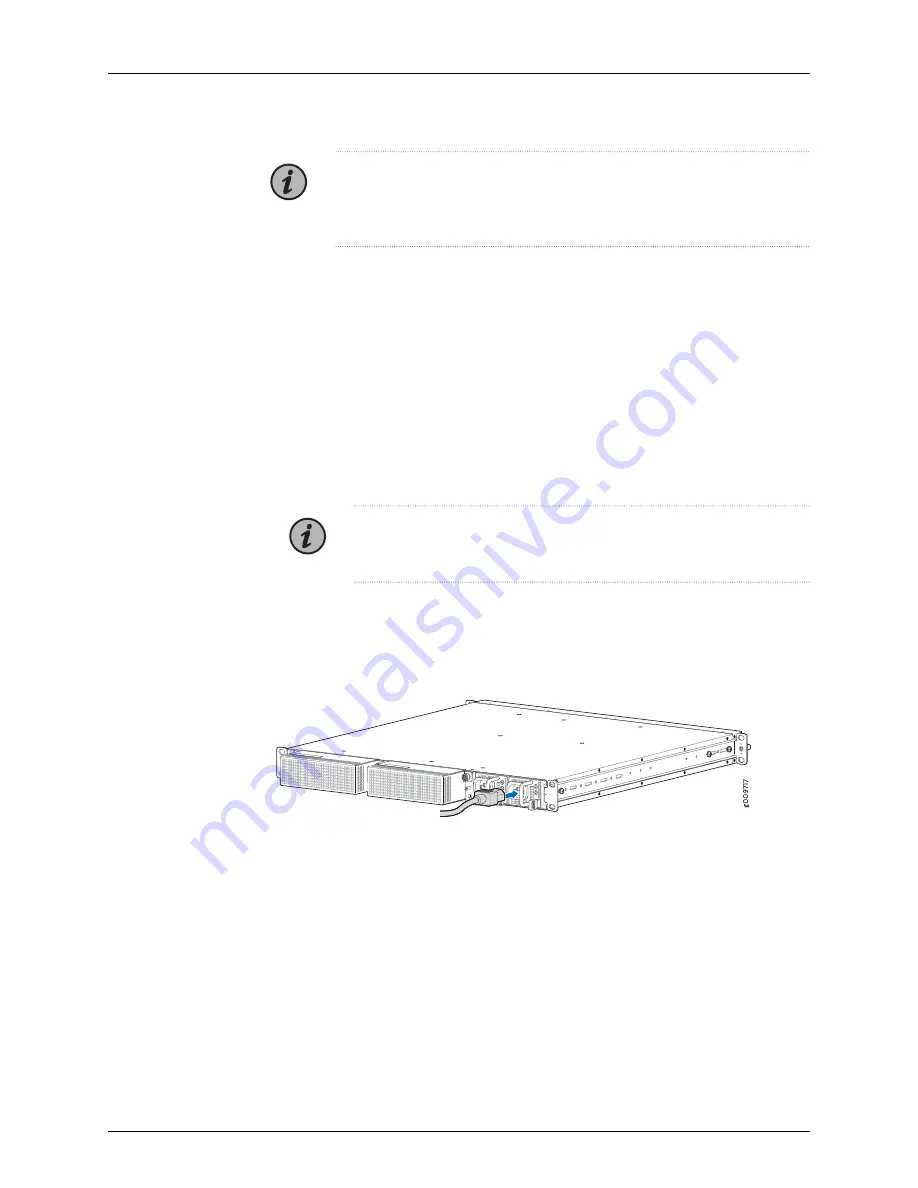
Insert the power cord plug into an AC power source outlet for each power supply. See
Figure 24: Connecting an AC Power Cord to an AC Power Supply in a TCX1000-RDM20
6.
If the AC power source outlet has a power switch, set it to the on (
|
) position.
7.
Verify that the LEDs on each power supply are lit green. If any are lit yellow, remove
power from the power supply, and replace the power supply (see
Supply in a TCX1000-RDM20” on page 123
in the
TCX1000 Programmable ROADM
Hardware Guide
). Do not remove the power supply until you have a replacement power
supply ready; power supplies must be installed in the TCX1000-RDM20 to ensure
proper airflow.
Copyright © 2019, Juniper Networks, Inc.
74
TCX1000 Programmable ROADM Hardware Guide
Summary of Contents for TCX1000-RDM20
Page 8: ...Copyright 2019 Juniper Networks Inc viii TCX1000 Programmable ROADM Hardware Guide...
Page 14: ...Copyright 2019 Juniper Networks Inc xiv TCX1000 Programmable ROADM Hardware Guide...
Page 16: ...Copyright 2019 Juniper Networks Inc 2 TCX1000 Programmable ROADM Hardware Guide...
Page 22: ...Copyright 2019 Juniper Networks Inc 8 TCX1000 Programmable ROADM Hardware Guide...
Page 30: ...Copyright 2019 Juniper Networks Inc 16 TCX1000 Programmable ROADM Hardware Guide...
Page 34: ...Copyright 2019 Juniper Networks Inc 20 TCX1000 Programmable ROADM Hardware Guide...
Page 40: ...Copyright 2019 Juniper Networks Inc 26 TCX1000 Programmable ROADM Hardware Guide...
Page 42: ...Copyright 2019 Juniper Networks Inc 28 TCX1000 Programmable ROADM Hardware Guide...
Page 62: ...Copyright 2019 Juniper Networks Inc 48 TCX1000 Programmable ROADM Hardware Guide...
Page 64: ...Copyright 2019 Juniper Networks Inc 50 TCX1000 Programmable ROADM Hardware Guide...
Page 72: ...Copyright 2019 Juniper Networks Inc 58 TCX1000 Programmable ROADM Hardware Guide...
Page 74: ...Copyright 2019 Juniper Networks Inc 60 TCX1000 Programmable ROADM Hardware Guide...
Page 86: ...Copyright 2019 Juniper Networks Inc 72 TCX1000 Programmable ROADM Hardware Guide...
Page 98: ...Copyright 2019 Juniper Networks Inc 84 TCX1000 Programmable ROADM Hardware Guide...
Page 106: ...Copyright 2019 Juniper Networks Inc 92 TCX1000 Programmable ROADM Hardware Guide...
Page 128: ...Copyright 2019 Juniper Networks Inc 114 TCX1000 Programmable ROADM Hardware Guide...
Page 134: ...Copyright 2019 Juniper Networks Inc 120 TCX1000 Programmable ROADM Hardware Guide...
Page 148: ...Copyright 2019 Juniper Networks Inc 134 TCX1000 Programmable ROADM Hardware Guide...
Page 150: ...Copyright 2019 Juniper Networks Inc 136 TCX1000 Programmable ROADM Hardware Guide...
Page 152: ...Copyright 2019 Juniper Networks Inc 138 TCX1000 Programmable ROADM Hardware Guide...
Page 154: ...Copyright 2019 Juniper Networks Inc 140 TCX1000 Programmable ROADM Hardware Guide...
Page 164: ...Copyright 2019 Juniper Networks Inc 150 TCX1000 Programmable ROADM Hardware Guide...
Page 166: ...Copyright 2019 Juniper Networks Inc 152 TCX1000 Programmable ROADM Hardware Guide...
Page 180: ...Copyright 2019 Juniper Networks Inc 166 TCX1000 Programmable ROADM Hardware Guide...
Page 184: ...Copyright 2019 Juniper Networks Inc 170 TCX1000 Programmable ROADM Hardware Guide...


