background image

3.

Disconnect power to the TCX1000-RDM20:

AC power supply—If the AC power source outlet has a power switch, set it to the
off (

O

) position. If the AC power source outlet does not have a power switch, gently

pull out the male end of the power cord connected to the power source outlet.

DC power supply—Switch the circuit breaker on the panel board that services the
DC circuit to the off position.

4.

Remove the power source cable from the power supply faceplate:

AC power supply—Gently pull out the female end of the power plug connected to
the power supply faceplate.

DC power supply—Remove the plastic cover and remove the lug and cable from
the terminal screws.

5.

Slide the locking lever toward the handle until it stops.

6.

Grasp the power supply handle and pull firmly to slide the power supply halfway out
of the chassis.

7.

Place one hand under the power supply to support it and slide it completely out of
the chassis. Take care not to touch power supply components, pins, leads, or solder
connections.

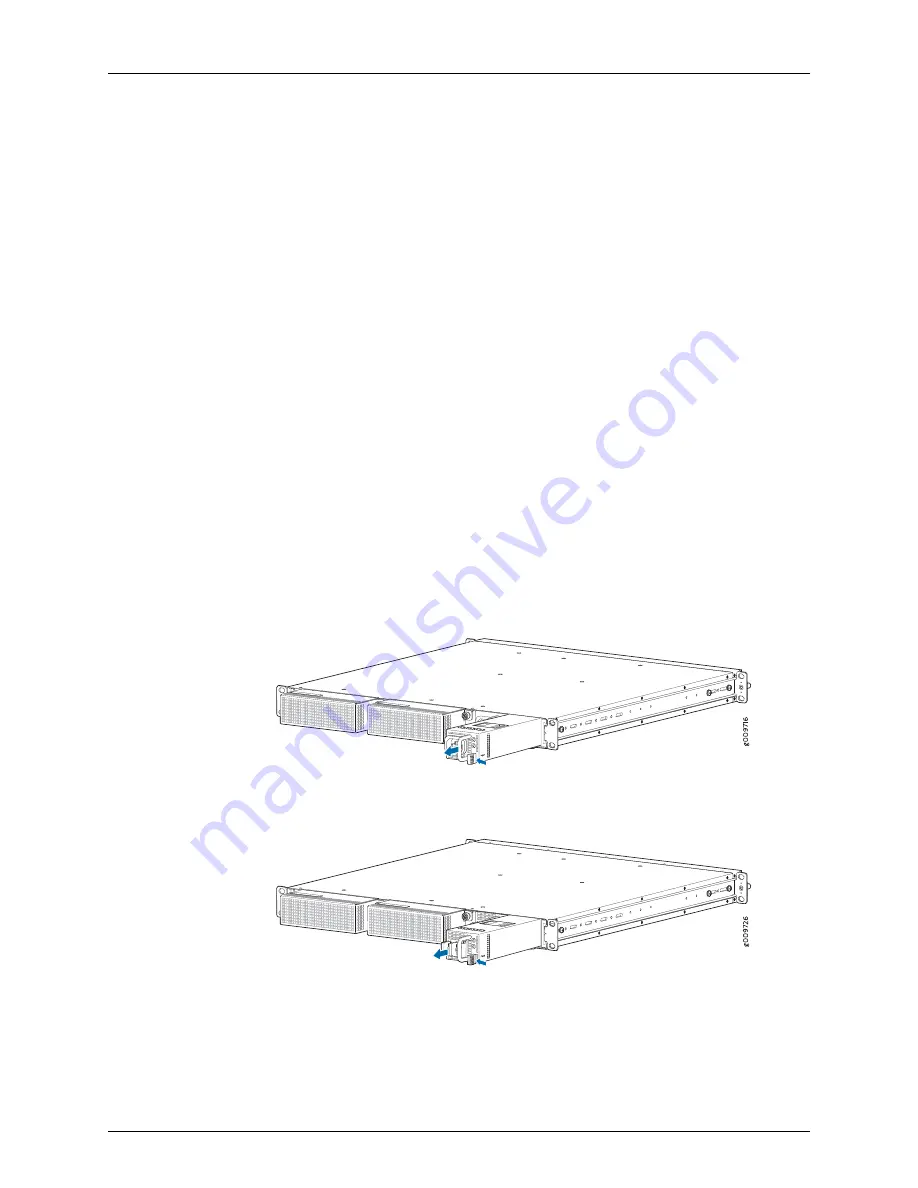
Figure 50: Removing an AC Power Supply from a TCX1000-RDM20

Figure 51: Removing a DC Power Supply from a TCX1000-RDM20

8.

Place the power supply in the antistatic bag or on the antistatic mat placed on a flat,
stable surface.

Copyright © 2019, Juniper Networks, Inc.

122

TCX1000 Programmable ROADM Hardware Guide

Summary of Contents for TCX1000-RDM20

Page 1: ...TCX1000 Programmable ROADM Hardware Guide Modified 2019 01 09 Copyright 2019 Juniper Networks Inc...

Page 2: ...t 2019 Juniper Networks Inc All rights reserved The information in this document is current as of the date on the title page YEAR 2000 NOTICE Juniper Networks hardware and software products are Year 2...

Page 3: ...r 2 TCX1000 RDM20 Components and Descriptions 9 TCX1000 RDM20 Chassis Description 9 TCX1000 RDM20 Front Panel and FRU Panel 9 Front Panel 9 FRU Panel 11 TCX1000 RDM20 Chassis and Port Status LEDs 12 T...

Page 4: ...sumption Specifications 49 Chapter 7 AC Power Specifications and Requirements 51 TCX1000 RDM20 AC Power Specifications 51 TCX1000 RDM20 AC Power Cord Specifications 51 Chapter 8 DC Power Specification...

Page 5: ...annel Fixed Mux Demux BT8A78MD03 96 Removing an FMD96 101 Connecting the FMD96 to a TCX1000 RDM20 102 Chapter 17 Installing and Connecting the TCX1000 2D8CMD Modules 105 TCX1000 2D8CMD Description 105...

Page 6: ...Components 145 Returning a Hardware Component to Juniper Networks Inc 145 Guidelines for Packing Hardware Components for Shipment 146 Packing a TCX1000 RDM20 Chassis or Component for Shipping 146 Pack...

Page 7: ...Power Disconnection Warning 180 TCX1000 RDM20 DC Power Electrical Safety Guidelines 180 DC Power Copper Conductors Warning 181 DC Power Disconnection Warning 181 DC Power Grounding Requirements and W...

Page 8: ...Copyright 2019 Juniper Networks Inc viii TCX1000 Programmable ROADM Hardware Guide...

Page 9: ...www juniper net documentation If the information in the latest release notes differs from the information in the documentation follow the product Release Notes Juniper Networks Books publishes books...

Page 10: ...de type the configure command user host configure Represents text that you type Bold text like this user host show chassis alarms No alarms currently active Represents output that appears on the termi...

Page 11: ...d sign community name members community ids Encloses a variable for which you can substitute one or more values square brackets edit routing options static route default nexthop address retain Identif...

Page 12: ...d at https www juniper net us en local pdf resource guides 7100059 en pdf Product warranties For product warranty information visit https www juniper net support warranty JTAC hours of operation The J...

Page 13: ...s entitlementsearch juniper net entitlementsearch Creating a Service Request with JTAC You can create a service request with JTAC on the Web or by telephone Visit https myjuniper juniper net Call 1 88...

Page 14: ...Copyright 2019 Juniper Networks Inc xiv TCX1000 Programmable ROADM Hardware Guide...

Page 15: ...tem Overview on page 3 TCX1000 RDM20 Components and Descriptions on page 9 Cooling System Components and Descriptions on page 17 Power System Components and Descriptions on page 21 1 Copyright 2019 Ju...

Page 16: ...Copyright 2019 Juniper Networks Inc 2 TCX1000 Programmable ROADM Hardware Guide...

Page 17: ...ted Ethernet optical supervisory channel OSC The 20 universal ports are used for Direct add drop of channels on to the network This provides single direction colorless mux demux ports Connection to ex...

Page 18: ...orts small form factor pluggable SFP port status LEDS 20 universal ports LINE IN and LINE OUT ports monitor ports and system status LEDs Figure 1 on page 4 shows the front panel of the TCX1000 RDM20 F...

Page 19: ...21 TCX1000 RDM20 DC Power Supply Description on page 22 TCX1000 RDM20 Hardware Component Overview Table 3 on page 5 describes the TCX1000 RDM20 hardware models Table 3 TCX1000 RDM20 Hardware Models D...

Page 20: ...2 TCX1000 RDM PWR DC The kit includes OSC SFP 100BASE FX Ethernet 1511 nm 43 dB reach Two 3 dB LC fixed optical attenuators LC UPC duplex fiber patchcord 30 cm length 2 mm jacket TCX1000 OSC SFP OSC S...

Page 21: ...ng power supply is replaced Related Documentation TCX1000 RDM20 Cooling System Description on page 17 TCX1000 RDM20 AC Power Supply Description on page 21 TCX1000 RDM20 DC Power Supply Description on...

Page 22: ...Copyright 2019 Juniper Networks Inc 8 TCX1000 Programmable ROADM Hardware Guide...

Page 23: ...gh 23 in 58 42 cm deep and 17 6 in 44 70 cm wide without the mounting brackets and FRUs The chassis can be installed in racks or cabinets Related Documentation TCX1000 RDM20 Description on page 3 TCX1...

Page 24: ...et Duration Warm reset of the TCX1000 RDM20 It does not impact the data plane but management connectivity is lost to the network element for the duration of the restart 250 to 8000 ms Cold reset of th...

Page 25: ...off the TCX1000 RDM20 or disrupt the TCX1000 RDM20 function to replace a fan module The TCX1000 RDM20 has two 650 W power supplies either AC or DC depending on your configuration Only one power supply...

Page 26: ...ription State Color Name Power is off Off Unlit Status STATUS LED Power is turned on On steadily Red System is operational On steadily Green Device is booting Blinking Green No critical alarms Off Unl...

Page 27: ...l fault On steadily Red Laser on operating normally On Green No fault Off Unlit SFP In port status OSC IN LED Loss of signal LOS is active On steadily Yellow No fault Off Unlit OSC 0 and OSC 1 status...

Page 28: ...ERIAL DB 9 craft port to connect to a management console 5 2 DCN 1 Ethernet port Secondary management Ethernet port ETH CRAFT RJ 45 1000BASE T management Ethernet port 3 USB port This port is not used...

Page 29: ...the location of the LEDs Figure 7 Management Port LEDs on the TCX1000 RDM20 g009703 2 3 1 3 1 LEDs for DCN 1 LEDS for ETH CRAFT 2 LEDs for DCN 0 Table 9 on page 15 describes the RJ 45 management port...

Page 30: ...Copyright 2019 Juniper Networks Inc 16 TCX1000 Programmable ROADM Hardware Guide...

Page 31: ...at a moderate speed Temperature sensors in the chassis monitor the temperature within the chassis The system raises an alarm if a fan module fails or if the ambient temperature inside the chassis rise...

Page 32: ...Ds Table 10 TCX1000 RDM20 Fan LED Description State Color Name Fan is operating normally Off Unlit Fan LED located left side of fan Fan module has failed On steadily Red Airflow Through the Chassis In...

Page 33: ...ing a Fan Module from a TCX1000 RDM20 on page 117 Installing a Fan Module in a TCX1000 RDM20 on page 118 Prevention of Electrostatic Discharge Damage on page 178 19 Copyright 2019 Juniper Networks Inc...

Page 34: ...Copyright 2019 Juniper Networks Inc 20 TCX1000 Programmable ROADM Hardware Guide...

Page 35: ...e Figure 12 on page 21 are hot removable and hot insertable field replaceable units FRUs that you can install without powering off the TCX1000 RDM20 or disrupting the functioning of the TCX1000 RDM20...

Page 36: ...ing a Power Supply in a TCX1000 RDM20 on page 123 and Removing a Power Supply from a TCX1000 RDM20 on page 121 NOTE For more information about power system redundancy see TCX1000 RDM20 Component Redun...

Page 37: ...he full load without interruption The fan in the power supply provides front to back airflow which is also known as airflow out AFO CAUTION To avoid electrical injury carefully follow instructions in...

Page 38: ...Electrostatic Discharge Damage on page 178 TCX1000 RDM20 Power Supply LEDs Figure 15 on page 24 and Figure 16 on page 24 show the locations of the power supply LEDs Figure 15 AC Power Supply LEDs 2 1...

Page 39: ...Unlit Bottom LED The power supply is present and on standby mode Blinking Green The power supply is OK and operating correctly On steadily There is an internal failure On steadily Yellow There is an...

Page 40: ...Copyright 2019 Juniper Networks Inc 26 TCX1000 Programmable ROADM Hardware Guide...

Page 41: ...Overview on page 29 Power Consumption Specifications on page 49 AC Power Specifications and Requirements on page 51 DC Power Specifications and Requirements on page 53 Management Cable Specifications...

Page 42: ...Copyright 2019 Juniper Networks Inc 28 TCX1000 Programmable ROADM Hardware Guide...

Page 43: ...1000 RDM20ChannelCenterWavelengthandFrequencySpecificationsonpage38 96 Channel Fixed Mux Demux FMD96 DWDM 50 GHz Wavelength Specifications on page 42 TCX1000 RDM20 Chassis Grounding Cable and Lug Spec...

Page 44: ...cabinet to the floor and building structure Cables Acquire cables and connectors Determine the number of cables needed based on your planned configuration Reviewthemaximumdistanceallowedforeach cable...

Page 45: ...s of the front mounting brackets extend the width to 22 9 in 58 16 cm Ensure that the front and rear rack rails are spaced between 28 in 71 1 cm and 36 in 91 4 cm front to back Ensure that the rack is...

Page 46: ...ow The TCX1000 RDM20 exhausts hot air through the fans and power supplies Route and dress all cables to minimize the blockage of airflow to and from the TCX1000 RDM20 Ensure that the spacing of rails...

Page 47: ...restricted See TCX1000 RDM20 Cooling System Description on page 17 for more information about the airflow through the chassis If you are mounting a TCX1000 in a rack or cabinet with other equipment en...

Page 48: ...onmental Tolerances Tolerance Description No performance degradation up to 6000 feet 1828 8 meters Altitude Normal operation ensured in relative humidity range of 5 through 85 noncondensing Short term...

Page 49: ...hrough 95 noncondensing Relative humidity Normal operation ensured in temperature range of 23 F 5 C through 158 F 70 C Nonoperating storage temperature in shipping container 40 F 40 C through 185 F 85...

Page 50: ...mentation Overview of Installing the TCX1000 RDM20 on page 59 TCX1000 2D8CMD Optical Specifications Table 19 on page 36 lists the optical specifications for the TCX1000 2D8CMD Table 19 Optical Specifi...

Page 51: ...ng the TCX1000 2D8CMD to a TCX1000 RDM20 on page 110 TCX1000 RDM20 SFP Kit Optical Specifications Table 20 on page 37 lists the optical specifications for the items in the SFP kit for the TCX1000 RDM2...

Page 52: ...channel center wavelengths and frequencies for the TCX1000 RDM20 The wavelength is in nanometers Table 21 Channel Center Wavelength and Frequency for the TCX1000 RDM20 Channel Spacing Channel Center...

Page 53: ...95 20 1535 82 50 GHz 195 15 1536 22 50 GHz 195 10 1536 61 50 GHz 195 05 1537 50 GHz 195 1537 4 50 GHz 194 95 1537 79 50 GHz 194 90 1538 19 50 GHz 194 85 1538 58 50 GHz 194 80 1538 98 50 GHz 194 75 153...

Page 54: ...32 50 GHz 193 95 1545 72 50 GHz 193 9 1546 12 50 GHz 193 85 1546 52 50 GHz 193 80 1546 92 50 GHz 193 75 1547 32 50 GHz 193 70 1547 72 50 GHz 193 65 1548 11 50 GHz 193 60 1548 51 50 GHz 193 55 1548 91...

Page 55: ...0 1554 94 50 GHz 1932 75 1555 34 50 GHz 192 70 1555 75 50 GHz 192 65 1556 15 50 GHz 192 60 1556 55 50 GHz 192 55 1556 96 50 GHz 192 50 1557 36 50 GHz 192 45 1557 77 50 GHz 192 40 1558 17 50 GHz 192 35...

Page 56: ...35 1566 72 Related Documentation Overview of Installing the TCX1000 RDM20 on page 59 96 Channel Fixed Mux Demux FMD96 DWDM 50 GHz Wavelength Specifications The 96 Channel Fixed Mux Demux FMD96 DWDM wa...

Page 57: ...95 60 C85 1533 07 195 55 C84 1533 47 195 50 C83 1533 86 195 45 C82 1534 25 195 40 C81 1534 64 195 35 C80 1535 04 195 30 C79 1535 43 195 25 C78 1535 82 195 20 C77 1536 22 195 15 C76 1536 61 195 10 C75...

Page 58: ...C62 1542 14 194 40 C61 1542 54 194 35 C60 1542 94 194 30 C59 1543 33 194 25 C58 1543 73 194 20 C57 1544 13 194 15 C56 1544 53 194 10 C55 1544 92 194 05 C54 1545 32 194 00 C53 1545 72 193 95 C52 1546 1...

Page 59: ...93 30 C39 1551 32 193 25 C38 1551 72 193 20 C37 1552 12 193 15 C36 1552 52 193 10 C35 1552 93 193 05 C34 1553 33 193 00 C33 1553 73 192 95 C32 1554 13 192 90 C31 1554 54 192 85 C30 1554 94 192 80 C29...

Page 60: ...2 20 C17 1560 20 192 15 C16 1560 61 192 10 C15 1561 01 192 05 C14 1561 42 192 00 C13 1561 83 191 95 C12 1562 23 191 90 C11 1562 64 191 85 C10 1563 05 191 80 C9 1563 45 191 75 C8 1563 86 191 70 C7 1564...

Page 61: ...ng Cable on page 70 A cable with an incorrectly attached lug can damage the TCX1000 RDM20 Before connecting the TCX1000 RDM20 to earth ground review the following information A protective earthing ter...

Page 62: ...Copyright 2019 Juniper Networks Inc 48 TCX1000 Programmable ROADM Hardware Guide...

Page 63: ...AC TCX1000 RDM20 AC input voltage range 60 Hz 50 Hz TCX1000 RDM20 AC input voltage frequency 3 A 1 5 A TCX1000 RDM20 AC input current range 250 W 120 W TCX1000 RDM20 DC 44 48 60 TCX1000 RDM20 DC input...

Page 64: ...Copyright 2019 Juniper Networks Inc 50 TCX1000 Programmable ROADM Hardware Guide...

Page 65: ...nt rating 120 W Typical power rating 650 W Maximum power rating Related Documentation TCX1000 RDM20 AC Power Supply Description on page 21 TCX1000 RDM20 AC Power Cord Specifications on page 51 General...

Page 66: ...odel Number Country AS NZ 3112 1993 250 VAC 10 A 50 Hz CBL GP JX PWR AU Australia GB2099 1 1996 and GB1002 1996 CH1 10P 250 VAC 10 A 50 Hz CBL GP JX PWR CH China CEE 7 VII 250 VAC 10 A 50 Hz CBL GP JX...

Page 67: ...local code We recommend that the 60 VDC facility DC source be equipped with a circuit protector rated as required by local code Table 27 DC Power Specifications for the TCX1000 RDM20 Specifications I...

Page 68: ...CX1000 RDM20 CAUTION You must ensure that power connections maintain the proper polarity The power source cables might be labeled and to indicate their polarity There is no standard color coding for D...

Page 69: ...eceptacle Maximum Length Cable Specification Port on TCX1000 RDM20 DB 9 7 feet 2 13 meters RS 232 EIA 232 serial cable Console SERIAL port RJ 45 328 feet 100 meters Category 5 cable or equivalent suit...

Page 70: ...able 30 Console Port Connector Pinouts for the TCX1000 RDM20 Description Signal Pin Reserved DCD 1 Data terminal ready Reserved Tx Data 2 Transmit data Rx Data 3 Signal ground DTR 4 Signal ground GND...

Page 71: ...TCX1000 RDM20 to Ground on page 69 Providing Power to the TCX1000 RDM20 on page 73 Connecting the TCX1000 RDM20 to External Devices on page 79 Performing Initial Configuration on page 85 Installing an...

Page 72: ...Copyright 2019 Juniper Networks Inc 58 TCX1000 Programmable ROADM Hardware Guide...

Page 73: ...70 4 Connect AC or DC power Connecting AC Power to a TCX1000 RDM20 on page 73 Connecting DC Power to a TCX1000 RDM20 on page 75 5 Connect your device Connecting the TCX1000 RDM20 to a Management Cons...

Page 74: ...Copyright 2019 Juniper Networks Inc 60 TCX1000 Programmable ROADM Hardware Guide...

Page 75: ...n Do not unpack the TCX1000 RDM20 until you are ready to begin installation To unpack a TCX1000 RDM20 1 Move the shipping carton to a staging area as close to the installation site as possible but whe...

Page 76: ...pply AC power cord only with the AC version 1 for each power supply Number 8 ring lug for DC power only with the DC version 1 1 2 OSC SFP 100BASE FX Ethernet 1511 nm 43 dB reach LC UPC duplex fiber pa...

Page 77: ...he TCX1000 RDM20 from the shipping carton see Unpacking the TCX1000 RDM20 on page 61 6 Ensure that you have the following parts and tools available to mount the TCX1000 RDM20 in a rack ESD grounding s...

Page 78: ...ont and rear brackets are attached to the TCX1000 RDM20 when they are shipped If you want to attach the 21 in or 23 in brackets unscrew the 19 in brackets from the chassis and attach the 21 in or 23 i...

Page 79: ...bracket is aligned with the rack holes 5 Have a second person secure the front of the chassis to the rack using four mounting screws and cage nuts and washers if your rack requires them Tighten the s...

Page 80: ...tiple units in the rack mount the heaviest unit at the bottom and mount the others from bottom to top in order of decreasing weight The TCX1000 RDM20 weighs 12 92 lb 5 86 kg 2 Unscrew the 19 in front...

Page 81: ...nimum of 3 inches distance is required between the brackets 8 Ensure that the chassis is level by verifying that all the screws on the front of the rack are aligned with the screws at the back of the...

Page 82: ...Connecting DC Power to a TCX1000 RDM20 on page 75 Copyright 2019 Juniper Networks Inc 68 TCX1000 Programmable ROADM Hardware Guide...

Page 83: ...CHAPTER 12 Connecting the TCX1000 RDM20 to Ground Connecting the TCX1000 RDM20 Grounding Cable on page 70 69 Copyright 2019 Juniper Networks Inc...

Page 84: ...e TCX1000 RDM20 for example by causing a short circuit NOTE Mount the TCX1000 RDM20 in the rack or cabinet before attaching the grounding lug to the TCX1000 RDM20 Ensure that you have the following pa...

Page 85: ...23 Connecting a Grounding Cable to the TCX1000 RDM20 5 Dress the grounding cable and ensure that it does not touch or block access to other device components and that it does not drape where people c...

Page 86: ...Copyright 2019 Juniper Networks Inc 72 TCX1000 Programmable ROADM Hardware Guide...

Page 87: ...attach a cable lug to the grounding and power cables that you supply A cable with an incorrectly attached lug can damage the switch for example by causing a short circuit NOTE To meet safety and elect...

Page 88: ...to the off O position NOTE The TCX1000 RDM20 powers on as soon as power is provided to the power supply 5 Insert the power cord plug into an AC power source outlet for each power supply See Figure 24...

Page 89: ...to earth ground CAUTION Before you connect power to the TCX1000 RDM20 a licensed electrician must attach a cable lug to the grounding and power cables that you supply A cable with an incorrectly atta...

Page 90: ...re that the power supplies are fully inserted in the chassis and the latches are secure 3 Ensure that the power source is turned off the voltage across the DC power source cable leads is 0 V and there...

Page 91: ...re connecting to power WARNING Ensure that the power cables do not block access to device components or drape where people can trip on them 11 Replace the plastic cover 12 Close the input circuit brea...

Page 92: ...ADM Hardware Guide Do not remove the power supply until you have a replacement power supply ready the power supplies must be installed in the TCX1000 RDM20 to ensure proper airflow CAUTION Replace a f...

Page 93: ...NOTE You cannot use the management port to perform the initial configuration of the TCX1000 RDM20 You must configure the management ports through the console connection before you can successfully con...

Page 94: ...you have an RJ 45 to DB 9 rollover cable available NOTE If your laptop or PC does not have a DB 9 male connector pin and you want to connect your laptop or PC directly to the TCX1000 RDM20 use a combi...

Page 95: ...ation stage for signals coming in and launching out on the line ports The SFP provides OSC band signal transmit and receive functionality for a bidirectional optical link The TCX1000 RDM20 includes op...

Page 96: ...connectors should face the component See Figure 30 on page 82 4 Slide the transceiver until the connector is seated in the component slot If you are unable to fully insert the transceiver make sure t...

Page 97: ...pplied LC duplex fiber patch cord to connect SFP Rx port to the OSC 0 OUT port and the SFP Tx port to the OSC 0 IN port See Figure 32 on page 83 Figure 32 Connecting the Ports g009749 Related Document...

Page 98: ...Copyright 2019 Juniper Networks Inc 84 TCX1000 Programmable ROADM Hardware Guide...

Page 99: ...from the DCN ports It is not user configurable The craft Ethernet port can be used for local management connections and to configure the node s IP address from its default settings through a CLI conn...

Page 100: ...N To determine this DHCP assigned address you can query the DHCP server with the equipment s MAC address or you can query the equipment by using a CLI session NOTE NOTE YoumustconfigureeachTCX1000 RDM...

Page 101: ...st ip service show CMD_STATUS 0 OK CMD_RESPONSE 22 config hostname host ipv4 address 198 51 100 3 netmask 255 255 255 0 gateway 0 0 0 0 dhcp enabled true ipv6 address prefix 128 gateway enabled true s...

Page 102: ...o take effect STATUS 0 OK 5 Enter the ip service config ipv6 address IPv6 address prefix command to set a static IPv6 address See the following sample output to set the IPv6 address user host ip servi...

Page 103: ...ed to a remote site without DCN access or is connected to a TCX1000 ILA See the TCX Series Optical Transport System Feature Guide at https www juniper net documentation en_US release independent tcx i...

Page 104: ...Command SfpConfigOsc_sfp_portStp_group has been entered successfully 5 Verify the OSC forwarding is enabled by using the sfp show osc_sfp_port port 1 command user host sfp show osc_sfp_port port 1 CM...

Page 105: ...adcast message from root host Fri Sep 28 09 32 00 2018 The system is going down for reboot NOW The TCX1000 RDM20 reboots 91 Copyright 2019 Juniper Networks Inc Chapter 15 Performing Initial Configurat...

Page 106: ...Copyright 2019 Juniper Networks Inc 92 TCX1000 Programmable ROADM Hardware Guide...

Page 107: ...nted module that is installed alongside a ROADM node to provide local fixed grid access to all 96 wavelengths in the DWDM 50 GHz channel plan It has a single bidirectional line port a monitor port and...

Page 108: ...on page 101 C Band In the line in direction the incoming C band channels from the L1 port are demultiplexed into individual wavelengths for output onto the respective client ports In the client in di...

Page 109: ...3 FMD96 BT8A78MD03 Specifications Range Parameters Physical 438 mm Width 88 mm Height 280 mm Depth Weight Environmental See Site Requirements Temperature and Humidity Not applicable passive Power Cons...

Page 110: ...installed directly into the following types of racks 23 inch ANSI equipment rack 19 inch ANSI equipment rack 19 inch 410 mm ETSI equipment rack 21 inch 500 mm ETSI equipment rack NOTE The FMD96 is not...

Page 111: ...the FMD96 are dual function with the 21 and 23 inch configuration governed by orientation Three mounting positions are available Choose the mounting position that ensures the FMD96 is flush with adja...

Page 112: ...lush with adjacent equipment If required remove the mounting brackets and attach the brackets to the new mounting positions b To install the 21 inch brackets Figure 36 on page 98 Figure 36 21 inch Bra...

Page 113: ...g position 2 Mounting position 2 Mount the module on the frame or the rack a With one person at each side of the module lift the module into position in the equipment frame b Align the mounting holes...

Page 114: ...tween the lug and the frame and between the lug and the screw head 4 Open the cover and connect fibers The fibers should be routed between the front panel and the front cover to allow for the cover to...

Page 115: ...cover and disconnect the fibers CAUTION When working with the FMD96 follow the safety procedures associated with equipment containing Laser Safety Hazard Level 1M CAUTION When the ports are optically...

Page 116: ...essfully completed this procedure Connecting the FMD96 to a TCX1000 RDM20 The TCX1000 RDM20 has optical connectors to which you can connect fiber optic cables Before you connect a fiber optic cable to...

Page 117: ...struments even if the interface has been disabled 2 If the optical connector is covered by a rubber safety cap open the cap 3 Insert the cable connector into the optical connector of the TCX1000 RDM20...

Page 118: ...r optic cables hang free from the connector Do not allow fastened loops of cables to dangle which stresses the cables at the fastening point Copyright 2019 Juniper Networks Inc 104 TCX1000 Programmabl...

Page 119: ...provides eight ports for transceiver connections This allows for more transceivers to be connected to the TCX1000 RDM20 while still maintaining the spectrally programmable colorless operation The TCX...

Page 120: ...e L1 OUTport 2 Add and drop channel ports C0 to C7 OUT and IN Model Numbers Table 34 on page 106 describes the TCX1000 2D8CMD hardware models Table 34 TCX1000 2D8CMD Hardware Models Description Model...

Page 121: ...rts and tools available to install the TCX1000 2D8CMD Electrostatic discharge ESD grounding strap not provided Screwdriver appropriate for the rack mounting screws not provided TCX1000 RCK 1 kit separ...

Page 122: ...posts in a rack using the 19 in mounting brackets NOTE This procedure requires two persons Do not attempt to do it alone 1 Attach an ESD grounding strap to your bare wrist and to a site ESD point NOTE...

Page 123: ...CMD in the chassis 1 Attach the ESD grounding strap to your bare wrist and to a site ESD point 2 Remove the blank cover by pulling the knobs of the snap latch located on either side and pulling the co...

Page 124: ...ocumentation TCX1000 2D8CMD Description on page 105 Connecting the TCX1000 2D8CMD to a TCX1000 RDM20 on page 110 Connecting the TCX1000 2D8CMD to a TCX1000 RDM20 The TCX1000 2D8CMD has optical connect...

Page 125: ...Inspect the fiber optic cable with a scope or use a fiber cleaning device to clean the connector prior to inserting the fiber optic cable into the Line 0 L0 OUT port of the TCX1000 2D8CMD See Figure...

Page 126: ...g fasteners on a loop helps cables maintain their shape CAUTION Do not bend fiber optic cables beyond their minimum bend radius Bending the cables beyond their minimum bend radius can damage the cable...

Page 127: ...omponents TCX1000 RDM20 FRUs on page 115 Maintaining Cooling System Components on page 117 Maintaining Power Supplies on page 121 Maintaining Fiber Optic Cables on page 125 Removing the Device on page...

Page 128: ...Copyright 2019 Juniper Networks Inc 114 TCX1000 Programmable ROADM Hardware Guide...

Page 129: ...within 30 seconds of removal to prevent chassis overheating Table 35 on page 115 lists the FRUs for the TCX1000 RDM20 and actions to take before removing them Table 35 Required Actions Before Removing...

Page 130: ...tomers support tools updateinstallbase Failure to do so can result in significant delays if you need replacement parts This note does not apply if you replace existing components with the same type of...

Page 131: ...re that you have a replacement fan module available Before you remove a fan module from a TCX1000 RDM20 ensure that you have taken the necessary precautions to prevent electrostatic discharge ESD dama...

Page 132: ...ge 118 Installing a Fan Module in a TCX1000 RDM20 The fan modules in a TCX1000 RDM20 are hot removable and hot insertable field replaceable units FRUs you can remove and replace them without powering...

Page 133: ...g 3 Align the module with the open slot on the FRU end of the TCX1000 RDM20 and slide it in until it is fully seated 4 Tighten the captive screws The thumb screw can be tightened by hand or with a Phi...

Page 134: ...Copyright 2019 Juniper Networks Inc 120 TCX1000 Programmable ROADM Hardware Guide...

Page 135: ...M20 ensure that you have taken the necessary precautions to prevent electrostatic discharge ESD damage see Prevention of Electrostatic Discharge Damage on page 178 Ensure that you have the following p...

Page 136: ...faceplate DC power supply Remove the plastic cover and remove the lug and cable from the terminal screws 5 Slide the locking lever toward the handle until it stops 6 Grasp the power supply handle and...

Page 137: ...autions to prevent electrostatic discharge ESD damage see Prevention of Electrostatic Discharge Damage on page 178 Ensure that you have the following parts and tools available ESD grounding strap To i...

Page 138: ...s at https www juniper net customers support tools updateinstallbase Failure to do so can result in significant delays if you need replacement parts This note does not apply if you replace existing co...

Page 139: ...fety Warnings for Class 1M Juniper Networks Devices on page 167 To disconnect a fiber optic cable from an optical connector installed WARNING Do not look directly into a fiber optic connector or into...

Page 140: ...VEL 1M LASER RADIATION DO NOT VIEW DIRECTLY WITH NON ATTENUATING OPTICAL INSTRUMENTS Before you connect a fiber optic cable to a TCX1000 RDM20 ensure that you have taken the necessary precautions for...

Page 141: ...nterface has been disabled 2 If the optical connector is covered by a rubber safety cap open the cap 3 Insert the cable connector into the optical connector 4 Secure the cables so that they do not sup...

Page 142: ...d their minimum bend radius can damage the cables and cause problems that are difficult to diagnose Frequent plugging and unplugging of fiber optic cables in and out of optical instruments can damage...

Page 143: ...e following parts and tools available to power off the TCX1000 RDM20 An ESD grounding strap An external management device such as a PC To power off an TCX1000 RDM20 1 Attach an ESD grounding strap to...

Page 144: ...ling the rack NOTE This procedure requires two persons Do not attempt to do it alone Before removing a TCX1000 RDM20 from a rack Ensure that the rack is stable and secured to the building Ensure that...

Page 145: ...removing a TCX1000 2D8CMD from a rack Ensure that the rack is stable and secured to the building Ensure that there is enough space to place the removed TCX1000 2D8CMD in its new location and along the...

Page 146: ...ounting brackets to the rack 3 Remove the TCX1000 RCK 1 chassis from the rack 4 Transport the TCX1000 2D8CMD and TCX1000 RCK 1 chassis to your desired new location or pack it to prepare to return see...

Page 147: ...PART 5 Troubleshooting Hardware Troubleshooting Components on page 135 133 Copyright 2019 Juniper Networks Inc...

Page 148: ...Copyright 2019 Juniper Networks Inc 134 TCX1000 Programmable ROADM Hardware Guide...

Page 149: ...rmation see the following topics TCX1000 RDM20 Chassis and Port Status LEDs on page 12 TCX1000 RDM20 Management Port LEDs on page 15 TCX1000 RDM20 Power Supply LEDs on page 24 For information on alarm...

Page 150: ...Copyright 2019 Juniper Networks Inc 136 TCX1000 Programmable ROADM Hardware Guide...

Page 151: ...mer Support and Returning the Chassis or Components Contacting Customer Support on page 139 Locating Component Serial Numbers on page 141 Packing and Returning Components on page 145 137 Copyright 201...

Page 152: ...Copyright 2019 Juniper Networks Inc 138 TCX1000 Programmable ROADM Hardware Guide...

Page 153: ...all other locations 1 408 745 9500 If contacting JTAC by phone enter your 12 digit case number followed by the key if this is an existing case or press the key to be routed to the next available supp...

Page 154: ...Copyright 2019 Juniper Networks Inc 140 TCX1000 Programmable ROADM Hardware Guide...

Page 155: ...ion RMA See Returning a Hardware Component to Juniper Networks Inc on page 145 NOTE If you want to find the serial number ID label on a component you need to remove the component from the chassis see...

Page 156: ...supply The serial number ID label is on the top of the AC power supply See Figure 56 on page 142 DC power supply The serial number ID label is on the top of the DC power supply See Figure 57 on page 1...

Page 157: ...le or chassis You must provide the serial number to the Juniper Networks Technical Assistance Center JTAC when you contact them to obtain a Return Material Authorization RMA See Returning a Hardware C...

Page 158: ...ure 59 Chassis Serial Number Label g009492 Serial number ID label Figure 60 TCX1000 2D8CMD Serial Number Label g009497 1 Copyright 2019 Juniper Networks Inc 144 TCX1000 Programmable ROADM Hardware Gui...

Page 159: ...eshipmentsthatdonothaveanRMA Refusedshipmentsarereturned to the customer by collect freight For more information about return and repair policies see the customer support Web page at https www juniper...

Page 160: ...RDM20 or component to Juniper Networks for repair or replacement pack the item as described in this topic Before you pack a TCX1000 RDM20 RDM20 or component Ensure that you have taken the necessary p...

Page 161: ...the TCX1000 RDM20 in an antistatic bag 7 Place the TCX1000 RDM20 in the shipping carton 8 Place the packing foam on top of and around the TCX1000 RDM20 9 Close the top of the cardboard shipping box an...

Page 162: ...ontact your JTAC representative if you do not have these materials to learn about approved packing materials see Contacting Customer Support on page 139 Ensure that you have the following parts and to...

Page 163: ...e exterior of the box to ensure proper tracking See Returning a Hardware Component to Juniper Networks Inc on page 145 for instructions on obtaining an RMA number Related Documentation Returning a Har...

Page 164: ...Copyright 2019 Juniper Networks Inc 150 TCX1000 Programmable ROADM Hardware Guide...

Page 165: ...Safety Guidelines and Warnings on page 159 Laser and LED Safety Guidelines and Warnings on page 167 Maintenance and Operational Safety Warnings on page 171 Electrical Safety Guidelines and Warnings on...

Page 166: ...Copyright 2019 Juniper Networks Inc 152 TCX1000 Programmable ROADM Hardware Guide...

Page 167: ...ces Keep the area around the device clear and free from dust before during and after installation Keep tools away from areas where people could trip over them while walking Do not wear loose clothing...

Page 168: ...ollowing label provides the warning of the hot surfaces on the chassis Always ensure that all modules power supplies and cover panels are fully inserted and that the installation screws are fully tigh...

Page 169: ...nza indica un pericolo La situazione potrebbe causare infortuni alle persone Prima di lavorare su qualsiasi apparecchiatura occorre conoscere i pericoli relativi ai circuiti elettrici ed essere al cor...

Page 170: ...extinguishers which use noncorrosive fire retardants such as carbon dioxide and Halotron are most effective for suppressing electrical fires Type C fire extinguishers displace oxygen from the point o...

Page 171: ...r montere eller bytte ut dette utstyret Aviso Este equipamento dever ser instalado ou substitu do apenas por pessoal devidamente treinado e qualificado Atenci n Estos equipos deben ser instalados y r...

Page 172: ...Varning Apparaten skall anslutas till jordat n tuttag Copyright 2019 Juniper Networks Inc 158 TCX1000 Programmable ROADM Hardware Guide...

Page 173: ...oeding verbindt VaroitusLueasennusohjeetennenj rjestelm nyhdist mist virtal hteeseen AttentionAvantdebrancherlesyst mesurlasourced alimentation consulter les directives d installation Warnung Lesen Si...

Page 174: ...ing lifting guidelines to lift devices and components Up to 39 7 lb 18 kg One person 39 7 lb 18 kg to 70 5 lb 32 kg Two or more people 70 5 lb 32 kg to 121 2 lb 55 kg Three or more people Above 121 2...

Page 175: ...e mounting or servicing the device in the rack Waarschuwing Om lichamelijk letsel te voorkomen wanneer u dit toestel in een rek monteert of het daar een servicebeurt geeft moet u speciale voorzorgsmaa...

Page 176: ...itifs stabilisateurs installer les stabilisateurs avant de monter ou de r parer l unit en casier Warnung Zur Vermeidung von K rperverletzungbeim Anbringen oder Warten dieser Einheit in einem Gestell m...

Page 177: ...den tyngste komponenten nederst i kabinettet Hvis kabinettet er utstyrt med stabiliseringsutstyr skal stabilisatorene installeres f r montering eller utf ring av reparasjonsarbeid p enheten i kabinet...

Page 178: ...ningen Om denna enhet installeras p en delvis fylld st llning skall st llningen fyllasnedifr nochupp meddetyngstaenheternal ngstnedp st llningen Omst llningen rf rseddmedstabiliseringsdonskalldessamon...

Page 179: ...ontra ligado terra durante a sua utiliza o normal Atenci n Este equipo debe conectarse a tierra Asegurarse de que el equipo principal est conectado a tierra durante el uso normal Varning Denna utrustn...

Page 180: ...Copyright 2019 Juniper Networks Inc 166 TCX1000 Programmable ROADM Hardware Guide...

Page 181: ...uct Warning on page 168 Class 1 LED Product Warning on page 168 Laser Beam Warning on page 168 General Laser Safety Guidelines When working around ports that support optical transceivers observe the f...

Page 182: ...odukter av Klass 1M IEC Class 1 LED Product Warning WARNING Class 1 LED product Waarschuwing Klasse 1 LED product Varoitus Luokan 1 valodiodituote Attention Alarme de produit LED Class I Warnung Class...

Page 183: ...irettamente Advarsel Stirr eller se ikke direkte p strlen med optiske instrumenter Aviso N o olhe fixamente para o raio nem olhe para ele directamente com instrumentos pticos Atenci n No mirar fijamen...

Page 184: ...Copyright 2019 Juniper Networks Inc 170 TCX1000 Programmable ROADM Hardware Guide...

Page 185: ...d by the manufacturer Dispose of used batteries according to the manufacturer s instructions Waarschuwing Er is ontploffingsgevaar als de batterij verkeerd vervangen wordt Vervang de batterij slechts...

Page 186: ...s del fabricante Varning Explosionsfara vid felaktigt batteribyte Ers tt endast batteriet med samma batterityp som rekommenderas av tillverkaren eller motsvarande F lj tillverkarens anvisningar vid ka...

Page 187: ...a ligado a linhas de corrente retire todas as j ias que estiver a usar incluindo an is fios e rel gios Os objectos met licos aquecer o em contacto com a corrente e em contacto com a liga o terra poden...

Page 188: ...welke switch van de Juniper Networks router dan ook oververhit raakt dient u deze niet te bedienen op een plaats waar de maximale aanbevolen omgevingstemperatuur van 40 C wordt overschreden Om te voor...

Page 189: ...C Para impedir la restricci n de la entrada de aire deje un espacio m nimo de 15 2 cm alrededor de las aperturas para ventilaci n Varning F rhindra att en Juniper Networks switch verhettas genom att i...

Page 190: ...a de acordo com os regulamentos e a legisla o nacional Atenci n El desecho final de este producto debe realizarse seg n todas las leyes y regulaciones nacionales Varning Slutlig kassering av denna pro...

Page 191: ...on the device are designed for use as intrabuilding within the building interfaces only Type 2 or Type 4 ports as described in GR 1089 CORE and require isolation from the exposed outside plant OSP ca...

Page 192: ...gs and product usage instructions To ensure that the device and peripheral equipment function safely and correctly use the cables and connectors specified for the attached peripheral equipment and mak...

Page 193: ...SD wrist strap is attached to the ESD point on the chassis If no grounding strap is available touch the exposed bare metal of the device to ground yourself before handling the component Avoid contact...

Page 194: ...rtodeunidades de fornecimento de energia desligue o cabo de alimenta o nas unidades de corrente alternada Atenci n Antes de manipular el chasis de un equipo o trabajar cerca de una fuente de alimentac...

Page 195: ...ring Guidelines DC Power Copper Conductors Warning WARNING Use copper conductors only Waarschuwing Gebruik alleen koperen geleiders Varoitus K yt vain kuparijohtimia Attention Utilisez uniquement des...

Page 196: ...erbrecher auf AUS und kleben Sie den Schaltergriff des Unterbrechers mit Klebeband in der AUS Stellung fest Avvertenza Prima di svolgere una qualsiasi delle procedure seguenti verificare che il circui...

Page 197: ...Bij de installatie van het toestel moet de aardverbinding altijd het eerste worden gemaakt en het laatste worden losgemaakt Varoitus Laitetta asennettaessa on maahan yhdist minen aina teht v ensiksi...

Page 198: ...a derni re fois Warnung Die Stromzufuhr ist nur mit geeigneten Ring sen an das DC Netzteil anzuschliessen Die richtige Anschlusssequenz ist Erdanschluss zu Erdanschluss RTN zu RTN und dann 48V zu 48V...

Page 199: ...grijperschop type waarbij de aansluitpunten omhoog wijzen Deze aansluitpunten dienen de juiste maat voor de draden te hebben en dienen zowel de isolatie als de geleider vast te klemmen Varoitus Jos s...

Page 200: ...ar tanto el aislante como el conductor Varning N r flertr diga ledningar kr vs m ste godk nda ledningskontakter anv ndas t ex kabelsko av sluten eller ppen typ med upp tv nd tapp Storleken p dessa kon...

Page 201: ...ge from lightning strikes increases if wires exceed recommended distances or if wires pass between buildings The electromagnetic pulse EMP caused by lightning can damage unshielded conductors and dest...

Page 202: ...llically connected to interfaces that connect to the Outside Plant OSP or its wiring These interfaces are designed for use as intrabuilding interfaces only Type 2 or Type 4 ports as described in GR 10...

Page 203: ...ety CAN CSA C22 2 No 60950 1 2007 Information Technology Equipment Safety EN 60950 1 2006 A2 2013 Information Technology Equipment Safety IEC 60950 1 2005 A2 2013 Information Technology Equipment Safe...

Page 204: ...DM20 is designed to comply with the following standard NEBS Level 3 GR 63 CORE Physical Protection GR 1089 CORE EMC and Electrical Safety for Network Telecommunications Equipment Related Documentation...

Page 205: ...United States The hardware equipment has been tested and found to comply with the limits for a Class A digital device pursuant to Part 15 of the FCC Rules These limits are designed to provide reasonab...

Page 206: ...rn that is DC I as defined in GR 1089 CORE You must provision a readily accessible device outside of the equipment to disconnect power The device must also be rated based on local electrical code prac...

Reviews: