background image

LIST OF FIGURES

LIST OF TABLES

FIGURE 1 

- Lifting Unit With Base Rails ...................................................................................................................9

FIGURE 2 

- Lifting Units Without Base Rails...........................................................................................................10

FIGURE 3 

- Assembly, Units Without Base Rails .................................................................................................... 11

FIGURE 4 

- Assembly, Units With Base Rails ......................................................................................................... 11

FIGURE 5 

- Gasket Application ............................................................................................................................... 11

FIGURE 6 

- Suspended Units .................................................................................................................................12

FIGURE 7 

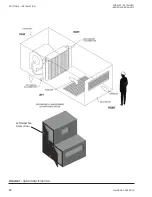
- Hand Identification

 ...............................................................................................................................13

FIGURE 8 

- Remove Hold Downs ...........................................................................................................................14

FIGURE 9 

- Isolator Installation ...............................................................................................................................14

FIGURE 10 

- Drain Trap ..........................................................................................................................................15

FIGURE 11 

- Mounting Sheaves .............................................................................................................................21

FIGURE 12 

- Sheave Alignment ..............................................................................................................................22

FIGURE 13 

- Split Tapper Sheave Mounting ...........................................................................................................22

FIGURE 14 

- Belt Tension .......................................................................................................................................23

TABLE 1 

- Minimum Hex Head Bolt Torque In Lb-Ft - Grade 5 Bolt .......................................................................18

TABLE 2 

-  Recommended Greasing Intervals Of Fan Bearings .............................................................................19

TABLE 3 

- Recommended Greases For Various Operating Ranges ......................................................................20

TABLE 4 

- Fan Bearing Maximum Grease Capacity ...............................................................................................20

TABLE 5 

- Recommended Motor Greasing Schedule ............................................................................................21

TABLE 6 

- Determining Deflection Force ................................................................................................................25

TABLE 7 

- Forward Curve Fan Data .......................................................................................................................26

TABLE 8 

- Vibration Levels .....................................................................................................................................26

TABLE 9 

- MQL Troubleshooting Analysis ..............................................................................................................29

TABLE OF CONTENTS (CONT’D)

JOHNSON CONTROLS

7

LIST OF FIGURES

FORM ET102.19-NOM1

ISSUE DATE:08/26/2013

Summary of Contents for ENVIRO-TEC MQL B Series

Page 1: ...BY JOHNSON CONTROLS MODEL MQL SERIES B INDOOR AIR HANDLING UNIT INSTALLATION OPERATION MAINTENANCE Supersedes ET102 19 NOM1 1012 Form ET102 19 NOM1 813 Issue Date August 26 2013 ...

Page 2: ... with all applicable governmental standards and regulations pertaining to the task in question SAFETY SYMBOLS The following symbols are used in this document to alert the reader to specific situations Indicates a possible hazardous situation which will result in death or serious injury if proper care is not taken Indicates a potentially hazardous situa tion which will result in possible injuries o...

Page 3: ...dismember ment injuries HOT PARTS HAZARDS Electric Resis tance heating elements must be discon nected prior to servicing Electric Heaters may start automatically disconnect all power and control circuits prior to servic ing to avoid burns SAFETY CONSIDERATIONS WARNING Failure to follow these instructions could result in death serious injury or equipment damage Follow all warnings and instructions ...

Page 4: ...in spelling grammar or formatting are not included Check that the unit assembly and compo nent weights can be safely supported by rigging and lifting equipment All assemblies must be adequately se cured during lifting and rigging by temporary supports and restraints until equipment is permanently fastened and set in its final location All unit temporary and permanent sup ports must be capable of s...

Page 5: ...ion 15 External Isolation 15 Service Clearance 15 Panel Removal 15 General Piping 15 DX Connection Steps 16 In the field 16 Notes 16 Condensate Drain 16 Electrical Installation 16 INSPECTION START UP CHECKLIST 17 SECTION 3 STARTUP 19 Electric Heat Start Up 19 Before Start Up Check 19 Start Up 19 First Time Motor Startup 20 Air Balancing 20 Sheaves 20 SECTION 4 PERIODIC MANINTENANCE AND SERVICE 21 ...

Page 6: ...g Straight Bore Sheaves 25 Mounting Split Tapper Sheaves 26 Adjust Variable Pitched Sheaves 26 Belts 27 Adjusting Belt Tension 27 How to Increase Belt Life 27 Coils 28 Steam Hot Water and Chilled Water Coils 28 Refrigerant Coils 29 Winterizing Water Coils 29 OPERATING GUIDELINES 29 Operating Limits 29 Vibration Levels 29 Vibration Causes 30 Periodic Service and Maintenance 30 APPLICATION RECOMMEND...

Page 7: ... FIGURE 12 Sheave Alignment 22 FIGURE 13 Split Tapper Sheave Mounting 22 FIGURE 14 Belt Tension 23 TABLE 1 Minimum Hex Head Bolt Torque In Lb Ft Grade 5 Bolt 18 TABLE 2 Recommended Greasing Intervals Of Fan Bearings 19 TABLE 3 Recommended Greases For Various Operating Ranges 20 TABLE 4 Fan Bearing Maximum Grease Capacity 20 TABLE 5 Recommended Motor Greasing Schedule 21 TABLE 6 Determining Deflect...

Page 8: ...THIS PAGE INTENTIONALLY LEFT BLANK JOHNSON CONTROLS 8 FORM ET102 19 NOM1 ISSUE DATE 08 26 2013 LIST OF FIGURES ...

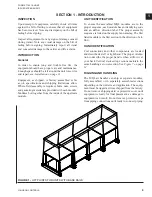
Page 9: ... the assembled MQL modules are in the proper sequence each module has an identifying code and an airflow direction label The proper assembly sequence is listed on the supply fan nametag The first listed module is the first section in the direction of air flow HAND IDENTIFICATION Coil connections and other components are located and described as left or right hand The proper orienta tion to describ...

Page 10: ...Rough handling may cause bearing misalignment and or shaft damage STORAGE To transfer equipment from truck to storage site refer to Rigging And Handling on page 9 If a forklift is used lift only from heavy end of skid 1 Do not stack unit modules or accessories during storage Stacking can cause damage or deforma tion 2 If equipment is to be stored for more than two weeks prior to installation obser...

Page 11: ...if the damp ers are the same size If the dampers are different sizes they must be driven by individual actuators and con trolled separately b Remove all shipped loose parts from job site to minimize theft Tag and store parts in a safe place until needed c Cover entire equipment with protective tarp or moisture proof cover Extend cover under equipment if stored on ground Secure cover with adequate ...

Page 12: ...THIS PAGE INTENTIONALLY LEFT BLANK JOHNSON CONTROLS 12 FORM ET102 19 NOM1 ISSUE DATE 08 26 2013 Section 1 introduction ...

Page 13: ...eil ing a base rail angle iron or channel must support the equipment The MQL product line is not designed to be suspended from the top of the equipment Be fore hanging the equipment all field assembly must be completed Suspending Using Factory Base Rail The factory optional base rails have a 5 8 diameter hole located in each corner for hanger rods A hanger rod must be installed in each corner of a...

Page 14: ...Left Hand Fan Access Door Figure 7 HAND IDENTIFICATION JOHNSON CONTROLS 14 FORM ET102 19 NOM1 ISSUE DATE 08 26 2013 Section 2 installation ...

Page 15: ...is also isolated the piping must be isolated or have a flexible connection to prevent coil header damage due to equipment movement All piping wiring ductwork and external connections must be isolated Service Clearance Access to at least one side of the equipment is required for routine service maintenance and repair Consider ation should be given to fan shaft coil filter removal motor fan bearings...

Page 16: ...h hot gas bypass or heat pump condensing units but require the addition of fittings or refrigerant specialties to be furnished and installed by others Condensate Drain All condensate drains must have a trap installed This will prevent excessive condensate buildup and or con densate overflow To ensure that the trap remains sealed the trap depth and the distance between the pan outlet and the trap o...

Page 17: ...Freeze Protection Proper Supply Return Grille Type Size Used Insulate All Ductwork As Required Verify All Ductwork Is Complete Dampers And Filters Are Installed Prior To Startup E ELECTRICAL CONNECTIONS Refer To Unit Wiring Diagram All Field Wiring In Code Compliance Connect Incoming Power Service or Services F UNIT STARTUP General Visual Unit System Inspection Record Ambient Temperature Close All...

Page 18: ...JOHNSON CONTROLS 18 FORM ET102 19 NOM1 ISSUE DATE 08 26 2013 Section 2 installation ...

Page 19: ...ied individuals should perform these tasks Before entering the fan section make sure that the fan electrical power source is disconnected locked and tagged out in the OFF position 1 Check that the unit is completely and properly installed with ductwork connected Check that all construction debris is removed and filters are cleaned 2 Check that all electrical work is finished and prop erly terminat...

Page 20: ...ually rotate motor shaft to ensure that it ro tates freely 8 Replace all panels that were removed during in stallation 9 Momentarily apply power and check direction of rotation of motor shaft 10 If motor rotation is wrong be sure power is off and change the motor lead connections verify ro tation before you continue 11 Start motor and ensure operation is smooth with out excessive vibration or nois...

Page 21: ...ghten sheave set screws to the proper torque see Table 1 on page 22 Check and adjust fan belt tension Tighten electrical connections Inspect coils for dirt build up or coil freeze up Every Year Inspect the units casing for corrosion If damage is found clean and paint the surface with a rust resistant primer and vinyl chlorinated lacquer Clean the fan wheel and fan shaft Remove rust with an emery c...

Page 22: ...eir product 6 Immediately rinse the drain pan thoroughly with fresh water to prevent potential corrosion from the cleaning solution of the drain pan and drain line components 7 Allow the unit to dry thoroughly before putting the system back into service 8 Determine and correct the cause of the microbial contamination 9 Be careful that the contaminated material does not contact other areas of the u...

Page 23: ... to NLGI Number 2 for consis tency See Table 2 on page 23 Table 3 on page 23 and Table 4 on page 23 for recommended greasing intervals operating range and bearing grease capacities Table 2 RECOMMENDED GREASING INTERVALS OF FAN BEARINGS OPERATING CONDITIONS 20 F TO 140 F 140 F TO 200 F Clean Dry 3 6 months 1 3 weeks Dirty Dry 1 3 months 1 4 weeks Dirty Wet High Humid 1 4 weeks 1 14 days Table 3 REC...

Page 24: ...n It is important to remember that this recommendation is base of average use Refer to Table 2 on page 23 for additional information Types of Grease A high grade ball or roller bearing grease should be used See Table 3 on page 23 for Recommended Greases Chevron SRI Factory Installed Polyurea Base Lubrication Procedure Be sure that the grease you are adding to the motor is compatible with the greas...

Page 25: ... should be close to the motor as possible with setscrew A in full contact with the key If the setscrew a is not fully in contact with key the sheave assembly could come off 4 Be sure that both the driver and driven sheaves are in alignment and that the shafts are parallel The centerline of the driver sheave must line up with the centerline of the driven sheave Angle A cannot exceed 1 2º see Figure...

Page 26: ...en capscrews progressively with wrench Dothis following a star pattern taking a partial turn on each capscrew successively until all are tight see Table 1 on page 22 for proper torque Do not attempt to pull flange flush with hub some gap should remain between flange and hub after tightening Figure 13 SPLIT TAPPER SHEAVE MOUNTING 9 Put on belt and adjust belt tension properly Refer to Belt Section ...

Page 27: ...calculate the belt span LD14003 2 2 2 d D C Span C Center distance shaft to shaft D Driver sheave large sheave pitch diameter d Driver sheave small sheave pitch diameter 2 Calculate deflection Deflection Span 64 3 See Table 6 on page 28 for correct deflection force 4 Using a spring scale apply force at right angle to the midpoint of the belt span see Figure 14 on page 27 5 Check the tension at lea...

Page 28: ...he coil reduces its ability to transfer heat that can result in reduced performance and increased operating energy costs If the dirt on the surface of the coil becomes wet which commonly oc curs with cooling coils microbial growth mold can result in turn causing un pleasant odors and serious health related indoor air quality problems Fin edges are sharp Fins are fragile car must be exercised to av...

Page 29: ...ion to assure that any contaminated ma terial does not contact other areas of the unit or building Properly dispose of all contaminated ma terials and cleaning solutions Winterizing Water Coils Due to air stratification failure of outdoor air damp ers and or preheat controls coil freeze up can occur Scheduled draining of water cooling coils for win ter shutdown cannot be depended upon as insurance...

Page 30: ...AN SPEED RPM VIBRATION 800 or less 5 mils maximum displacement 801 or greater 20 in sec Maximum velocity Note Excessive vibration from any cause contributes to premature fan and motor bearing failure Overall vibration levels should be monitored every six months of operation An increase in levels is an indication of potential trouble APPLICATION RECOMMENDATION FOR COILS Observe all local codes and ...

Page 31: ...ons to prevent retaining con densate in the coil Generally the vacuum breaker is to be connected between the coil inlet and the return main the vacuum breaker should be open to the atmosphere and the trap design should al low venting of large quantities of air 6 Do not drip supply mains through the coil 7 Do not attempt to lift condensate when using modulating or on off control 8 Size traps in acc...

Page 32: ...r dampers if steam supply pressure falls below minimum specified Water Heating Coils 1 Water supply and water return connections extend through the end panel of the coil section All con nections are labeled on the end panel 2 Water supply and water return connections are male N P T copper pipe 3 When installing couplings do not apply undue stress to the connection extending through unit panel Use ...

Page 33: ... lubricant MOTOR STALLS Open phase Check line for an open phase Overloaded motor Reduce load or replace with larger motor Low line voltage Check voltage across AC line Correct voltage if pos sible EXCESSIVE VIBRATION Poor alignment Align bearing setscrews see Fig 8 Loosen and retighten bearing setscrew Shipping spacers not removed Remove shipping spacers and or bolts Over tensioned belts Adjust be...

Page 34: ...sen bearing setscrews and realign see Fig 10 Inadequate lubrication Grease bearing s LOW COIL CAPACITY CHILLED WATER Air is bypassing coil Prevent bypass with block offs Coil tubes are blocked Clean and unblock tubes Incorrect airflow Check fan operating conditions Incorrect gpm Check water pumps valves and lines for obstructions Incorrect water temperature Provide proper water temperature LOW COI...

Page 35: ...5 JOHNSON CONTROLS 35 Section 5 TROUBLESHOOTING FORM ET102 19 NOM1 ISSUE DATE 08 26 2013 ...

Page 36: ...SA 17405 1592 800 861 1001 Subject to change without notice Printed in USA Copyright by Johnson Controls 2012 www johnsoncontrols com ALL RIGHTS RESERVED Form ET102 19 NOM1 713 Issue Date October 16 2012 Supersedes ET102 19 NOM1 1012 ...

Reviews: