4
Two groove sheaves are supplied with
both grooves set at the same pitch diam-
eter. Both movable flanges must be rotated
the same number or turns to ensure the
same pitch diameter for satisfactory op-
eration.
Do not open sheaves more than five turns
for “a” belt or 6 turns for “b” belt. Doing
so may cause the belts to sit improperly,
and cause the flanges to detach in service.
6. Replace key (D).
7. Tighten setscrew (B) in outer locking ring and
capscrew (C) with torque wrench to the values in
.
8. Put on belts and adjust belt tension properly.
Refer
to Belt Section for tensioning instructions.
9. Be sure that all keys are in place. Be sure that all
setscrews and capscrews are torqued properly be-
fore starting drive. Check setscrews and belt ten-
sion after 24 hours of service.
Belts
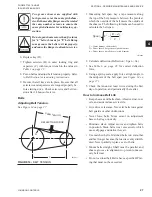
Adjusting Belt Tension.
See
LD14011
DEFLECTION FORCE
D
C
d
SPAN LENGTH
FIGURE 14 -
BELT TENSION
1. Measuring belt span. Lay a tape measure along
the top of the belt, measure between the points at
which the outside of the belt meets the outside of
the sheaves. The following formula can be used to
calculate the belt span.
LD14003
2
2
2
−
−
=
d
D
C
Span
C = Center distance shaft to shaft
D = Driver sheave (large sheave) pitch diameter
d = Driver sheave (small sheave) pitch diameter
2.
Calculate deflection (Deflection = Span ÷ 64)
3. See
for correct deflection
force.
4. Using a spring scale, apply force at right angle to
the midpoint of the belt span (see
).
5.
Check the tension at least twice during the first
day of operation, and periodically there after.
How to Increase Belt Life
•
Keep sheaves and belts clean. Abrasive dust, rust,
oils, and acids reduce service life.
•
Give drives clearance. Never let belts run against
belt guards or other obstructions.
•
Never force belts. Move motor on adjustment
base so belts go on easily.
•
Eliminate slack. Adjust motor and tighten belts
in position. Slack belts wear excessively which
cause slippage and deliver less air.
•
Use matched belts. Matched belts run smoother
and last longer because the load is evenly distrib-
uted. Never partially replace a set of belts.
•
Mount belts straight. Shaft must be parallel and
sheave grooves in alignment to prevent unneces-
sary belt wear.
• Do not overload belt. Belts have a specific HP rat
-
ing that must not be exceeded.
JOHNSON CONTROLS
27
SECTION 4 - PERIODIC MANINTENANCE AND SERVICE
FORM ET102.19-NOM1
ISSUE DATE:08/26/2013


