background image

AMPLITUDE MODULATION (AM)

40 | GRAPHIC DISPLAY

synthesis modules. 

The Prophet VS introduced the idea of changing the 

harmonic structure of the ‘raw material’ to be filtered and 

shaped by using a 2-dimensional mixer. We called it Vec-

tor Synthesis. You can also program this with one of the 

regular Mixers, but to make things easier, I put in two of 

these ‘Vector Mixers’ (essential quad panners) to simplify 

programming. The VS1 mixer has 4 signal inputs, each with 

an initial Level. The X-axis (controlled by 

SourceX

) will 

crossfade between inputs 1 and 2; the Y-axis (controlled by 

SourceY

) between inputs 3 and 4.  The ‘factory default’ for 

Source X & Y are the 2 outputs from the 

Joystick

, but you 

could program anything you want. 

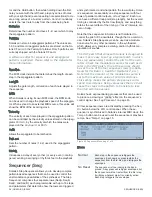
Figure 71. Vector Synthesis Menu, page 1 of 2

Figure 72. Vector Synthesis Menu, page 2 of 2

The X/Y “motion” of the vector synthesis module can be 

assigned to the hardware 

Joystick

, or modulated by any 

of Solaris’ extensive modulation sources. When assigned 

to the 

Joystick

, each corner of the control represents the 

full level of one of the four input sources. 

X-Offset

 and 

Y-

Offset 

shift the value of the x/y control, moving the “center” 

of the 

Joystick

 away from 0,0.

If you take a look at the factory setting (default patch when 

you switch on the Solaris without any CF card), you can 

see that 

Input1

-

Input4

 are set to 

Oscs 1

-

Osc 4

, all at full 

Level. Moving to the next VS 1 page, you will see 

JoyX

 for 

SourceX

, and 

JoyY

 for 

SourceY

, both at 100%, with no 

offsets. If you now set the tuning for each oscillator at obvi-

ous different intervals, you can use the 

Joystick

 to isolate 

each oscillator, and crossfade between the 4 oscillator 

outputs, with the center 

Joystick

 position being an equal 

mix of all 4 inputs.

Amplitude Modulation (AM)

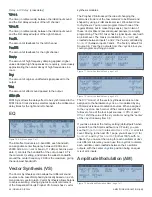
Figure 73. Amplitude Modulation Menu, page 1 of 1

Delay

, or 

XDelay

 (cross delay).

Time L

The time (in milliseconds) between the initial input sound 

and the first delayed output of the left channel.

Time R

The time (in milliseconds) between the initial input sound 

and the first delayed output of the right channel.

Feed L

The amount of feedback for the left channel

Feed R

The amount of feedback for the right channel

Damp

The amount of high frequency damping applied. Higher 

values dampen high frequencies more quickly, more closely 

approximating the natural decay of high frequencies in a 

room. 

Dry

The amount of original, unaffected signal passed to the 

output.

Wet

The amount of effect sound passed to the output.

MIDI Clk

MIDI Sync allows the delay effect to be synchronized to the 

MIDI Clock. Clock division selectors replace the millisecond 

delay times for the right and left channel.

EQ

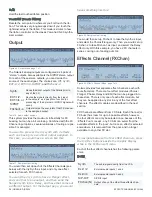
Figure 70. EQ Menu, page 1 of 1

The EQ effect module is a 3-band EQ, each band with 

an assignable center frequency between 0.00Hz and 

20000.0Hz. A 

Gain

 cut or boost of 12 dB per band is avail-

able. 

controls the bandwidth of the cut or boost; 0.7 is 

the minimum 

Q

 setting, and allows the widest bandwidth 

around the center frequency. 20.00 is the maximum, giving 

the narrowest bandwidth.

Vector Synthesis (VS)

The Vector Synthesis section allows four different sound 

sources to be mixed/morphed dynamically based on a 2 di-

mensional x/y vector graph. Vector Synthesis allows Solaris 

to achieve swirling, moving dynamic sounds reminiscent 

of the Sequential Circuits Prophet VS. Solaris has 2 vector 

Summary of Contents for Solaris

Page 1: ...User Guide Version 1 ...

Page 2: ...val system or transmitted in any form or by any means electronic mechanical recording or otherwise without the prior written permis sion of John Bowen Synth Design Solaris is a trademark of John Bowen Synth Design All other trademarks contained herein are the property of their re spective owners All features and specifications subject to change without notice For the latest revision of this manual...

Page 3: ...ecided to implement however as with any complex system work flow and understanding can take time depending on your experience and interest Please register your purchase of the Solaris with me at info johnbowen com Once I have your name and email and se rial number I will send you links to some video tutorials to get you started It is my hope that Solaris will provide you with many hours of explora...

Page 4: ...ir early efforts that enabled my dream to begin taking shape and I will forever be grateful for their friendship and the many hours of unselfish dedica tion they contributed to bring the Solaris into the world Thank You a million times over As well all of the Sonic Core team who have worked so tirelessly to bring Solaris to life Klaus Piehl Julian Schmidt Ralf Dressel Alex Zielke Nadia Haubrich an...

Page 5: ...ignal Path 21 Flexible Signal Path 21 Boosting the signal of each oscillator by 6dB 21 Classic synthesizer configuration 21 Insert FX before the filters Mixer Insert FX Filter 21 Insert FX after the filters Mixer Filter Insert FX 21 Feedback loop in mixer 22 Processing External Signals 23 External Signals 23 Processing External Audio Signals 23 Processing External Control Signals 23 Oscillators 24...

Page 6: ...age 1 Parameters 34 Page 2 Parameters 34 EG Parameters Mod Mode 34 Page 1 Parameters 34 Page 2 Parameters 34 Graphic Display Functions 35 Graphic Display 35 Soft Menus 35 Soft Menu Group Organization 35 Arpeggiator Arp 35 Sequencer Seq 36 Ribbon Controller 37 Output 38 Effects Channel FXChan 38 Chorus Flanger ChorFla 39 Phaser 39 Delay 39 EQ 40 Vector Synthesis VS 40 Amplitude Modulation AM 41 Loo...

Page 7: ...at was included with the unit Never connect the Solaris to a power outlet that does not fully comply with national safety regulations Never use an external power supply which wasn t designed to match the local voltage require ments   Disconnect the power whenever you are unlikely to use the Solaris for a long period of time Always pull on the plug itself not on the cord Never touch the mains plu...

Page 8: ... like this   When referring to the value of a parameter the value is formatted like this   When referring to a panel s Main mode versus Mod ulation mode the mode name is formatted like this   Sidebar notes hints etc are formatted like this This is a sample of how hints and notes are format ted   When describing one of Solaris s panels or soft menus the name of the parameters are often used...

Page 9: ...r and sequencer patterns storage of samples and several other basic setup files In addition there are a few hidden com mands to call up system diagnostics and calibration Updating the Operating System There are two ways to update Solaris s operating system OS 1 There is a file in the OS folder of the CompactFlash card that came with Solaris called doFlash txt There is a single value in the text fi...

Page 10: ...ld press 3 12 then Enter Preset Mode Graphic Display Preset Mode is enabled when you press the Preset button above the numeric keypad on so that its LED is lit This must be on to select any presets As soon as an edit is made anywhere on the front panel the Solaris will automat ically leave Preset Mode to allow for editing so when you want to play through the presets make sure this Preset button is...

Page 11: ...igure 7 and lets you select a new bank and preset location in which to store your preset If you just want to store it in the same location you don t need to change anything If however you want to listen to the new location to see if you don t want to keep what s there you can press Compare which will load the new location s preset and allow you to play it Compare will stay lit when you are listeni...

Page 12: ...ou press Enter again and wait until the Solaris is finished loading the samples at which point you should see the message Finished sample transfer To avoid any accidental reloading of the SamplePool names and or samples themselves it s best to move off of the SYSTEM screen to some other screen you can go to the MIDI screens or any other soft key group Now you can go to any Oscillator select the WA...

Page 13: ...ages per group although this does vary a bit Throughout this manual we will refer to a panel s Main Mode and Mod Mode Those modes or sets of menus are access by the sub group toggle button or by using Wrap as described below There are several ways to step through the pages The user can decide to step through all pages with the Inc Dec buttons and then stop at the end or to be able to continu ously...

Page 14: ... output assignment effects bussing and effects con trols are here VS AM This page has 2 each of Amplitude Mod and Vector Mixer sections also Looping EG KeyTab The 4 Key Tables and 4 Lag processors are here also the Env Follower SysMid All other system parameters and MIDI controls are here This data is not stored in a preset but as a glo ini file You can tell how many pages of information are avail...

Page 15: ... will immediately take you out of Preset Mode Also there are parameters in the graphic display for many different functional groups and you might want to have ac cess to these To give you quick access to any parameter in the system the bottom five knobs below the graphic display can be assigned You use the Shift button to the left side of the lower row of knobs to assign these knobs Figure 16 Perf...

Page 16: ...ones The default knob behavior ap plied to Cutoff is to increase or decrease the frequency by 1 semitone as the knob is turned There is a small amount of acceleration programmed in to ensure the entire range is available with only a couple of full turns In this case the default knob behavior is to compress the range of values which allows faster access to the range of values but by making larger s...

Page 17: ...ter mode Solaris will operate at 96kHz in Slave mode ANALOG OUT The analog outputs are described in Output on page 38 ANALOG IN See Processing External Signals on page 23 for more information about the analog inputs MIDI Solaris provides standard MIDI In Out and Thru connectors MIDI configuration is covered in MIDI Menu on page 44 COMPUTER Solaris can transmit and receive MIDI signals over the USB...

Page 18: ... oscillator module in a large modular system Figure 19 depicts Solaris oscillator 1 which currently holds a Multimode Oscillator as an imaginary oscillator module in a modular synth The typi cal oscillator controls waveform shape coarse and fine tuning map 1 1 to our imaginary modular oscillator Figure 19 Waveform Wave Shape Coarse Fine Exponential FM Side Chain Linear FM 120 0 120 60 0 60 100 0 1...

Page 19: ...t setting of Source1 is the modular equivalent of patching the con trol output of LFO1 to the control input for wave shape on our modular oscillator Figure 21 Waveform Wave Shape Coarse Fine Exponential FM Side Chain Linear FM 120 0 120 60 0 60 100 0 100 0 0 100 Ctrl In 100 0 100 100 0 100 Ctrl In Strength Side Chain 100 0 100 Ctrl In Strength Multimode OSC Pulse Sine Saw Ctrl In Ctrl In Side Chai...

Page 20: ... signal from LFO3 Modulation Source3 LpEG1 Looping Envelope is modulating the LinFM Linear Frequency Modulation parameter of the oscillator and sidechain modulation is coming from AT Aftertouch Figure 23 Waveform Wave Shape Coarse Fine Exponential FM Side Chain Linear FM 120 0 120 60 0 60 100 0 100 0 0 100 Ctrl In 100 0 100 100 0 100 Ctrl In Strength Side Chain 100 0 100 Ctrl In Strength Multimode...

Page 21: ... of each oscillator by 6dB You can increase the signal of an oscillator by assigning it to more than one input on a single mixer For example Osc 1 Mixer 1 input 1 Osc 2 Mixer 1 input 2 Osc 1 Mixer 1 input 3 Osc 2 Mixer 1 input 4 Or Osc 1 Mixer 1 input 1 Osc 1 Mixer 1 input 2 Osc 1 Mixer 1 input 3 Osc 1 Mixer 1 input 4 Classic synthesizer configuration The most standard configuration like the Minim...

Page 22: ...k effect if there are other signals also coming into the Mixer This can be really effective try this Osc1 Mixer 1 input 1 Mixer 1 Mixer 1 input 2 As you adjust the Level of Input 2 you can control the overdriven sound of Osc 1 prior to the signal going into the Filter or InsFX This can give you a real fat sound when used judiciously You can also modulate the level of Input2 with an envelope or oth...

Page 23: ...nvelope Follower EGFoll on page 43 for any of the external ins to sweep the filter cutoff or modulate other pa rameters You can even use them with the lag processors for simple 1 pole filtering as described in Lag Processor on page 43 Using external ins with the Vector Mixers allows you to quad mix 4 inputs with the Joystick Using them with the AM sections such as the Ring Mod algorithm allows the...

Page 24: ...oscillator Oscillators loaded into the active oscillator slot as indicated by the LED above the oscillator selection buttons The parameters associated with Osc 1 4 are displayed in the Oscillator text display grouped into 2 pages which can be accessed by pressing the up down arrows to the left of the text display as shown in Figure 25 The parameters displayed in the text display will vary based up...

Page 25: ...e square For the LFO section Gate Sync is called Retrigger and is accessible via the rightmost button on the LFO panel Glide rate Exponential glide setting for the selected oscillator in the range 0 0ms 20 0sec Produces a smooth transition in pitch between two notes Glide on off Enables or disables oscillator glide for the selected oscilla tor Oscillator Parameters Mod Mode Oscillator Mod mode is ...

Page 26: ...1 Coarse Coarse tuning of the Rotor between 60 and 60 semitones This control allows the Rotor to operate as an audio rate oscillator The Clock Sync No Track and Low buttons on the Oscillators panel have the same effect on the Ro tors as the do on the standard Oscillators Osc 1 4 Refer to that section for an explanation of how these buttons affect the oscillator s frequency Fine Fine tuning amount ...

Page 27: ... routed within the Solaris Page 2 Parameters Figure 34 Mixer Main Mode page 2 Page 2 allows you to set the individual levels of the mixer s inputs You can also set the overall mix level Mixer Parameters Mod Mode The level of each mixer input as well as the overall mix level can be modulated separately The mixer s Mod mode pages allow you to specify the modulation source and mod ulation amount for ...

Page 28: ... filters or between the filters and the VCAs See Signal Path on page 21 for examples Insert FX Parameters Main Mode Figure 38 Insert FX Main Mode Mode Parameter Description Decim ator Reduces the sample rate of the playback system The range is 63 with lower values increasing the decimation effect BitChop A bit crusher effect that allows you to reduce the bit length of the playback signal from 16 t...

Page 29: ... in series Some filter types also support different pole configurations Refer to Filter Types on page 56 for details Cutoff The filter s cutoff frequency in semitones from 0 0 to 126 0 Recall from Knob Acceleration and the Shift Button on page 16 that the Cutoff knob is designed to sweep quickly through its values For fine control over cutoff frequency use the Data Wheel or press and hold the Shif...

Page 30: ...ach filter has 4 modulation source slots A filter s Cutoff cutoff frequency or Reso resonance can be modulated by any of the four modulation sources Other modulation sources are available for some filter models for example case Damping for the Comb filter and X Fade crossfade for the Vocal filter ...

Page 31: ...e VCA type controls the response of the amplifier to control signals The Boost control is an emulation of an OTA circuit or soft distortion taken from the original Minimoog filter emula tion It was moved into the amplifier section so that is could be used with any filter type Setting its value at around 70 or more will result in a more analog sound VCA Parameters Mod Mode Figure 46 VCA Mod Mode Th...

Page 32: ...t button while turning the Rate knob Page 2 Parameters Figure 49 LFO Main Mode page 2 Parameter Description DelStrt 0 0 ms to 10 0 seconds Delays the output of the LFO based on the note on gate FadeIn 0 0 ms to 10 0 seconds The time it takes to fade in the LFO output after the Delay Start is finished FadeOut 0 0ms to 10 0 seconds The time it takes to fade out the LFO output after a note key is rel...

Page 33: ...VIBRATO LFO Page 2 Parameters Figure 51 Vibrato LFO Main Mode page 2 LFO Parameters Mod Mode Figure 52 LFO Mod Mode All of the LFOs have 3 modulation source slots An LFO s Rate or Level can be modulated by any of the three modu lation sources ...

Page 34: ...he value either a down arrowhead if a negative value or an up arrowhead for a positive value This is to help describe that any negative value eventually ends up taking the EG output down to 0 while any positive value takes it up to 127 full value EG Parameters Mod Mode Page 1 Parameters Figure 56 Envelope Generator Mod Mode page 1 The modulation source list for the envelope generators is limited t...

Page 35: ... earlier the Graphic Display shows six soft menus at a time and pressing the More button will bring up the next group of 6 soft menus We will refer to those groups of six soft menus as Soft Menu Groups Table 8 de scribes the general organization of these groups of menus Group 1 For live performance or things that you might want to adjust while playing related to the arpeggiator or sequencers The R...

Page 36: ...d synchronized and what pattern the row will play Solar is s sequencer is essentially one step sequencer with four rows of parallel control outputs or four layers Each row can have a different loop point step length but the overall timing is controlled by the first row SeqA and everything retains the overall feel of the timing or reset intervals are set on SeqA Note that the sequencer in Solaris i...

Page 37: ...be set to synchronize to an incoming MIDI clock signal by setting the ClkSrc parameter to Ext in the MIDI menu See MIDI Menu on page 44 Figure 61 Sequencer Menu page 2 of 3 PatLen Specifies the length of the sequencer row s pattern Each of the 4 rows can have a different pattern length Step1 Step8 Allows the first 8 steps of the row s pattern to be set If the Amount parameter in the destination is...

Page 38: ...hannel You want the dry synth to have a Flanger effect and send that to one output and then send the flanged synth into a Delay and have that come out a different output For the Output page you would have something like this Figure 65 Sample output routing You would then set up FXchan1 to take the Synth as input and select the Chorus Flanger only Then you would set up FXchan 2 to take FXchan1 as I...

Page 39: ... Figure 68 Phaser Menu page 1 of 1 Mode Bypass or enable the effect Freq Speed of the modulation from 0 00Hz to 50 0Hz Depth Depth of the modulation effect from 0 to 100 Phase Phase 180 degrees Offset Allows you to specify the center point of the frequency be ing swept in Hertz The range is 0 00Hz to 20000 0Hz InLevel Gain of the input signal Feedbck Amount of feedback to be applied from 0 100 Dry...

Page 40: ... the Joystick to isolate each oscillator and crossfade between the 4 oscillator outputs with the center Joystick position being an equal mix of all 4 inputs Amplitude Modulation AM Figure 73 Amplitude Modulation Menu page 1 of 1 Delay or XDelay cross delay Time L The time in milliseconds between the initial input sound and the first delayed output of the left channel Time R The time in millisecond...

Page 41: ...dditional sidebands equally spaced around the carrier s fundamental frequency The frequency of the sidebands is the sum and difference of the carrier and modulator s fre quencies and the amplitude of the new partials is half the amplitude of the carrier Solaris has 2 AM modules Any source can be used as the carrier or modulator though a classic AM synthesis tech nique is to modulate the amplitude ...

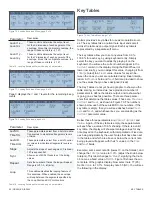
Page 42: ...0 100 0 for each key by using keyboard entry Simply select the key you want to adjust by playing it on the keyboard You will see the current number appear in the Current column in the display Using the Data Wheel or lower row knob you can adjust this value changing it from Interpol ated to a Fixed value Values for keys in be tween the ones you set are calculated using linear interpo lation A Previ...

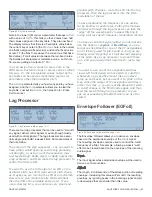
Page 43: ...te to give random subtle pitch variations like the drift of an unstable analog osc If you use a slow lag time you can have very small and gradual pitch changes route the LFO into the lag processor then the lag processor into the Pitch modulation of the osc You are modulating the frequency of one oscilla tor by another at audio rates Putting the modula tion source through the lag processor can take...

Page 44: ... integral part of the sound This function is provided if for some rea son you wish to have the Solaris audio coming from output jacks that are not normally programmed in the factory Presets Split Limits the Inc Dec buttons to select pages only from the Main or Mod group The most recent displayed page is stored for each section allowing one to go between a Main page and a Mod mode page Wrap Allows ...

Page 45: ...e that CC1 is one of the choices so you could go into a Filter modulation source set the Destination for Cutoff and then select CC 1 as the Mod Source with a full Amount and you would have the knob from the box controlling the filter cutoff of the Solaris The other thing to know about this is that these CC values are usually 0 127 so they may sound stepped when you use them especially on frequency...

Page 46: ... off Press and hold a chord then press the Unison button As long as the Unison button is on LED lit any notes you play will play back your stacked chord UniTune This parameter acts as a tuning spread 100 cents between the voices specified in UniVoice The larger the value the more detuned from each other the voices will become This can result in an extremely fat sound Figure 87 Home Menu page 2 of ...

Page 47: ...e is linear At 0 it is logarithmic and at 100 it is exponential VTOff Velocity Table Offset This parameter is an offset which allows you at larger values to shift the zero point of the control signal from velocity ATIntens Aftertouch Table Intensity 0 100 For the table shapes at 50 the table shape is linear At 0 it is logarithmic and at 100 it is exponential ATOff Aftertouch Table Offset This para...

Page 48: ...ing and Jaws types of waveforms this pa rameter determines the shape of the waveform the oscillator will generate 0 to 100 Note that this parameter doesn t affect all waveforms When the Jaws waveform is selected the Shape parameter affects the tuning spread between the 7 stacked sawtooth waves Coarse Parameter controls the pitch of the oscillator in semitones 60 to 60 Fine Fine tuning of the oscil...

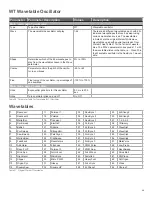
Page 49: ...ne semitone 100 to 100 Main mode page 2 parameters Glide Exponential glide time for this oscillator 0 0 ms to 20 0 sec Glide Turns oscillator glide on and off On Off Table 20 Parameter Table for Wavetable WT Oscillator Wavetables 1 Resonant 17 Formant 1 33 SawSync 1 49 K Strong2 2 Resonant 2 18 Polated 34 SawSync 2 50 K Strong3 3 MalletSyn 19 Transient 35 SawSync 3 51 1 2 3 4 5 4 Sqr Sweep 20 Elec...

Page 50: ...and Jaws types of waveforms this parameter determines the shape of the waveform the oscillator will generate 0 to 100 For the CEM Oscillator only the Pulse waveform is affected by the Shape parameter Pulse width is affected in any of the waveshape combinations that include the Pulse waveform Coarse Parameter controls the pitch of the oscilla tor in semitones 60 to 60 Fine Fine tuning of the oscill...

Page 51: ... set the user has uploaded to Solaris 1 N Shape No effect 0 to 100 Coarse Parameter controls the pitch of the oscilla tor in semitones 60 to 60 Fine Fine tuning of the oscillator in percentage of one semitone 100 to 100 Main mode page 2 parameters Glide Exponential glide time for this oscillator 0 0 ms to 20 0 sec Glide Turns oscillator glide on and off On Off Table 23 Parameter Table for Sample P...

Page 52: ...ant Organ 70 Pinched 2 7 Warm Bell 2 39 Clarinet 71 Cluster 8 Formant Bell 40 Ahh Female 72 Medium Pinched 9 Fuzzy Reed 41 Ahh Homme 73 Vox Pinched 10 Formant Aoh 42 Ahh Bass 74 Organ Pinched 11 Formant Ahh 43 Reg Vox 75 Ahh Pinched 12 TriPlus 44 Vocal 1 76 Piano Organ 13 Dissonant Bell 45 Vocal 2 77 Bright Reed 14 Pulse 1 46 High Ahh 78 No Fundamental 15 Pulse 2 47 Bass 79 Reed Harmonic 16 Square...

Page 53: ...wave of a preset shape Pulse2 The oscillator generates a pulse wave of a preset shape Pulse3 The oscillator generates a pulse wave of a preset shape Shape The Shape parameter has no effect The Minimoog had three preset pulse waveform shapes 0 to 100 Coarse Parameter controls the pitch of the oscilla tor in semitones 60 to 60 Fine Fine tuning of the oscillator in percentage of one semitone 100 to 1...

Page 54: ...ontrollers Refer to MIDI Menu on page 44 for details Seq A D Step sequencers A through D Ped1 Pedal 1 Ped2 Pedal 2 Btn1 Assignable Button 1 Btn2 Assignable Button 2 EnvFol Envelope Follower KeyTab1 KeyTab4 Key Tables 1 through 4 PolyAT Polyphonic Aftertouch Lag1 Lag4 Lag processors 1 through 4 Breath Breath controller MaxVal Maximum value for that parameter Osc1 Osc4 Oscillators 1 through 4 Rotor ...

Page 55: ...source list used by the Envelope Generator EG components We will refer to this list as Modulation Source List 2 Source Name OFF Vel Velocity KeyTrk Key tracking ModWh Modulation wheel CC1 CC4 Continuous controllers 1 through 4 Table 28 Modulation Source List 2 ...

Page 56: ...lope filter Mini Emulation of the filter used in the Minimoog A 4 pole 24 dB slope filter Input levels easily distort Obie A 2 pole 12 dB state variable filter based on an Oberheim design Includes LB HP BP and BR Comb The comb filter adds a delayed copy of a signal to itself in either a feed forward or feedback loop Both cause interference with the original signal resulting in a frequency response...

Page 57: ... notes 1 2T Half note triplets 1 4P 1 5 Quarter note 3 eighth notes 1 4 Quarter notes 1 4T Quarter note triplets 1 8P 1 5 Eighth note 3 sixteenth notes 1 8 Eighth notes 1 8T Eighth note TRIPLETS 1 16P 1 5 Sixteenth note 3 32nd notes 1 16 Sixteenth notes 1 16T Sixteenth note triplets 1 32 Thirty second notes 1 32T Thirty second note triplets 1 64 Sixty fourth notes 1 64T Sixty fourth note triplets ...

Page 58: ...highkey 127 Sample sampleindex 2 filename Glockenspiel B5 raw samplerate 44100 samplelength 40628 loopstart 39628 loopend 40628 rootkey 83 finetune 0 lowkey 0 highkey 127 Figure 90 Example SamplePool text file The sample pool file shown in Figure 90 contains two individual samples These two samples will show up as samples 1 and 2 in the Wave parameter of any oscillator slot running a sample playba...

Page 59: ...re 91 shows the main menu of the Self Test Menu In this case you can see that the DSP diagnostic test has been run Figure 92 shows the second page of self test menu options Press Exit to leave the Self Test Menu Figure 92 Self Test Menu page 2 The menu you are most likely to use is the Analog Ctrls menu Access this menu by pressing 4 on the numeric keypad when you are on the main Self Test menu pa...

Page 60: ...hysical damages customer will be charged for testing procedure and services Any deficiencies caused by transportation have to be declared within a 14 days period after receipt of goods by written notice Please note that any warranty repair at no cost ruled by the above regulations requires registration of name and address by sending the proof of purchase together with the defective product To retu...

Page 61: ...1 Lfo2ModControl3 162 Lfo2ModDest1 164 Lfo2ModDest2 165 Lfo2ModDest3 166 Lfo2Frequency0 168 Lfo2WaveSel0 169 Lfo2Phase0 170 Lfo2KeySyncSw0 171 Lfo2FadeInTime0 172 Lfo2FadeOutTime0 173 Lfo2DelayTime0 174 Lfo2OffsetSw0 175 Lfo2Level0 177 Lfo3ModCMix1 178 Lfo3ModAmount1 179 Lfo3ModCMix2 180 Lfo3ModAmount2 181 Lfo3ModCMix3 182 Lfo3ModAmount3 183 Lfo3ModSource1 186 Lfo3ModSource2 187 Lfo3ModSource3 188...

Page 62: ...od0 493 Mix1In3GMod0 494 Mix1In4GMod0 495 Mix1In1Src0 496 Mix1In2Src0 497 Mix1In3Src0 498 Mix1In4Src0 499 Mix1In1GMSrc0 500 Mix1In2GMSrc0 501 Mix1In3GMSrc0 502 Mix1In4GMSrc0 503 Mix1OutputGain0 504 Mix1OutputGMod0 505 Mix1OutputGMSrc0 506 Mix2In1Gain0 507 Mix2In2Gain0 508 Mix2In3Gain0 509 Mix2In4Gain0 510 Mix2In1GMod0 511 Mix2In2GMod0 512 Mix2In3GMod0 513 Mix2In4GMod0 514 Mix2In1Src0 515 Mix2In2Sr...

Page 63: ...ec1YMod0 793 Vec1In1Src0 794 Vec1In2Src0 795 Vec1In3Src0 796 Vec1In4Src0 797 Vec1XMSrc0 798 Vec1YMSrc0 799 Vec2In1Gain0 800 Vec2In2Gain0 801 Vec2In3Gain0 802 Vec2In4Gain0 803 Vec2XOffset0 804 Vec2YOffset0 805 Vec2XMod0 806 Vec2YMod0 807 Vec2In1Src0 808 Vec2In2Src0 809 Vec2In3Src0 810 Vec2In4Src0 811 Vec2XMSrc0 812 Vec2YMSrc0 813 Leg1T1 814 Leg1X1 815 Leg1Y1 816 Leg1T2 817 Leg1X2 818 Leg1Y2 819 Leg...

Page 64: ..._Pitch0 1119 Osc2ModAmount4_Pitch0 1120 Osc3ModAmount4_Pitch0 1121 Osc4ModAmount4_Pitch0 1122 Lfo1ModAmount1_Pitch0 1123 Lfo2ModAmount1_Pitch0 1124 Lfo3ModAmount1_Pitch0 1125 Lfo4ModAmount1_Pitch0 1126 Lfo5ModAmount1_Pitch0 1127 Lfo1ModAmount2_Pitch0 1128 Lfo2ModAmount2_Pitch0 1129 Lfo3ModAmount2_Pitch0 1130 Lfo4ModAmount2_Pitch0 1131 Lfo5ModAmount2_Pitch0 1132 Lfo1ModAmount3_Pitch0 1133 Lfo2ModAm...

Page 65: ...e of radio or TV interference relocate reorient the antenna If the antenna lead in is 300 ohm ribbon lead change the lead in to coaxial type cable If these cor rective measures do not produce satisfactory results please contact the local retailer authorised to distribute this type of product The statements above apply ONLY to products distributed in the USA SOLARIS Version 1 191 FCC Information CA...

Page 66: ... Generators 34 EQ 40 Exp 45 Exponential 45 ExpPed 46 External Signals 23 F Feedbck 39 Feed L 40 Feed R 40 Filters 29 Filter Types 56 Fine 26 48 Free CF Space 47 Function Group Shortcut 14 FX 14 FXChan 38 No Track 24 O Obie 56 Octaves 36 Octave Transpose 15 Offset 32 Omni 45 Oscillators 24 OS Version 47 OutLevel 44 P PatLen 36 Pattern 37 Performance Controls 14 Phase 25 Pitch and Modulation Wheels ...

Reviews: