background image


computer  radio  control  system  

EN


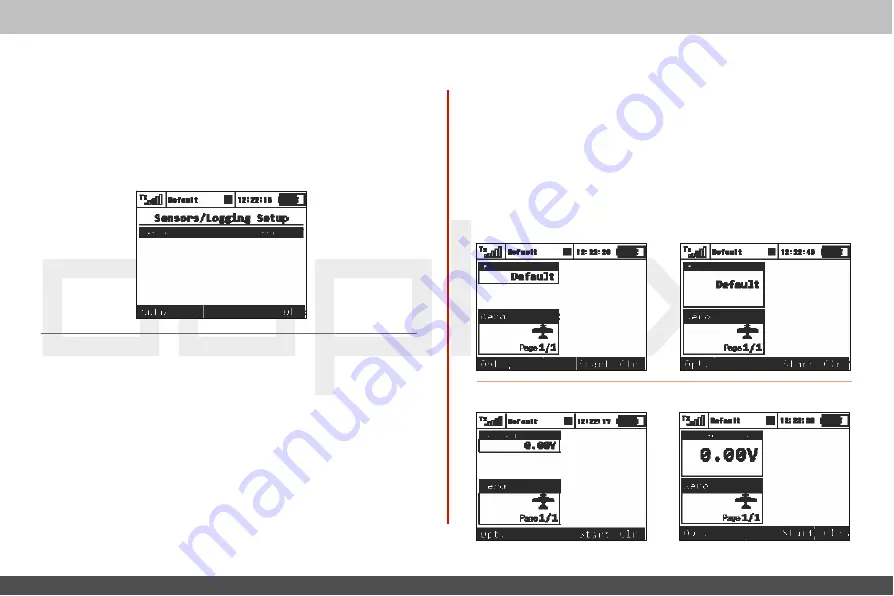
9.4.5   Sensors/Logging Setup


This menu lists all of the Duplex EX sensors and their values which 
are operating in your model. When you connect a sensor to a Duplex 
EX  receiver it may take several minutes  for the sensor to be 
recognized by the transmitter  and added  to the list.


In this menu  you can edit  the  telemetry  parameters of each sensor.


9.4.6   Displayed Telemetry


This menu  lists all of the  user  information  blocks which are displayed 
on the desktop.   You can use  this menu  to  manually  add,  delete, 
rename and resize the user information blocks displayed on the 
desktop.


User Block Overview:


"Flight mode" - Name  of the  current flight mode


„Voltage  Rx“ 

- Receiver Voltage


Summary of Contents for Duplex DC16

Page 1: ...3431 Tel 561 961 5585 Fax 561 961 5587 Certification Exhibit FCC ID ONTJETIDC16US IC 10491A JETIDC16US FCC Rule Part 15 247 IC Radio Standards Specification RSS 210 ACS Project 12 2095 Manufacturer Es...

Page 2: ...allows the setup of audible notifications optionally createdbytheuser whichcanberelatedtoactualtelemetricvalues or to sound alarms or signals which have been assigned to conditionsofvariouscontrolele...

Page 3: ...user recordable alarms and sounds to keep you fully informed while also keeping distractions to a minimum To make navigationfaster the DC 16 transmitter Instruction Manual hasbeendividedinto5basicgro...

Page 4: ...zedJetiModelCZdistributoror dealer Third party transactions are not covered by this warranty Proof of purchase is required for warranty claims Repair or replacement decisions are at the sole discretio...

Page 5: ...ssortment of 4 to 18 channel Duplex Receivers Wide Assortment of Jeti Telemetry Sensors 3 System Specifications Frequency 2 4GHz Dimensions WxLxH with Antenna 180x270x40 230x270x40 Weight 1 5Kg Number...

Page 6: ...eftStickT3 T4 5 DigitalTrimsfortheRightStickT1 T2 6 RightSideControlLever5 7 LeftSideControlLever6 8 RotaryControlKnob7 9 RotaryControlKnob8 10 LCDDisplay 11 FunctionButtonsF1 F5 12 TransmitterOn OffP...

Page 7: ...computer radio control system EN 23 BatteryConnector 24 TransmitterBatteryPack 25 PPMOutputConnector 26 LeftGimbalAssembly 27 RightGimbalAssembly 2 2 24 23 25 26 27 4 2 Assembly Identification...

Page 8: ...n the overall stick length 3 Adjust the lower part to support the top part of thestickend 4 Finally secure by tightening both parts to eachother 1 2 3 4 If you have installed optional sticks with swit...

Page 9: ...ansmitterandremovethe10screwsthatsecure the radio back cover Next remove the radio back cover Be sure to disconnect the transmitter battery pack connector 2 Use indicated machine adjustment screws to...

Page 10: ...k cover Be sure to disconnect the transmitter battery pack connector 2 Disconnect the control stick assembly wires from the Tx board 3wiresX Y S 3 Removethestickassemblyconnectingwiresfromtheirholders...

Page 11: ...uration The switch between Modes 1 to 3 or Modes 2 to 4 are done with the software only NO manualstickchangeisnecessary Note 4 3 6 Transmitter Gimbals with Switch or Button Installation If you wantto...

Page 12: ...amaging the connecting cables The safest method is to de solder the stick end switch control wires and remove them from the gimbal opening during adjustment 9 Pass the switch wires through the same gi...

Page 13: ...c 2 positionshortswitch Sd 2 positionlongswitch Se 3 positionshortswitch Sf 3 positionshortswitch Sg 3 positionlongswitch Sh 2 positionshortswitch Si 2 positionshortswitch Sj 3 positionlongswitch 2 2...

Page 14: ...rims Transmitter gimbals are used for controlling the basic flight functionslikethrottle roll aileron pitch elevator andyaw rudder Immediately under the transmitter gimbal sticks you can see four push...

Page 15: ...uit In switched on position the transmitter LCD display shows the status and condition of the batterypack TheLi Ionbatteryisfactoryinstalled 4 6 1 Charging The DC 16 transmitter can be charged with th...

Page 16: ...ld and avoid contact of the transmitterantennawithyourbody Warning 2 2 4 7 PPM Output Connector The PPM output is accessible via connector labeled B This connector features the non stabilized battery...

Page 17: ...one part of a model can be controlled with one receiver using the first transmitter RF module the other part of a model with a second receiver and the second RF module In an instant you have created a...

Page 18: ...Fastswitch on 2 1 If you want to find out the battery status on a switched off transmitterjustpushthebutton Power andtheinitialscreen with the battery status will appear If you do not confirm turning...

Page 19: ...owerbarshows 1 Opt fasttransmitterset up Contrast Telemetry Volume DurationofBackliting BacklitingBrightness 2 LeftArrow moveleftwithinthedesktoppages 3 Arrow moverightwithinthedesktoppages 4 Clr rese...

Page 20: ...ncreaseanyvalueyouareediting by pressing the selector you will confirm your 3c choice entertheselectedmenu 4 The F1 F5 functions buttons located below the display are usedtoselect variousoptionsbasedu...

Page 21: ...mode in Main menu System Configuration MODE 1 4 The basic standardized assignment of transmitterinputstoflightcontrolsarebaseduponthisselection First it is necessary to first create a model in the tr...

Page 22: ...eiver with your transmitter Press the F5 OK buttonandyouaretakentothemain screenwhereyournewmodelisdisplayedina desktoppage Bindtransmitterwiththereceiver seechapter8 4 Receiver Binding Once your tran...

Page 23: ...zed assignment oftransmitterinputstoflightcontrolsarebaseduponthisselection First it is necessary to first create a model in the transmitter and then bind the DC 16 transmitter with the receiver which...

Page 24: ...ntage You can use these these travel range adjustments to prevent linkage binding and to tune the 8 The screen will display a question which asksifyoureallywanttocreateandactivate thenewmodel Pressthe...

Page 25: ...re creating a model make sure that you have setup the correct transmitter mode in Main menu System Configuration MODE 1 4 The basic standardized assignment of transmitter inputstoflightcontrolsarebase...

Page 26: ...rom item Then select Sound M the name of the sound function in the To item The item Master Value represents the amount of mixing from the input function to the output function for this mixer With the...

Page 27: ...nue with each channel until all of the servostravelintherequireddirections Center Subtrim adjusts the center position of each servo s output With your sticks in their neutralpositions scroll through e...

Page 28: ...lows you to connect an additional JETI DUPLEX Rsat2 satellite receiver This allows you to increase the number of receiver antennas in your system for increased reliabilty in installations with shielde...

Page 29: ...ill bind with the primarytransmittermodule 3 3 8 5 Range Test The range test will verify that the transmitter and receiver are functioningproperly Before the first flight of each flying session or if...

Page 30: ...routputwhich you want to configure use the left right buttons and proceed by usingthedown button 4 In the Signak Fault Yn menu where n denotes the channel number which has to be configured use the rig...

Page 31: ...button you will enter into the User MenuSetupsection 5 The numbers on the left side of the display shows the sequence ofthemenuitems 6 Withthe F1 and F2 buttonsyoumaychangethesequence oftheselectedme...

Page 32: ...number of the receiver with which it is starting to communicate If the two series numbers do not match the transmitter displays a warning that a different receiver has been detected for the model In t...

Page 33: ...itterallowsstoringofmanymodelsinthememory 9 1 2 NewModel Selecting this menu item starts the new model creation assistant The assistant begins creating a new model profile as soon as you select New mo...

Page 34: ...the menus with many of the popular options for each type of model The possible choices are Aero Heli and General Once your model is stored it is not possible to change that model stype Once your mode...

Page 35: ...ervos You can then assign the control of each landing gear servo to a different receiver channel if needed Press the F5 Next button proceed to the next step of the menu assistant FunctionsAssignment 4...

Page 36: ...ou to rotate the entire swash plate by a defined angle This allows you to add fine tune your swash plate as required by some scalemodels Servoarmlengths servo1 4 This item allows you move your swash p...

Page 37: ...Auto button and then press the F5 Yes button 1 FlightfunctionRenaming By editing each Function item you can rename a flight function fromitsoriginalnametoanynamethatyouchoose 2 AssignmentofaControlEl...

Page 38: ...functions to the correct transmitter control elements stick switch knob or slider and make sure that the trims are assigned and functioning as you wish By pressing the F5 Next button you will enter t...

Page 39: ...y time be configured by selecting the Main menu Model ServoSetup menu 4 4 Onceyourmodeliscreatedandactivatedyoushould bind your receiver with the transmitter and then proceedwith ServoSetup Advice 9 1...

Page 40: ...trim settings dual rate throws and other proportional setups Note 5 MaxPositive MaxNegativeLimit These restrict the absolute throw of the receiver channel output This limit can never be exceeded by a...

Page 41: ...only accessible in wing configuration 2FLAP 2AIL and higher Ailevator Thismenuisonlyaccessibleinthe Ailevator tailconfiguration Delta Elevon This menu is only accessible in wing configuration None Ele...

Page 42: ...es in the positions of your control surfaces can negatively affect performance or even create a critical situation The Time delay can help you avoid this situation 4 4 1 2 3 If no flight mode is requi...

Page 43: ...owsetasyournewdefault 7 Deleting a Flight Mode Todeleteaflightmode Highlight the desired flight mode and press the F4 Opt a buttontoseetheoptionsmenu Scroll and select the Deleteflightmode option and...

Page 44: ...nctions can be set collectively for all flight modes by keeping the G globe symbol setting or they can be set in each flight mode individually by selecting the S Separate setting For a maiden flight w...

Page 45: ...turns ON OFF the lock which allows each output to be adjusted either together symmetrically or independantly 2 TrimTravelGlobalorSeparateSetting The servo trim position for each function output can be...

Page 46: ...the switch travel by using F2 Prop button to select the proportional setting The correct function can be verified in the Dual Rate Edit screen by activating the switch and observing the position numb...

Page 47: ...lypressing F4 button Eitherway youwill betakentothehighlightedfunction scurveoptionscreen c a b e FlightModeDelayEnable In the menu Fine Tuning Function Curves it is possible to activate deactivate a...

Page 48: ...olpoints All of the points can be moved in both horizontal and vertical directions Usingthe 3DControl orthe F3 and F4 buttonsyou can move the curve points in a vertical direction and in a horizontal d...

Page 49: ...p and down has to be set differently The number of aileron servos displayed depends upon the selected wing type of your airplane the maximum number is four S1 S4 1 AileronDifferentialGlobalorSeparateS...

Page 50: ...s marked Elevator and Aileron contain two columns S1 and S2 which represent the elevator and aileron surface throws as a percentage Scroll and highlight the lines marked as Elevator or Aileron with th...

Page 51: ...ing of each servo If the servos need to be adjusted independantly use the F1 Sym button to unlock the servotravelforadjustingtheindividualvaluesintheselectedmenuline 1 Delta ElevonGlobalorSeparateSett...

Page 52: ...nother Function of the Delay is to slow down the movementofthecontrolsurfacesduringthechange Increasingthe number on the positive side slows the deployment while increasing the number on the negative...

Page 53: ...ocontrolthewholetravelrange You can choose between a standard curve constant and X point curve types d ButterflyTuningmenu Screen of the Butterfly menu allows you to fine tune all braking travels thro...

Page 54: ...slave channel s mix travel After your model s basic configuration is finished use the F5 Next button to exit the free mix screen If you need to make any changes simply highlight the desired free mix...

Page 55: ...u to edit the settingsfortheindividualslaveservos S1 S4 g FreeMixDirectionalPositive NegativeMovements Once the free mix function is created you can edit the advanced settings menu so that the mix wil...

Page 56: ...dividual Gyro settings in eachseparateflightmodebysellectingthe S Separate symbol i FreeMixTrimSettings This item allows you to enable or disable whether trim functions will influencethefreemixornot j...

Page 57: ...lowest motor RPM you wantto use This is the point where the limiter begins its operation The rate represents the maximum possible output of your throttle channel If your application needs full thrott...

Page 58: ...menddisablingthisfunction Advice 2 TrainerFunction TheTrainer function can be set so that it may be activated using any assignedswitch knoborstick 3 TelemetryRecording The Telemetry recording function...

Page 59: ...control element positon will switch a function OFF Bydefault the system setting forallproportional channels and forall inputs isset to function the same as a 3 position switch a Afunction above this p...

Page 60: ...been programmed in Trainer mode this setting willnot change ifthe Txisturned ONor OFF For safety reasons the Trainer RF mode will be automatically be switched to Initial RF mode when a different mode...

Page 61: ...r function switch when the switch is activated control ofthe model istransferred to the student c Binding initialization of the Instructor transmitter s secondary RFmodule with student stransmitter d...

Page 62: ...bind with the student stransmitter 3 Connect the wireless trainer module to the student Tx Trainer Jack see Tx manual then prepare the module for binding to the instructor Tx by inserting the bind pl...

Page 63: ...4...

Page 64: ...1 and 2 by assigning functions to switches sticks or knobs After that select your desired logic statement OR YES Multi On the bottom of the screen the result of your logical expression is displayed by...

Page 65: ...b logical switch alarm or any other special function Since you can also upload music files the the DC DS 16 you can fully customize how your transmitter communicates with you If multiple sound files a...

Page 66: ...mers will be reset after turning on the TX or after selecting the model By default all timers with specified Short Reset option are cleared In addition it is possible to have all timers cleared or non...

Page 67: ...computer radio control system EN 4 4...

Page 68: ...possible timer types Standard The timer starts or resumes when the chosen switch is triggered and the timer pauses when the switch is turned off The timer s value is not reset when the timer is pause...

Page 69: ...computer radio control system EN 4 4...

Page 70: ...the wav file association as needed The third column shows whether the selected wav file for each letter is enabled Use the 3D button to enable or disable the alarm sound as needed This configuration...

Page 71: ...4 4...

Page 72: ...If an x is displayed then the audio filewillplay onlyonce 6 Set ThrottleIdle With this item activated you model s throttle will go to idle when the alarm condition occurrs 7 Activation Switch If the s...

Page 73: ...for the voice output of a timer The actual status of a single timer can be expressed by a synthesized voice If you select the desired timer and a switch every time the switch isactivated the actual t...

Page 74: ...to add a variable to the Repeat queue or to remove a variable from the Repeat queue By selecting the Trigger option the specified variable is added into the Trigger queue so that every time the Trigge...

Page 75: ...sor to be recognized by the transmitter and added to the list Inthis menu you can edit the telemetry parameters ofeach sensor 9 4 6 Displayed Telemetry This menu lists all of the user information bloc...

Page 76: ...computer radio control system EN 4 4...

Page 77: ...current rate ActualTxbattery voltage Consumed capacity of Tx battery This value increases when the transmitter isinuse and decreases when the battery ischarging User Name User name Jetibox JETIBOX emu...

Page 78: ...computer radio control system EN 4 4...

Page 79: ...erBlockorder Using the 3D button highlight your selected user block in the list Use the F1 and F2 buttons to move your selected block up or down the list 3 Deleting aUserBlock Use the F4 Del button to...

Page 80: ...computer radio control system EN 4 4...

Page 81: ...4 To change the stick mode you can either use the 3D button to highlight and select the line item or simply press the F3 button Either will take you into the Stick Mode menu Use the F1 F4 buttons to m...

Page 82: ...computer radio control system EN 4 4...

Page 83: ...send the test output to all of the channels which are active in the current model setup The servo speed item allows you to adjust the travel time for the servos during the servo test During the test t...

Page 84: ...transmitter software This menu also contains a wizard to guide you through calibrating your transmitters proportional controls Itisrecommended to calibrate your proportional controls when Youchange f...

Page 85: ...that can be mounted into the ends of your transmitter sticks 9 5 4 Receiver Output Servo Monitor This menu displays the receiver output channels being generated by the transmitter You can press the F...

Page 86: ...4 4...

Page 87: ...signalising Playback Volume volume of played WAV files Alarms Audio Playerand Sound on Event Stop Playback Switch after activating the assigned switch in the picture Sj all currently played WAV files...

Page 88: ...ss a bound receiver s menu and or any connected telemetry sensors connectedto the receiver 9 5 10 Info This menu displays information about your DC DS 16 such as product name firmware version availabl...

Page 89: ...an also assign edit how a control device functions You can set the contol device to have two types of proportional output or just a simple ON OFF function From this menu you can also reverse the contr...

Page 90: ...s 3 Reversing Press the F3 Rev button to change the control device activation direction This will not reverse the output direction of your function It will simply reverse the direction of the control...

Page 91: ...tillhave normal control ofyour model output functions are processed and at what point the various configuration choices affect the outputfunction When you move a control device top block the output fu...

Page 92: ...l instruction manual Model programmingfilesofindividual models Update directory used forsoftware updates 10 2 Update firmware The Jeti Duplex line of transmitters fully supports future software update...

Page 93: ...mitterBattery Pack 1 The Installed battery pack must be charged from an AC voltage source using only by the included wall battery charger The included adapters work with local utility services each co...

Page 94: ...and free of dust or fine debris that might damagethe mechanical parts ofthe radio 10 Do not point the transmitter antenna directly towards your model or a human body The radiation pattern from the ant...

Page 95: ...er there is no guarantee that interference will not occur in a particular installation If this equipment does cause harmful interference to radio or television reception which can be determined by tur...

Page 96: ...diated power e i r p is not more than that necessary for successful communication Conform ment la r glementation d Industrie Canada le pr sent metteur radio peut fonctionner avec une antenned un type...

Page 97: ...ileron Differential Aileron Differentialisavailable with wing configurations of2ailerons servos or more You can find the Aileron Differential menu in Fine Tuning Aileron Differential a a b b c c d e f...

Page 98: ...system EN 5 5 configurations For example if your model has Wing Type 2 Ailerons and standard tail configuration The Butterfly function can be setup to raise the ailerons spoilers and also to raise the...

Page 99: ...l both the elevator function and the rudder function Seechapter9 2 8 If you have this selected as your model s tail type you can find the V Tailmenu in FineTuning V Tail a a b c b c a Flightmode setti...

Page 100: ...d when the spoilers are deployed You can use one of the free mixers to set up this compensation 1 From inside the Fine Tuning Free mixes menu press the F2 Add button to create a new mix a b c a Flight...

Page 101: ...one of the free mixersto set up this mixing function 1 From inside the Fine Tuning Free mixes menu press the F2 Add button to create a new mix a Flightmode setting configuration b Switchassignmentfor...

Page 102: ...computer radio control system EN 5 5...

Page 103: ...ode setting configuration b Switchassignmentforthe spoiler mixfunction c Curvetype icon d Delay forthe mixfunction deploymentor retraction 1 From inside the Fine Tuning Free mixes menu press the F2 Ad...

Page 104: ...g controlled drag for spot landings Typically this mix is set up so that the ailerons travel up the flaps travel down and the elevator isset to control any pitch changes Youcan find the Butterflymenu...

Page 105: ...to create a new mix 3 To edit the mix simply highlight the mix and press the F4 Edit button to go into the selected mix sadvanced menu a b c d 2 In the From menu line select the Rudder input function...

Page 106: ...simply highlight the mix and press the F4 Edit button to go into the selected mix sadvanced menu a b c d e 2 In the From menu line select the Flaps input function as the master function and in the To...

Page 107: ...t consider mixing the flaps to the elevator In some model designs this mix can improve the elevator response You can use one of the free mixers to set up this mixing function 1 From inside the Fine Tu...

Page 108: ...his is another popular sailplane mix This mix allows you to effectively change the airfoil of your model s wing by combining the flaps and ailerons to lower the trailing edge under camber of the wing...

Page 109: ...e your throttle stick has no effect on the throttle output You can find the Throttle Cut menu in Advanced Properties Other Model Options Throttle Cut 12 16 Throttle Idle This feature is used to set th...

Reviews: