


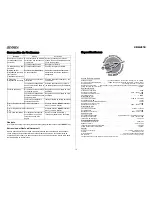


CDH4110
6
Basic Operation
1. Motorized Front Panel
Power
Press the button at the top left corner of the front panel to turn the unit on (there is a hidden
button behind this quadrant). The front panel will rotate 180 degrees and the unit will turn on.
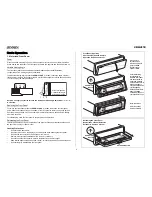
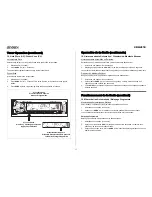
Variable Viewing Angle
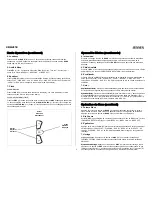
The front panel angle can be adjusted to accommodate different dash/installation
configurations. Two viewing angles are available.
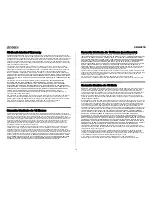
To adjust the viewing angle, press the
OPEN/CLOSE
(1) button. Locate the angle selector
(shown below), which is to the right of the CD slot illumination light. Select the desired position
(1 or 2) to modify the front panel angle.
Note: Do not apply excessive force to the front panel when angle adjustment “1” or “2”
is selected.
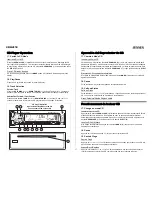
Removing the Front Panel
To remove the front panel, press the
OPEN/CLOSE
(1) button to motorize the front panel
down. Slide the release button on the bottom of the front panel to the left, and gently pull the
front panel away from the unit. The assembly will motorize into the up position automatically
after a few seconds.
For safekeeping, store the front panel in the protective case provided.
Reinstalling the Front Panel
To install the front panel, insert the left side of the panel into the panel bracket and then push
the right side in until your hear a “click”.
Handling Precautions
•
Do not drop the front panel.
•
Do not put pressure on the display or control buttons when handling the front panel.
•
Do not touch the contacts on the front panel or main unit.
•
Remove dirt or foreign substances with a clean,
dry
cloth only.
•
Do not expose the front panel to extreme temperatures or direct sunlight.
•
Keep volatile agents such as benzene, thinner, or insecticides away from the front panel.
•
Do not attempt to disassemble the front panel.
0 1 2
1 2 0
0 = Normal position
1 = Maximum angle
2 = Minimum angle
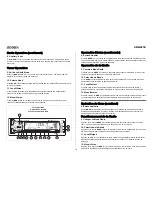
CD R
ECEIVER
MODE
BAND
DISP
MUTE
MONO
SCAN
MOS
FET
50
WATT
S X
4
AUX
IN
/
AS/PS
CDH41
10
OPEN/CLOSE
BUTTON
RELEASE BUTTON
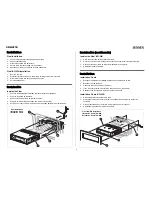
Detaching the Front Panel
Removiendo el Panel Delantero
Détacher le Panneau d'Avant
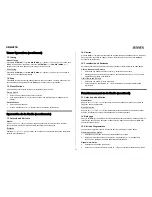
CD R
ECEIVER
MODE
BAN
D
DISP
MUT
MON
SCN
MOSFET
50
WATT
S X
4
AUX
IN
/
AS/PS
CDH41
10
CD RECEIVER
MODE
BAN
D
DISP
MUT
MON
SCN
MOS
FET
50
WATT
S X
4
AUX
IN
/
AS/PS
CDH41
10
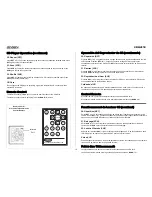
Front Panel Operation
Operación Del Panel Delantero
Opération De Panneau Avant
OPEN/CLOSE
BUTTON
Press here to
Panel motorizing
Normal Position
turn the unit on
into the Normal
Position after power
has been turned-on
Presione aquí para
girar la unidad
Serrez ici pour
allumer l'unité
Panel que motoriza
en la posición normal
después de que la
energía se haya dado
vuelta apagado
Panneau motorisant
dans la position
normale après que le
courant ait été coupé
Posición normal
Position normale