


CDH4110
15
Troubleshooting
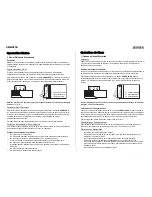
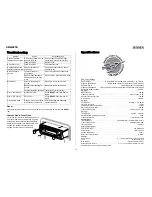
Reset
After removing the front panel, use a pencil tip (or any non-metallic object) to press
RESET
(20).
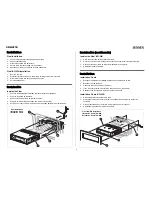
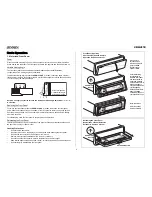
Remove Radio From Dash
To remove the radio from the dash, detach the
front panel and remove the trim ring by gently
pulling up in the middle to release the plastic
snaps. Insert removal keys between the radio
chassis and sleeve to depress locking
springs. Pull the radio out of the dash.
Problem
Cause
Corrective Action
Does not operate
(display does not light)
No power to yellow wire; no
power to red wire
Check connection with test light;
check vehicle fuse with test light
Inline fuse blown
Replace fuse
No power to unit
Inline fuse blown
Check/replace fuse
No speakers operate
(display lights normally)
Speaker harness not
connected
Connect speaker harness; check
speaker wires
Not all speakers
operate
Incorrect splices or
connections
Check all splices and connections
Speaker wires shorting to
chassis ground or to each
other
Check splices, insulate all bare wires
Blows fuses
Power wire shorting to
ground
Make sure wire is not pinched
Speaker wires shorting to
ground
Make sure wire is not pinched
Incorrect fuse/fuse too small
Install fuse of correct rating
Error-1 (CD Player)
Mechanism error
Press
RESET
, insert disc and try
again
Error-2 (CD Player)
Servo error
Press
RESET
, insert disc and try
again
CD skips too much
Receiver mount is not solid
or backstrap is not secure
Check mounting and backstrap,
tighten if needed
Specifications
CEA Power Ratings
Power Output . . . . . . . . . . . . . . . .13 watts RMS X 4 channels into 4-ohms @ < 1% THD+N
Signal to Noise Ratio. . . . . . . . . . . . . . 70dBA below reference. (Reference: 1 watt, 4-ohms)
Dynamic Power . . . . . . . . . . . . . . . . . . . . . . . . . . . . . . . . . . 26 watts @ 4-ohms x 4 channels
Frequency Response . . . . . 20Hz to 20kHz (-3dB), Auxiliary input used as source reference
Reference Supply Voltage. . . . . . . . . . . . . . . . . . . . . . . . . . . . . . . . . . . . . . . . . . . . . 14.4VDC
CD Player
Signal to noise . . . . . . . . . . . . . . . . . . . . . . . . . . . . . . . . . . . . . . . . . . . . . . . . . . . . . . . . . . . .>86 dB
Frequency response. . . . . . . . . . . . . . . . . . . . . . . . . . . . . . . . . . . . . . . . . . . . 20Hz to 20kHz, -3 dB
Channel separation @ 1kHz . . . . . . . . . . . . . . . . . . . . . . . . . . . . . . . . . . . . . . . . . . . . . . . . .>55 dB
D/A converter . . . . . . . . . . . . . . . . . . . . . . . . . . . . . . . . . . . . . . . . . . . . . . . . . . . . . . . . . . . .1 Bit/CH
FM Tuner
Tuning range . . . . . . . . . . . . . . . . . . . . . . . . . . . . . . . . . . . . . . . . . . . . . . . . . 87.5MHz – 107.9MHz
FM mono sensitivity . . . . . . . . . . . . . . . . . . . . . . . . . . . . . . . . . . . . . . . . . . . . . . . . . . . . . . . . 12 dBf
50 dB quieting sensitivity (stereo) . . . . . . . . . . . . . . . . . . . . . . . . . . . . . . . . . . . . . . . . . . . . . 18 dBf
Stereo separation @ 1kHz . . . . . . . . . . . . . . . . . . . . . . . . . . . . . . . . . . . . . . . . . . . . . . . . . . .>35 dB
Frequency Response . . . . . . . . . . . . . . . . . . . . . . . . . . . . . . . . . . . . . . . . . . . . 30Hz to 12kHz, -3dB
AM Tuner
Tuning range . . . . . . . . . . . . . . . . . . . . . . . . . . . . . . . . . . . . . . . . . . . . . . . . . . . 530kHz – 1710kHz
AM sensitivity @ 20dB signal to noise . . . . . . . . . . . . . . . . . . . . . . . . . . . . . . . . . . . . . . . . . . . 30uV
Frequency response. . . . . . . . . . . . . . . . . . . . . . . . . . . . . . . . . . . . . . . . . . . . . . 30Hz to 2kHz, -3dB
Auxiliary Input
Input Sensitivity . . . . . . . . . . . . . . . . . . . . . . . . . . . . . . . . 400mV RMS for 1 watt RMS into 4-ohms
Frequency Response . . . . . . . . . . . . . . . . . . . . . . . . . . . . . . . . . . . . . . . . . . . . 20Hz to 20kHz, -3dB
Input Impedance. . . . . . . . . . . . . . . . . . . . . . . . . . . . . . . . . . . . . . . . . . . . . . . . . . . . . . . . 10k-ohms
EIAJ Amplifier (PEAK)
Total system power. . . . . . . . . . . . . . . . . . . . . . . . . . . . . . . . . . . . . . . . . . . . . . . . . . 200 watts peak
Power output . . . . . . . . . . . . . . . . . . . . . . . . . . . . . . . . . . . . . . . . . . . . . . . . . . . . . . . 50W x 4 peak
Speaker impedance . . . . . . . . . . . . . . . . . . . . . . . . . . . . . . . . . . . . . . . . . . . . . . . . . . . . . . . 4 ohms
Reference supply voltage . . . . . . . . . . . . . . . . . . . . . . . . . . . . . . . . . . . . . . . . . . . . . . . . . . 14.4VDC
General
Power supply . . . . . . . . . . . . . . . . . . . . . . . . . . . . . . . . . 11 – 16 VDC (allowable), negative ground
Fuse . . . . . . . . . . . . . . . . . . . . . . . . . . . . . . . . . . . . . . . . . . . . . . . . . . . . . . . . . . .15 amp, ACG type
Wire harness . . . . . . . . . . . . . . . . . . . . . . . . . . . . . . . . . . . . . . . . . . . . . . . 20-pin quick-disconnect
DIN chassis dimensions . . . . . . . . . . . . . . . . . . . . . . . . . . . 7" x 7" x 2" (178mm x 178mm x 51mm)
Specifications subject to change without notice.


