JDS Technologies HomeRunner RBI User Manual Download Page 31

                                                                            31          HomeRunner RBI User Manual – Rev 1.03a                      

Likewise, an 

“After Date”

 condition is considered true from 12:00:00 AM the day after the specified 

date through the end of the year (11:59:59 PM, December 31).  A “

Before


Date”

 condition is 

considered true from 12:00:00 AM (midnight), January 1 up to and including one second before the 
specified date.  Since it can never be before January 1 AND after January 1, 

you must use OR logic 

when crossing over the new year. 

  
Example: 
  
//

Holiday Lights


If


Date is After December 15  

or

 Date is Before January 5 

Then


X10: [A-2] Holiday lights ON


Else


X10: [A-2] Holiday lights OFF


In the above event, the Holiday lights will be ON from 12:00:00 AM, December 16 through 11:59:59 
PM, January 4 and OFF from 12:00:00 AM, January 5 through 11:59:59 PM, December 15. 


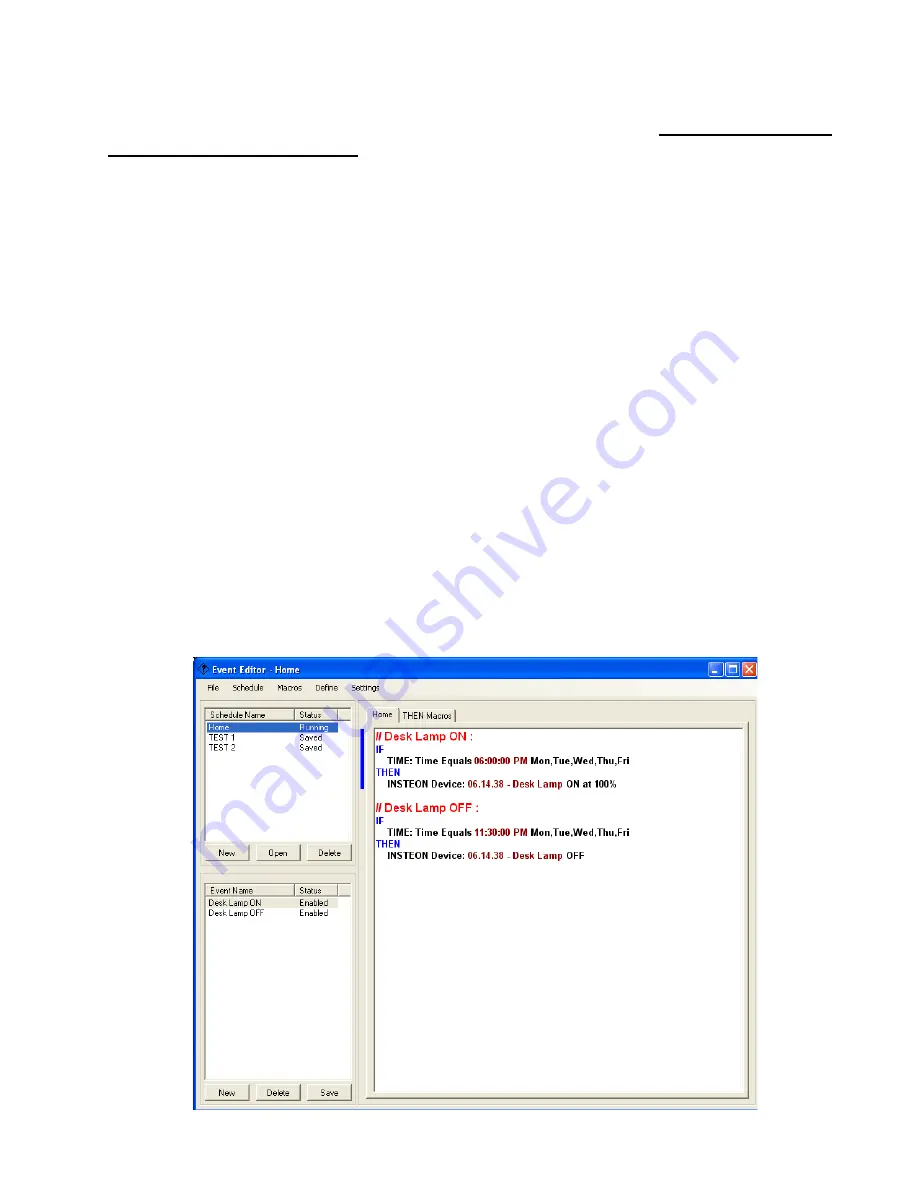
Uploading Event Schedules 

 
Once you have completed creating and naming a schedule of events, you UPLOAD the schedule to 
the 

HomeRunner RBI

 controller to execute the programmed events. 

To upload, click 

“Schedule”

 then click 

“Upload to Controller”

 (or press 

“Ctrl+F5”

).  When 

uploading has completed, the Schedule Status will change to “Running” and your events will be 
executed as programmed. 


Summary of Contents for HomeRunner RBI

Page 1: ...1 HomeRunner RBI User Manual Rev 1 03a USER MANUAL 12200 Thatcher Court Poway CA 92064 TEL 858 486 8787 SUPPORT JDSTECHNOLOGIES COM WWW JDSTECHNOLOGIES COM...

Page 2: ...Insteon Device 19 Add By Address 19 Add By Linking 22 Add By List 23 Adding An Insteon Scene 24 Creating If Then Else Conditional Events 26 Transition 26 Special Cases Crossing Over Midnight And New Y...

Page 3: ...ation and other household functions without the need for additional wiring Support for these devices is being added and will be posted as updates on our web site HomeRunner RBI also includes a Stargat...

Page 4: ...utlet 3 Wait 5 10 seconds for the green and yellow SEND and RECV LEDs to turn on 4 For applications that don t require the PLM neither Insteon or X 10 are used plug a 9 12 Volt DC power adapter into t...

Page 5: ...r hold the Ctrl key down and type the corresponding letter to select a button You can adjust the format of the toolbar by simply stretching it horizontally or vertically drag from corner or side and p...

Page 6: ...g screen attributes Event Editor Launches the Event Editor for adding editing Events and Then Macros Labels Defines X 10 devices Flags Variables and Timers Insteon Defines Insteon devices links and sc...

Page 7: ...network settings plus one Demo setting which can be selected either through the Network Settings screen or from actions assigned to user created buttons Each setting can be given an optional name i e...

Page 8: ...atitude longitude time zone and other parameters 1 Click Connect to Controller in Network Settings or click the Controller button in the Settings section of the toolbar to access the served pages 2 Se...

Page 9: ...name to access your home from any internet connected PC Edit Mode HomeRunner RBI operates in one of two modes Edit Mode and Run Mode Edit Mode is for adding and editing control screens and buttons Run...

Page 10: ...o not choose an image background click in the Background Color box and a color selection dialog will be displayed To select a Background Image click the folder button to display a list of files in the...

Page 11: ...e highlighted screen The Copy Screen button will copy the highlighted screen and will name the new screen with Copy at the end of the name As with the New Screen function the Screen Name text box will...

Page 12: ...s running full screen When the window is scaled the font size will be scaled proportionately The button next to the Font selection button allows you to specify the vertical position of the button capt...

Page 13: ...rimeter indicate its status For example a red border could indicate On and green or no border at all could indicate off You can assign a border to any or all of the three states and each can have a di...

Page 14: ...ads and supported peripheral Insteon devices SCENE is for executing Insteon scenes X10 is for executing X 10 actions FLAG is for controlling flag functions Set Clear Idle Toggle Wizard Do Nothing disp...

Page 15: ...to access the Multi Edit field The title bar of the Multi Edit field will indicate the number of buttons selected Any changes made will affect all selected buttons Transparent button images can also...

Page 16: ...l be extracted downloaded from the HomeRunner RBI controller however the graphics files backgrounds buttons layout cannot be extracted It is recommended that you back up your entire HomeRunnerRBI fold...

Page 17: ...ags Variables Timers To access the Define Labels window click the Define Labels button on the toolbar or press Ctrl L or from within the Event Editor click Define then Define Labels Select Show All De...

Page 18: ...ed them all First make sure the Insteon Power Line Modem PLM is connected to the HomeRunner RBI s PLM jack using the provided network cable and that the green and yellow LEDs are on steady To access t...

Page 19: ...HomeRunner RBI installs them all automatically Use Add By Address when you re only adding a few devices Use Add By Linking when you do not know the Insteon device s address Use Add By List when insta...

Page 20: ...ck the Add button to add the new device 5 Once a device has been added it will appear in the middle Status section and the cursor will revert back to a blank Specify New Device box so you can enter th...

Page 21: ...21 HomeRunner RBI User Manual Rev 1 03a 7 Type a name for each device in the Name column You can now control your Insteon devices from HomeRunner RBI...

Page 22: ...Select Remove Existing Links 3 Click the Start button in the Add By Linking section to begin linking 4 Press and hold the Set button on the Insteon Device you are adding for 3 5 seconds 5 Repeat the...

Page 23: ...ice in the Add By List section 4 Repeat step 3 for the remaining Insteon adresses and names then click the Finish button 5 The Status section will list each device address as they get added to your In...

Page 24: ...er RBI button scheduled event or any Insteon controller button linked to the scene Although Insteon devices can support scenes directly with or without HomeRunner RBI running always use HomeRunner RBI...

Page 25: ...will be used to execute the scene Select Responder if the device you are adding to the scene will be responding to the Scene command 5 Select the On Level and Ramp Rate if applicable for each device i...

Page 26: ...vent events from triggering during the first schedule pass after a schedule upload or after a firmware update NOTE Do not use Transition with IF THEN ELSE events since Transition only affects the If C...

Page 27: ...ner RBI Once uploaded the schedule of events runs as programmed As an example let s create events to turn a desk lamp on at 6 00 PM and off at 11 30 PM on weekdays only The desk lamp in this example i...

Page 28: ...w 4 In the Time of Day field select Equals then set the Hour Min Sec boxes to 06 00 00 then select PM 5 In the Day s of Week field select Weekdays then click OK Your selected If condition statement wi...

Page 29: ...device action then click OK Use the ON Level slider to set the dim level default 100 Your selected Then action statement will appear under the THEN line So far we have created an event to turn the des...

Page 30: ...n click OK The If statement now reads TIME Equals 11 30 00 PM Mon Tue Wed Thu Fri Next click on the Then statement INSTEON Device Desk Lamp ON at 100 and select Edit Change the Device action from ON t...

Page 31: ...f Date is After December 15 or Date is Before January 5 Then X10 A 2 Holiday lights ON Else X10 A 2 Holiday lights OFF In the above event the Holiday lights will be ON from 12 00 00 AM December 16 thr...

Page 32: ...Changes 3 Update your Web Xpander firmware to version 2 8 or higher required for Stargate Link The Web Xpander on Stargate IP or CommStar IP listens for a telnet like connection on port 24 The Starga...

Page 33: ...nner RBI schedule You can also type or edit them manually Using the same labels for these functions can be helpful when creating events that talk back and forth between HomeRunner RBI and a Stargate I...

Page 34: ...e i followed by 6 hex digits Insteon device address followed by and then the command If the specified command requires any parameters i e on level ramp rate etc the parameters are separated by commas...

Page 35: ...bright Dim Send single dim command Approx 3 decrease dim rbi i112233 dim Start Bright sbright rbi i112233 sbright Start Dim sdim rbi i112233 sdim Stop Bright Dim stop rbi i112233 stop Refresh Status r...

Page 36: ...rbi f5 set Flag 5 Set rbi f93 idle Flag 93 Idle rbi f7 clear Flag 7 Clear Variables Set a variable to a specified value from 0 to 255 v variable index value Examples rbi v1 0 Load Variable 1 with 0 r...

Page 37: ...ct for the Stargate s Web Xpander you want to communicate with Click Transfer Labels to import the Stargate labels into this window These labels are only used as a reference for sending commands to St...

Page 38: ...n Macros from Stargate IP or CommStar IP When selecting a Stargate Then Macro you can either enter the Then Macro number that appears in the WinEVM Define Then Macro database or click Import From WinE...

Page 39: ...16 simultaneous shared Dynamic Timers 32 Variables 256 Flags 256 X 10 256 Insteon Devices 1024 Total System Links 5000 Insteon Scenes 500 max History Log 512 lines FIFO Message Log 128 lines 32 chara...

Reviews: