background image

· 27 ·

REF. 60028

TECHNIKAI JELLEMZŐK

Feszültség  .   .   .   .   .   .   .   .   .   .   .   .   .   .   .   .   .   .   .   .   .   .   .   .   .   .   .   .   .   .   .   .   .   .   .   .   .   .   .   .   .   .   .   .   .   .   .   .   .  DC 20 V

Az alapjárati fordulatok száma   . . . . . . . . . . . . . . . . . . . . . . . . . . . . . . . . . . 8000 ford / perc

Korong átmérő 

.   .   .   .   .   .   .   .   .   .   .   .   .   .   .   .   .   .   .   .   .   .   .   .   .   .   .   .   .   .   .   .   .   .   .   .   .   .   .   .   .   .   .   .   .   .   .   .125mm

Menetméret  . . . . . . . . . . . . . . . . . . . . . . . . . . . . . . . . . . . . . . . . . . . . . . . . . .  M14

Súly  . . . . . . . . . . . . . . . . . . . . . . . . . . . . . . . . . . . . . . . . . . . . . . . . . . . . . 1,54 kg

LEÍRÁS

1

Kiegészítő fogantyú

2

Orsó rögzítő gomb

3

Kapcsoló (be / ki)

4

Gyorskioldó kar

5

Védőfedél

6

Csiszolókorong

7

Kioldógomb

8

Akkumulátor

9

Töltő

10

Belső perem / korong perem

11

Külső perem / rögzítőanya

12

Kulcs

3. 

Forgassa  a  védőfedelet  (5)  a  kívánt  szögbe,  és 

húzza vissza a gyorskioldó kart (4), hogy rögzítse 

a védőfedelet.

MEGJEGYZÉS: A védőburkolatot úgy kell felszerelni, 

hogy a zárt rész a felhasználói oldalon helyezkedjen el.

Védőfedél beállítása

1. 

Húzza ki a gyorskioldó  kart a gyűrű alakú gallér 

nagyításához.

2. 

Forgassa a védőfedelet a kívánt szögbe, és húzza 

vissza  a  gyorskioldó  kart,  hogy  rögzítse  a  védő

-

burkolatot.

ÜZEMELTETÉS

FIGYELEM! Tartsa tisztán és ne blokkolja a szellőzőn

-

yílásokat a motor megfelelő hűtése érdekében.

Szerszám be-/kikapcsolása

A szerszám bekapcsolásához állítsa az BE / KI kapc-

solót első helyzetbe.

A szerszám kikapcsolásához állítsa a BE / KI kapcsolót 

hátsó helyzetbe.

MEGJEGYZÉS: A hálózati kapcsoló biztonsági zár is. 

Ha a kapcsolót előre mozgatja, előre tolja és elengedi, 

akkor az automatikusan reteszelődik.

Az eszközzel történő munka szabályai

•  Általában tartsa a szerszámot úgy, hogy a penge 

széle kb. 30 ° -os szögben legyen nagyoláshoz és 

kb. 15 ° -os szögben a befejezéshez.

•  Ne terhelje túl a szerszámot. A szerszám visszau-

grásának megakadályozása érdekében ne hasz-

náljon túlzott erőt.

KARBANTARTÁS

•  A vágószerszámoknak élesnek és tisztanak kell 

lenniük.

• 

Rendszeresen  ellenőrizze  a  szerszámot,  hogy 

nincs-e elmozdulása vagy alkatrészeinek sérülé-

se.

•  Tárolja a gépet és a fogantyút száraz, tiszta hel-

yen. A gépnek nem szabad érintkeznie olajjal és 

zsírral.

•  Ne használjon olyan tisztítószereket, amelyek 

károsíthatják  a  műanyag  alkatrészeket,  például 

olaj alapú termékeket vagy erős oldószereket.

• 

A  szellőzőnyílásokat  rendszeresen  csak  száraz 

sűrített levegővel tisztítsa.

•  A szerszám karbantartását csak szakképzett sze-

mélyzet végezheti.

Summary of Contents for 60028

Page 1: ...SANGLE GRINDER 125MM 5 WINKELSCHLEIFER MIT B RSTENLOSEM MOTOR 125MM 11 POLIZOR UNGHIULAR CU MOTOR F R PERII 125MM 20 125MM 29 SMERIGLIATRICEANGOLARE CON MOTORE BRUSHLESS 125MM 14 HOEKSCHUURMACHINE MET...
Page 2: ...ce de los ni os cuando no est en uso No exponga la amoladora a la lluvia o condiciones de humedad Coloque siempre la cubierta protectora para evitar el impacto con fragmentos sueltos Conecte el disco...

Page 3: ...ntizar una correcta refrigeraci n del motor Encendido Apagado Deslice el interruptor de encendido apagado hacia de lante para encender la amoladora Deslice el interruptor de encendido apagado hacia at...

Page 4: ...e un circuito de protecci n 2 No siga presionando el interruptor de encendido apagado despu s del cierre autom tico de la he rramienta Instalaci n de la bater a 1 Alinee las costillas realzadas de la...

Page 5: ...ile not in use Do not expose the angle grinder to rain or wet conditions Always use the guard with the grinding wheel to protect you against broken fragments Hold the angle grinder by the insulated ha...

Page 6: ...or cooling Turning On Off Slide the On Off switch forwards to turn the grinder on Slide the On Off switch backwards to turn the grinder off NOTE The On Off switch itself is also a safety lock bu tton...

Page 7: ...ly switches off by means of a protecti ve circuit 2 Do not continue to press the On Off button after the automatic shutdown of the power tool Installing the battery 1 Align the raised ribs on the batt...

Page 8: ...ou OFF Gardez l outil hors de la port e des enfants Ne laissez pas d eau ou d humidit p n trer dans l outil Utilisez toujours une enveloppe de protection qui prot ge contre des fragments volants en ca...

Page 9: ...refroidissement correct du moteur Branchement d branchement de l outil Pour brancher l outil placez l interrupteur d alimentation ON OFF en position avant Pour d brancher l outil placez l interrupteur...

Page 10: ...s hors tension l aide d un circuit de protection 2 Apr s le d branchement automatique de l outil lectrique n appuyez pas sur le bouton marche arr t Installation de la batterie 1 Alignez les nervures d...

Page 11: ...teile austauschen oder das Werkzeug aufbewahren Bewahren Sie das Werkzeug au erhalb der Rei chweite von Kindern auf Lassen Sie kein Wasser oder Feuchtigkeit in das Werkzeug eindringen Verwenden Sie im...

Page 12: ...ellen Ein Ausschaltung des Werkzeugs Zur Einschaltung des Werkzeugs stellen Sie den EIN AUS Schalter auf die vordere Position Zur Ausschaltung des Werkzeugs stellen Sie den EIN AUS Schalter auf die hi...

Page 13: ...nt laden ist wird das elektrische Werkzeug durch eine Schutzschaltung automatisch ausgeschaltet 2 Nachdem das elektrische Werkzeug automatisch aus geschaltet ist dr cken Sie keine Ein Aus Taste Einbau...

Page 14: ...azione in posizione di bloccaggio o OFF Tenere lo strumento fuori dalla portata dei bambini Evitare che acqua o umidit penetrino nello stru mento Utilizzare sempre una copertura protettiva per pro teg...

Page 15: ...o del motore Accensione spegnimento dello strumento Per accendere lo strumento portare l interruttore di ali mentazione ON OFF in posizione anteriore Per spegnere lo strumento portare l interruttore d...

Page 16: ...i spegne automaticamente per mezzo di un circuito di protezione 2 Dopo la disabilitazione automatica dell utensile elettrico non premere il pulsante di accensione disinserzione Installazione della bat...

Page 17: ...e coloque o interruptor na posi o travada ou desligada Mantenha a ferramenta fora do alcance de crian as N o permita que gua ou umidade entre no ins trumento Sempre use uma tampa protetora para prote...

Page 18: ...o do motor Liga o desliga o da ferramenta Para ligar a ferramenta coloque o interruptor ON OFF na posi o frontal Para desligar a ferramenta coloque o interruptor ON OFF na posi o traseira NOTA O inter...

Page 19: ...um circuito de prote o 2 N o continue a pressionar o bot o On Off ap s o desligamento autom tico da ferramenta el trica Instala o da bateria 1 Alinhe os cumes levantados na bateria com as ran huras n...

Page 20: ...ozi ia de blocare sau OPRIT Nu p stra i instrumentul la ndem na copiilor Nu l sa i apa sau umiditatea s p trund n ins trument Utiliza i ntotdeauna o carcas protectoare care protejeaz mpotriva fragment...

Page 21: ...ea instrumentului Pentru pornirea instrumentului seta i comutatorul de alimentare PORNIT OPRIT n pozi ia din fa Pentru a opri instrumentul seta i comutatorul de ali mentare PORNIT OPRIT n pozi ia din...

Page 22: ...ia litiu ion este complet desc rcat scu la electric se opre te automat prin intermediul cir cuitului de protec ie 2 Dup oprirea automat a sculei electrice nu ap sa i butonul de pornire oprire Instalar...

Page 23: ...t stand Houd het gereedschap buiten bereik van kinderen Laat geen water of vocht in het instrument komen Gebruik altijd een beschermhoes om tegen vlie gende fragmenten te beschermen in geval van breuk...

Page 24: ...schoon voor een goede motorkoeling Aan uit schakelaar Zet de AAN UIT schakelaar in de voorstand om het gereedschap in te schakelen Zet de AAN UIT schakelaar in de achterste stand om het gereedschap u...

Page 25: ...isch gereedschap automatisch uitgeschakeld door middel van een beschermingscircuit 2 Druk niet op de aan uitknop nadat het elektrisch gereedschap automatisch is uitgeschakeld Batterij installatie 1 Li...

Page 26: ...l zati kapcsol t reteszelt vagy kikapcsolt helyzetbe Tartsa a szersz mot gyermekekt l elz rva Ne engedje v z vagy nedvess g bejut s t a szer sz mba A korong t r s eset re mindig haszn ljon v d burkola...

Page 27: ...sa A szersz m bekapcsol s hoz ll tsa az BE KI kapc sol t els helyzetbe A szersz m kikapcsol s hoz ll tsa a BE KI kapcsol t h ts helyzetbe MEGJEGYZ S A h l zati kapcsol biztons gi z r is Ha a kapcsol t...

Page 28: ...ljesen lemer lt az elektromos k ziszersz m egy v d ramk rnek k sz nhet en automatikusan kikapcsol 2 Miut n a szersz m automatikusan kikapcsolt ne nyomja meg a be ki gombot Az akkumul tor beszerel se 1...

Page 29: ...29 REF 60028 RU 1 2 2 11 10 3 10 4 6 10 5 2 11 1 2 1 1 4 5 2 5...

Page 30: ...30 REF 60028 20 8000 125 M14 1 54 N 1 2 3 4 5 6 7 8 9 10 11 12 3 5 4 1 2 30 15...

Page 31: ...31 REF 60028 10 C 40 C 40 C 1 2 1 2 3 1 2 1 2 3 5 4 5...

Page 32: ...k w pozycji blokady lub wy czono Nieu ywane urz dzenie nale y przechowywa w mie jscu niedost pnym dla dzieci Urz dzenie nale y chroni przed wod i wilgoci Zawsze nale y u ywa os ony zabezpieczaj cej kt...

Page 33: ...silnika W czanie wy czanie urz dzenia W celu w czenia urz dzenia nale y przesun wy cznik zasilania W Wy do przodu W celu wy czenia urz dzenia nale y przesun wy cznik zasilania W Wy do ty u UWAGA Wy c...

Page 34: ...ych 1 Je li akumulator litowo jonowy jest ca kowicie roz a dowany elektronarz dzie jest automatycznie wy c zane za pomoc obwodu ochronnego 2 Po automatycznym wy czeniu narz dzia elektrycz nego nie nal...

Page 35: ...35 REF 60028...

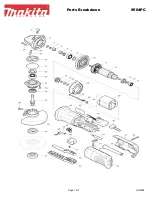
Page 36: ...22 Screw ST4 2x22 4 18 Caja de engranajes Gear box 1 19 Resorte de bloqueo Lock spring 1 N Descripci n Description Qty 20 Pin de bloqueo Lock pin 1 21 Tuerca hexagonal M5 Hex nut M5 1 22 Engranaje c n...

Reviews: