background image

Software Version 5.0

25/11/02

Draft Page 

73

18  Connecting an External Monitor

An external monitor allows the user to display a variety of information screens on a
VGA-type video monitor. The screens available include:

Palette button labels

Identify Positions, Colours, Beams, etc

Desk Outputs

Output by Fader, Fixture, Scroller & DMX channel

Memory / Chase Details

Fader, Fixture & Scroller settings

The current release / update notes

Tetris

18.1 Operation

The monitor can be controlled either using a keyboard or the console controls as
detailed below.

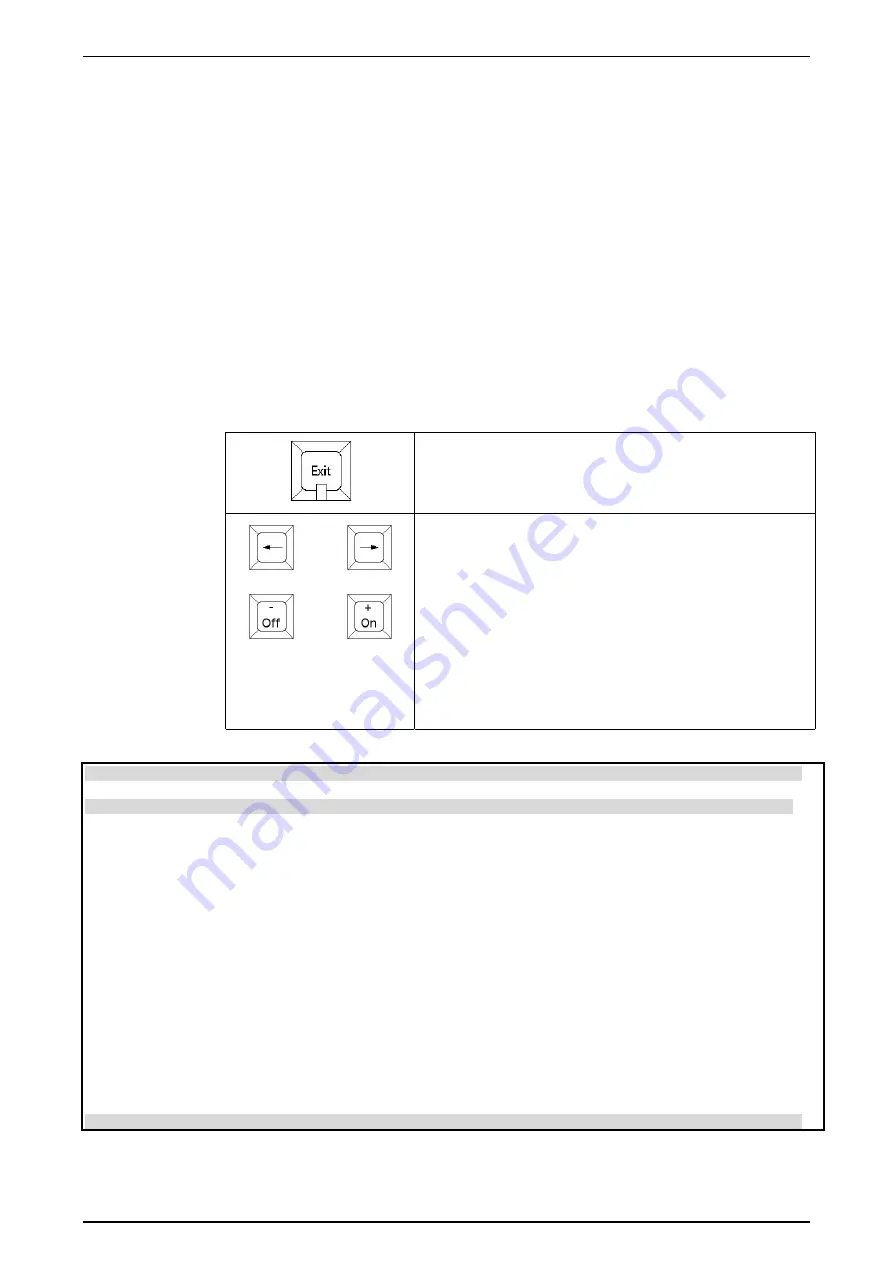
Press the Exit button to show the VDU selection screen –
As illustrated below

Press the 

+ (On)

 to scroll vertically through the list of

screens.

Press the 

- (Off)

 to scroll horizontally between options.

The item highlighted in Red becomes the start screen for
this group.

Press the 

--> (Right Arrow) 

to open the selected screen.

Once any screen is open the arrow buttons will scroll
between screens, ignoring any groups set to None in the
selection screen.

GM  100%  19:00:00  --:--:--:--                        JANDS Event 416  VDU Setup

 Keyboard Display               Option
 Alt F1   Not Used
 Alt F2   Palette Labels        Open at:    On
 Alt F3   Memory Summary        Sort By:    Number  Next      Timecode       None
 Alt F4   Memory Detail         Open with:  Faders  Fixtures  Scrollers      None
 Alt F5   Patch Display         Open with:  Faders  Fixtures  Scrollers      None
 Alt F6   Page File Display     Open with:  Page    Files                    None
 Alt F7   Outputs               Open with:  Faders  Fixtures  Scrollers      None
 Alt F8   Output DMX            Open at:    On                               None
 Alt F9   Not Used
 Alt F10  Current Release Notes
          Show Menus on VDU                 On      Off

 – to toggle option, + to Scroll   Arrow keys (<>) to Open.   Exit for this menu

Summary of Contents for Event 4

Page 1: ...EVENT 4 User Manual Version 5...

Page 2: ...television reception which can be determined by turning the equipment off and on the user is encouraged to try to correct the interference by one or more of the following measures reorient or relocat...

Page 3: ...esetting the Console 11 2 1 To Reset the Console 11 2 2 To Load a New Software Version 11 3 Operation Overview 12 3 1 Event Menus 12 3 2 Entering Editing menu data 12 3 3 Entering Labels 13 3 4 Exit R...

Page 4: ...lash Buttons 22 8 2 Setting Fader Levels with the Keypad 22 8 2 1 Preset Faders 22 8 3 The Programmer 24 8 3 1 The Programmer LCD 24 8 3 2 Position Colour and Beam 24 8 4 Programmer Buttons 26 8 5 Pal...

Page 5: ...er channels with the Keypad 41 10 6 Clearing Memories 41 10 6 1 The Clear Memory Menu 42 10 7 Copying a Memory 42 11 Working with Chases 43 11 1 Recording a Chase Using the Menu 43 11 2 The Chase menu...

Page 6: ...t Field 55 15 1 2 Infade Outfade Fields 55 15 1 3 Delay Field 55 15 2 Setting a Stack to 2 fader Operation 55 16 Playback 57 16 1 Controlling Memories and Chases 57 16 1 1 Assign Master Faders and Dis...

Page 7: ...g SMPTE TimeCode 66 17 2 The Setup Patch Submenu 66 17 3 The Setup Ctrl Submenu 66 17 3 1 Setup Ctrl P1 2 Reversing the P2 Master Fader 67 17 3 2 Setup Ctrl DBO Changing DBO operation 67 17 3 3 Setup...

Page 8: ...5 25 11 02 20 Battery Replacement 75 21 Appendix A Pin Assignments 76 21 1 1 DMX Digital Output Sockets 76 21 1 2 MIDI In Thru Out Sockets 76 21 1 3 Desklight Socket 76 21 1 4 Desk Link Cable 76 21 1...

Page 9: ...not included in the library file it is possible to create an entry using the Event Event 4 Library Editor a PC application available from the Jands website If you require support or need a fixture li...

Page 10: ...ly 12V Littlite or compatible desklights with 3 pin XLR type connectors should be used for wiring see Appendix A 1 4 Connecting a Monitor Connect any VGA monitor to the 15 pin D connector on the back...

Page 11: ...while turning power on to the console Press the Record button to confirm the console Reset 2 2 To Load a New Software Version Software updates are released from time to time and are available from Jan...

Page 12: ...Sometimes a field is used to lead to another menu in this case the bottom line shows to which means Press the On button to open a submenu Note As the cursor moves the selected field changes to UPPERC...

Page 13: ...r something similar Use the cursor buttons to move back and type over any incorrect character The numeric keypad enters numbers 3 4 Exit Record Buttons The Exit button is used to close any main menu I...

Page 14: ...ld and change this field to Single to allow all the Preset faders to be used as a single preset Move the Cursor to the Confirm field and Press the On button to confirm the changes When the console is...

Page 15: ...ible to patch several DMX channels to the one desk fader However a DMX channel can only be patched to one fader or fixture or scroller at a time Patching can be simplified by using the Next And Thru a...

Page 16: ...a Library disk in the floppy drive To Unpatch a Fixture set the type field to Blank i e clear the field Part The field will be set to ALL unless the fixture type eg Vari liteTM VL5 needs to have the...

Page 17: ...ve the fixture in the opposite direction to an equivalent fixture set to Normal Useful when some Fixtures are hung facing down and others are facing up i e sitting on the stage AXIS When set to Swap t...

Page 18: ...ler HTP 1 1 1 to Dx Select which DMX output 1 or 2 to patch the scroller s The HTP and LTP channels do not have to be on the same DMX output DMX Sets the start DMX address of this Scroller or group of...

Page 19: ...r field can be used to search the disk for show files Move the cursor to this field and press the On button File The default show name is Event An alternate name of up to 8 characters can be entered w...

Page 20: ...ED will flash synchronously with the Add Solo switch LED If Add Latch is disabled while some channels are latched the channels will unlatch but will not become latched again if Add Latch is subsequent...

Page 21: ...der scales the level of the Flash buttons 7 6 Grand Master GM Fader This fader scales the level of all console intensity outputs except the Flash buttons 7 7 Rate Control The Rate Control scales the s...

Page 22: ...associated with either row of Faders by switching the Preset 1 Preset 2 switch located in the Master section The Flash buttons perform two functions 1 Flash The buttons are used to momentarily flash...

Page 23: ...level double click to enter 100 Press the Fader number Thru number to enter a range of Fader numbers Press the Fader number And number to enter a group of Fader numbers Edit Fdr To AT Clear All Master...

Page 24: ...wever when the Record button is held down it also displays and provides quick access to the Record options menu The top line of the LCD displays the current programmer function and labels for the unma...

Page 25: ...er to be recorded to the palette buttons and then combined together For example it is often useful to record Gobos to one set of buttons and Focus settings to another set Then a particular Gobo say St...

Page 26: ...de time can be set in the Setup Prefs Ptime field Press and hold Position Colour or Beam and press this button to toggle between Snap and use Time Shift Position to open the EFFECTS palette The Effect...

Page 27: ...will point in the same direction This feature is not available for moving mirror fixtures Active Fixture Function Only The Active button is used to select any Fixtures that have intensity greater than...

Page 28: ...palette buttons can be recorded Mask Beam Function Only The Mask buttons are used to prevent beam parameters from being recorded to either a palette button or a memory Initially all Beam parameters a...

Page 29: ...igure 8 4 Forward clockwise Square 5 Reverse anti clockwise Square 6 Forward clockwise Spiral 7 Reverse anti clockwise Spiral 8 Ballyhoo 9 Wave 1 10 Wave 2 Programmer LCD Effect Display Circle Clear M...

Page 30: ...rds or away from the lowest numbered fixture Mid Select Mid to fan fixtures towards or away from the middle numbered fixture End Select End to fan fixtures towards or away from the higest numbered fix...

Page 31: ...in the palette have been changed 6 Press and hold the Record button and press the palette button that the positions are to be recorded into Intensity is not stored in the palette 9 2 Recording Colour...

Page 32: ...r non selected scrollers The colour setting for the 2nd higher number scroller is regarded as a unique setting for that scroller alone If a scroller is patched at a later stage this new scroller is ad...

Page 33: ...ing for that light alone If a different fixture needs to be included in a palette at a later stage it is possible to re record the palette It will not affect the previously recorded values If a fixtur...

Page 34: ...e Record button down press the Assign Flash button beneath the Memory number to be recorded 3 Release Record button 10 1 2 Advanced option Recording CueList Stacks on the fly Using the method describe...

Page 35: ...predictable but does not suit all situations For example recording a mark cue where lights are positioned in one cue and turned on in the next can be difficult To cater for alternate recording styles...

Page 36: ...ll take to fade from 0 to 100 ie if set to 0 10 5 it will take 10 5 seconds to fade to full output NOTE By default the Outfade field automatically tracks the infade time that is if the infade time is...

Page 37: ...arameters that will use the memory fade times Other parameters will snap See below for information on usage TimeCode Sets the MIDI can also be used for SMPTE timecode that will activate this Memory pr...

Page 38: ...abelled later by using the Memory menu TIP Press the P1 P2 flash selector button to change from upper to lower case and vice versa 10 3 Masking Masking allows only desired parameters to be played back...

Page 39: ...parameters to use timing by pressing the On once and then use the arrow keys to move the cursor to each of the four Time options IFCB Press the On to toggle the option on or off Any letter shown indi...

Page 40: ...d the memory contents or to Merge the memory with any selections currently in the programmer Mask Masks any or all of Intensity Focus Colour and Beam when loaded to the Programmer For example loading...

Page 41: ...t 1 top preset faders to set new levels To edit a channel this way the fader first has to be moved to match the existing level and then moved to the new level The simplest way to do this is to move th...

Page 42: ...Move the cursor to this field and press On to clear the memory or range of Memories 10 7 Copying a Memory 1 Press the Copy button to open the Copy menu 2 Move the cursor to the Mem field 3 Press the...

Page 43: ...l set of fields is displayed Chse C 1 St Of Dr Bpm Xf Mask Time C 1 1 12 120 50 more Chse Infade Outfade Next Delay C 1 0 02 0 0 02 0 C 2 0 00 0 more Chse Time Code C 1 CHSE This field sets the Chase...

Page 44: ...e Chase number 0 999 to be edited 11 3 2 The Edit Chase Confirm Menu The Edit Chase Confirm menu is used to set the state of the programmer when editing Edit labl St Of Prog Confirm Mask C999 labl 1 3...

Page 45: ...hase Step or as a Memory This provides a quick way to create new looks from existing programming 11 3 4 Adding or Deleting a Chase Step To add or delete a Chase step move the cursor to the Add or Dele...

Page 46: ...meric keypad Otherwise any changes will not be saved 1 Use the Fader And At Thru buttons to adjust Intensity levels 2 Press Record button TIP Finding the Step to edit If you want to edit a particular...

Page 47: ...e Version 5 0 25 11 02 Draft Page 47 From Sets the first Chase number to clear To Sets the last Chase number to clear Confirm Move the cursor to this field and press On to clear the chase or group of...

Page 48: ...8 Assign Master Faders 1 7 Memories Mn0 Mn6 Assign Master Fader 8 Chase Cn Event 416 Assign Master Faders 1 14 Memories Mn0 M nx2 13 Assign Master Fader 15 Chase Cn Assign Master Fader 16 Chase C100 w...

Page 49: ...indicate the current contents 12 2 2 Labelling a Page Pages can be labelled in the page menu to allow easy identification of their contents Labels only display in the Page Info screen on an optional...

Page 50: ...AUTO to OFF no Chases are loaded with each Page 12 3 2 Restoring the Factory Settings for Page To restore the default settings for EDIT PAGE 1 Press the Edit button 2 Press the Page Button 3 Move cur...

Page 51: ...to control this Memory or Chase Once the flash button has been pressed the Assign menu will close and you will see the Assigned item has replaced whatever was previously controlled by the Assign Maste...

Page 52: ...nt 4 allows this but unless the Memory is already recorded you will not be able to put the memory on an Assign fader and thus be able to see what you are doing To get around this problem it is possibl...

Page 53: ...sure that the Assign Masters are loaded with Memories Chases and Stacks as you require Press the File button Use the keypad or On Off buttons to enter a File number 0 24 Use the arrow buttons to move...

Page 54: ...ed with the contents of a File 3 Move the cursor to the Last field set the number of the last Assign Master fader of the group that will be loaded with the contents of a File 4 Press the Exit key Exam...

Page 55: ...move the cursor over the M then press the On button to change the M to a C This can also be achieved by pressing the Flash button marked C In the Chase menu press flash button M to set a memory number...

Page 56: ...sion 5 0 0 5 25 11 02 When two faders are used the possible fader pairs are 1 2 3 4 15 16 The left hand fader controls the Infade rate while the right hand fader controls the Outfade rate The Flash bu...

Page 57: ...lash button To stop a chase controlled by an Assign master press and hold the Halt button and press the Assign Master flash button A chase can also be stopped by turning the rate to zero however this...

Page 58: ...ase to playback 3 Press an Assign master flash button to put the Stack on that fader 16 2 2 Method 2 Using the Stack Menu If you want to have a Stack available all the time it is best to use the Stack...

Page 59: ...el of the current Memory or Chase Normally the faders are used at full When they are in this position they do not affect the timing of the crossfade to take manual control of the crossfade see Section...

Page 60: ...er was left at this level the next press of GO would cause Memory 3 to fade to 50 and Memory 2 to fade from 50 to 25 ie 50 of 50 16 3 6 Taking Manual Control when a Fade has completed When a crossfade...

Page 61: ...nfigure the physical preset Faders into either a single preset or as dual presets The menu is also used to create additional virtual Fader channels that do not have a physical fader associated with th...

Page 62: ...ols on the slave console are disabled To do this the main console must be set to Master operation and the other console must be set to Slave operation Press Setup and open the Desk submenu and open th...

Page 63: ...backlight level Contr1 Sets the contrast of the left Assign master LCD Can be set from 0 to 15 Higher contrast settings tend to make the LCDs more legible from a lower viewing angle Contr2 Sets the c...

Page 64: ...quired 17 1 12 The Setup Midi Prog Note Submenu Any number of Assign masters can be set to listen for Midi note messages Prog Note Channel Assign Note 1 1 48 Channel Sets the Midi channel that the Eve...

Page 65: ...ge information by playing back the equivalent Memory number i e Programme Change message 5 triggers memory 5 on an Assign Master Program change messages can be used to activate any of the Memories fro...

Page 66: ...l source such as a home studio recorder would be used as a timecode source The Internal source is mainly used for testing purposes Playback Sets MTC playback Off or On A MTC Stack must be on one of th...

Page 67: ...trl Norm Momt Hold Normal Single DBO This field can be set to Momt All intensity channels are Blacked Out only while the DBO button is held down Ltch The DBO button must be pressed once to BlackOut an...

Page 68: ...rl Stack Using 1 or 2 Faders to control a Stack The Event 4 defaults to using a single Assign master fader to control the crossfade of a Stack This setting can only be changed if there is no Stack cur...

Page 69: ...ets the DMX channel number or the first in a range of channels DMX Sets the DMX channel number or the last in a range of channels AT Sets the preheat level in the range 0 to 10 TIP Setting preheat to...

Page 70: ...is selected in the Programmer Record Sets which console controls will be included when recording a memory or chase All records from the Programmer and the Presets Prog records from the Programmer onl...

Page 71: ...e recording Memories it can be helpful to set default fade times to avoid the necessity of setting times for each Memory Times Sets the default fade time for any memories The time can be set from 0 1S...

Page 72: ...100 17 6 6 Setup Prefs PTimes Setting Live Palette Fade Time When the Palette buttons are used live it is possible to set a fade time so that any changes fade in rather than snap Changes made here app...

Page 73: ...ns Press the Off to scroll horizontally between options The item highlighted in Red becomes the start screen for this group Press the Right Arrow to open the selected screen Once any screen is open th...

Page 74: ...JANDS Event 4 Version 5 Users Manual Page 74 Revision 5 0 0 5 25 11 02 Items in Yellow are the opening screen for each group of screens If None is selected no screens in the group will be displayed...

Page 75: ...alent type recommended by the manufacturer Dispose of used batteries according to the manufacturer s instructions The internal battery within the Event 4 should be replaced every 3 years or whenever p...

Page 76: ...NOT USED 2 NOT USED 3 NOT USED 4 MIDI 5 MIDI SIGNAL Connector type DIN 5 pin 21 1 3 Desklight Socket PIN No Signal 1 No Connection 2 Ground 3 0 to 12 volts Connector type 3 pin AXR 21 1 4 Desk Link Ca...

Page 77: ...ighting channel parameter typically used to describe colour beam or position MASK Masking Masking allows only desired parameters to be re played MEMORY Memory Settings for Intensity Colour Beam etc th...

Page 78: ...ers Add Solo 4 23 Preset Masters 4 22 Presets 4 5 24 38 44 48 49 65 74 Virtual 3 15 16 66 Fan 33 File 56 Edit 57 label 57 Load Save 6 56 fixture library 9 Flash Buttons 4 6 24 60 Flip 30 G Go Button 6...

Reviews: