background image

Click Update  (system will automa cally re-boot)

Warning: be sure the device is connected to power or has at least 20% ba3ery life prior to performing 
an update. Do not disconnect the USB memory device un l the update is complete. Do not turn off 
during a sytsem update.

15T. Save Se5ngs: 

Permanently saves all seLngs to memory (un l Save SeLngs is pressed again) 

When applied a box will appear around the bu3on to indicate comple on.

15U. Restore Defaults: 

Returns all datalight so ware seLngs back to the factory default values.

(Restore does not erase or alter calibra on factors or any save data within the device)

16. Files:

The .csv files saved in the Files folder can be accessed using both internal so ware which will display a 
graph of the results or downloaded using the USB micro port.

16A. Viewing Stored Readings: 

Click on the Files icon. The newest recording file will automa cally 

open in the graph. Use the drop down menu to select a different file. If the recording is s ll ongoing
you can click in and out of the file (view a different file then return the ongoing measurement file) 
to update the graph results in the view window. To view files created using the survey app, scroll 
down to survey_data_file, to view files created using capture, scroll down to single_sample_file.

16B. Downloading Stored Readings: 

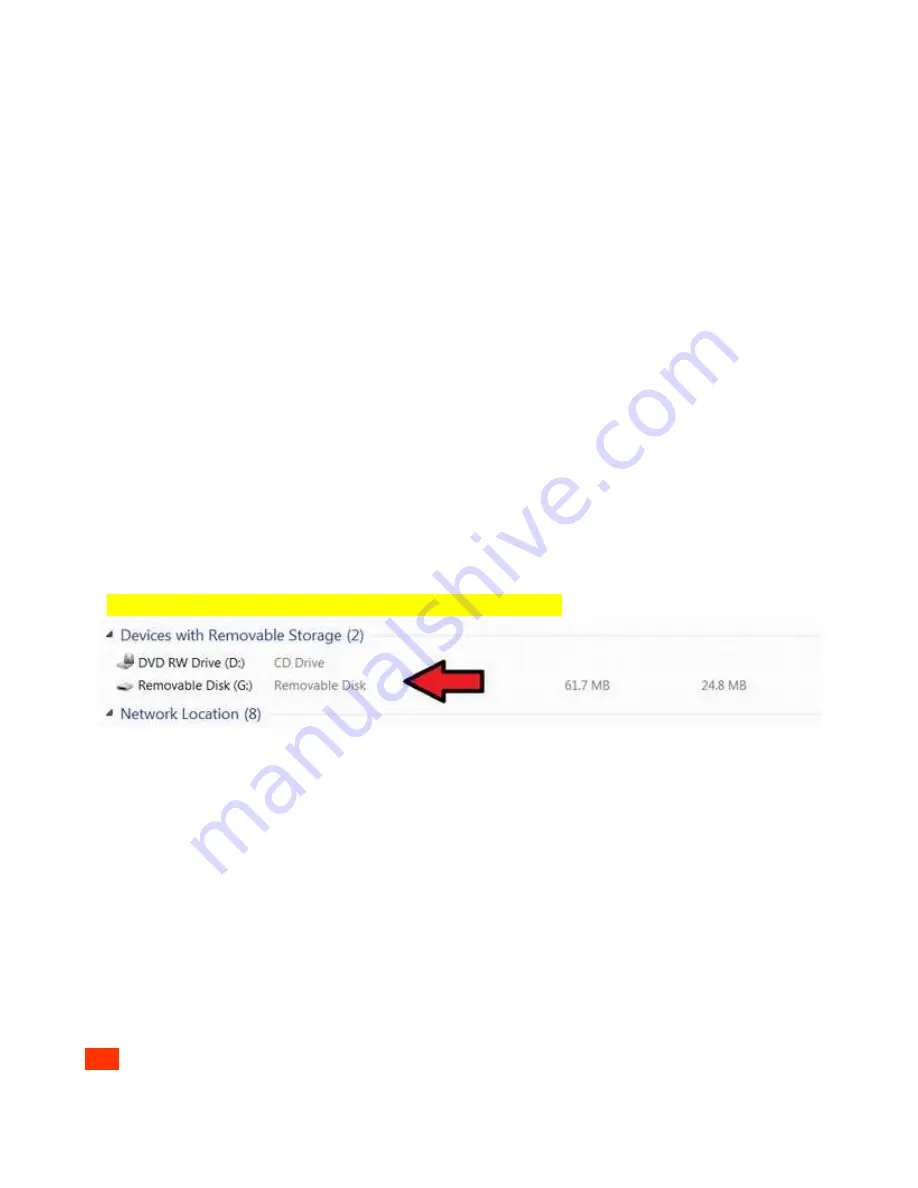
When the ILT2500 is connected to the computer using the 

USB micro cable, the computer will register the ILT2500 as a device with removable storage, 
allowing access into the Files folder.  To access saved Files using a PC, click on Start, Computer and 
then click double click on the “ Removable Disk  ...” within “Devices with Removable Storage”.

To open in excel, you will need to select tab or space delimited

16D. Dele ng Stored Readings: 

To delete files, access the files through the USB micro port. 

Selected the file to highlight the then press delete.  

17. Light Calc:

Includes some basic light measurement formulas for conver ng between units of measurement such 
as foot-candles to lux, lux to candela, W/m2 to W/cm2 etc.
Ie Enter 1.11 W/cm2 reading obtain a calculated reading of 1.11e+4 W/m2.
For lux to Candela, enter lux value and the distance in meters.
 Addi onal formulas may be added over  me, if you have a formula you would like ILT to add, please 
email [email protected].

18. Light Stack:

  SeLngs for light stack will determine when the screen turns Red, Yellow, and 

Green.  See sec on 

15K. Light Stack Se5ng

 to configure your system.

RED

 is typically used to indicate an error-unacceptable level that does not meet the customer’s 

requirements. For hazard measurements, this level could be when the light level recorded is unsafe. In
other cases the level can be used as a go/no go level indica ng the a risk of product failures when 

ILT2500 INSTRUMENTATION MANUAL  Preliminary 8/18     15 OF 22

Summary of Contents for ILT2500

Page 1: ...ILT2500 Opera on Manual ILT2500 manual www intl lighttech com 1 of 22...

Page 2: ...t Measurement and Limita ons 8 9 Sample Time and Limita ons 9 10 5V Bias 9 11 Home Screen 9 12 Display Style Selec on 10 13 Display Content 10 14 Feature Bu ons 11 15 Se5ngs 11 16 Files 16 17 Light Ca...

Page 3: ...480x272 TFT Color LCD Touch enabled Backlit C Opera ng Temperature 0 40 Deg C D Storage Temperature 10 45 Deg C E Memory 4GB microSD F USB Current Draw Typical 500mA Max 900mA USB 3 0 G Bias Programm...

Page 4: ...in sensors mfg 2018 or later 2 Turn on the meter by pushing the On O bu3on down into the I posi on 3 A er a short start up menu the Home Screen will appear 4 Check the power monitor window in the upp...

Page 5: ...mbient zero is used to subtract small background light levels that are not coming from the test source With the test source o or blocked and the sensor exposed to the environment ambient light press z...

Page 6: ...al temperature can rapidly increase and cause erroneous readings and damage Standard opera ng temperature is rated at 0 400 C Do not apply any force to the display Do not apply pressure to extended st...

Page 7: ...Analog In 1 Pin6 Det Cathode Pin14 External Analog In 2 Pin7 Det Anode Pin15 N C Pin8 5Volts Warning please consult with an ILT technician before connec ng a current genera ng device that could excee...

Page 8: ...hen this condi on occurs the display will provide a SATURATION warning To prevent satura on neutral density lters or apertures can be added to the sensor or a greater distance between the sensor and t...

Page 9: ...material ILT silicon sensors include SED033 SED100 SCD110 XSD140B XSD340B XSD140A and XSD340A 11 Home Screen When the meter is turned on it will take a few moments for the so8ware to ini alize Upon c...

Page 10: ...e as fast as 1 seconds or as slow as once per hour Note See see 15I 15J for seLng bar or line graph 14 Feature Bu ons 14A Display Units Toggles between the available fields Current output is in amps O...

Page 11: ...alibra on factors 15B1 Meter Factor Selects calibra on factors from the pre programmed available list ranging from 1 20 Factor selec on allows readings in calibrated units such as W W cm2 Lux etc 15B2...

Page 12: ...es such as scanning lasers or pulses of light use FW peak For be3er averaging we recommend using min max when speed is not a factor 15G 5V Bias On or O The defaults seLng is o as there are numerous se...

Page 13: ...3 For High and Range the error level must be greater than the warning level Ie target is 1 mW cm2 1e 3 the warning must be larger than 1e 3 ie 3e 3 or 3 mW and the error must be larger than the warni...

Page 14: ...ed arrow on cal cert on page 14 15Q 5 Resul ng Light Level Allows the user to enter a know value for the light level under test and create a calibra on factor to force the meter to read the correct va...

Page 15: ...adings When the ILT2500 is connected to the computer using the USB micro cable the computer will register the ILT2500 as a device with removable storage allowing access into the Files folder To access...

Page 16: ...the loca on to apply With the box showing the loca on touch the Del delete bu3on The Delete bu3ons border will turn blue to indicate comple on If you want to back out of Delete scroll to the top and...

Page 17: ...in SeLngs The white display box shows the ash count in the upper le Note Counts was designed for rapid rises in light intensity and increases when the signal rises 4x between 100uS samples the working...

Page 18: ...generated light level measured exceeds the measurement capabili es of the system Increase the distance add a3enua on lters or add an aperture to the sensor to allow measurement of stronger signals Low...

Page 19: ...00 decreases the number of digits of strobes to count v is a programmable value of how many ashes to be measured Level selec on High Light level 3 uA to 1 mA Frequency 3 1 4 Hz Low Light 0 to 3 uA Fre...

Page 20: ...hould be plugged in during ini aliza on Insert the USB s ck into the USB A port on the side of the ILT2500 Click on Settings and Scroll to the bottom of setting window Click on the rmware update box S...

Page 21: ...pressure to the meter when the stand is in use 28A Opera ng Temperature 0 40 C ILT meters and sensors have a recommended opera ng range of 0 to 40 C to assure the accuracy of the calibrated measuremen...

Page 22: ...parts or repair by other than Interna onal Light Technologies The equipment will be repaired or replaced at our op on without charge to the owner for parts or labor incurred in such repair This warra...

Reviews: