background image

Intel

® 

Server System SR1520ML User’s Guide

53

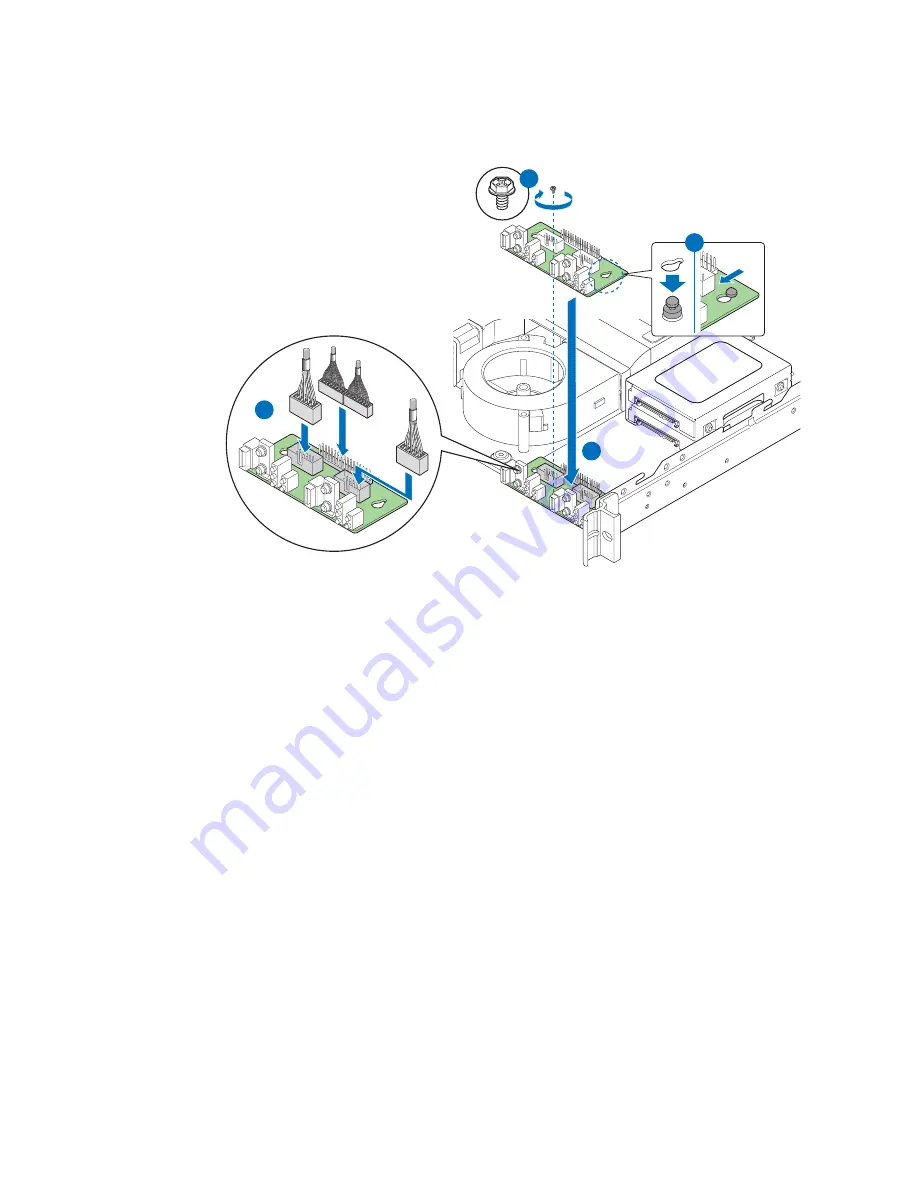
Figure 42. Installing Front Panel Board 

12. Tuck the USB and SATA cables into place under the lip at the front of the system.

13. If you removed the power supply, set it back into place.

14. Route the power cables into the cable harness.

15. Install the server system cover. For instructions, see 

“Installing the Server System 

Cover”

16. Plug all peripheral devices and the AC power cable into the server.

Replacing the CMOS Battery

Caution: The CMOS battery is NOT hot swappable. Before removing or replacing the CMOS 

battery, you must first take the server out of service, turn off all peripheral devices 
connected to the system, turn off the system by pressing the power button, and unplug the 
AC power cord from the system or wall outlet.

AF002511

B

C

D

A

Summary of Contents for SR1520ML - Server System - 0 MB RAM

Page 1: ...Intel Server System SR1520ML User s Guide A Guide for Technically Qualified Assemblers of Intel Identified Subassemblies Products Intel Order Number E17409 004...

Page 2: ...Intel may make changes to specifications and product descriptions at any time without notice Intel server boards contain a number of high density VLSI and power delivery components that need adequate...

Page 3: ...r Intel Server Deployment Toolkit 2 0 CD oder unter http support intel com support motherboards server sb cs 010770 htm Consignes de s curit Lisez attention toutes les consignes de s curit et les mise...

Page 4: ...cables Hazardous electrical conditions may be present on power telephone and communication cables Turn off the server and disconnect the power cord telecommunications systems networks and modems atta...

Page 5: ...liers If your jumpers do not have such a tab take care when using needle nosed pliers to remove or install a jumper grip the narrow sides of the jumper with the pliers never the wide sides Gripping th...

Page 6: ...vi Intel Server System SR1520ML User s Guide...

Page 7: ...al Devices 7 Internal Components 8 Server Board Connectors 8 Configuration Jumpers 10 SATA RAID Support 11 Rack and Cabinet Mounting 11 Hardware Requirements 11 Processor 12 Memory 12 Chapter 2 Hardwa...

Page 8: ...alling the Processor 35 Installing the Heat Sink 36 Replacing the Power Supply 37 Replacing the Fans 40 Replacing a Blower Fan 41 Replacing a Memory Cooling Fan 44 Replacing a Server Board 46 Removing...

Page 9: ...ive Actions 91 Power Light Does Not Light 92 No Characters Appear on Screen 92 Characters Are Distorted or Incorrect 93 System Cooling Fans Do Not Rotate Properly 93 Drive Activity Light Does Not Ligh...

Page 10: ...Entladungen ESD 116 Andere Gefahren 116 Fran ais 117 Consignes de securite sur le serveur 117 S urit avertissements et mises en garde 117 Domaines d utilisation pr vus 118 S lection d un emplacement 1...

Page 11: ...ance 131 Product EMC Compliance Class A Compliance 132 Certifications Registrations Declarations 133 Product Regulatory Compliance Markings 133 Electromagnetic Compatibility Notices 136 FCC Verificati...

Page 12: ...xii Intel Server System SR1520ML User s Guide...

Page 13: ...stem References xix Table 2 Feature Summary 2 Table 3 NIC LED Descriptions 6 Table 4 Setup Menu Key Use 60 Table 5 Power Supply Output Capability 74 Table 6 System Environmental Specifications 75 Tabl...

Page 14: ...xiv Intel Server System SR1520ML User s Guide...

Page 15: ...Riser Card onto Riser Assembly 25 Figure 19 Installing an Add In Card 26 Figure 20 Removing an Add In Card 27 Figure 21 Removing the Processor Air Duct 28 Figure 22 Installing the Processor Air Duct...

Page 16: ...Figure 46 BIOS Recovery Mode Jumper in Recovery Position 63 Figure 47 Password Clear Jumper in Clear Password Position 64 Figure 48 CMOS Clear Jumper in Clear CMOS Position 65 Figure 49 MiBMC Force Up...

Page 17: ...identify components and their locations Chapter 2 provides instructions on adding and replacing components Use this chapter for step by step instructions and diagrams for installing or replacing comp...

Page 18: ...m product box Two hard drive brackets in the server system product box Two PCI Express x16 risers installed in the server system Two processor memory air ducts Rack handles in the server system produc...

Page 19: ...in outs timing information mechanical drawings and LED information Intel Server System SR1520ML Technical Product Specification At http support intel com support motherboards server X38ML If you just...

Page 20: ...m support motherboards server X38ML To make sure your system falls within the allowed power budget Search for the phrase Power Budget Tool At http support intel com support motherboards server X38ML F...

Page 21: ...em SR1520ML ships with two Intel Server Boards X38ML installed in it Each server board operates as a fully functioning server system with it s own control panel BIOS setup configuration processor memo...

Page 22: ...y on each server board Chipset Intel X38 chipset on each server board consisting of Intel X38 Memory Controller Hub MCH Intel I O Controller Hub ICH9R Peripheral Interfaces External connections on eac...

Page 23: ...uttons and LEDs Control panel Each server board has a control panel Each control panel includes One USB port Power sleep button Reset button Power Supply LED Status LED Hard drive activity LED NIC1 ac...

Page 24: ...el Buttons and LED Indicators B Server board power sleep button Press to turn the system power on or off C Power Supply LED Green LED for system power supply status LED State Power State Green On DC P...

Page 25: ...failure voltage power supply Voltage and thermal fault Amber Blink Non Critical failure Non critical power and voltage Off Board is off with no alarm E LAN1 LAN 2 Status LEDs Green LEDs that show the...

Page 26: ...ocation one for each server board F NIC 2 10 100 1000 Mb one for each server board C NIC 1 10 100 1000 Mb one for each server board G USB ports 0 1 one sets of two ports for each server board D Video...

Page 27: ...instructions on installing a hard drive see Installing and Removing a Hard Drive on page 15 For instructions on installing the Intel Z U130 Value Solid State Drive see the document titled Intel Z U130...

Page 28: ...l Server Boards X38ML have the same connectors components AF002493 B C D A E F G H A Memory cooling fans two E Power supply B Processor and memory air duct two F Hard drive bracket one bracket for two...

Page 29: ...SB port 0 bottom USB port 1 center J Front panel connector R DIMM socket B2 C NIC2 RJ45 connector K System fan 3 S SATA port 0 D CMOS battery L System fan 2 T SATA port 1 E Serial A DB9 connector M Sy...

Page 30: ...2 BIOS Recovery Mode When pins 2 3 are jumpered the BIOS will be recovered on the next boot Pins 1 2 should be jumpered for normal operation C J1A3 CMOS Clear When pins 2 3 are jumpered the CMOS setti...

Page 31: ...cluded on the Intel Server Deployment Toolkit 2 0 CD Rack and Cabinet Mounting The server system can be mounted into a 19 inch wide by up to a 30 inch deep server cabinet The system ships with a basic...

Page 32: ...t to the MCH DIMMs must meet the following requirements If dual channel operation is desired Channel A and Channel B must be populated identically i e same capacity Use DDR2 667 800 only The speed use...

Page 33: ...n off the system by pressing the power button s and unplug the AC power cord from the system or wall outlet Before You Begin Before working with your server product pay close attention to the Safety I...

Page 34: ...op behind the server system may be needed to prevent the server system from sliding on your work surface 1 Observe the safety and ESD precautions at the beginning of this book See Safety Information o...

Page 35: ...two small screws on the top surface of the cover near the front edge See letter C Figure 9 Installing the Server System Cover 5 Reconnect all peripheral devices and the AC power cord Installing and R...

Page 36: ...s at the beginning of this book See Safety Information on page iii 2 Power down the server Unplug all peripheral devices and the AC power cable 3 Remove the server system cover For instructions see Re...

Page 37: ...fore installing the drive assembly into the server 8 Connect one blue SATA cable between each drive and the SATA_0 port on each server board if you installed two drives Be sure to note which drive is...

Page 38: ...mation on page iii 2 Power down the server and unplug all peripheral devices and the AC power cable 3 Remove the server system cover For instructions see Removing the Server System Cover on page 14 4...

Page 39: ...bag 8 If you are installing a new drive skip the remaining steps and refer to Installing a Hard Drive on page 16 Begin with step 6 9 Insert the screws that held the drive in the carrier into the screw...

Page 40: ...over Installing an Intel Z U130 Value Solid State Drive Caution The Intel VSSD is NOT hot swappable Before removing or replacing the Intel VSSD you must first take the server out of service turn off a...

Page 41: ...mbly is NOT hot swappable Before removing or replacing the PCI riser assembly you must first take the server out of service turn off all peripheral devices connected to the system turn off the system...

Page 42: ...y Note For clarity the figure in this series of instructions does not show an attached add in card If you are installing an add in card do so before installing the PCI riser assembly into your server...

Page 43: ...Server System SR1520ML User s Guide 23 Figure 16 Installing PCI Riser Assembly into the Server System 4 Install the server system cover For instructions see Installing the Server System Cover AF00251...

Page 44: ...ices and the AC power cable 3 Remove the server system cover For instructions see Removing the Server System Cover on page 14 4 Disconnect any cables attached to any add in cards 5 Remove the PCI rise...

Page 45: ...ctions see Removing the Server System Cover 4 Disconnect any cables attached to any add in cards 5 Remove the PCI riser assembly For instructions see Removing the PCI Riser Assembly on page 21 6 Remov...

Page 46: ...the AC power cable 3 Remove the server system cover For instructions see Removing the Server System Cover on page 14 4 Remove the PCI riser assembly For instructions see Removing the PCI Riser Assembl...

Page 47: ...ower cable 3 Remove the server system cover For instructions see Removing the Server System Cover on page 14 4 Remove the PCI riser assembly For instructions see Removing the PCI Riser Assembly on pag...

Page 48: ...essor air duct in place The air duct is required for proper airflow within the server system Removing the Processor Air Duct 1 Observe the safety and ESD precautions at the beginning of this book See...

Page 49: ...the Server System Cover on page 14 4 Lower the air duct into place Use caution so you do not pinch or disengage cables that may be near or under the air duct See the figure below Figure 22 Installing...

Page 50: ...The minimum memory is one 256 MB DIMM in socket A1 on each server board Socket A1 is the blue socket that is the closest to the center of the server board This provides single channel mode for each se...

Page 51: ...MM socket See letter B in the figure 9 Insert the bottom edge of the DIMM into the socket See letter C in the figure 10 When the DIMM is correctly positioned push down on the top edge until the retain...

Page 52: ...System Cover on page 14 4 Remove the processor air duct For instructions see Removing the Processor Air Duct on page 28 5 Locate the DIMM sockets See Figure 23 6 Gently open the retaining clips at ea...

Page 53: ...etal chassis before touching the processor or server board Keep part of your body in contact with the metal chassis to dissipate the static charge while handling the processor 2 Avoid moving around un...

Page 54: ...ger to slightly lift the front of the load plate Raise the load plate completely Raise the CPU load plate See the following figure Figure 26 Opening the Load Plate Caution Do not touch the socket pins...

Page 55: ...is powered down and unplugged If this is not true see Removing the Heat Sink and Processor on page 33 before following these steps Caution Do not touch the socket pins they are very sensitive and easi...

Page 56: ...n the bottom of it Use caution when you unpack the heat sink so you do not damage the TIM 1 Remove the protective cover from the TIM on the underside of the heat sink Do not touch the TIM 2 Orient the...

Page 57: ...wappable Before removing or replacing the power supply you must first take the server out of service turn off all peripheral devices connected to the system turn off the system by pressing the power b...

Page 58: ...From each server board disconnect the main power cable This connector is labeled P1 for the board on the right and P2 for the board on the left See letters A and B in the following figure From each h...

Page 59: ...he system if necessary Figure 31 Removing Power Supply 9 Slide the rear edge of the replacement power supply into place lining up with the rear of the server system See letter A in the following figur...

Page 60: ...led P3 and the connector to the bottom drive is labeled P4 See letters C and D in Figure 30 on page 38 17 Install the server system cover For instructions see Installing the Server System Cover 18 Plu...

Page 61: ...r Air Duct on page 28 5 The fan cables are tucked underneath the main power supply cable For ease of access disconnect the main power supply cable on both server boards See letter A in the following f...

Page 62: ...42 Intel Server System SR1520ML User s Guide Figure 34 Removing Bracket and Fans AF002507 B A...

Page 63: ...es between the blower fan and the memory cooling fans 15 Route the left USB and SATA cables between the left blower fan and left memory cooling fan 16 Route the right USB and SATA cables between the l...

Page 64: ...erver System Cover 4 Remove the processor air duct For instructions see Removing the Processor Air Duct on page 28 5 optional The fan cables are tucked underneath the main power supply cable For ease...

Page 65: ...letter C in the figure 12 If you removed the main power cable bundle the fan cables together and hold them in place under the cable for the main power cable while you connect the main power cables Use...

Page 66: ...t the front of the server board Note Use caution when disconnecting cables Pull only on the cable connector not on the cable Main power The cable end is labeled P1 for the server board at the right an...

Page 67: ...le and close the server system without replacing the server board 12 Install the processor air duct For instructions see Installing the Processor Air Duct on page 29 13 Install the server system cover...

Page 68: ...ge 14 4 Remove the processor air duct For instructions see Removing the Processor Air Duct on page 28 5 Remove the PCI riser assembly For instructions see Removing the PCI Riser Assembly on page 21 6...

Page 69: ...e routing information see Cable Routing on page 71 10 Connect the cables at the front of the server board Main power The cable end is labeled P1 for the server board at the right and P2 for the server...

Page 70: ...server system cover For instructions see Installing the Server System Cover 15 Plug all peripheral devices and the AC power cable into the server Replacing the Front Panel Board Caution The control p...

Page 71: ...from place Note For ease of access lift the front panel board from the server before disconnecting the cables 6 Remove the screw that attaches the front panel board to the server system See letter A i...

Page 72: ...e replacement front panel board See letter A in the following figure 10 Set the front panel board into place inserting the two knobs on the floor of the system through the two holes in the front panel...

Page 73: ...erver system cover For instructions see Installing the Server System Cover 16 Plug all peripheral devices and the AC power cable into the server Replacing the CMOS Battery Caution The CMOS battery is...

Page 74: ...atteri Eksplosjonsfare Ved utskifting benyttes kun batteri som anbefalt av apparatfabrikanten Brukt batteri returneres apparatleverand ren Varning Explosionsfara vid felaktigt batteribyte Anv nd samma...

Page 75: ...e the new lithium battery from its package and being careful to observe the correct polarity insert it in the battery socket The sign needs to face the rear of the system 9 Install the system cover Fo...

Page 76: ...afety Information on page iii 2 Power down the server and unplug all peripheral devices and the AC power cable 3 Attach the rack handle to the server system with two screws as shown by letters A and B...

Page 77: ...the server and unplug all peripheral devices and the AC power cable 3 Remove the two screws holding the rack handle in place and remove the rack handle from the server system as shown by letters A and...

Page 78: ...58 Intel Server System SR1520ML User s Guide...

Page 79: ...Self Test POST you will see this prompt Press F2 to enter SETUP In a third condition when CMOS NVRAM has been corrupted you will see other prompts but not the F2 prompt Warning CMOS checksum invalid...

Page 80: ...Select Item up The up arrow is used to select the previous value in a menu item s option list or a value field pick list Pressing the Enter key activates the selected item Down arrow Select Item down...

Page 81: ...rocess may need to be followed to return the system to service See Table 1 on page xix for a link to necessary software and instructions Recording the Current BIOS Settings 1 Boot the computer and pre...

Page 82: ...BIOS upgrade When the update completes remove the bootable media from which you performed the upgrade Caution Do not power down the system during the BIOS update process The system will reset automat...

Page 83: ...T screen appears and displays the progress 6 Select to boot to the EFI SHELL 7 Run Update NSH The system loads and executes the flash update application A message displays success or failure upon comp...

Page 84: ...ower 2 Open the server chassis 3 Move the J6B1 Password Clear jumper from the normal operation position Password Clear Protect at pins 1 and 2 to the Password Clear Erase position covering pins 2 and...

Page 85: ...system and disconnect the AC power 2 Open the server 3 Move the J1A3 CMOS Clear jumper from the normal operation position CMOS Clear by BMC at pins 1 and 2 to the CMOS Clear Force Erase position cover...

Page 86: ...ly onto the flash device In the unlikely event that the iBMC firmware update process fails because the iBMC not in the proper update state the server board provides a BMC Force Update jumper J3A1 that...

Page 87: ...iBMC is still in update mode 7 Power down and remove AC power 8 Open the server and move the jumper from the enabled position pins 2 3 to the disabled position pins 1 2 9 Close the server system and r...

Page 88: ...uilt with the authority to access this section of code In the unlikely event that the boot block must be written to complete the following steps 1 Power down the system and disconnect the AC power 2 O...

Page 89: ...e covering pins 1 and 2 The boot block is a critical section of the IBMC firmware that contains code to initialize the iBMC hardware If this flash area becomes corrupted then the iBMC may be rendered...

Page 90: ...70 Intel Server System SR1520ML User s Guide...

Page 91: ...d or remove components from your server system make sure your cables are routed correctly before reinstalling the server system cover Use caution to make sure no cables or wires are pinched and that t...

Page 92: ...outing Figure 51 Power Cable Routing AF002529 A A B B C C D D A Memory fan one for each server board C Main power one for each server board B Blower fan one for each server board D Drive power Daisy c...

Page 93: ...a Cable Routing AF002528 A A B B C C A Y USB cable One end to Intel Z U130 Value Solid State Drive optoinal and the other end to the front panel one for each server board C Y Front panel cable One end...

Page 94: ...bout calculating the power usage for your configuration see Calculating Power Usage Warning Do not exceed a combined power output of 150 Watts for the 5 V and 3 3 V outputs Exceeding a combined 90 Wat...

Page 95: ...change not to exceed 10 C per hour Humidity Non operating 90 relative humidity non condensing at 35 C Shock Operating Packaged 2 0 g 11 msec 1 2 sine Operational after an 24 inch free fall Acoustic n...

Page 96: ...76 Intel Server System SR1520ML User s Guide...

Page 97: ...s is considered the disconnect device to the main AC power The socket outlet that the system plugs into shall be installed near the equipment and shall be easily accessible SAFETY STEPS Whenever you r...

Page 98: ...r and heat sink may be hot if the system has been running Also there may be sharp pins and edges on some board and chassis parts Contact should be made with care Consider wearing protective gloves Dan...

Page 99: ...echselstrom Netzkabel aus der Steckdose bzw dem Netzger t um den Stromanschlu des Systems zu unterbrechen SICHERHEISMASSNAHMEN Immer wenn Sie die Geh useabdeckung abnehmen um an das Systeminnere zu ge...

Page 100: ...Abdeckung wieder anzubringen 1 Vergewissern Sie sich da Sie keine Werkzeuge oder Teile im Innern des Systems zur ckgelassen haben 2 berpr fen Sie alle Kabel Zusatzkarten und andere Komponenten auf or...

Page 101: ...Wechselstromsteckdose ausger stet sein ber ausreichend Platz verf gen um Zugang zu den Netzkabeln zu gew hrleisten da der Stromanschlu des Produkts haupts chlich ber die Kabel unterbrochen wird Le blo...

Page 102: ...tall sur l arri re du syst me d verrouillez le et retirez le 2 Retirez toutes les vis des panneaux et mettez les dans un endroit s r 3 Retirez les panneaux Afin de permettre le refroidissement et l a...

Page 103: ...s magn tiques il est recomand de brancher votre syst me un supresseur de surtension et de d brancher toutes les lignes de t l communications de votre modem durant un orage Muni d une prise murale corr...

Page 104: ...cualquier tipo de superficie de metal sin pintar 6 No ponga en marcha el sistema si se han extra do las tapas del chasis Despu s de completar las seis instrucciones de SEGURIDAD mencionadas ya puede e...

Page 105: ...trucciones del fabricante El sistema est dise ado para funcionar en un entorno de trabajo normal Escoja un lugar Limpio y libre de part culas en suspensi n salvo el polvo normal Bien ventilado y aleja...

Page 106: ...all interno del sistema seguire i seguenti passi 1 Spegnere tutti i dispositivi periferici collegati al sistema 2 Spegnere il sistema usando il pulsante spento acceso dell interruttore del sistema 3...

Page 107: ...Fare attenzione alla presenza di piedini appuntiti e parti taglienti sulle schede e sul telaio consigliabile l uso di guanti di protezione Esiste il pericolo di un esplosione se la pila non viene sos...

Page 108: ...88 Intel Server System SR1520ML User s Guide...

Page 109: ...ce Test that may help with your diagnostics See Server System References on page xix for a link to this software If you are unable to resolve your server problems on your own see Getting Help on page...

Page 110: ...fer to the manufacturer s documentation that comes with them If applicable ensure that there are no conflicts for example two add in boards sharing the same interrupt Are all peripheral devices instal...

Page 111: ...Proper Operation of Key System Lights As POST determines the system configuration it tests for the presence of each mass storage device installed in the system As each device is checked its activity l...

Page 112: ...Remove the memory DIMMs and re seat them Make sure the processor complies with the system requirements Remove the processor and re seat it No Characters Appear on Screen Check the following This serv...

Page 113: ...ct your service representative or authorized dealer for help Characters Are Distorted or Incorrect Check the following Are the brightness and contrast controls properly adjusted on the video monitor S...

Page 114: ...following Are the CD ROM DVD ROM drive s power and signal cables properly installed Are all relevant switches and jumpers on the drive set correctly Is the drive properly configured Cannot Connect to...

Page 115: ...es on page xix for a link to the current version Make sure the other adapter supports shared interrupts Make sure your operating system supports shared interrupts Try reseating the add in adapter The...

Page 116: ...ctly sometimes indicate equipment failure However they can also be caused by file corruption or changes to the software configuration Check the following If you are running the software from a USB CD...

Page 117: ...er System References on page xix for a link to the tested drives Make sure you have not exceeded the power budget for the server See Server System References on page xix for a link to software to chec...

Page 118: ...98 Intel Server System SR1520ML User s Guide...

Page 119: ...elephone support at any time without notice Before calling fill out an Issue Report Form available at http support intel com support motherboards server X38ML For an updated support contact list see h...

Page 120: ...36 9796 via Philippines New Zealand 0800 444 365 Pakistan 632 63684 15 IDD via Philippines Philippines 1 800 1 651 0117 Singapore 65 6213 1311 Taiwan 2 2545 1640 Thailand 1 800 631 0003 Vietnam 632 63...

Page 121: ...1 Pacifictel Contact AT T USA at 1 800 225 528 Once connected dial 800 843 4481 Guatemala Contact AT T USA at 99 99 190 Once connected dial 800 843 4481 Mexico Contact AT T USA at 001 800 462 628 4240...

Page 122: ...102 Intel Server System SR1520ML User s Guide...

Page 123: ...Product OR REFUND the then current value of the Product if Intel is unable to repair or replace the Product If such Product is defective transportation charges for the return of Product to buyer withi...

Page 124: ...and exclusive remedies for any breach of warranty Intel is not responsible for direct special incidental or consequential damages resulting from any breach of warranty under another legal theory incl...

Page 125: ...in Asia Contact your original authorized distributor for warranty service Any replacement Product is warranted under this written warranty and is subject to the same limitations and exclusions for th...

Page 126: ...106 Intel Server System SR1520ML User s Guide...

Page 127: ...t certifications and approvals Use only the described regulated components specified in this guide Use of other products components will void the UL Listing and other regulatory approvals of the produ...

Page 128: ...hysical shock Isolated from strong electromagnetic fields produced by electrical devices In regions that are susceptible to electrical storms we recommend you plug your system into a surge suppresser...

Page 129: ...acturer for servicing When replacing a hot plug power supply unplug the power cord to the power supply being replaced before removing it from the server To avoid risk of electric shock turn off the se...

Page 130: ...en running any installed processor s and heat sink s may be hot Unless you are adding or removing a hot plug component allow the system to cool before opening the covers To avoid the possibility of co...

Page 131: ...replacing the battery use only the battery recommended by the equipment manufacturer Dispose of batteries according to local ordinances and regulations Do not attempt to recharge a battery Do not att...

Page 132: ...assenen Komponenten die im vorliegenden Handbuch angegeben werden Die Verwendung anderer Produkte oder Komponenten f hrt zum Erl schen der UL Zulassung und anderer Genehmigungen f r das Produkt Dadurc...

Page 133: ...he Ger te erzeugt werden In gewittergef hrdeten Gebieten sollten Sie das System an einen berspannungsschutz anschlie en und bei einem Gewitter die Telekommunikationskabel zum Modem abziehen Eine ordnu...

Page 134: ...k nnen ffnen Sie das Netzteil nicht Im Netzteil bestehen gef hrliche Spannungen Str me und Energiequellen Schicken Sie das Ger t f r Wartungsarbeiten an den Hersteller zur ck Wenn Sie ein hot plug f h...

Page 135: ...tzkabel ab bevor Sie Komponenten ein oder ausbauen die nicht hot plug f hig sind Wenn Sie ein hot plug f higes Netzteil austauschen ziehen Sie dessen Netzkabel ab bevor Sie es aus dem Server ausbauen...

Page 136: ...ie Platinen nur an den Kanten fest Legen Sie die Platinen nach dem Auspacken aus der Schutzh lle oder nach dem Ausbau aus dem Server mit der Bauelementseite nach oben auf eine geerdete statisch entlad...

Page 137: ...aller ou de mettre jour votre produit serveur Intel En cas de conflit entre les informations fournies dans ce document et celles livr es avec le produit ou publi es sur le site Web pour un produit par...

Page 138: ...que la lumi re directe du soleil et les radiateurs l cart des sources de vibration ou des chocs physiques Isol des champs lectromagn tiques importants produits par des appareils lectriques ATTENTION I...

Page 139: ...lectricit Attention Le bouton d alimentation indiqu par le symbole de mise en veille NE COUPE PAS compl tement l alimentation secteur du syst me car le courant de veille 5 V reste actif lorsque le sys...

Page 140: ...rises lectriques reli es la terre Les cordons d alimentation doivent r pondre aux crit res suivants Le cordon d alimentation doit supporter une intensit sup rieure celle indiqu e sur le produit Le cor...

Page 141: ...ontact avec un composant chaud lors d une installation chaud prenez toutes les pr cautions n cessaires lorsque vous retirez ou installez des composants connectables chaud Attention Pour viter de vous...

Page 142: ...que la carte ne glisse sur aucune surface Autres risques Remplacement de la pile Attention Il existe un risque d explosion si la pile n est pas correctement remplac e Lors du remplacement de la pile u...

Page 143: ...r y prestar los servicios para el servidor Debe ce irse a las directrices de esta gu a y a las instrucciones de montaje de los manuales del servidor para asegurar y mantener el cumplimiento con las ce...

Page 144: ...recta y los radiadores Alejada de fuentes de vibraci n o de golpes f sicos Aislada de campos electromagn ticos producidos por dispositivos el ctricos En zonas propensas a tormentas el ctricas se recom...

Page 145: ...conexi n en funcionamiento Algunas fuentes de alimentaci n de electricidad de los servidores de Intel utilizan el polo neutral del fuselaje Para evitar riesgos de choques electricos use precauci nes a...

Page 146: ...e alimentaci n deben estar conectados a los enchufes con una toma de tierra adecuada Advertencias el acceso al sistema Precauci n Para evitar lesiones personales o da os en la propiedad se aplican las...

Page 147: ...servidor se ha estado ejecutando los procesadores y disipadores de calor estar n recalentados A no ser que est instalando o extrayendo un componente de conexi n en funcionamiento deje que el sistema s...

Page 148: ...so y deber n incluirse indicaciones que lo identifiquen como el control de alimentaci n el ctrica de toda la unidad no s lo de los servidores Para evitar el riesgo de descargas el ctricas deber instal...

Page 149: ...ca para reducir al m nimo los problemas de obstrucci n de la ventilaci n y de refrigeraci n Para conseguir una refrigeraci n y corriente de aire adecuadas compruebe que cuando sistema est funcionando...

Page 150: ...130 Intel Server System SR1520ML User s Guide...

Page 151: ...gher speed as the microprocessor used on this server board The final configuration of your end system product may require additional EMC compliance testing For more information please contact your loc...

Page 152: ...talled in a compatible Intel host system For information on compatible host system s refer to Intel s Server Builder Web site or contact your local Intel representative FCC ICES 003 Emissions USA Cana...

Page 153: ...ity Australia MED Declaration of Conformity New Zealand BSMI Certification Taiwan GOST R Certification License Russia Belarus Certification License Belarus RRL Certification Korea IRAM Certification A...

Page 154: ...Class A USA EMC Marking Class A Canada C Tick Mark Australia New Zealand VCCI Marking Class A Japan BSMI Certification Number Class A Warning Taiwan GOST R Marking Russia RRL MIC Mark Korea Table 8 Pr...

Page 155: ...et WEEE Mark RoHS China Recycling Mark China Recycling Other than China CA Lithium Perchlorate insert Perchlorate Material Special handling may apply See www dtsc ca gov hazardouswaste perchlorate Thi...

Page 156: ...not occur in a particular installation If this equipment does cause harmful interference to radio or television reception which can be determined by turning the equipment off and on the user is encour...

Page 157: ...he Canadian Department of Communications Europe CE Declaration of Conformity This product has been tested in accordance to and complies with the Low Voltage Directive 73 23 EEC and EMC Directive 89 33...

Page 158: ...ated Specified Components To maintain the UL listing and compliance to other regulatory certifications and or declarations the following regulated components must be used and conditions adhered to Int...

Page 159: ...s Declarations of Conformity to the banned substances must be obtained from all suppliers and a Material Declaration Data Sheet MDDS must be produced to illustrate compliance Due verification of rando...

Page 160: ...er s Guide End of Life Product Recycling Product recycling and end of life take back systems and requirements vary by country Contact the retailer or distributor of this product for information about...

Reviews: