Intel® Server System M20NTP1UR - System Integration and Service Guide
63
4.
Locate and unpack the replacement 2.5” drive
5.
Position the SSD with its interface connector facing the back of the drive bracket
6.
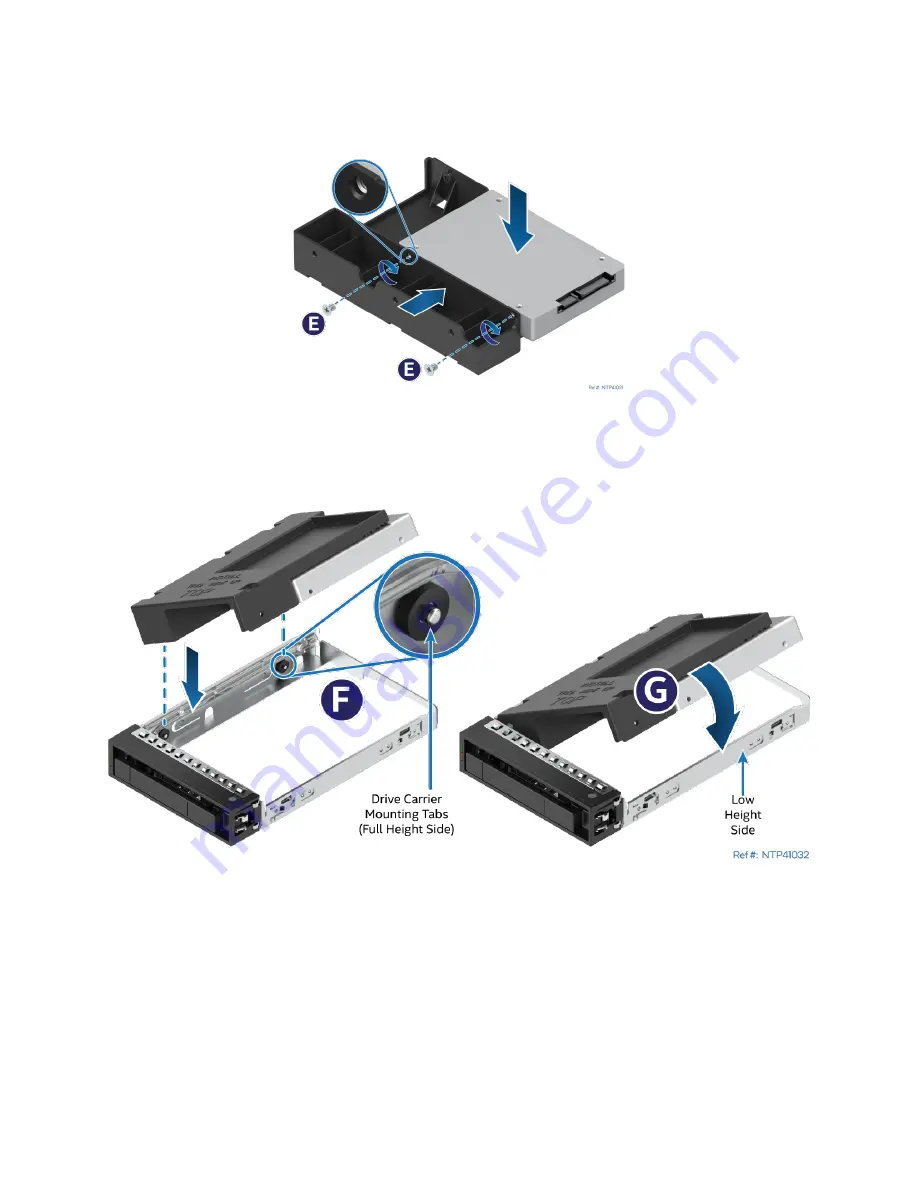
Install the replacement drive into the 2.5” mounting bracket (See
Figure 72. 2.5” Drive Installation to Mounting Bracket
•
Install and secure the SSD to the drive bracket using two screws (See Letter “E”).
7.
Install the SSD assembly into the drive carrier (See
Figure 73. 2.5” Drive Assembly Installation to Drive Carrier (Step 7)
•
Orient the SSD so that its interface connector is positioned towards the back of the drive carrier.
•
Align and position the mounting holes on the left side of the SSD assembly over the mounting
tabs located on the left side rail of the drive carrier (See Letter “F”)
•
Lower the right side of the SSD assembly into the drive carrier and press down until all mounting
tabs lock in place. (See Letter “G”)
Summary of Contents for M20NTP1UR
Page 2: ...2 This page intentionally left blank...
Page 101: ...Intel Server System M20NTP1UR System Integration and Service Guide 101 1 2 3 4 5...
Page 102: ...Intel Server System M20NTP1UR System Integration and Service Guide 102 1 2 3 4 5 6 1 2 3...
Page 103: ...Intel Server System M20NTP1UR System Integration and Service Guide 103 1 2 3 4 5...
Page 112: ...Intel Server System M20NTP1UR System Integration and Service Guide 112 1 2 3 4 5 ESD 6 1 2 3...
Page 113: ...Intel Server System M20NTP1UR System Integration and Service Guide 113 1 2 3 4 5...


