background image


Mechanical Drawings 

R


Thermal/Mechanical Design Guide


95  

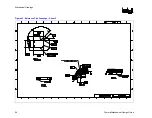
Figure 46. ATX/µATX Motherboard Keep-out Footprint Definition and Height Restrictions for Enabling Components – Sheet 2 


Summary of Contents for 640 - Pentium 4 640 3.2GHz 800MHz 2MB Socket 775 CPU

Page 1: ...d LGA Package Thermal and Mechanical Design Guidelines Supporting Intel Pentium 4 Processor 5xx and 6xx Sequences in the 775 land LGA Package and Intel Pentium 4 Processor Extreme Edition in the 775 land LGA Package November 2005 Document Number 302553 004 R ...

Page 2: ...formation for customer s convenience only Use at your own risk Intel accepts no liability for results if customer chooses at its discretion to implement these methods within its business operations Intel makes no representations or warranties regarding the accuracy or completeness of the information provided The Intel Pentium 4 Processor in the 775 Land LGA Package may contain design defects or er...

Page 3: ...s 21 2 3 1 Heatsink Size 22 2 3 2 Heatsink Mass 22 2 3 3 Package IHS Flatness 22 2 3 4 Thermal Interface Material 23 2 4 System Thermal Solution Considerations 23 2 4 1 Chassis Thermal Design Capabilities 23 2 4 2 Improving Chassis Thermal Performance 23 2 4 3 Summary 24 2 5 System Integration Considerations 24 3 Thermal Metrology 25 3 1 Characterizing Cooling Performance Requirements 25 3 1 1 Exa...

Page 4: ...rocessor Memory Test Procedures 44 5 3 Material and Recycling Requirements 44 5 4 Safety Requirements 45 5 5 Geometric Envelope for ATX Intel Reference Thermal Mechanical Design 45 5 6 ATX Reference Thermal Mechanical Solution for the Intel Pentium 4 Processor in the 775 Land LGA Package 46 5 7 Reference Attach Mechanism 48 5 7 1 Structural Design Strategy 48 5 7 2 Mechanical Interface to the Refe...

Page 5: ...onditions 71 Appendix C Thermal Interface Management 73 C 1 Bond Line Management 73 C 2 Interface Material Area 73 C 3 Interface Material Performance 73 Appendix D Case Temperature Reference Metrology 75 D 1 Objective and Scope 75 D 2 Definitions 75 D 3 Supporting Test Equipment 76 D 4 Thermal Calibration and Controls 77 D 5 IHS Groove 77 D 6 Thermocouple Attach Procedure 80 D 6 1 Thermocouple Con...

Page 6: ...Figure 25 Load Cell Installation in Machined Heatsink Base Pocket Side View 69 Figure 26 Preload Test Configuration 69 Figure 27 775 Land LGA Package Reference Groove Drawing 78 Figure 28 IHS Reference Groove on the 775 Land LGA Package 79 Figure 29 IHS Groove Orientation Relative to the LGA775 Socket 79 Figure 30 Bending the Tip of the Thermocouple 80 Figure 31 Securing Thermocouple Wires with Ka...

Page 7: ...ence Solution Assembly 104 Tables Table 1 Thermal Diode Interface 35 Table 2 ATX Reference Heatsink Performance Target 39 Table 3 Fan Electrical Performance Requirements 41 Table 4 Intel RCBFH 3 Reference Design Performance 46 Table 5 Board Deflection Configuration Definitions 62 Table 6 Typical Test Equipment 70 Table 7 FSC Definitions 87 Table 8 ATX FSC Settings 89 Table 9 Balanced Technology Ex...

Page 8: ...Extreme Edition in the 775 land LGA package February 2005 003 Added information for Intel Pentium 4 processor 670 Updated the Fan Speed Control tables Updated the Fastener Drawings May 2005 004 Added Intel Pentium 4 processors 662 and 672 to the list of processors supported by this thermal mechanical design guide Added Intel Pentium 4 processors 571 561 551 541 531 and 521 to the list of processor...

Page 9: ... and above the processor The processor temperature depends in particular on the component power dissipation the processor package thermal characteristics and the processor thermal solution All of these parameters are affected by the continued push of technology to increase processor performance levels and packaging density more transistors As operating frequencies increase and packaging size decre...

Page 10: ... On 90 nm Process in the 775 land LGA Package supporting Intel Extended Memory 64 TechnologyΦ and supporting Intel Virtualization Technology as appropriate If needed for clarity the specific processor datasheet will be referenced Chapter 2 discusses package thermal mechanical requirements to design a thermal solution for the Pentium 4 processor in the 775 land LGA package in the context of persona...

Page 11: ... 521 Supporting Hyper Threading Technology On 90 nm Process in the 775 Land LGA Package and Supporting Intel Extended Memory 64 Technology Φ Datasheet http developer intel com design Pentium 4 datashts 302351 htm LGA775 Socket Mechanical Design Guide http developer intel com design Pentium 4 guides 302666 htm Boxed Intel Pentium 4 Processor in the 775 Land LGA Package Integration Video http www in...

Page 12: ...A Total Package Power Note Heat source must be specified for Ψ measurements TIM Thermal Interface Material The thermally conductive compound between the heatsink and the processor case This material fills the air gaps and voids and enhances the transfer of the heat from the processor case to the heatsink PMAX The maximum power dissipated by a semiconductor component TDP Thermal Design Power a powe...

Page 13: ...ONTROL_BASE that results in the value for TCONTROL TCONTROL TCONTROL is the specification limit for use with the on die thermal diode PWM Pulse width modulation is a method of controlling a variable speed fan The enabled 4 wire fans use the PWM duty cycle from the fan speed controller to modulate the fan speed Health Monitor Component Any standalone or integrated component that is capable of readi...

Page 14: ...Introduction R 14 Thermal Mechanical Design Guide ...

Page 15: ...the center of the socket with solder balls for surface mounting to the motherboard The socket is named LGA775 socket A description of the socket can be found in the LGA775 Socket Mechanical Design Guide The package includes an integrated heat spreader IHS that is shown in Figure 1 for illustration only Refer to the processor datasheet for further information In case of conflict the package dimensi...

Page 16: ...ns These include heatsink installation removal mechanical stress testing and standard shipping conditions When a compressive static load is necessary to ensure thermal performance of the thermal interface material between the heatsink base and the IHS it should not exceed the corresponding specification given in the processor datasheet When a compressive static load is necessary to ensure mechanic...

Page 17: ... a means for protecting LGA775 socket solder joints One of the strategies for mechanical protection of the socket is to use a preload and high stiffness clip This strategy is implemented by the reference design and described in Section 5 7 Note Package pull out during mechanical shock and vibration is constrained by the LGA775 socket load plate refer to the LGA775 Socket Mechanical Design Guide fo...

Page 18: ...een installed into the chassis Minimizes contact with the motherboard surface during installation and actuation to avoid scratching the motherboard 2 2 Thermal Requirements Refer to the datasheet for the processor thermal specifications The majority of processor power is dissipated through the IHS There are no additional components e g BSRAMs that generate heat in this package The amount of power ...

Page 19: ... profile and can be thought of as the thermal resistance of the heatsink attached to the processor ΨCA Refer to Section 3 1 The intercept on the thermal profile assumes a maximum ambient operating condition that is consistent with the available chassis solutions To determine compliance to the thermal profile a measurement of the actual processor power dissipation is required Contact your Intel sal...

Page 20: ...gh TCONTROL will dissipate more power than a part with lower value of TCONTROL when running the same application The value of TCONTROL is calculated such that regardless of the individual processor s TCONTROL value the thermal solution should perform similarly The higher power of some parts is offset by a higher value of TCONTROL in such a way that they should behave virtually the same acousticall...

Page 21: ...quately fill the gap The TIM thermal performance depends on its thermal conductivity as well as the pressure applied to it Refer to Section 2 3 4 and Appendix C for further information on TIM and on bond line management between the IHS and the heatsink base The heat transfer conditions on the surface on which heat transfer takes place Convective heat transfer occurs between the airflow and the sur...

Page 22: ...sign considerations air duct etc 2 3 2 Heatsink Mass With the need for pushing air cooling to better performance heatsink solutions tend to grow larger increase in fin surface resulting in increased mass The insertion of highly thermally conductive materials like copper to increase heatsink thermal conduction performance results in even heavier solutions As mentioned in Section 2 1 the heatsink ma...

Page 23: ...processor and other system components Moving air through the chassis brings in air from the external ambient environment and transports the heat generated by the processor and other system components out of the system The number size and relative position of fans and vents determine the chassis thermal performance and the resulting ambient temperature around the processor The size and type passive...

Page 24: ... usually combined in a single cooling performance parameter ΨCA case to air thermal characterization parameter More information on the definition and the use of ΨCA is given Section 3 1 Heatsink interface to IHS surface characteristics including flatness and roughness The performance of the thermal interface material used between the heatsink and the IHS The required heatsink clip static load betw...

Page 25: ... can rarely be accurately and easily modeled by a single resistance parameter like Ψ The case to local ambient thermal characterization parameter value ΨCA is used as a measure of the thermal performance of the overall thermal solution that is attached to the processor package It is defined by the following equation and measured in units of C W ΨCA TC TA PD Equation 1 Where ΨCA Case to local ambie...

Page 26: ...ormance ΨCA is then defined using the principle of thermal characterization parameter described above The case temperature TC MAX and thermal design power TDP given in the processor datasheet Define a target local ambient temperature at the processor TA Since the processor thermal profile applies to all processor frequencies it is important to identify the worst case lowest ΨCA for a targeted chas...

Page 27: ...ly recommended to verify functionality of the thermal solution on real processors and on fully integrated systems Contact your Intel field sales representative for further information on TTV or regarding accurate measurement of the power dissipated by an actual processor 3 3 Local Ambient Temperature Measurement Guidelines The local ambient temperature TA is the temperature of the ambient air surr...

Page 28: ...sing If a variable speed fan is used it may be useful to add a thermocouple taped to the barrier above the location of the temperature sensor used by the fan to check its speed setting against air temperature When measuring TA in a chassis with a live motherboard add in cards and other system components it is likely that the TA measurements will reveal a highly non uniform temperature distribution...

Page 29: ...Mechanical Design Guide 29 Figure 5 Locations for Measuring Local Ambient Temperature Active Heatsink Note Drawing Not to Scale Figure 6 Locations for Measuring Local Ambient Temperature Passive Heatsink Note Drawing Not to Scale ...

Page 30: ... the complete measurement system must be routinely checked against known standards When measuring the temperature of a surface that is at a different temperature from the surrounding local ambient air errors could be introduced in the measurements The measurement errors could be caused by poor thermal contact between the thermocouple junction and the surface of the integrated heat spreader heat lo...

Page 31: ...ient circuits can significantly reduce processor power consumption An on die thermal management feature called Thermal Monitor is available on the Pentium 4 processor in the 775 land LGA package It provides a thermal management approach to support the continued increases in processor frequency and performance By using a highly accurate on die temperature sensing circuit and a fast acting Thermal C...

Page 32: ...register settings within the processor It is asserted any time the processor die temperature reaches the trip point The point where the Thermal Control Circuit activates is set to the same temperature at which PROCHOT asserts The temperature at which the PROCHOT signal goes active is individually calibrated during manufacturing The power dissipation of each processor affects the set point temperat...

Page 33: ...he Thermal Control Circuit allows the processor to attempt to maintain a safe operating temperature without the need for special software drivers or interrupt handling routines When the Thermal Control Circuit has been enabled processor power consumption will be reduced after the thermal sensor detects a high temperature i e PROCHOT assertion The Thermal Control Circuit and PROCHOT transitions to ...

Page 34: ...d Thermal Control Circuit to be enabled for all Pentium 4 processors in the 775 land LGA package based systems The thermal control circuit is intended to protect against short term thermal excursions that exceed the capability of a properly designed processor thermal solution Thermal Monitor should not be relied upon to compensate for a thermal solution that does not meet the thermal profile up to...

Page 35: ...n significant temperature differences between the on die thermal diode and the Thermal Monitor s temperature sensor This temperature variability across the die is highly dependent on the application being run As a result it is not possible to predict the activation of the thermal control circuit by monitoring the on die thermal diode System integrators should note that there is no defined correlat...

Page 36: ...voltage across the diode k Boltzmann Constant and T absolute temperature Kelvin This equation determines the ideality factor of an individual diode For the purpose of determining a correction factor to use with the thermal sensor the ideality equation can be simplified to the following TERROR TMEASURED 1 NACTUAL NTRIM Where TERROR correction factor to add to the reported temperature TMEASURED temp...

Page 37: ...tive is roughly parallel to the thermal profile and greater than the PROCHOT activation temperature Once configured the temperature at which the THERMTRIP signal is asserted is neither re configurable nor accessible to the system 4 2 8 1 Cooling System Failure Warning It may be useful to use the PROCHOT signal as an indication of cooling system failure Messages could be sent to the system administ...

Page 38: ...Thermal Management Logic and Thermal Monitor Feature R 38 Thermal Mechanical Design Guide ...

Page 39: ...chassis of 35 C is assumed resulting in a temperature rise TR of 3 C Meeting TA and ΨCA targets can maximize processor performance refer to Sections 2 2 2 4 and Chapter 4 By minimizing TR in the performance chassis this helps lead to improved acoustics Refer to the datasheet for detailed processor thermal specifications Table 2 ATX Reference Heatsink Performance Target Processor Number Thermal Per...

Page 40: ...the processor thermal profile additional acoustic improvements can be achieved at lower processor workload by using the TCONTROL specifications described in Section 2 2 3 Intel s recommendation is to use the Fan Specification for 4 Wire PWM Controlled Fans to implement fan speed control capability based on die thermal diode temperature Refer to Chapter 6 for further details Note Heatsinks providin...

Page 41: ...A 5 1 5 Fan Performance for Active Heatsink Thermal Solution The fan power requirements for proper operation are given in Table 3 Table 3 Fan Electrical Performance Requirements Requirement Value Peak fan current draw 1 5 A Average fan current draw 1 1 A Fan start up current draw 2 2 A Fan start up current draw maximum duration 1 0 second Fan header voltage 12 V 10 Tachometer output 2 pulse per re...

Page 42: ...er these tests are conducted however the test conditions outlined here may differ from your own system requirements 5 2 1 1 Random Vibration Test Procedure Duration 10 min axis 3 axes Frequency Range 5 Hz to 500 Hz Power Spectral Density PSD Profile 3 13 G RMS Figure 8 Random Vibration PSD 5 2 1 2 Shock Test Procedure Recommended performance requirement for a motherboard Quantity 3 drops for and d...

Page 43: ...relaxation during burn in stage The stress test should be followed by a visual inspection and then BIOS Processor Memory test 5 2 1 2 2 Post Test Pass Criteria The post test pass criteria are 1 No significant physical damage to the heatsink attach mechanism including such items as clip and motherboard fasteners 2 Heatsink must remain attached to the motherboard 3 Heatsink remains seated and its bo...

Page 44: ...l enabling components including socket and thermal solution parts Power supply Disk drive Video card DIMM Keyboard Monitor The pass criterion is that the system under test shall successfully complete the checking of BIOS basic processor functions and memory without any errors 5 3 Material and Recycling Requirements Material shall be resistant to fungal growth Examples of non resistant materials in...

Page 45: ...nce Thermal Mechanical Design Figure 45 Figure 46 and Figure 47 in Appendix G provide detailed reference ATX μATX motherboard keep out information for the reference thermal mechanical enabling design These drawings include height restrictions in the enabling component region The maximum height of the reference solution above the motherboard is 71 12 mm 2 8 inches and is compliant with the motherbo...

Page 46: ...ely designed without a fan guard to optimize thermal and acoustic performance Note If this fan design is used in your product and you will deliver it to end use customers you have the responsibility to determine an adequate level of protection e g protection barriers a cage or an interlock against contact with the energized fan by the user during user servicing Table 4 Intel RCBFH 3 Reference Desi...

Page 47: ...e Intel RCBFH 3 Reference Solution is provided in Figure 55 in Appendix G Figure 11 Intel RCBFH 3 Reference Design Exploded View Fan Fan Attach Extrusion Core Fastener Clip Fan Fan Attach Extrusion Copper Core Fastener Clip Development vendor information for the Intel RCBFH 3 Reference Solution is provided in Appendix H ...

Page 48: ...in particular upward board deflection Figure 12 In addition a moderate preload provides initial downward deflection Figure 12 Upward Board Deflection during Shock The reference metal clip nominal stiffness is 540 N mm 3100 lb in The combined reference clip and fasteners nominal stiffness is 380 N mm 2180 lb in The nominal preload provided by the Intel RCBFH 3 reference design is 191 3 N 44 5 N 43 ...

Page 49: ...re 48 and Figure 49 for the component drawings Four plastic fasteners see Appendix G Figure 50 Figure 51 Figure 52 and Figure 53 for the component drawings Figure 10 and Figure 11 show the reference attach mechanism as part of the Intel RCBFH 3 Reference Design The clip is assembled to heatsink during copper core insertion and is meant to be trapped between the core shoulder and the extrusion as s...

Page 50: ...l com go integration Caution Assess the potential risk of Musculoskeletal Disorders Many factors impact the risk of introducing Musculoskeletal Disorders MSDs when installing and assembling computers and similar equipment Along with common injuries such as cuts lacerations and bruises frequent and prolonged repeated forceful exertions can cause soreness aches pains and fatigue in hands wrists and ...

Page 51: ...Clip Core 1 6 mm Detail A Fin Array Clip Core 1 6 mm Detail A Fin Array Clip Core 1 6 mm Detail A Fin Array Clip Core 1 6 mm Figure 15 Critical Core Dimension R 0 40 mm max R 0 40 mm max φ33 56 0 10 mm Gap required to avoid core surface blemish during clip assembly Recommend 0 3 mm min 1 00 mm min 3 29 0 10 mm φ36 10 0 30 mm 1 00 0 10 mm Core NOTE Dimension from the bottom of the clip to the botto...

Page 52: ...Intel Thermal Mechanical Reference Design Information R 52 Thermal Mechanical Design Guide ...

Page 53: ...e solution and the Boxed Pentium 4 Processor in 775 land LGA package have implemented a thermistor into the design The following sections will discuss the necessary steps to implement Acoustic Fan Speed Control 6 2 Thermal Solution Design 6 2 1 Compliance to Thermal Profile The first step is to select or design a processor thermal solution that meets the thermal profile for the Pentium 4 Processor...

Page 54: ...lution design is to determine the minimum speed at which the fan will be allowed to operate This value can be driven by the cooling requirements for another portion of the design such as the processor voltage regulator or by functional limits of the fan design Per the Fan Specification for 4 wire PWM Controlled Fans there are three possible options to consider Type A The fan will run at minimum RP...

Page 55: ...l These components can be a discrete device or a super I O SIO with the functionality embedded The following vendors currently have components that could be suitable Analog Devices ITE Maxim National Semiconductor SMSC and Winbond Consult their web sites or local sales representatives for a part suitable for your design See Appendix E for further details on the motherboard requirements 6 3 1 Choos...

Page 56: ...to accelerate the fan That would delay the fan accelerating for the longest period after an increase in TDIODE There are a number of issues that should be considered with this strategy There is little granularity in the fan speeds For each 1 C of increase in diode temperature 20 jump in PWM duty cycle Fan speed oscillation as the thermal solution chases the diode temperature Having TDIODE overshoo...

Page 57: ...an speed oscillation are significantly reduced Maximum fan speed is lower The rate of change of ΨCA vs RPM is an exponential curve with a larger decrease at the beginning of the fan acceleration than as the maximum speed is approached By having the fan start to accelerate at a lower TDIODE reading the thermal solution can keep up with rate of change in processor power The rate of change in acousti...

Page 58: ...se with the Intel Boxed Pentium 4 Processor in 775 Land LGA Package on the enabled reference solution a TRANGE value of 10 C is recommended for ATX chassis 6 3 1 2 Minimum PWM Duty Cycle The final step in determining the FSC setting is to determine the minimum PWM Duty cycle This is the fan speed for any TDIODE TLOW The selection of this value is dependent on Acoustic target at system idle Voltage...

Page 59: ... Speed PWM Duty Cycle 100 Fan Speed RPM Inlet Temperature C Full Speed 30 38 Min Operating Variable Speed Fan VSF Curve Fan Speed Operating Range with FSC 34 Min Fan Speed PWM Duty Cycle 100 6 5 Interaction of Thermal Profile and TCONTROL The Pentium 4 processor in the 775 land LGA packaged thermal specification is comprised of the two parameters TCONTROL and the maximum case temperature defined b...

Page 60: ...Acoustic Fan Speed Control R 60 Thermal Mechanical Design Guide ...

Page 61: ...te is actuated In addition solder joint shear stress is caused by coefficient of thermal expansion CTE mismatch induced shear loading The solder joint compressive axial force Faxial induced by the heatsink preload helps to reduce the combined joint tensile and shear stress Overall the heatsink required preload is the minimum preload needed to meet all of the above requirements Mechanical shock and...

Page 62: ...tion metric provides guidance for mechanical designs that differ from the reference design for ATX µATX form factor A 2 2 Motherboard Deflection Metric Definition Motherboard deflection is measured along either diagonal refer to Figure 22 d dmax d1 d2 2 d dmax d 1 d 2 2 Configurations in which the deflection is measured are defined in the Table 5 To measure board deflection follow industry standar...

Page 63: ...imits Deflection limits for the ATX µATX form factor are d_BOL d_ref 0 09 mm and d_EOL d_ref 0 15 mm And d _BOL d _ref 0 09 mm and d_EOL d_ref 0 15 mm NOTES 1 The heatsink preload must remain within the static load limits defined in the processor datasheet at all times 2 Board deflection should not exceed motherboard manufacturer specifications ...

Page 64: ...s for the creep expected to occur in the motherboard It assumes no creep will occur in the clip However there is a small amount of creep accounted for in the plastic fasteners This situation is somewhat similar to the Intel Reference Design The impact of the creep to the board deflection is a function of the clip stiffness The relatively compliant clips store strain energy in the clip under the BO...

Page 65: ... back of the board NOTES 1 The heatsink preload must remain below the maximum load limit of the package at all times Refer to processor datasheet 2 Board deflection should not exceed motherboard manufacturer specifications A 2 5 1 Motherboard Stiffening Considerations To protect LGA775 socket solder joint designers need to drive their mechanical design to Allow downward board deflection to put the...

Page 66: ...ink preload for example The Intel Boxed Pentium 4 Processor in the 775 land LGA package The Intel RCBFH 3 Reference Design available from licensed suppliers refer to Appendix H for contact information Intel is also collaborating with vendors participating in its third party test house program to evaluate third party solutions Vendor information will be available and updated regularly after product...

Page 67: ...2 To install the load cells machine a pocket in the heatsink base as shown in Figure 24 and Figure 25 The load cells should be distributed evenly as close as possible to the pocket walls Apply wax around the circumference of each load cell and the surface of the pocket around each cell to maintain the load cells in place during the heatsink installation on the processor and motherboard Refer to Fi...

Page 68: ...nt to meaningful results An alternate method to make sure that the test setup will measure loads representative of the non modified design is Machine the pocket in the heat sink base to a depth such that the tips of the load cells are just flush with the heat sink base Then machine back the heatsink base by around 0 25 mm 0 01 so that the load cell tips protrude beyond the base Proceeding this way...

Page 69: ...tsink Base Pocket Side View Figure 26 Preload Test Configuration Load Cells 3x Preload Fixture copper core with milled out pocket Wax to maintain load cell in position during heatsink installation Height of pocket height of selected load cell Load cell protrusion Note to be optimized depending on assembly stiffness ...

Page 70: ...ording and control with a 6101 PCI card GPIB added to the scanner allowing it to be connected to a PC running LabVIEW or Vishay s StrainSmart software 4 IMPORTANT In addition to just a zeroing of the force reading at no applied load it is important to calibrate the load cells against known loads Load cells tend to drift Contact your load cell vendor for calibration tools and procedure information ...

Page 71: ...to allow the load cell to settle is generally specified by the load vendors often in the order of 3 minutes The time zero reading should be taken at the end of this settling time 5 Record the preload measurement total from all three load cells at the target time and average the values over 10 seconds around this target time as well i e in the interval for example over target time 5 seconds target ...

Page 72: ...Heatsink Clip Load Metrology R 72 Thermal Mechanical Design Guide ...

Page 73: ...inishing returns Unrestrained incremental increases in thermal interface material area do not translate to a measurable improvement in thermal performance C 3 Interface Material Performance Two factors impact the performance of the interface material between the processor and the heatsink base Thermal resistance of the material Wetting filling characteristics of the material Thermal resistance is ...

Page 74: ...anagement R 74 Thermal Mechanical Design Guide interface material area also becomes significant the larger the desired thermal interface material area the higher the force required to spread the thermal interface material ...

Page 75: ... for TC measurement This procedure takes into account the specific features of the 775 land LGA package and of the LGA775 socket for which it is intended It describes the recommended equipment for the reference thermocouple installation including tools and adhesive part numbers D 2 Definitions Definitions of common acronyms used in this appendix are given in the table below Item Definition IPA Iso...

Page 76: ...m with needle not included to maintain TC bead location during the attach process YOU 3 Miscellaneous Hardware Loctite 498 Adhesive Super glue w thermal characteristics 49850 Adhesive Accelerator Loctite 7452 for fast glue curing 18490 Kapton Tape For holding thermocouple in place Not Available Thermocouple Omega 40 gauge T Type 5SRTC TT T 40 72 Calibration and Control Ice Point Cell Omega stable ...

Page 77: ...an appropriate temperature source Wire gauge and length also should be considered as some less expensive measurement systems are heavily impacted by impedance There are numerous resources available throughout the industry to assist with implementation of proper controls for thermal measurements Note 1 It is recommended to follow standard safety procedures and wear safety items like glasses for cut...

Page 78: ...Case Temperature Reference Metrology R 78 Thermal Mechanical Design Guide Figure 27 775 Land LGA Package Reference Groove Drawing ...

Page 79: ... as shown in Figure 29 Figure 29 IHS Groove Orientation Relative to the LGA775 Socket Select a machine shop that is capable of complying with drawing specified tolerances IHS channel geometry is critical for repeatable placement of the thermocouple bead ensuring precise thermal measurements The specified dimensions minimize the impact of the groove on the IHS under the socket load A larger groove ...

Page 80: ...40 gauge type T thermocouple 3 Straighten the wire for about 38 mm 1 inch from the bead to place it inside the channel 4 Bend the tip of the thermocouple at approximately 45 degree angle by about 0 8 mm 0 030 inch from the tip Figure 30 Figure 30 Bending the Tip of the Thermocouple D 6 2 Thermocouple Attachment to the IHS 5 Clean groove with IPA and a lint free cloth removing all residues prior to...

Page 81: ...uple Wires with Kapton Tape Prior to Attach 7 Lift the wire at the middle of groove with tweezers and bend the front of wire to place the thermocouple in the channel ensuring the tip is in contact with the end of the channel grooved in the IHS Figure 32 A and B Figure 32 Thermocouple Bead Placement A B ...

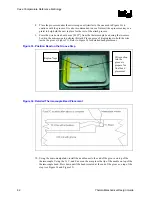
Page 82: ...croscope to perform this task Place a piece of Kapton tape to hold the wire inside the groove Figure 33 Refer to Figure 34 for detailed bead placement Figure 33 Position Bead on the Groove Step Figure 34 Detailed Thermocouple Bead Placement 10 Using the micromanipulator install the needle near to the end of the groove on top of the thermocouple Using the X Y and Z axes on the arm place the tip of ...

Page 83: ... during the thermocouple conditioning see Section D 6 1 step 2 and Figure 36 Figure 36 Measuring Resistance between Thermocouple and IHS 12 Place a small amount of Loctite 498 adhesive in the groove where the bead is installed Using a fine point device spread the adhesive in the groove around the needle the thermocouple bead and the thermocouple wires already installed in the groove during step 5 ...

Page 84: ...least 1 2 Hr It is not recommended to use any curing accelerator like Loctite Accelerator 7452 for this step as rapid contraction of the adhesive during curing may weaken bead attach on the IHS 15 Reconfirm electrical connectivity with DMM before removing the micromanipulator Figure 36 see Section D 6 1 step 2 and above 16 Remove the 3D Arm needle by holding down the processor unit and lifting the...

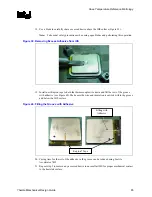
Page 85: ...new Kapton tape to hold the thermocouple wire down and fill the rest of the groove with adhesive see Figure 40 Make sure the wire and insulation is entirely within the groove and below the IHS surface Figure 40 Filling the Groove with Adhesive Kapton Tape Filling with Adhesive 20 Curing time for the rest of the adhesive in the groove can be reduced using Loctite Accelerator 7452 21 Repeat step 5 t...

Page 86: ...ading maybe incorrect For example if there are any cuts into the wires insulation where the wires are pinched between the IHS and the load plate the thermocouple wires can get in contact with each other at this location In that case the reported temperature would be at the edge of the IHS socket load plate area This temperature is usually much lower than the temperature at the center of the IHS Pr...

Page 87: ...ocessor on die thermal diode TCONTROL TCONTROL is the specification limit for use with the on die thermal diode TLOW The temperature above which the fan will begin to accelerate in response to the on die thermal diode temperature Hysteresis The number of degrees below T control the fans will remain on before slowing down THIGH The temperature at which the fan is operating at full speed 100 PWM Dut...

Page 88: ...xed Pentium 4 Processor External remote thermal diode measurement capability required External remote thermal diode sampling rate 4 times per second required External remote diode measurement is calibrated by the component vendor to account for the diode ideality and package series resistance as listed in the appropriate datasheet Suggested Note If the fan speed controller is not calibrated with t...

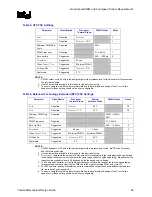
Page 89: ...7 C 3 5 Minimum PWM Duty Cycle Required PWM 1 TMA 20 PWM Frequency Required 21 28 kHz 1 Spin Up Time Suggested 250 500 ms 2 TAVERAGING Suggested 4 0 sec 4 0 sec 3 When TDIODE TLOW Suggested Minimum PWM Minimum PWM All Fans On Suggested TCONTROL 3 C 65 C Hysteresis Suggested 2 C 4 C NOTES 1 A PWM frequency of 25 kHz is the design target for the reference and for the Intel Boxed Processor and the re...

Page 90: ...nical Design Guide Note The fan speed component vendors provide libraries that are used by the BIOS writer to program the component registers with the parameters listed above Consult the appropriate vendor datasheet for detailed information on programming their component ...

Page 91: ...re should be responsible for specifying the System Monitor thermal sensor location However it is not always possible for a board supplier especially a channel board supplier to know the system into which a board will be installed It is therefore important for BTX board suppliers to select a System Monitor thermal sensor location that will function properly in most systems A BTX system should be de...

Page 92: ...Mechanical Design Guide Figure 43 System Airflow Illustration with System Monitor Point Area Identified OM16791 Power Supply Unit Thermal Module MCH Memory Graphics Add In Card Monitor Point Figure 44 Thermal Sensor Location Illustration TMA Airflow Thermal Sensor MCH Heatsink ...

Page 93: ...Page Number ATX µATX Motherboard Keep out Footprint Definition and Height Restrictions for Enabling Components Sheet 1 94 ATX µATX Motherboard Keep out Footprint Definition and Height Restrictions for Enabling Components Sheet 2 95 ATX µATX Motherboard Keep out Footprint Definition and Height Restrictions for Enabling Components Sheet 3 96 Reference Clip Drawings Sheet 1 97 Reference Clip Drawings...

Page 94: ...Mechanical Drawings R 94 Thermal Mechanical Design Guide Figure 45 ATX µATX Motherboard Keep out Footprint Definition and Height Restrictions for Enabling Components Sheet 1 ...

Page 95: ...Mechanical Drawings R Thermal Mechanical Design Guide 95 Figure 46 ATX µATX Motherboard Keep out Footprint Definition and Height Restrictions for Enabling Components Sheet 2 ...

Page 96: ...Mechanical Drawings R 96 Thermal Mechanical Design Guide Figure 47 ATX µATX Motherboard Keep out Footprint Definition and Height Restrictions for Enabling Components Sheet 3 ...

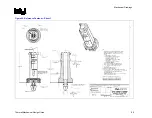
Page 97: ...Mechanical Drawings R Thermal Mechanical Design Guide 97 Figure 48 Reference Clip Drawings Sheet 1 ...

Page 98: ...Mechanical Drawings R 98 Thermal Mechanical Design Guide Figure 49 Reference Clip Drawings Sheet 2 ...

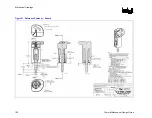
Page 99: ...Mechanical Drawings R Thermal Mechanical Design Guide 99 Figure 50 Reference Fastener Sheet 1 ...

Page 100: ...Mechanical Drawings R 100 Thermal Mechanical Design Guide Figure 51 Reference Fastener Sheet 2 ...

Page 101: ...Mechanical Drawings R Thermal Mechanical Design Guide 101 Figure 52 Reference Fastener Sheet 3 ...

Page 102: ...Mechanical Drawings R 102 Thermal Mechanical Design Guide Figure 53 Reference Fastener Sheet 4 ...

Page 103: ...Mechanical Drawings R Thermal Mechanical Design Guide 103 Figure 54 Clip Heatsink Assembly ...

Page 104: ...Mechanical Drawings R 104 Thermal Mechanical Design Guide Figure 55 Intel R RCBFH 3 Reference Solution Assembly ...

Page 105: ...Intel enabled component offerings with the supplier OEMs and System Integrators are responsible for thermal mechanical and environmental validation of these solutions Table 11 Intel Reference Component Thermal Solution Provider Supplier Part Description Part Number Contact Phone Email CCI Chaun Choung Technology Corp Intel RCBFH 3 Reference Heatsink C40387 Harry Lin Monica Chih 714 739 5797 886 2 ...

Reviews: