80
SERVICE MANUAL
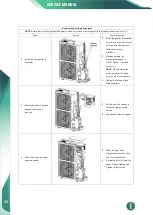
Removal of condenser
NOTE
:Before removing the condenser, make sure there is no refrigerant in the pipeline and power is cut off.
Step
Picture
Work instruction
4. Remove the condenser.
Welding interface
Heat up the welding points of
connection pipes through gas
welding until the pipes break
off.
NOTE
: When welding the
pipes, do not let the flame
burn the other components.
The welding points of
condenser are steel and
copper welding points. Be
sure to maintain the welding
quality.
5. Take out the condenser.
Loosen the securing screws
of condenser support. Take off
the plate type heat exchanger
and the support as a whole.
6. Install the new condenser.
Welding interface
Secure the screws of
condenser and support. Then
fix them together on the
chassis.
Install the condenser by
referring to the positions of
entering and leaving pipes.
Weld the connection pipes.
Nitrogen welding: the
pressure of nitrogen is
0.5±0.1kgf/ cm² (relative
pressure).
NOTE
: When welding the
pipes, do not let the flame
burn the other components.
Summary of Contents for Inverter FLEX24 DEV24H2R18
Page 9: ...6 SERVICE MANUAL 2 Control 2 1 Operation Mode 2 1 1 Cooling Mode ...
Page 10: ...2 1 2 Heating Mode SERVICE MANUAL 7 ...
Page 19: ...Model DEV48H2R18 DEV60H2R18 16 SERVICE MANUAL ...
Page 27: ...SEV2040H2R18 SEV4060H2R18 24 SERVICE MANUAL ...


