background image

April 10, 2013 

INFODRAW                                         TMRS User Manual v5.3            


142


its normal speed.

Faster 

Enable this option to speed the recording 
playback up. In the list box, select how fast 
you want the recording to speed up. Choose 
from: x2, x3, x4, x6, x8, and x10. 

Slower 

Enable this option to slow the recording 
playback down. In the list box, select how 
slow you want the recording to slow down. 
Choose from: /2, /3, /4, /6, /8, and /10. 

 
After you have finished, press 

“OK”

. The recording playback will now speed up or slow down 

accordingly. 
 

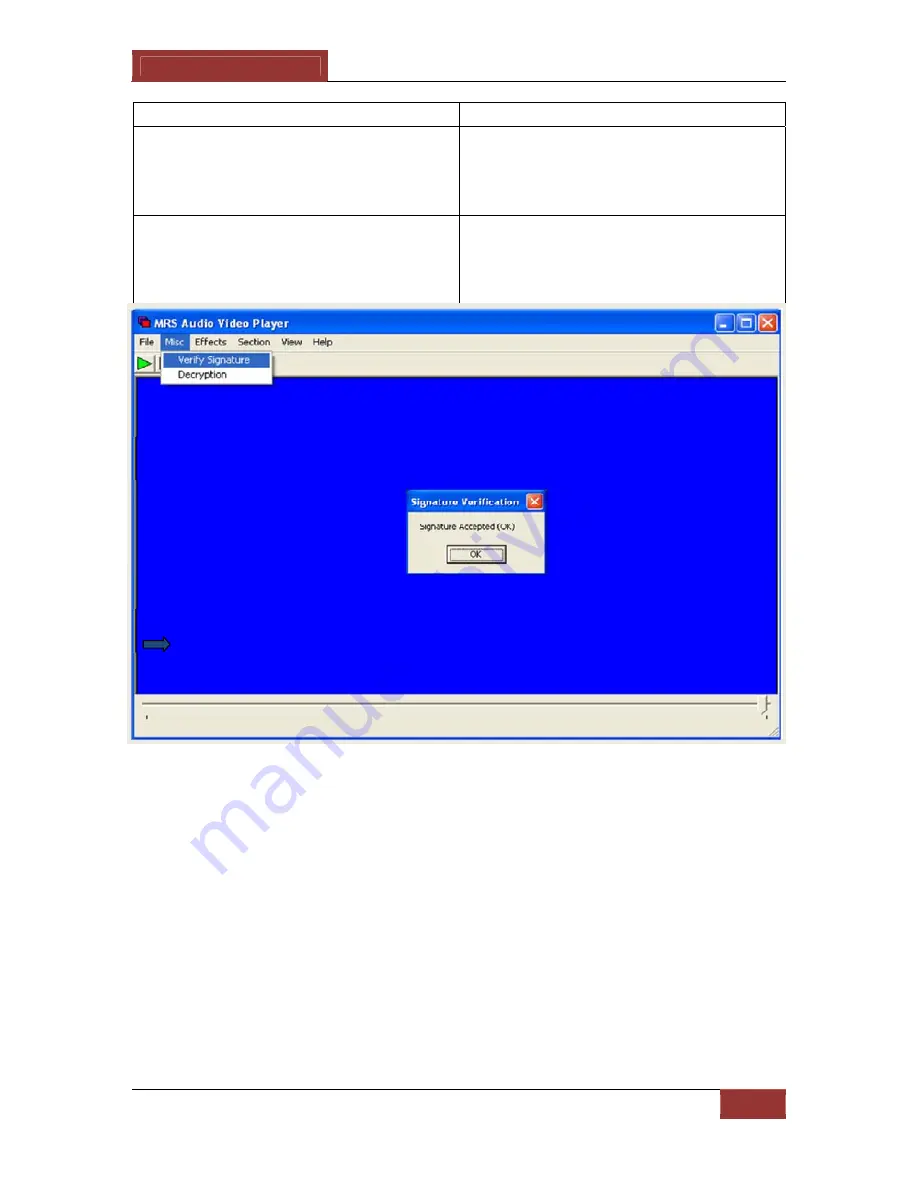
3-9-10-2   Verifying Digital Signatures:


The digital signature authenticates the recording as one that was recorded by the MRS 
system (a MRS/TMRS device, an MRS Monitor application or a MRS Service). If a digital 
signature has been assigned to a recorded file, it can be verified in the MRS AV Player 
Application. Follow these instructions: 

Once the recorded file is opened in the MRS AV Player, open the 

“Misc”

 menu and select 

“Verify Signature”

.  


This will result in a message 

“Signature Accepted (OK)” 

or 

“Signature Rejected (BAD)”


Summary of Contents for TMRS-102

Page 1: ...TMRS 102 Date April 2013 Manual version 5 3 Firmware 4 5 0 0 ...

Page 2: ... used in this manual may differ in appearance from the actual software depending on the software version in use The stability and performance of the TMRS unit s wireless data streaming may vary in different countries due to bandwidth and reception capabilities of the available carrier wireless networks and service providers in each country Every effort has been made to ensure that the information ...

Page 3: ... lithium battery is damaged or leaking Avoid exposing the TMRS device to very hot or very cold temperatures Extreme temperatures may cause deformation of the device and reduce the charging capacity and or life of your device battery Do not use or store your device in dusty or dirty areas Do not allow children to use your TMRS device When turning the unit on To turn the TMRS unit on locate the ON O...

Page 4: ... in this manual Make sure you understand the functions of each dip switch prior to using the unit When installing the unit in a vehicle Only use Infodraw Chargers to charge the TMRS Unit Non Infodraw chargers are not covered by the 1 Year Limited Warranty When installing custom 12V Power Outlets directly into vehicle batteries please ensure that this is done by a qualified experienced Auto Electri...

Page 5: ...ardware Interfaces 19 1 6 1 Video Input 5V Power Output 19 1 6 2 Video 5V Power Adapter Cable 19 1 6 3 Audio In Out 20 1 6 4 Audio In Out Adapter Cable 20 1 6 5 Antennas Option 1 External GSM and GPS 21 1 6 6 Antennas Option 2 Internal GSM and External GPS 22 1 6 7 SIM Card Slot 23 1 6 8 Alarm Button 23 1 6 9 USB Client Mini USB Input 24 1 6 10 Micro SD Slot 24 1 6 11 ON OFF Switch 25 1 6 12 5V Po...

Page 6: ... Setup 50 2 2 MRS Monitor Client 55 2 3 TMRS Unit Configuration 58 2 3 1 MRS Device Configurator Installation 58 2 3 2 MRS USB Drivers Installation 60 2 3 2 1 Drivers Installation for Windows XP Vista 7 32Bit 60 2 3 2 2 Drivers Installation for Windows 7 64Bit 63 2 3 3 Device Config Application 68 2 3 3 1 Device Identification Menu 69 2 3 3 2 Connection Menu 70 2 3 3 3 Modem Menu 72 2 3 3 4 Local ...

Page 7: ...7 3 Map Views 106 3 7 4 Video Over Map 107 3 7 5 GPS Location History 108 3 7 6 GPS Location Event Alarm 109 3 7 7 Device Speed Over Map 111 3 8 Audio 113 3 8 1 Computer Audio Properties 113 3 8 2 Audio Streaming 115 3 8 3 Unit Audio Properties 116 3 8 4 Unit Audio Controls 117 3 9 Recording 118 3 9 1 Local Recorder Settings 118 3 9 2 Local Recording 120 3 9 3 Device Recording 122 3 9 4 Remote Ser...

Page 8: ...s From Device 158 3 14 SMS Commands To Device 161 3 15 PTZ 162 3 16 Photo Snapshots 165 3 17 LAN 166 3 18 Wi Fi 169 3 19 Permissions 170 3 20 Session 174 3 21 Neighbourhood 175 3 22 Communication 176 3 23 Other Clients 177 3 23 1 iPhone Client 177 3 23 2 Android Client 182 3 23 3 Windows Mobile Clients 184 3 23 4 Web Browser Client 185 3 24 Streaming Video to Websites 186 3 25 Software Upgrading 1...

Page 9: ...ifications 196 4 1 TMRS Unit Specifications 196 4 2 MRS Software Specifications 199 4 3 MRS Server Technical Requirements 200 Chapter 5 Support 201 5 1 Troubleshooting Index 201 5 2 Troubleshooting 203 5 3 FAQ Index 212 5 4 Frequently Asked Questions FAQ 213 Contact Us 218 ...

Page 10: ...April 10 2013 INFODRAW TMRS User Manual v5 3 10 Box Contents Video Power Adapter Cable Audio In Out Adapter Cable GPS Antenna GSM WiFi Antenna Optional 5V Power Charger Option 1 TMRS Unit Option 2 ...

Page 11: ...April 10 2013 INFODRAW TMRS User Manual v5 3 11 USB Cable For Setup 12V 5V Car Adapter Charger GPIO PTZ Cable Ethernet Cable ...

Page 12: ...ommended for the SIM to be of high speed HSPA or faster and have a large browsing package at least 3GB Any analogue PAL NTSC camera with a RCA connector for video output can be connected to the TMRS unit The unit supports 1 camera The unit s battery can feed power to a 5V camera for portable use A Micro SD Card is required if you would like to record in the TMRS device The speed of the Micro SD Ca...

Page 13: ...nit and for upgrading the unit s firmware The unit is configured through a USB Cable interface on any PC Windows XP or higher MRS AV Player Application This application is used for viewing recorded video audio files It is also used to verify recorded files that have a digital signature assigned to them as well as decrypting recorded files that are encrypted with a key MRS Server Windows Service Pr...

Page 14: ...PMRS unit to connect to the Device Configurator Program using the USB cable iMRS iPhone Client iMRS is used for monitoring video audio location streams from TMRS devices on your iPhone MRS Android Client MRS Android Client is used for monitoring video audio location streams from TMRS devices on your Android powered mobile device MRS Monitor Server Application This application can be used for both ...

Page 15: ... for the abbreviated terms used in this manual Term Description TMRS Personal Media Relay System IP Internet Protocol TCP Transmission Control Protocol UDP User Datagram Protocol GPS Global Positioning System GSM Global System for Mobile Communications 3G 3rd Generation Mobile Telecommunications HSPA High Speed Packet Access EDGE Enhanced Data rates for GSM Evolution GPRS General packet radio serv...

Page 16: ...nd controlled from any location upon alarm request The media streaming is done using TMRS units which can be carried handheld or located either on mobile vehicles or in fixed locations The units can be monitored remotely from fixed mobile control centres mobile phones PDAs or an internet web client The TMRS unit will operate using WiFi as long as such a network is operational and in reception rang...

Page 17: ...er Based Architecture This architecture is based on a server with a fixed IP address Multiple units can communicate with the server as well as multiple clients All clients are connected to the server only and have viewing and control capabilities 1 5 1 Server Based Architecture ...

Page 18: ...April 10 2013 INFODRAW TMRS User Manual v5 3 18 ...

Page 19: ...put and 5V power output to the camera from the unit The input is labelled A V IN on the TMRS Unit 1 6 2 Video 5V Power Adapter Cable The unit comes with a 2 5mm TRRS Male Jack splitter cable which has a RCA Connector for Video Input Yellow connector and a 5V DC Power Connector black connector for Power Output to a camera Max 5V The White RCA Connector in this cable has no use Connect this adapter ...

Page 20: ... Headphones can be connected here directly 1 6 4 Audio In Out Adapter Cable The unit comes with a 2 5mm TRRS Male Jack splitter cable which has a 2 5mm TRRS Female connector for Audio In Pink Connector and a 2 5mm TRRS Female connector for Audio Out Green Connector A microphone and speakers can be connected to this cable pink connector for microphone green connector for speakers Connect this adapt...

Page 21: ...SM Antenna on to the GSM Antenna Base 2 Connect the GSM and GPS Antennas to their appropriate antenna connectors shown above WARNING Before turning the unit ON please make sure that the GSM Antenna is connected to its appropriate antenna connector on the unit If the SIM card is inserted into the unit and the unit is turned ON without the GSM antenna being connected this may cause harm to the inter...

Page 22: ...ternal GSM and External GPS With this antenna setup the TMRS unit has an Internal Antenna for GSM and an External SMA Antenna connector for GPS located on the top side of the unit GPS Antenna GPS Antenna Connect the GPS Antenna to the single SMA Antenna Connector shown above ...

Page 23: ...ernails to insert the SIM card Once the SIM card is inserted properly close the notch by carefully pushing it all the way into the unit 1 6 8 Alarm Button The TMRS unit has a built in alarm button located on the side of the unit The button can be used in emergencies and can be set up to trigger a variety of actions on the MRS monitor Refer to Alarm Button Section ...

Page 24: ...ice Configurator application Connect the USB cable between the Mini USB Input shown here and a PC when configuring the unit 1 6 10 Micro SD Slot The Micro SD Slot is located on the side of the TMRS unit next to the SIM Card Slot Insert a Micro SD card into the Micro SD slot for recording in the TMRS device The unit supports up to a 32GB Micro SD Card SDHC ...

Page 25: ...ition until it clicks and the LED lights turn on To turn the unit OFF carefully move the switch back to the OFF position until it clicks and the LED lights turn off After switching the unit off the LED lights may take up to a few seconds to turn off 1 6 12 5V Power Input The 5V power input is located on the side of the unit Connect the 5V Power Charger here DO NOT CONNECT MORE THAN 5V INTO THIS IN...

Page 26: ...harger Connect the AC Charger to a wall power outlet Connect the DC tip to the TMRS Unit s 5V Power Input shown above The unit s battery takes about 10 12 hours to charge from flat to full charge 2 Using the 5V Car Adapter Charger The 5V Car Adapter Charger has a cigarette lighter interface Connect the Car Adapter Charger to a cigarette lighter 12 24V power outlet in a vehicle either pre installed...

Page 27: ...h are described below in order from left to right 1 USB HOST CLIENT AND CELLULAR OPERATION i Up Position USB client setup through PC ii Down Position Normal cellular operation 2 USB IN OUT i Up Position USB out to connector setup through PC or WIFI Dongle ii Down Position USB in onboard 3 MICROPHONE i Up Position Disable ii Down Position Enable 4 SPEAKER i Up Position Disable ii Down Position Enab...

Page 28: ... is connected 2 Red LED Software status blinks when software is running 3 Blue LED on Modem is on 4 Blue LED flashing every second Modem is connected to cellular provider CAUTION After turning the unit OFF please wait until all the LED s on the top of the unit shut off completely before turning the unit back ON except the green LED which can stay on if the unit is being charged ...

Page 29: ...rposes such as PTZ and GPIO The definitions of the wires are listed below INDEX COLOR FUNCTION 1 BLUE GPIO IN 1 2 BLUE WHITE GPIO IN 2 3 ORANGE GPIO IN 3 4 RED WHITE GPIO IN 4 5 GREEN GPIO OUT 1 6 PURPLE GPIO OUT 2 7 PINK GPIO OUT 3 8 BROWN GPIO OUT 4 9 BROWN WHITE PTZ TX 10 GRAY PTZ TX 11 YELLOW 5V 12 RED TTL TX 13 WHITE TTL RX 14 BLACK GND ...

Page 30: ...m side of the TMRS unit Connect the GPIO PTZ cable to its correct input shown above Make sure it is firmly connected WARNING When disconnecting the cable from the TMRS unit do not just pull the cable Press and hold the Lock Lever shown here and then pull it out Lock Lever Press and Hold to unlock before disconnecting ...

Page 31: ...the bottom side of the TMRS unit next to the GPIO PTZ Cable Input Connect the Ethernet Interface cable to its correct input on the TMRS unit shown above Make sure it is firmly connected WARNING When disconnecting the cable from the TMRS unit do not just pull the cable Press and hold the Lock Lever shown here and then pull it out Lock Lever Press and Hold to unlock before disconnecting ...

Page 32: ...et one through your internet service provider 2 Enter your router admin settings 3 Set your local PC server PC to have a fixed local Static IP Address assigned in the router 4 In the routers port forwarding settings you need to open the above two ports and then port forward them to your local PC s fixed local Static IP Address 5 After opening and forwarding the ports to your local PC in your route...

Page 33: ... the web Recommended 2 MRS Monitor Server Application This program allows the user to run the server in the same program where the video and audio are streaming However the MRS Monitor program gives full access to the server only from the computer itself and most of its features cannot be reached from the outside CAUTION If you are connecting multiple MRS TMRS units to the server it is recommended...

Page 34: ...e setup files Setup_MRS_Service msi and setup exe are placed in the same directory on your server machine 2 Run the setup exe file Locate the installed MRS Server folder and run the MRS_Service exe file This will activate the MRS Server Windows Service Program on your server machine The starting point for the web administration interface is the main menu page reachable at the following address ent...

Page 35: ...ys network information Logging Menu Latest Messages Displays the server s latest log messages use for debugging Configure Configure the server s logging parameters such as how many messages it is able to receive Latest events Displays the latest I O and VMD detections on the server User Device Access Permissions Menu Default Access Configure default users and device s access to the server Users Co...

Page 36: ...the files which are being uploaded from the server Recordings Menu Configure Configures the server s recording attributes List Lists the devices with video and audio channels that are being recorded Software Updates Menu Configure Allows the user to select the folder from which to upload the upgrade file List Lists the software update files for clients devices only Upload Enables uploading a softw...

Page 37: ...assword where it says New password and retype the new password where it says Retype new password Then click on Set This will take you back to the main menu page Files and Folders Page The Data Folder is the root folder where all other folders and files are used by the server The Parameters File contains all server parameters in XML format The Recordings folder contains all server media recordings ...

Page 38: ...d the XML file Latest Log Messages Page This page will let you view the server s latest log messages It displays the time and date the message and its parameters Click on Refresh to refresh this page Click on the Main Menu link to go back to the main menu page Configure Logging Page This page will let you change the logging parameters The maximal number of messages is the maximal number of message...

Page 39: ...anging Video Audio settings Erasing recordings Disabling Video Audio channel Default Access Page Here you can determine the default situation for all unlisted devices and users connecting to the server This page will let you set how users and devices are permitted in the system when no other more specific rules apply Default Device Access Level This list box determines the access level for all unl...

Page 40: ...ails page will appear Fill in the user name and password Retype the new password and click Apply All added User Names will appear in the list on the Users Page Click on Edit to change a password of an existing user Click on Delete to delete a user from the list Devices Page Each device is distinguished from another by a unique ID number which is given to it by Infodraw but can be changed by the us...

Page 41: ... Click on Edit to change the device ID or the access permission level for a certain entry in the list Click on Delete to delete a specific entry from the list User Device Access Page The User Device Access Page allows you to assign specific users to specific devices This page will list the specific device access levels certain users are permitted on certain devices Click Add to add a user device a...

Page 42: ...the server It gives information about the received data rate and the sent data rate for observing the server s currently consumed bandwidth Click on the Main Menu link to return to the main menu Connected Devices Users Page This page lists the connected devices Users Their IP address as seen from the server their numeric identifier name and current data rate ...

Page 43: ... Page This page lists the connected users Their IP address as seen from the server their name and current data rate File Uploads Page This page lists the active file uploads Downloading client s IP address as seen from the server file path and progress information ...

Page 44: ... has been detected The recording ends after motion is not detected for a full minute Delete old files to free space Check this option to automatically delete old server recordings after the free space on the storage device drops below 10 2 1 1 5 Recordings Menu One of the features of the MRS system is the ability to record on the server The Recording section in the MRS Service gives you the abilit...

Page 45: ...ile Type Description TMRS A_B_C_D tgz TMRS device firmware Software Updates List Page This page lists the update files to be sent to devices in order to upgrade their firmware The software updates can generally be enabled or disabled If enabled and a device connects to the server and there is a newer version of its firmware listed then the server will send the relevant update to the device The dev...

Page 46: ...your server in this example we connected the TMRS device to the IP address mrs1 infodraw com MRS_BlackfinDeviceSystem ldr MRS 400 device firmware 2 After connecting the device open the MRS Service program by opening your browser and entering SERVER_IP_ADDRESS 12654 admin 3 To configure the sleep management under the Sleep management section click on the configure option 4 Click on Add Device to in...

Page 47: ...rdered and how many times the device woke and went back to sleep mode shutdowns along with the last date of waking If a device awakes after the pre set time period is over 5 minutes for example and the sleep regiment is not removed it will return to sleep 8 To change the sleeping regiment simply click on the Change option 9 To terminate the sleep mode and allow the device to go online click on the...

Page 48: ...ense is required The license depends on the hard disk volume serial number as displayed in this page You can obtain a license by pushing Request License After you receive the license copy the license text into the text area instead of Enter license here Click on Add License to add the new license Once the license is added it will appear in the list on the License List page and its state should be ...

Page 49: ...gh MRS Monitor Application The MRS Monitor Server can be set up on any PC using Windows XP or later To setup the MRS Monitor Server application follow these instructions 1 Run the Setup_MRS_PC_Application msi file 2 Click Next 3 Click Next 4 Click Next to begin installation ...

Page 50: ...ure Setup Once the MRS Monitor Server Application is installed and opened to setup the PC to act as a server using Server Based Architecture follow these instructions 1 Open the session menu on the top left hand side 2 Open the Connection screen 3 Select local server and press OK ...

Page 51: ...ure is now activated Units and Clients can now communicate with the server This architecture is recommended for multi unit to multi client communication 4 Once the server is running the status bar on the bottom left hand side of the window should show Server is listening ...

Page 52: ... User Manual v5 3 52 Permissions 1 Double click on the Permissions menu on the left hand side of the window 2 In the Default Device Access Level List Box select Forbidden 3 Un tick Allow Unlisted Devices and Allow Unlisted Users ...

Page 53: ...u and select Add Fill in a User Name and Password Then press OK 5 Your new user name should appear in the User Name list 6 Open the Devices menu and select Add Fill in the Device ID of the TMRS unit Then press OK 7 Your new Device ID should appear in the User Name list ...

Page 54: ...ill in the User Name and the Device ID of the TMRS unit In the Access Level List box select Administrative Then press OK 9 Your new User Name Device ID and Access Level should now be listed This now means that user has administrative access to that device only Once finished select Apply and press OK ...

Page 55: ...nitor Client The MRS Monitor Client can be set up on any PC Laptop using Windows XP or later To setup the MRS Monitor Client Application follow these instructions 1 Run the Setup_MRS_Client msi file 2 Click Next 3 Click Next 4 Click Next to begin installation ...

Page 56: ...plication is installed and opened to setup the PC Laptop to act as a client follow these instructions 1 Open the session menu on the top left hand side 2 Open the Connection screen 3 Select Remote server Enter the IP of the server and a Username and Password if required Press OK ...

Page 57: ...ient is now connected and can communicate with the server The client has viewing and control capabilities as defined on the server 4 Once the client is connected to the server the status bar on the bottom left hand side of the window should show Connected ...

Page 58: ...llular provider in use In particular the cellular provider s APN Access Point Name must be provided The unit is configured using the Device Configurator software by connecting a USB cable between the unit and a computer XP or higher In order for the MRS device Configurator to work and communicate with the unit the following two elements have to be installed on your PC 1 MRS Device Configurator sof...

Page 59: ...April 10 2013 INFODRAW TMRS User Manual v5 3 59 3 If you have an Anti Virus program installed on your PC and this window appears Click Run this program Anyway 3 Click Next ...

Page 60: ... on your PC a idmrs inf b idmrs sys If you are downloading the files from www infodraw com dlds sometimes the file idmrs inf can only be downloaded by right clicking the link and pressing the save link as option Once the above two files are on your PC follow these instructions to install the drivers 1 Make sure the SIM card is NOT inserted into the TMRS unit 2 Change the 2 left dip switches number...

Page 61: ...int the driver setup to Infodraw MRS Driver and install 8 If the driver setup doesn t automatically open follow these instructions to install the drivers manually a Right click my computer b Click properties c Enter the Hardware tab d Click on Device manager When the PC is connected to a device With the USB cable a Open the Infodraw Multimedia folder b Right click on the Infodraw MRS Device file c...

Page 62: ...ck Next Click the Install from a list or specific location Advanced option and then click Next a Click the Search for the best driver in these locations option b Tick the Include this location in the search option c Press the Browse button and search for the folder where the MRS driver files are stored on your PC d Click OK after you have located the driver s folder e Then click Next ...

Page 63: ...ocated in the same folder on your PC a dseo13b exe b idmrs64 inf c idmrs64 sys If you are downloading the files from www infodraw com dlds sometimes the file idmrs64 inf can only be downloaded by right clicking the link and pressing the save link as option Once the above three files are on your PC follow these instructions to install the drivers 1 Run the dseo13b exe file Click Next Click Yes ...

Page 64: ...st Mode option b Press Next and exit the program c Restart your computer Once your computer restarts you should see the Test mode writing on the bottom right hand side of your desktop screen Open the dseo13b exe program again and enable Sign a System File Then press Next ...

Page 65: ...t 1 minute 6 After a few seconds the system will show 7 After another few seconds the system will detect new hardware 8 For the first time connecting the unit to a PC the PC will detect new hardware and automatically ask for a driver Browse for the folder where the MRS driver files are located on your PC Point the driver setup to Infodraw MRS Driver and install A new window will open Fill in the p...

Page 66: ... the driver setup doesn t automatically open follow these instructions to install the drivers manually a On your desktop right click on Computer Select the Properties option b In the System window select Device Manager on the left hand side of the screen ...

Page 67: ...r b Right click on the Infodraw MRS Device file c Choose the Update Driver Software option The Update Driver Software window will appear Select the Browse my Computer for driver software option Browse your computer and choose the folder where the MRS drivers are located Then click Next ...

Page 68: ...en the Device Configurator application This program allows you to configure the unit through the USB cable 2 Turn the TMRS unit off and then back on 3 Once the unit reconnects to the PC it will automatically load the unit s configuration parameters on the Device Configurator application This application communicates with the unit and has a menu with the following options ...

Page 69: ...S unit that is connecting to the same server has a Unique ID Number Device Client Password If a TMRS device ID has been assigned a password in the permissions feature of the server the password will need to be inserted here otherwise the unit will not be able to connect to the server Hardware Identifier This is the hardware ID number of the TMRS unit Modem IMEI This is the Identifier number of the...

Page 70: ...ocal server The TMRS unit can also act as a server by selecting the Local server option However for this configuration the unit will require a SIM card with a fixed public IP address which must be obtained from your cellular provider Connection Reference TCP Do not enable this feature at this time Timeout This feature should be enabled both Maximal idle time and Device Reset It is designed to dete...

Page 71: ...he Manage button to open the Multiple Connections Window In the Multiple Connections Window press on the Add button to insert another server to which the TMRS device will connect to The Local Server option allows the TMRS unit to act as one of the multiple servers Tick to enable this option The Share Devices Among Servers option shares all the devices that are connected to the same network as this...

Page 72: ...red in this box User Name Here you can enter your User Name for your cellular provider if required usually is not required Password Here you can enter your Password for your cellular provider if required usually is not required Authentication Keep this parameter the same set to Any unless told otherwise by your cellular provider Extra Command This feature allows you to give the modem additional co...

Page 73: ...l Configuration This option also allows you to create your own local network which comes in handy when trying to connect to an external hard drive or use the TMRS device as a router For more information view the SMB Recording External Storage Device section of this user manual Enable DHCP Server When the Manual option is selected tick the Enable DHCP Server option to turn the TMRS device into a 3G...

Page 74: ...he SSID of the wireless router available on the router website or on your Smartphone Network Passphrase Network password that you have installed it is the password you use to connect your smartphone and PC to the network Address configuration Method DHCP CLIENT for standard use Used in order to connect the device to an available network that has the SSID and passphrase above Manual Not relevant fo...

Page 75: ...M cards require a PIN number but most don t The PIN number is obtained from your cellular provider PUK Here you can update the PUK numbers for the SIM card in use A PUK number will only be required if your SIM card is locked which can happen for various reasons If your SIM card does not work ask your cellular provider if the SIM card is locked and how to unlock it ...

Page 76: ... will send an SMS to this phone number containing the new IP address Send Service Type This is a parameter defining the technology used for sending SMS messages It depends on the cellular service provider Keep this setting the same set to Circuit Switched unless told otherwise by your cellular provider Authentication Code This is the code which will be required when sending commands to the TMRS de...

Page 77: ...April 10 2013 INFODRAW TMRS User Manual v5 3 77 ...

Page 78: ...ive This option will disable the selected port Normally Close This option changes the selected input port to Active High Normally Open This option changes the selected input port to Active Low Associated Camera This option allows you to add or remove the camera for the selected port Associated Microphone This option allows you to add or remove the microphone for the selected port Record Video Enab...

Page 79: ...ure on each Micro SD card recording file to prove the integrity of that recording For more information please view the Recorded Files Digital Signature section of this user manual Record Locations This option allows you to choose whether the unit records GPS information or not File Encryption This option allows you to encrypt the recording files on the Micro SD with a code For more information ple...

Page 80: ...should always be disabled unless told otherwise 2 3 3 10 GPS Menu GPS Parameters Descriptions Activate GPS This option allows you to enable disable the GPS capability Reset GPS This option if enabled resets the GPS every time the system shuts down thus clearing the unit s memory of old satellite information ...

Page 81: ...a ID As the TMRS unit only has one video channel set the Video Channel and Camera ID both to 1 Baud Rate This list box allows you to set the PTZ control Baud Rate The unit supports the following Baud Rates 1200 1800 2400 4800 9600 19200 38400 57600 115200 230400 The Baud Rate must be set the same for the TMRS unit and for the PTZ Camera For more information please view the PTZ section of this user...

Page 82: ...add a license click on the Add License button The License Text window will appear Insert the license code that you have received Then press OK If the Encryption License code is correct it will then be listed in the licenses list shown below For more information about IPSEC Encryption licenses please view the Secure Session IPSEC Encryption section of this user manual Remove License To remove a lic...

Page 83: ...ould now be upgraded to the new version Download button Click the Download button to automatically download the latest TMRS firmware version file Once the file is downloaded it will automatically prompt you to commence programming Click Program Once the unit is finished programming click Restart Device Once the device reconnects it should now be upgraded to the new version Automatic Restart If the...

Page 84: ...April 10 2013 INFODRAW TMRS User Manual v5 3 84 2 3 3 14 Log Menu Log Parameters Descriptions Log Menu Here you can log information while running ...

Page 85: ...e world In most cases this will provide an automatic connection to the cellular network in use For Manual Modem Setup click the Manual option a Enter the APN Access Point Name of your Cellular Provider b A User Name and Password for your Cellular Provider may also be required mostly for VPN users After inputting the necessary settings using the Device Configurator application the configurations mu...

Page 86: ...urn the TMRS device off 3 Change back the left 2 dip switches numbers 1 2 to down position as shown This will allow normal cellular operation After the parameters are saved open the File menu and select Shutdown Device You will then see the following status at the bottom left hand side of the screen Device disconnected ...

Page 87: ...ction Configure trigger actions for Visual Motion Detection event alarms Contacts Alarm Configure trigger actions for the Alarm button and GPIO event alarms Permissions Set permissions and access levels for connecting units and clients Online Devices Will display all online MRS TMRS devices Offline Devices Will display all devices that have disconnected from the server if the device has been ticke...

Page 88: ...ection Configure trigger actions for Visual Motion Detection event alarms Contacts Alarm Configure trigger actions for the Alarm button and GPIO event alarms Online Devices Will display all online MRS TMRS devices Offline Devices Will display all devices that have disconnected from the server if the device has been ticked to be remembered by the server Neighbourhood Will display information about ...

Page 89: ...t languages Follow these instructions to change the language of the application 1 Open the Session menu at the top left hand corner of the screen 2 Select Language 3 The Select Language window will appear Select your desired language Then press OK Your selected language will now be displayed on the MRS Monitor screen ...

Page 90: ...or Client on another PC Laptop and connect to the server 5 If your server is running through the MRS Monitor Server Application you can either connect to it using the MRS Monitor client on another PC Laptop or you can view the video streaming in the MRS Monitor Server Application itself 6 Turn on the TMRS device Once you turn the unit on it should connect to the server within 1 minute All connecte...

Page 91: ...ensors Switches View the status and control Output Switches Location a View the GPS location of that specific device only b Set location event alarms SMS Allows you to add mobile phone numbers for SMS events as well as determine what events will trigger an SMS Signal Displays the current signal strength for the cellular network the unit is connected to Service Type Displays the Cellular Service Ty...

Page 92: ...o open it for live video streaming Alternatively double click on a video channel to open it for live streaming Before viewing the video channel it must be enabled In order to enable a specific channel point the cursor over the channel and right click Alternatively open the action menu at the top of the screen then select the Enable item ...

Page 93: ...the size to full screen Double clicking again returns it to the previous setting If the video looks like it is not centred correctly right click on the video channel and select Restart Media or press F5 while the cursor is on the channel This will restart the video channel and centre it correctly ...

Page 94: ...ser Manual v5 3 94 The viewing area can be split into 1 4 6 9 12 16 or 20 viewing channels To change the number of channels viewed on the screen open the View menu at the top of the window and select the desired number of channels ...

Page 95: ...eo Properties Right clicking on an open video stream opens a small menu Select Properties Selecting a specific video channel on the left hand side of the screen and pressing F3 brings up the same Video Properties window The Video Properties window will appear ...

Page 96: ...to the camera you have PAL NTSC and to the bandwidth at your disposal For example D1 TV quality will require high bandwidth CIF can be afforded with medium bandwidth and QCIF is the format more suitable to low bandwidth Frame Rate This allows you to adjust the Frame Rate of the video channel The Frame Rate can be set to any number from 1 to 25 fps for PAL 1 to 30 fps for NTSC Bitrate This allows y...

Page 97: ...he Bit Rate and Frame Rate are set excessively higher than the mobile network bandwidth this may cause the unit to disconnect from the server Data Usage When purchasing mobile data SIM card packages from your cellular provider please consider the amount of data the unit will consume The table below provides an example of a TMRS unit s mobile data consumption when streaming continuously Bit Rate of...

Page 98: ... the video channel By default the same encoder is used for viewing and recording the video channel Different video encoders can be applied for viewing the video channel and recording the video channel Follow these instructions to do so 1 In the Video Properties window un tick Single Encoder 2 In the Destination list box select Broadcast ...

Page 99: ...April 10 2013 INFODRAW TMRS User Manual v5 3 99 3 Enter in the desired Image Size Frame Rate and Bit rate 4 In the Destination list box select Recording ...

Page 100: ... the video channel and when recording the video channel 5 Enter in the desired Image Size Frame Rate and Bit rate Once you have finished press OK To switch back to a single video encoder for both viewing and recording the video channel simply tick the Single Encoder item in the video properties window ...

Page 101: ...tion Detection Status will be displayed on the upper left side of the video channel Shown Below To activate the video frame text tick the Frame Text option located at the bottom right hand side of the video properties window Tick the Write Location option to include the GPS Co Ordinates of the unit in the video frame text Then press OK ...

Page 102: ...hannel to the video channel for synchronised recording Restart Device This option restarts the TMRS device remotely Restart Application This option restarts the video controller Set Packet Data Size Default is 1000 recommended not to change this parameter Set Time Select this option to set the time on the TMRS device to the current time The user can change and control the device from the MRS Monit...

Page 103: ...t position It takes about 30 seconds for the unit to fully operate with GPS and GSM outside The unit starts by searching for its position then connects to GSM If the unit is located inside a building without clear sky it will struggle to find its location It will take about 3 minutes for the unit to give up and continue with the rest of the system connecting to GSM Therefore it is better to disabl...

Page 104: ...ations under My Monitor The Select Map menu will open In the List box select Open Street Map Then press OK The Location screen will now be viewed using Open Street Maps You will now be able to see all devices on one full screen map as moving icons If there are multiple device icons on the map the map will not be centred ...

Page 105: ...ble click on Location under a specific TMRS device tree You can also open this Location tree to see the GPS Co ordinates You will now be able to see the location of the specific device in a small map alongside any video channels that are open The moving icon will be centred automatically every few seconds ...

Page 106: ...al v5 3 106 3 7 3 Map Views The GPS map can be viewed in 4 ways To change the view of the map select one out of the four options on the top right hand corner of the map window Map View Terrain View Satellite View Satellite View with labels ...

Page 107: ... Manual v5 3 107 3 7 4 Video Over Map To view a video channel over the map click on a floating icon A menu will appear with a list of all that device s video channels Click on the desired channel to open the video stream over the map ...

Page 108: ...monitor The location history is stored per day and per device You can view the GPS location history by opening the view menu and selecting Locations History The Locations History Viewer window will open The files are arranged by date Select a specific date in the tree Click on a device under the Devices tree to display its location history ...

Page 109: ...ollowing actions on the MRS monitor Beep Display device location View default video channel Make a Pop up Window appear Play a custom sound The unit can also send a SMS to any number of phones as a result of a location event trigger refer to SMS Alerts from Device section The location event trigger actions are set in the Location Event Settings window Follow these instructions Right click on Locat...

Page 110: ...om Point box Enter in the desired maximum number of meters that the TMRS device can move from its current position before the alarm is triggered Then press OK Once the Location event alarm is activated you will see Distance under the device Location tree The location alarm will still be active even if the GPS map is closed Once the distance reaches the max number of meters the alarm will trigger a...

Page 111: ...e speed of each connected TMRS unit can be viewed over the GPS map in km h The speed will only be displayed if the unit is moving When using Google Maps simply hover your cursor over the floating icon on the map either the small map or full screen map to bring up the device speed ...

Page 112: ...April 10 2013 INFODRAW TMRS User Manual v5 3 112 When using Open Street Maps open the full screen map and click on the floating icon on to bring up the device speed ...

Page 113: ... Audio Properties You can change the settings of your computer s speakers microphone using the MRS Monitor application Speakers Here you can a Enable Disable your computer s speakers by ticking or un ticking the box Right click on the Speaker is off item under My Monitor Then select Properties The Select Audio Output Device window will appear ...

Page 114: ... Enable Disable your computer s microphone by ticking or un ticking the box Device list box Select from the Device list box which connected microphone you would like to use Signal Use the Signal bar to test your microphone If the green bar is moving then your microphone is working Right click on the Microphone is off item under My Monitor Then select Properties The Select Audio Input Device window...

Page 115: ...e on the TMRS device to the speakers on the PC Double clicking again on the Audio In 1 channel stops the audio stream The TMRS unit has a built in microphone which can be enabled by flipping Dip Switch 3 on the TMRS unit to down position An external microphone can also be attached to the Audio Input on the Audio in out splitter cable included with the TMRS unit Ensure that you have a speakers conn...

Page 116: ...en the Audio Properties window Here you can change the unit s audio parameters Name Allows you to rename the audio channel Sample Rate Allows you to change the sample rate of the audio channel The higher the sample rate the better the quality of sound but it requires more CPU resources Bitrate Allows you to adjust the Bitrate of the audio channel The higher the Bitrate the better the quality of th...

Page 117: ...ou can adjust the volume of the TMRS Unit s Audio In Out channels in the Controls window Follow these instructions to do so Right click on either the Audio In 1 channel or the Audio Out 1 channel of the TMRS unit Then select the Controls option The following windows will appear ...

Page 118: ...r Application or by using VLC player 3 9 1 Local Recorder Settings The recordings can be saved in any folder on your PC laptop The location of the recordings folder on your PC laptop as well as other local monitor recording settings can be changed in the Local Recorder Settings window To access this settings window right click on the Recordings item on the left hand side under My Monitor Select Pr...

Page 119: ... to be saved Explore button Click this button to open the recordings folder on your PC File Size Limit This option allows you to setup the file size limit of local recordings on your computer When a recording file reaches its size limit the file will split and start recording in a new file Delete old files to free space If you tick Delete old files to free space then the oldest recorded files in t...

Page 120: ... records GPS information or not File Encryption This option allows you to encrypt the recording files on your computer with a code For more information please view the Recorded Files Encryption section of this user manual 3 9 2 Local Recording To record a video channel locally on your PC laptop follow these instructions 1 Select the channel that you want to record by clicking on the channel name u...

Page 121: ...y date Choose the recorded file by date time device ID and channel name Double click on the file to play it in the MRS Monitor player After you enable the recording action the corresponding message will appear at the top of the video channel M This message means that local recording has commenced successfully Repeat the same process and select Record on Monitor to finish the recording ...

Page 122: ...recording Open it in either the MRS AV Player Application or in VLC Player 3 9 3 Device Recording To record a video channel on the Micro SD card in the TMRS device follow these instructions 1 Select the channel that you want to record by clicking on the channel name under the TMRS device on the left hand side 2 Open the Action Menu and enable the recording by clicking on Record on Device ...

Page 123: ...ew them 2 Download the device recordings from the Micro SD card to your PC remotely over the cellular network To download the files remotely follow these instructions Alternatively right click on an open video stream and select Record on Device After you enable the recording action the corresponding message will appear at the top of the video channel D This message means that device recording has ...

Page 124: ...April 10 2013 INFODRAW TMRS User Manual v5 3 124 Right click on the desired recording and select Download The recorded file will download to your PC laptop over the cellular network ...

Page 125: ...dings tree again and double click on it to play it in the MRS Monitor Player The device recorded file will also be saved in your recordings folder on your PC laptop Alternatively to play recordings locate and open the recordings folder on your PC The files are arranged by date Select the desired recording Open it in the MRS AV Player Application or in VLC Player ...

Page 126: ...server machine remotely from any location using the MRS Monitor Client Application Follow these instructions to do so 1 Select the channel that you want to record by clicking on the channel name of a TMRS device that is connected to the server 2 Open the Action Menu and enable the recording by clicking on Record on Server ...

Page 127: ...lect Record on Server After you enable the recording action the corresponding message will appear at the top of the video channel S This message means that Server recording has commenced successfully Repeat the same process and select Record on Server to finish the recording 1 In the MRS Monitor Client Application open the Neighbourhood tree on the left hand side 2 Open the Recordings tree This tr...

Page 128: ...April 10 2013 INFODRAW TMRS User Manual v5 3 128 ...

Page 129: ...hannel on the TMRS device follow these instructions 1 Select the audio channel for recording by clicking on the Audio In 1 channel name of the TMRS device on the left hand side 2 Open the Action Menu and enable the recording by clicking on Record on Monitor Record on Device or Record on Server ...

Page 130: ...ings the same way as video recordings are viewed 3 9 6 Synchronized Video and Audio Recording To record video and audio together follow these instructions Alternatively right click on the Audio In 1 channel and select Record on Monitor Record on Device or Record on Server 1 Select the TMRS device on the left hand side of the screen 2 Open the Action menu and select Attach Audio Video ...

Page 131: ...you record that video channel the recorded file will have synchronised audio in it 4 Select the Audio channel from the Audio Channel list box Then Press OK 3 The Attach Channels menu window will open Select the video channel from the Video Channel list box ...

Page 132: ...rnet external network storage drives can be purchased from your local IT store In order to communicate with the external network storage device a Local Area Network needs to be created in the TMRS unit Follow these instructions to do so 1 Open the Device Configurator Application 2 Turn the TMRS unit off 3 Ensure the 2 left dip switches on the TMRS unit numbers 1 2 are in up position 4 Ensure the S...

Page 133: ...e File System Change the type to SMB from the list box b In the Address box enter the address of the folder on your external network storage device that you want the recordings saved to c Enter the User Name for your storage device in the User Name box d Enter the Password for your storage device in the Password box ...

Page 134: ...he unit This is done by opening the File menu and clicking Write To Device The candle icon After pressing Write to Device the status at the bottom left hand side of the application will show Parameters Saved After the parameters are saved open the File menu and select Shutdown Device You will then see the following status at the bottom left hand side of the screen Device disconnected ...

Page 135: ...d on the External Network Storage Device the same way as you record on the Micro SD Card View Device Recording section for more information 3 9 8 Recorded Files Digital Signature A digital signature can be added to the recorded video to guarantee the integrity of the files This can be enabled in 1 The Device Configurator Application for Device Recordings 2 The MRS Monitor server client Application...

Page 136: ...Sign media files c Write to Device For Local Monitor Recordings a In the MRS Monitor Application right click on the Recordings item on the left hand side under the My Monitor tree Select Properties b The Local Recorder Settings will appear c Enable the option Sign Files ...

Page 137: ...tion please view the MRS AV Player Application Verifying Digital Signatures Section of this user manual below 3 9 9 Recorded Files Encryption The recorded files can be encrypted with a user defined encryption code This can be enabled in 1 The Device Configurator Application for Device Recordings 2 The MRS Monitor server client Application for Local Monitor Recordings For Device Recordings Encrypti...

Page 138: ... for Device Recordings The longer the code the harder it is to break d Save to the Device For Local Monitor Recordings Encryption a In the MRS Monitor Application right click on the Recordings item on the left hand side under the My Monitor tree Select Properties b The Local Recorder Settings will appear c Tick the Enable box under File Encryption ...

Page 139: ...Decrypting Recorded Files Section of this user manual below You will also be able to view the encrypted recording files in the MRS Monitor Application if your encryption code is inserted in the Local Recorder Settings window If you don t want anyone to be able to view the encrypted recordings in the MRS Monitor Application simply remove your encryption code from the Local Recorder Settings window ...

Page 140: ...ording Type Format Video H264 Audio AAC Synchronized Video and Audio FLV Once the MRS AV Player is installed and opened follow these instructions to play recorded files 1 Open the File menu and select Open 2 Browse your PC for the recordings folder The recorded files are arranged by date and time Select the desired recording Then press Open ...

Page 141: ...s option to keep the recording at 3 The Recorded file with then commence playing in the MRS AV Player The recording playback can be speeded up or slowed down To do so open the Effects menu and select Speed The Set Playback Speed window will appear The descriptions of the settings are listed below ...

Page 142: ... have finished press OK The recording playback will now speed up or slow down accordingly 3 9 10 2 Verifying Digital Signatures The digital signature authenticates the recording as one that was recorded by the MRS system a MRS TMRS device an MRS Monitor application or a MRS Service If a digital signature has been assigned to a recorded file it can be verified in the MRS AV Player Application Follo...

Page 143: ...corded file as part of the MRS system successfully 3 9 10 3 Decrypting Recorded Files If a recorded file is encrypted with a code it must be decrypted in the MRS AV Player before you can view it Follow these instructions to do so Once the recorded file is opened in the MRS AV Player open the Misc menu and select Decryption The Decryption window will appear In the Key box enter in your encryption c...

Page 144: ...dings can be viewed graphically per day and per device in the Historic Activity window of the MRS Monitor Application Open the View menu and select Historic Activity Recorded events triggered from GPIO alarms VMD location alarms or user events are marked as vertical lines on the graph Every recording can be viewed by double click on the required portion in the graph ...

Page 145: ...ons Beep Enable this option to cause a beeping sound on the MRS Monitor Application once motion is detected VMD can be setup to trigger a variety of actions once motion is detected To configure these settings double click on the Visual Motion Detection icon on the left hand side of the screen The Visual Motion Detection Settings window will open Select the desired actions that will trigger when VM...

Page 146: ...tected Popup Window Enable this option to cause a popup window to appear on the MRS Monitor Application once motion is detected Play Use this option to play a custom sound once motion is detected Click the Browse button to search for an audio file on your PC wav mp3 wma formats are supported To activate VMD on a video channel follow these instructions Right click on an open channel s video stream ...

Page 147: ...is now activated Once there is motion past the camera the following message will appear under the video channel s name on the left hand side of the screen Motion Detected Motion Detection will still be active even if the video channel is closed Once motion is detected the trigger actions predefined in the VMD settings menu will commence accordingly ...

Page 148: ...he SMS Alerts from Device section of this user manual The Alarm Button trigger actions are set in the Alarm Settings window of the MRS Monitor Follow these instructions If you applied recording in the VMD settings menu the video channel will start recording for 1 minute once motion is detected The following message s will appear at the top of the open video channel s window M D The Alarm Settings ...

Page 149: ...on is pressed Record Default Video Channel Enable this option to cause the video channel to automatically start recording once the alarm button is pressed Record Default Audio Channel Enable this option to cause the audio channel of the TMRS unit to automatically start recording once the alarm button is pressed Popup Window Enable this option to cause a popup window to appear on the MRS Monitor Ap...

Page 150: ... side will light up The preset trigger actions will also commence accordingly If you selected recording as a trigger action the message s M D will appear at the top right hand side of the video stream The status of the Alarm button signal is viewed as Sensor 1 under the Sensors tree on the left hand side of the screen ...

Page 151: ...l The GPIO ports can be set up to trigger a variety of alarms including live video streaming video audio recording GPS tracking etc These features are set on the MRS monitor The unit can also send a SMS to any number of phones as a result of a GPIO trigger refer to the SMS Alerts from Device section of this user manual The GPIO trigger actions are set in the Alarm Settings window of the MRS Monito...

Page 152: ...omatically start recording once a GPIO alarm is activated Record Default Audio Channel Enable this option to cause the audio channel of the TMRS unit to automatically start recording once a GPIO alarm is activated Popup Window Enable this option to cause a popup window to appear on the MRS Monitor Application once a GPIO alarm is activated Play Use this option to play a custom sound on the MRS Mon...

Page 153: ...rs can be set to either Active High or Active Low in the Device Configurator Application Follow these instructions to do so 1 Open the Device Configurator Application 2 Turn the TMRS unit off 3 Ensure the 2 left dip switches on the TMRS unit numbers 1 2 are in up position 4 Ensure the SIM card is NOT inserted into the unit 5 Connect the TMRS unit to the PC using the USB Cable Then turn it on 6 Onc...

Page 154: ...ove settings the configuration must be saved into the unit This is done by opening the File menu and clicking Write To Device The candle icon After pressing Write to Device the status at the bottom left hand side of the application will show Parameters Saved After the parameters are saved open the File menu and select Shutdown Device You will then see the following status at the bottom left hand s...

Page 155: ...d to close a connection between the following wires on the GPIO PTZ Cable Port 1 Input 1 wire and GND wire Port 2 Input 2 wire and GND wire Port 3 Input 3 wire and GND wire Port 4 Input 4 wire and GND wire Once an Input Sensor is triggered the Sensor number signal on the left hand side will light up The preset trigger actions will also commence accordingly If you selected recording as a trigger ac...

Page 156: ... Switch Ports on the TMRS unit you must close a connection between the following wires on the GPIO PTZ cable Port 1 Output 1 wire and GND wire Port 2 Output 2 wire and GND wire Port 3 Output 3 wire and GND wire Port 4 Output 4 wire and GND wire ON OFF switching of these ports is done in the MRS Monitor Application Follow these instructions The statuses of the Output signals are viewed in the TMRS ...

Page 157: ...ser Manual v5 3 157 Once you activate an Output Switch the preset trigger actions will commence accordingly If you selected recording as a trigger action the message s M D will appear at the top right hand side of the video stream ...

Page 158: ... trigger GPIO trigger or a location event trigger Messages can be written in any language The contact details must be supplied in the SMS settings window located on the left hand side of the screen Follow these instructions to activate SMS alerts Open the SMS Settings window by double clicking on the SMS item on the left hand side under the TMRS device tree ...

Page 159: ...de This will enable SMS alerts from that TMRS device Under Events select the desired triggers from which an SMS will be sent Contact Alarm GPIO events Motion Detection VMD events Location Events GPS events In the Common Message box write a message that you would like to receive on your mobile phone Once you have finished click Apply ...

Page 160: ...to attach a still picture of the video stream to the SMS Once the details are inserted press the Add button to add the mobile to the list Repeat the process to add another mobile Your new name and phone number will appear in the list box To delete a mobile number select the name and press the Delete button Once you have finished click Apply and then click Close ...

Page 161: ... SIM Card Number remotely by SMS There are 3 orders that can be sent 1 Restart modem PPP 2 Reset device 3 Change Server IP In order to make these operations happen follow these instructions a Remove any SIM card from the TMRS device b Attach a USB cable to the device and open the MRS Device Configurator c Open the SMS tab menu d In the Authentication Code box write down a code You will need to put...

Page 162: ...n_Code server New_Server_IP For the above device example the SMS would be 76D server 212 68 105 7 3 15 PTZ The TMRS system supports PTZ control The user can control the Pan Tilt Zoom of the PTZ camera according to its ability The TMRS system supports PTZ cameras using PELCO D Protocol Follow these instructions to setup PTZ control 1 Turn the TMRS device OFF 2 Remove any SIM card from the TMRS devi...

Page 163: ... unplug the USB cable and flip the 2 left dip switches on the TMRS unit numbers 1 2 to down position 12 Insert the SIM card Ensure the GSM GPS Antennas are connected to the unit After you have configured the PTZ settings of the TMRS unit in the Device Configurator the same settings must be applied to the PTZ camera itself On the PTZ camera set the ID number to 1 and the Baud Rate to the same rate ...

Page 164: ...ove the camera around To zoom in and out use the Zoom in and Zoom out buttons Move the camera to the desired position using the yellow ball Enter in a name for that position in the Name box Then press Save To view the pre set camera position choose the pre set name from the Move to list box The camera will then automatically adjust its position to the pre set ...

Page 165: ...ngs are viewed Follow these instructions The duration scale is to simulate the time of one click Moving the duration scale up or down will lengthen or shorten the PTZ duration command accordingly Right click on an open video stream and select Save Image Open the Recordings tree on the left hand side under My Monitor Double click on the desired saved image to open it The image will then open in Win...

Page 166: ...MRS 1 Open the Device Configurator Application 2 Turn the TMRS OFF 3 Ensure the 2 left dip switches on the TMRS unit numbers 1 2 are in up position 4 Ensure the SIM card is NOT inserted into the unit 5 Connect the TMRS unit to the PC using the USB Cable Then turn it on 6 Once connected to the PC the unit s parameters will load automatically on the Device Configurator 7 Go to the Local Network menu...

Page 167: ...April 10 2013 INFODRAW TMRS User Manual v5 3 167 8 Go to the Modem menu on the left hand side Under the Modem Configuration menu select None ...

Page 168: ...nd side After pressing this key the status at the bottom left hand side of the application will show Parameters Saved After inputting the above settings the configuration must be saved into the unit This is done by opening the File menu and clicking Write To Device The candle icon After the parameters are saved open the File menu and select Shutdown Device ...

Page 169: ...se WI FI to connect to a wireless local network router or wireless access point Open the Device Config application and connect the unit to the PC See instructions above in LAN section 1 Keep the applied LAN settings above the same 2 Go to the Wireless LAN menu on the left hand side 3 Select Enable Wireless LAN 4 Enter in the Network Identifier SSID and the Network Passphrase of the wireless router...

Page 170: ...nd connect to the MRS server using the internet 3 19 Permissions In general each device and user can be defined with a password for authentication in the server Permission can be defined for users devices and the connection between users and devices This can only be done using the server software Each user can be defined with a permission access level for a specific device There are 5 different ac...

Page 171: ...ication Double click on the Permissions icon on the left hand side under My Server to open the Access Permissions window Default Access Menu Here you can define the users default access level of all devices which have not been assigned to a specific user in the User Device Access menu or have not been assigned an access level in the Default Device Access menu You can also choose to allow or not al...

Page 172: ...ntered by that user who is trying to connect to the server from a client Devices Menu Each device can be defined in the server with a password The password is for authentication only To create a new device password select Add The Device window will open Enter in the Device ID and a Password Then press OK Your new device will appear in the Device ID list This password will need to be entered in the...

Page 173: ...ice ID s will appear in the drop list boxes Select the desired User Name Device ID and Access Level Then press OK Your new User Name Device ID and Access Level will now appear in the list This now means that this specific user is assigned to that specific device To edit the applied setting highlight the user and select the Change button To delete the applied setting highlight the user and select t...

Page 174: ...the Session menu and select Save As Default Device Access Menu The default device access screen defines the access level of each device which is not specified in User Device Access To apply an access level to a device select Add The Default Device Access window will open All listed devices from the Devices menu will appear in the Device ID list box Select the desired device and apply an access lev...

Page 175: ...sion when exiting the program After restarting the program will load the last updated session which was saved automatically when exited In the MRS Monitor Server Application In the MRS Monitor Server Application the user can view details of all connected MRS TMRS devices and clients under the Neighbourhood tree The details include IP addresses Software Versions and Tolerance CT ...

Page 176: ...cal area wireless and its loopback computer ID In the MRS Monitor Client Application In the MRS Monitor Client Application the user can view details of the server under the Neighbourhood tree The details include the IP address Software Version and Tolerance CT You can also access the server s recordings folder by double clicking on the Recordings tree ...

Page 177: ...Client The MRS system supports an iPhone client for viewing live video audio GPS streams as well as recording and controlling PTZ cameras from MRS TMRS devices Download the iMRS application from the Apple Appstore iMRS is compatible with iPhone iPod Touch devices using iOS 4 3 or later Once the iMRS application is installed on your iPhone iPod Touch open the application and follow these instructio...

Page 178: ... on the right hand side saves all the server IP Addresses that you have connected to Once the IP addresses are saved you can scroll through the wheel and select your desired server It will then automatically insert the IP address into the Server box To remove a server from the list highlight it and press the Remove button Once you re connected to the server all the connected MRS TMRS units will ap...

Page 179: ...ap button to open the GPS map full screen for live tracking of the unit Tap the Source button to open the previous screen where you can select which connected unit and channel you would like to view If you select the Map button the GPS map will appear full screen as shown here Tap the Google button to view the GPS map with Google Maps Tap the OSM button to view the GPS map with Open Street Maps Ta...

Page 180: ...re the map Tap the Video button to return to the video stream in full screen view The video stream can be played over the map as shown here To do so tap on the floating icon on the map Select the Playback button to open the recordings folder where your recordings are saved ...

Page 181: ...ton at the bottom right hand side of the screen Your iPhone recordings will then appear in the list The files are arranged by date Navigate through the sub folders to locate your desired recording Once you have located your desired recording tap on it to play it Tap on the X to delete the recording ...

Page 182: ... MRS application is installed on your Android device open the application and follow these instructions Upon opening the application the login menu will appear Enter in the IP address of your server in the Server box and a username and password if required Turn the Secure option ON if you want a secure connection This list box saves all the server IP Addresses that you have connected to Once the I...

Page 183: ...e streaming If you select a TMRS device as they only have 1 video channel it will automatically open for live streaming Press the Login button to return to the Login screen Tap the Map button to open the GPS map full screen for live tracking of the unit Tap the Source button to open the previous screen where you can select which connected unit and channel you would like to view If you select the M...

Page 184: ...ems To install the client follow these instructions 1 Copy the Windows Mobile installer files onto the PDA and install the software Run the cab file on the PDA 2 Run the MRS software on the PDA and set the IP of the server 3 Connect to the server and then select the device and channel to view the video stream The video stream can be played over the map as shown here To do so tap on the floating ic...

Page 185: ...l v5 3 185 3 23 4 Web Browser Client To view the live video streams using an Internet browser open the following address http server ip 12654 videostreams html This will let you view the video GPS streams of any connected device using flash ...

Page 186: ...MRSActiveXExample WIDTH 400 HEIGHT 300 CLASSID CLSID 96F064F1 2ACD 4E01 97B8 897739DF8516 CODEBASE http www infodraw com dlds mrs_activex_control MRS_ActiveX_Control ocx PARAM NAME ServerAddress VALUE 62 132 198 144 PARAM NAME DeviceID VALUE 473 PARAM NAME VideoChannelIndex VALUE 0 Select the desired video GPS channel to open it for live streaming If video and voice is required synchronized you ne...

Page 187: ...NNEL OF THE DEVICE HERE d You may also need to insert a User Name and Password for your server if required Please note After implementing the video stream of the TMRS device onto your website you will need to use Internet Explorer to view the video 3 25 Software Upgrading The simplest ways to upgrade the MRS Software Applications and the TMRS unit firmware are listed below 3 25 1 Application Upgra...

Page 188: ...MRS AV Player Application MRS Device Config Application 2 A newer version if available of the application will automatically download 3 You will then be prompted to install the new software Follow the installation instructions to complete the upgrade ...

Page 189: ...into the unit using the Device Configurator Application To do so follow these instructions 1 Open the Device Configurator Application 2 Turn the TMRS unit OFF 3 Ensure the 2 left dip switches on the TMRS unit numbers 1 2 are in up position 4 Ensure the SIM card is NOT inserted into the unit 5 Connect the TMRS unit to the PC using the USB Cable Then turn it on ...

Page 190: ...ion if available of the unit s firmware will automatically download 4 Once the firmware has been downloaded a pop up will appear asking you to commence programming Click OK 5 The firmware programming will commence DO NOT interrupt the programming Ensure that the unit is being charged when upgrading the firmware Once completed the unit will automatically restart When the unit reloads on the Device ...

Page 191: ...nse will already be activated If you want to activate encryption on an existing unit that you already have you will need to get an encryption license code The license code is based on the Hardware Identifier number of your unit Speak to your local Infodraw dealer about obtaining Encryption License codes To activate the encryption follow these instructions 1 Open the Device Configurator Application...

Page 192: ...arameters will load automatically on the Device Configurator 7 Go to the Licensing menu tab on the left hand side 8 Click on the Add License button 9 In the License Text window enter in the encryption license code you have received from your local Infodraw dealer Then press OK 10 If the code is correctly entered the IPSEC encryption will be listed as Active ...

Page 193: ...e Secure box Tick this Secure box to encrypt the data streaming from the unit to the server After inputting the above settings the configuration must be saved into the unit This is done by opening the File menu and clicking Write To Device The candle icon After pressing Write to Device the status at the bottom left hand side of the application will show Parameters Saved ...

Page 194: ...it 17 Ensure the GSM GPS Antennas are connected to the unit 18 When connecting to the server from the MRS Monitor Client Application In the connection window tick the Secure box before you connect This will encrypt all the data between the MRS Server and the MRS Client After the parameters are saved open the File menu and select Shutdown Device You will then see the following status at the bottom ...

Page 195: ...DRAW TMRS User Manual v5 3 195 3 27 Use TMRS Device as 3G Router The TMRS unit can act as a 3G Router Follow these instructions for setup 1 Connect the unit to the Device Configurator 2 Go to the LAN menu 3 Select Manual ...

Page 196: ...ce and turn off 9 Flip Dip Switches 1 2 to Down position 10 Insert the SIM Card 11 Ensure the GSM Antenna is connected to the unit 12 Connect the Ethernet cable to the unit 13 The TMRS unit will now act as a 3G Router You can connect it to a laptop PC through the Ethernet cable and you should be able to connect to the internet Chapter 4 Technical Specifications Below are the technical specificatio...

Page 197: ...g Streaming recording Video Resolution CIF D1 Remote User Control Video Bit rate From 10kbit s to 2Mbit s Remote User Control Video Frame rate Up to 25 30 fps Remote User Control Supported PTZ Cameras Analogue Protocol Baud Rates PAL NTSC Pelco D 1200 1800 2400 4800 9600 19200 38400 57600 115200 230400 PTZ Control Built in RS 485 Wires T T Through GPIO PTZ Cable Audio Audio Input Built in micropho...

Page 198: ...ble TTL Active Low Active high Streaming Recording SMS Noise GPS Tracking Output 4x Output Ports Logic Level Switching Multiple Trigger Actions Built in Through GPIO PTZ Cable TTL Through MRS Monitor Software Streaming Recording SMS Noise GPS Tracking Power Power Input 5V Max AC DC to 5V adapters Power consumption 500mA while streaming Battery Built in Lithium 4000 mAh 4 5 hours Power output DC 5v...

Page 199: ... interface Ethernet Cable Protocols RTP RTSP SDP 4 2 MRS Software Specifications Software Type Use Compatible Operating Systems MRS Server Web Admin Interface Windows Service Program Server Program Windows XP Vista 7 Windows Server 2008 2011 MRS Monitor Server Windows Application Server Program Monitoring Program Windows XP Vista 7 Windows Server 2008 2011 MRS Monitor Client Windows Application Mo...

Page 200: ... Up Windows Mobile Client Windows Mobile Application Monitoring Program Windows Mobile 5 0 6 0 4 3 MRS Server Technical Requirements Server Components Requirements Minimum Server Machine Processor PC Laptop Dedicated Server Pentium 4 Dual Core The more units clients connected to the server the better the processor will need to be RAM 500MB The more units clients connected to the server the more RA...

Page 201: ...ndwidth requirements very carefully when setting up servers This is the most important factor of the server Chapter 5 Support To assist you with using this product provided below is troubleshooting help and frequently asked questions FAQ for a variety of aspects in the TMRS system There are both troubleshooting and FAQ indexes listed below for convenience and easy navigation to specific help 5 1 T...

Page 202: ... video feed from the camera my device is connected to 203 7 M y device is online but I am not able to hear audio 204 8 M y GPS feature does not work 204 9 T he picture that appears on my monitor is always in diminished quality 205 10 T he quality of the video audio playback is diminished and is full of disruptions 206 11 T he recording folder does not appear in the device tree 206 12 I only manage...

Page 203: ...option 4 Open TCP port 12654 and UDP port 12655 in the firewall to allow access to the server 5 If you have an anti virus program installed on your PC make sure it is not blocking the inbound outbound traffic of these ports 6 Make sure you enter the correct IP address of your server in the Device Configurator 2 Q The MRS Device Configurator does not recognize my device A Check the following 1 Make...

Page 204: ...igurator program Open the Connection tab Enable the Remote Server option configure your IP address so that it would match your server address Check that your server is operational 5 Open the MRS Device Configurator program and choose the Device Identification tab Make sure that the device ID number is above 0 and under 2 000 000 000 6 Open the MRS Monitor program open the Session menu and choose t...

Page 205: ...ion of some TMRS devices which only have one antenna slot for GPS c DIP switches 1 2 should be in down position when using the wireless cellular modem 2 Software a In order to configure your device you need to connect a USB cable and activate the MRS Device Configuration program If you have a TMRS device you need to raise Dip switches 1 2 which are placed on the side of the device b Enter the Mode...

Page 206: ...mera my device is connected to A Check the following 1 Open your device folder by pressing on the sign and drag the camera icon to one of the video channels 2 Make sure that your device is connected to the camera and that the camera is activated being powered 3 Try to double click on the icon of the Camera 4 Right click the icon of the camera in the folder of your device and make sure that there i...

Page 207: ...t next to it the name of your device is written 3 Make sure that DIP switch number 3 is in down position 4 Open your device tree and right click the audio in icon click on the properties option in the menu Observe the Sample rate if the sample rate is 32000Hz than the bitrate has to be lower than 18 if it is 18 and above audio will not work This problem can also be resolved by raising the sample r...

Page 208: ...Configurator Make sure that the Tolerance level is set to High in the Connection menu of the Device Configurator c Put the SIM card in a mobile phone and check how strong the signal is on the phone If it is low on the mobile phone then it is the cellular provider which is not giving you the reception level that you require d Make sure that your GSM antenna is in an upright position in the clear sk...

Page 209: ...yback from your Server Close other programs that may require large amounts of memory usage You can download the file to your computer by right clicking on the playback file and choosing the download option After the download is complete you will be able to watch the video from your monitor tree which may be in better quality 4 If you are watching the playback from your monitor Close other programs...

Page 210: ... in it 13 Q I am connected with the cellular modem and my device is constantly restarting A Check the following 1 Constant restarting usually indicates a weak connection to the server a Open the MRS device configuration and make sure the tolerance level of the device is High in the Connection menu b Check to see if the other devices which are connected to the server are frequently restarting as we...

Page 211: ...n Try to stop the recording again as explained in the first answer 15 Q I can t get my TMRS device to send SMS messages A Check the following 1 Make sure that the SMS feature under your device tree in the MRS Monitor Program is enabled and that your mobile number is entered correctly 2 If your phone number is correct and you are still not receiving SMS messages Open the Device Configurator program...

Page 212: ...o I know if my server is operational 210 7 H ow do I find the ID number of my device 211 8 H ow can I see the video from the camera my device is connected to 211 9 H ow do I record video 211 10 H ow do I change the amount of video channels on the screen 211 11 H ow do I magnify one video channel to full screen 211 12 H ow do I activate the internal microphone in the MRS device 211 13 H ow do I hea...

Page 213: ...red coloured LED has to be illuminated or blinking The green LED indicates an external power source The third LED light the blue LED has to be operational and blinking if a cellular modem is inserted in the device and is working 2 Q How do I download the MRS software to my PC A The MRS software is either given to you on a CD USB Drive by your local Infodraw Dealer or can be downloaded at the follo...

Page 214: ... Listening A2 After confirming that the server is listening enter the Neighbourhood tree There you should be able to observe all the devices which are connected to your server If you can connect to the MRS Server Windows Service Program or the MRS Monitor Server Application from a MRS Client then your server is operational 7 Q How do I find the ID number of my device A1 Attach your device to a USB...

Page 215: ...hear an external microphone from my PC on to the device A1 Connect headphones to the TMRS device Connect headphones either directly into the 2 5mm TRRS Female Connector which has an imprint of headphones next to it or connect a speaker unit to the Audio In Out Adapter Cable included with the unit A2 Open the device tree in the MRS Monitor Application and double click on the Audio out icon to activ...

Page 216: ...ls mean A1 Forbidden The user device are not allowed to access the server at all A2 Aware you are able to see the device is online but you can t see video hear audio or change any of the settings A3 Passive The user is allowed to view video and hear audio but can only record on monitor The user cannot activate switches the audio out function or enable disable channels A4 Active The user is allowed...

Page 217: ...ally erase old files when your storage disk is full New files are recorded on the device over the old files Therefore there is no need to erase files to make space for new recordings However if you still want to erase a file click on the recording you want to delete and press the Delete button Alternatively right click on the recording file and choose the delete option 21 Q I would like to connect...

Page 218: ...April 10 2013 INFODRAW TMRS User Manual v5 3 218 Contact Us Infodraw Israel R D LTD Global Headquarters 14 Aba Hillel St Ramat Gan Israel Tel 972 3 6127434 www infodraw com ...

Reviews: