background image

37

Be sure to turn off the cameras that are not connected to the 

IV-SGVA

 in the

menu.

The types of external cameras can be set either in “NTSC” or “PAL”.

Select “8.COLOR SET” to change the brightness(“BRIGHT”),

hue(“HUE”),

saturation(“SATURATION”), and contrast(“CONTRAST”) of the cameras connected.

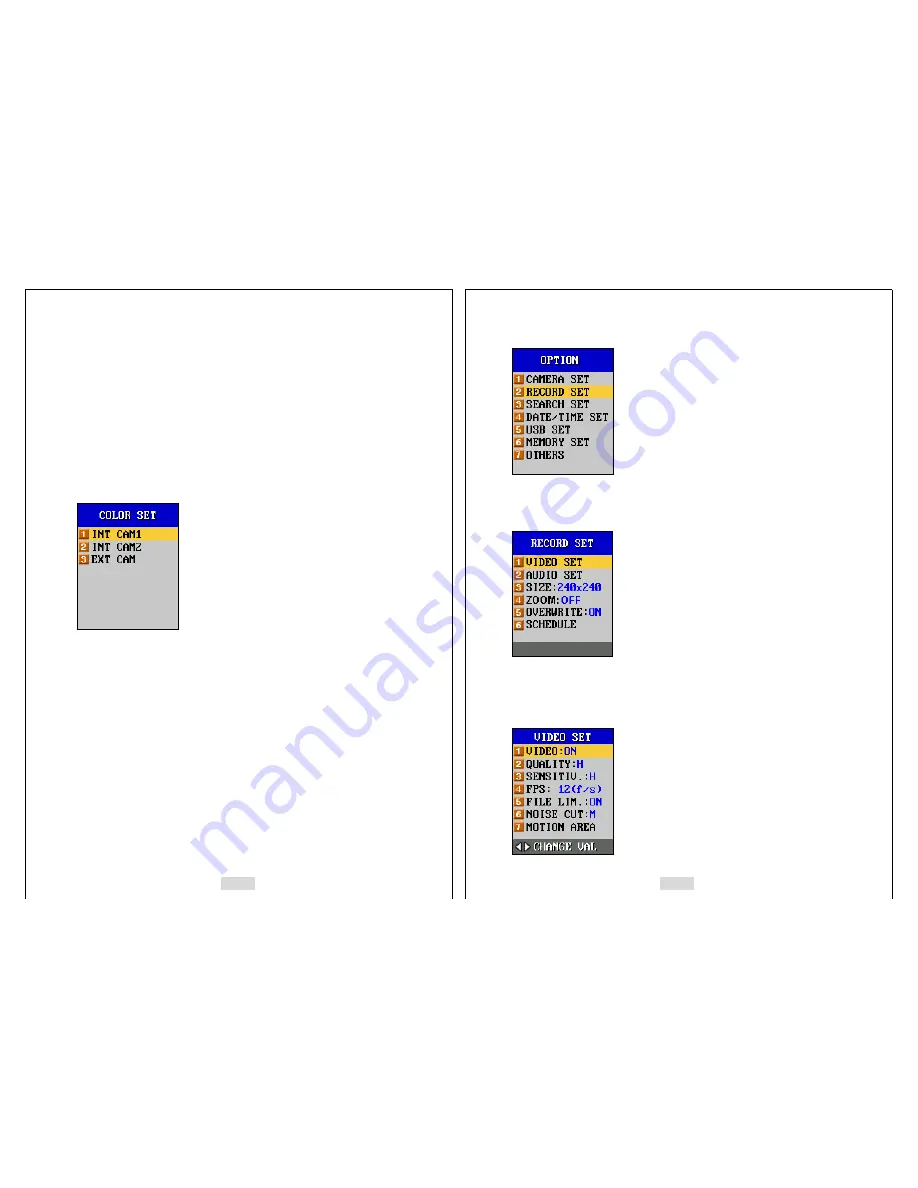
Press “8.COLOR SET” and press [ENT], then the next screen appears in the menu as
below.

If each one of the internal cameras is turned on, then that camera’s number (“1.INT
CAM1”, “2.INT CAM2”) appears on the menu screen.  But when one of the external
camera is turned on, then the “3.EXT CAM” appears on the menu screen. For the
internal cameras, you can only change the brightness (“BRIGHT”), and for the external
cameras, you can change all the values for“HUE”, “SATURATION”, and “CONTRAST”.
Select the camera that you want to change the value with, and press [ENT], then the
selected camera’s brightness value appears on the bottom of the screen. Using [ ] 

and [ ]

, set the value from 1 (darkest) to 20 (brightest). Using [ ] and [ ]

, change the

values for“HUE”, “SATURATION”, and “CONTRAST”, and the range for the values is
from 1 to 20.

4-2. RECORD SET

38

Select “2.RECORD” using the direction buttons, and press [ENT]. Then the next screen
appears in the LCD as below.

4-2-1. VIDEO SET

Select “a.VIDEO SET” using the direction buttons, and press [ENT]. Then the next
screen appears in the LCD as below.

Summary of Contents for IV-SGVA-100

Page 1: ... place including residential area Thank you for purchasing this IV SGVA product Before using it be sure to read the precautions contained in the User s Guide Keep the User s Guide in a safe place for future reference For the most up to date information about this product visit our official website at http www idview com Unpacking Check to make sure that all of the items shown below are included wi...

Page 2: ...ENERAL GUIDE 26 I Functions 26 I 1 RECORD 26 I 2 CAMERA 28 I 3 SEARCH 29 I 4 OPTION 35 4 1 Camera Set 35 4 2 Record Set 37 4 3 Search Set 45 4 4 Date Time Set 47 4 5 USB Set 48 4 4 6 Memory Set 50 4 7 Others 51 4 7 1 Password Set 52 4 7 2 Power Set 54 4 7 3 Alarm Set 57 4 7 4 Language 60 4 7 5 Upgrade 60 4 7 6 Default Set 61 4 7 7 SG Name 62 I 5 BLUETOOTH IV SGVA 300 IV SGVA 310 Only 63 II Data Se...

Page 3: ...used for both 110V and 220V Never try to open the case of the IV SVGA or attempt your own repairs High voltage internal components create the risk of electric shock when exposed Always leave maintenance and repair work up to a IDView com authorized service center Never look at the sun or other bright light through the LCD screen Doing so can damage your eyesight Keep the small parts and accessorie...

Page 4: ...le memory Removing the battery flash memory card or USB memory devices while the IV SGVA is performing a record or memory access operation Disconnecting the USB cable removing the IV SGVA from the Docking 8 Station or disconnecting the AC DC adaptor from the Docking Station while a data communication operation is being performed Low battery power Other abnormal operations Any of the above conditio...

Page 5: ...too much force when cleaning the surface of the lens Doing so can scratch the lens surface Dust or any other soiling of the lens can interfere with proper image recording You can remove dust particles from the lens surface by using a lens blower to blow them off Next wipe the surface of the lens with a soft 10 lens cloth Others The IV SGVA may become slightly warm during use This does not indicate...

Page 6: ...chnology z Unlimited Fields of Application z Easy Covert Operation using the Concealing Case Button Pen camera etc z Built In 1 up to 2 CCD Color Camera z 2 Built In Microphones and 1 speaker z Built In color LCD 1 8 Inch for Immediate and Easy Search Playback z Intelligent Algorithm for Motion and Audio Detection z Wireless Transmit and Receive of Digitalized Audio Video Data z Subminiature Size ...

Page 7: ...imized Algorithm for Security Storage Capacity High Quality 1 2 days Medium Quality 2 5 days Low Quality 5 10 days 128MB 1fps 240x240 pixels Indoor Use Display Date Time Frame Lens Built In Color Camera Angle 56 degrees Unlimited Focus Pin Hole Lens Motion Detection Digital Image Processing Wireless Communication Bluetooth Source of Power Rechargeable Li Polymer Battery 3 7VDC 1400mAh Adaptor 5V D...

Page 8: ...Special Agents Airports Bus Terminal z Taxi School Bus Car Traffic Signs Signals Airplane Parking Lot Cash Transporting Truck Subway z Courts Executive Office Conference Rooms Governmental Offices Cultural Property Controlling Office 16 QUICK START GUIDE 1 Charging the Battery z Load the battery into the IV SGVA z Plug in the AC DC adaptor directly into the Power input port of the IV SGVA 2 Turnin...

Page 9: ...start to record be sure to check from the LCD that the camera can capture the sight where you want it to be recorded Press ESC to stop recording and exit from the RECORD mode If you are recording with more than one camera you can select either a single channel mode or a 4 channel mode by pressing button z REC AV Indication of recording both A Audio and V Video Shows REC V when recording the video ...

Page 10: ...reen as below If you want to view the previous month then press and press to view the next month To move the cursor to the options at the bottom use and PREV Go to the previous page 1 3 First of 3 pages NEXT Go to the next page LOCK Lock from deleting file DEL Delete selected file DELALL Delete all files for the selected date except for sgvx file COPY Copy a selected file to the selected memory CO...

Page 11: ... details about viewing a moving image 6 BLUETOOTH IV SGVA 300 IV SGVA 310 Only First choose one IV SGVA as a SLAVE to send the images and the other unit as a MASTER to receive the images Steps to set the IV SGVA as a SLAVE 1 For the fastest transmission of the data set the recording resolution to 128x128 2 Set 5 BLUETOOTH B M S SLAVE 3 Check C MY ID and write down the ID 4 Select 1 RECORD Steps to...

Page 12: ...ts fullest While charging the battery the lamp blinks with the green light After charging is completed the lamp stops blinking and you will see the green light indicating that the battery is full Recording Status Lamp This lamp is to check on the recording status When the IV SGVA is not in the RECORD or TRANSMIT mode the color is green and the color changes into red when the IV SGVA goes into reco...

Page 13: ...en it automatically detects that and enables you to use those USB memories USB memory stick and USB hard disk as a memory expansion or a back up memory Cautions Do not insert or remove USB memory devices from the USB port in the IV SGVA while recording or searching When you remove the USB memory device from the IV SGVA you must exit from RECORD or SEARCH mode and select REMOVE USB from main menu a...

Page 14: ...the users who are in remote places from their IV SGVA and not able to control it immediately z REC AV Indication of recording both A Audio and V Video Shows REC V when recording the video only z C1 Camera channel number 1 being used for recording If it shows C1345 then C indicates of camera and 1345 indicates for camera channel numbers If it shows C1B123 then C1 indicates of camera number 1 and B1...

Page 15: ...th x 4 and length x 4 You cannot magnify the images in the 128x128 or 160x128 pixels of resolutions In magnified state for the images you can use the direction buttons to move to certain portion in the screen Press ESC to escape from the magnification mode I 3 SEARCH Use and to select SEARCH and then press ENT Then the next screen appears as below 30 All saved data are arranged according to the mo...

Page 16: ...ame File is stored in the memory card 32 Green colored file name File is stored in USB memory devices The name of the file is composed of hours minutes seconds and the camera s channel numbers For example 15373501 sgv means that the file has recorded for 10 hours 12 minutes and 40 seconds from channel number 1 For 15224201 sgvx x means the file is locked to protect from deleting To lock or unlock ...

Page 17: ...ng to see the rest of the camera channels one by one After showing the last camera s data in a single channel mode it switches into 4 channel mode and plays 4 camera channels simultaneously again as you press While playing the file use to magnify the image If you stop playing the files and press then the LCD screen is divided into several blocks for you select the area that you want to magnify Whe...

Page 18: ...mera in the back You can connect up to four more external cameras to your IV SGVA through the camera input cable SG 110 SG 210 and SG 310 only You can use only one external camera at a time And you can connect button hole camera SG 911 to your IV SGVA IV SGVA 110 210 and IV SGVA 310 only You can turn on and off each camera If there is only one built in camera and no camera is connected to the IV S...

Page 19: ...AM appears on the menu screen For the internal cameras you can only change the brightness BRIGHT and for the external cameras you can change all the values for HUE SATURATION and CONTRAST Select the camera that you want to change the value with and press ENT then the selected camera s brightness value appears on the bottom of the screen Using and set the value from 1 darkest to 20 brightest Using ...

Page 20: ...ond FPS depends on the different values for the Image Resolution Image Resolution Recording Speed FPS 128 x 128 1 15 40 160 x 128 1 15 240 x 240 1 12 320 x 240 1 10 480 x 480 1 5 640 x 480 1 4 4 2 1 5 FILE LIM This is to turn on and off the function to limit file sizes being recorded If this function is turned ON then a file gets created for every hour or 10MB of file size while recording images W...

Page 21: ...The ranges of the resolution are 128x128 160x128 240x240 320x240 480x480 and 640x480 pixels 4 2 4 ZOOM When this function is set to ON and recording with built in camera s then you can record images with a Zoom In function This Zoom In function can be used for the image resolutions of 128x128 160x128 240x240 and 320x240 In 128x128 and160x128 you can magnify by 16 times of the image recorded and by...

Page 22: ...eset recording time then the LCD displays with CHECK SCHEDULE message for 5 seconds and goes into the sleep mode When the time becomes for the preset time schedule IV SGVA exits from the Sleep mode and starts to record If you press ESC or ENT when the IV SGVA is in the sleep mode then the LCD will display with a message CHECK SCHEDULE for 5 seconds During this message is displayed on the LCD if yo...

Page 23: ...l play without the audio 4 3 4 FASTAUDIO OFF If you turn on c FASTAUDIO then the audio and video plays together during the High Speed Play When it is turned off then only the video plays during the High Speed Play 4 3 5 TIME SYNC OFF Time Sync function decides on whether to playback each file saved from different cameras synchronized with the time During playback you can switch between 4 channel m...

Page 24: ...assage Sync on the screen while synchronizing the files 4 4 DATE TIME SET Select 4 DATE TIME SET using the direction buttons and press ENT Then the next screen appears in the LCD as below 48 Using and you can move the cursor to the Date Month Year and the Time Use and to change the variables There are three ways to arrange this DATE TIME setting and it varies in different localities Move the curso...

Page 25: ...g When you remove the USB memory device from the IV SGVA you must exit from RECORD or SEARCH mode and select REMOVE USB from main menu and press ENT button After REMOVE USB NOW message appears on the LCD you can remove the USB memory device from the IV SGVA 50 When you back up the IV SGVA s data to your computer first copy the data in the IV SGVA to a USB memory device and then insert that USB mem...

Page 26: ... extensive memory device placed on the top of the IV SGVA which can be inserted or removed by the user And the USB memory is inserted into the USB port of the IV SGVA IV SGVA detects the existence of the extensive memory devices in the IV SGVA and you will not be able to select the memory s name if it is not in the IV SGVA If there are no RS MMC and USB memories in your IV SGVA then the IV SGVA de...

Page 27: ... numbers press ENT and repeat the same process until you complete putting in all the numbers for the password Once you put in the correct value that matches with the old password you will be asked to put in the new password Repeat the same process as above and enter the same password again to confirm the new password You must press ENT to 54 save the new password If you press ESC after putting in ...

Page 28: ...V SGVA start to record This low powering technology is very important when you are using the battery as power source for the IV SGVA In the case that you want to record objects passing once and quickly before the IV SGVA then turn off this function Caution Set it to off when using the Bluetooth 4 7 2 4 ULTRA SAV ON When you set this function to on then you can maximize the battery usage time 56 If...

Page 29: ...ower of the IV SGVA is gone abnormally such as detaching the battery from the IV SGVA during the operation then the IV SGVA will not record it in the power off history The black colored date time 03 10 14 19 51 indicates you of the time that you turned on the IV SGVA The blue colored date time 04 11 11 56 31 indicates you of the time that you turned off the IV SGVA 4 7 3 ALARM SET If you set the a...

Page 30: ...annel when there is a motion detected by the camera of the IV SGVAs which are connected wirelessly via Bluetooth 60 2 TIME 1 When there is a motion detected by the camera of theIV SGVAs which are connected wirelessly via Bluetooth the IV SGVA generates an alarm from the internal speaker The duration of the alarm is from 0 2 to 9 seconds 3 TYPE 3 Set the type for the alarm when there is a motion de...

Page 31: ...hat IV SGVA reboots and finishes upgrading process 4 7 6 DEFAULT SET 62 This function is to change the values set in all the menus back to its default set Select YES and press ENT to change all the values to the DEFAULT SET Note that all the values changed by the user will be deleted once you change the values back to the DEFAULT SET 4 7 7 SG NAME This function is to put in theIV SGVA s name and u...

Page 32: ...to search for a file under the selected SG name Select either RS MMC or USB and press ENT button to check the SG names registered in each device I 5 BLUETOOTH IV SGVA 300 310 only When using the Bluetooth you can get faster image transmitting speed by setting the image compress resolution to 128x128 for the slave IV SGVAs The transmitting speed goes down as you increase the image compress resoluti...

Page 33: ...have requested is not turned on then the slave IV SGVA will send the images of the camera channel which is turned on and nearest to the requested channel number 3 SLAVE PWD SET If 5 BLUETOOTH in a PASSWORD SET from F OTHERS is set to ON for the slave IV SGVA and requires you to input password then you have to put in the correct password to access the slave IV SGVAs wirelessly via Bluetooth with yo...

Page 34: ...r for that selected number of times and stops after those number of trials If it is set to OFF then the IV SGVA does not try to reconnect even after it gets disconnected If you set this function to ON then the IV SGVA will try to connect to other IV SGVAs until it gets reconnected 5 6 POWER OFF This function turns ON or OFF the power for the Bluetooth Turn it on to access the Bluetooth Be sure to ...

Page 35: ... program double click SETUP icon Then a new window appears as below and starts installing the program 70 Type in the serial number and you can get this number from the back of your IV SGVAwhere the battery is placed in ...

Page 36: ...71 72 When the processes above are finished then the program installment is completed ...

Page 37: ...he mouse point to the window that you want to playback and click the right side of the mouse then a new window appears as below 74 This function enables you to playback the file which is stored in your computer You can use the speed bar and the control buttons while you playback the file Click Browse and select the folder and file that you want to playback and then click OK For example select C Se...

Page 38: ...g modes when viewing the images of the IV SGVA from your computer If you want to magnify a certain image then point the mouse to that image and click the left side of the mouse If you click on that magnified image again then the image returns to the previous size g Pre Next page At each displaying mode if you want to see other channels instead of the current channels on the monitor click this butt...

Page 39: ...tivate AUTO POWER OFF function Caution To maximize the life of the battery do not turn off AUTO POWER OFF function z Battery power fades quickly 1 When you are not using the Bluetooth set POWER to off from the menu BLUETOOTH IV SGVA 300310 only 2 In the menu OPTION select SAVE BAT from the menu POWER SET of the menu OTHERS and set on SAVE BAT z If I connect the IV SGVA with the adaptor then the IV...

Page 40: ...od we give you free repair service according to the warranty sheet We charge you with the fee of parts and services despite free warranty service period 1 Any breakage made without care 2 Breakage or trouble made by natural disaster 3 Breakage or trouble made by breaking the product guide or manual 4 Breakage or trouble made by wrong power voltage or frequency 5 When you want to resemble for full ...

Reviews: