


1.
If
the
NON
LED
on
the
diagnostic
LED
panel
is
lit,
turn
off
the
server
and
peripheral
devices;
otherwise,
go
to
the
next
step.
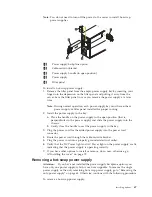
2.
Remove
the
power
supply:
a.
Unplug
the
power
cord
connector
from
the
power
supply.
Attention:
Be
careful
when
you
remove
the
hot-swap
power
supply;
the
power
supply
might
be
too
hot
to
handle
comfortably.
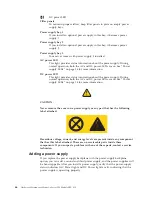
CAUTION:
The
following
label
indicates
a
hot
surface
nearby.
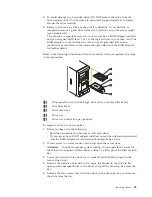
b.
Remove
the
defective
power
supply
by
placing
the
handle
on
the
power
supply
in
the
open
position
(perpendicular
to
the
power
supply)
and
pulling
the
power
supply
from
the
bay.
3.
If
you
are
replacing
the
power
supply
with
another
one,
go
to
step
4.
Otherwise,
continue
with
step
3a.
a.
Install
a
power-supply
filler
panel.
Note:
During
normal
operation,
each
power-supply
bay
must
have
either
a
power
supply
or
filler
panel
installed
for
proper
cooling.
b.
Open
the
cable-restraint
bracket
and
remove
the
power
cord
from
the
cable-restraint
bracket.
Close
the
cable-restraint
bracket.
c.
Unplug
the
power
cord
from
the
electrical
outlet.
d.
Continue
with
step
5.
4.
If
you
are
replacing
the
power
supply:
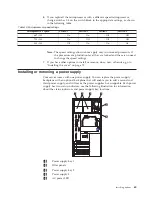
a.
Place
the
handle
on
the
replacement
power
supply
in
the
open
position;
then,
slide
the
power
supply
into
the
chassis.
b.
Gently
close
the
handle
on
the
power
supply
to
seat
the
power
supply
in
the
bay.
c.
Plug
the
power
cord
for
the
power
supply
into
the
power
cord
connector.
d.
Verify
that
the
AC
Power
light
and
DC
Power
light
are
lit,
indicating
that
the
power
supply
is
operating
correctly.
5.
If
you
have
other
options
to
install
or
remove,
do
so
now;
otherwise,
go
to
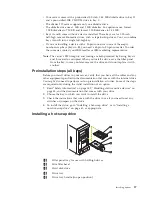
“Installing
the
cover”
on
page
70.
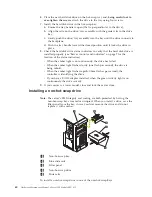
Removing
the
only
power
supply
To
remove
the
only
power
supply:
1.
Turn
off
the
server
and
peripheral
devices.
2.
Remove
the
power
supply:
a.
Unplug
the
power
cord
from
the
power
supply.
Attention:
Be
careful
when
you
remove
the
power
supply;
the
power
supply
might
be
too
hot
to
handle
comfortably.
68
Hardware
Maintenance
Manual:
xSeries
230
Models
6RY,
61Y
Summary of Contents for xSeries 230 6RY
Page 1: ...Hardware Maintenance Manual xSeries 230 Models 6RY 61Y...
Page 2: ......
Page 3: ...Hardware Maintenance Manual xSeries 230 Models 6RY 61Y...
Page 20: ...12 Hardware Maintenance Manual xSeries 230 Models 6RY 61Y...
Page 38: ...30 Hardware Maintenance Manual xSeries 230 Models 6RY 61Y...
Page 48: ...40 Hardware Maintenance Manual xSeries 230 Models 6RY 61Y...
Page 126: ...118 Hardware Maintenance Manual xSeries 230 Models 6RY 61Y...
Page 132: ...124 Hardware Maintenance Manual xSeries 230 Models 6RY 61Y...
Page 167: ...Related service information 159...
Page 168: ...160 Hardware Maintenance Manual xSeries 230 Models 6RY 61Y...
Page 169: ...Related service information 161...
Page 170: ...162 Hardware Maintenance Manual xSeries 230 Models 6RY 61Y...
Page 171: ...Related service information 163...
Page 172: ...164 Hardware Maintenance Manual xSeries 230 Models 6RY 61Y...
Page 173: ...Related service information 165...
Page 174: ...166 Hardware Maintenance Manual xSeries 230 Models 6RY 61Y...
Page 184: ...176 Hardware Maintenance Manual xSeries 230 Models 6RY 61Y...
Page 185: ...Related service information 177...
Page 186: ...178 Hardware Maintenance Manual xSeries 230 Models 6RY 61Y...
Page 193: ......
Page 194: ...Part Number 19K6112 Printed in USA 1P P N 19K6112...


