2.
To
avoid
damage
to
a
hard
disk
drive,
DO
NOT
remove
the
drive
from
the
hot-swap
bay
until
it
has
had
time
to
spin
down
(approximately
30
seconds).
Handle
the
drive
carefully.
3.
Before
you
hot-swap
a
drive,
make
sure
it
is
defective.
If
you
partially
or
completely
remove
a
good
drive
instead
of
a
defective
one,
your
server
might
lose
valuable
data.
This
situation
is
especially
relevant
if
your
server
has
a
RAID
adapter
installed
and
you
assigned
RAID
level
1
or
5
to
the
logical
drives
in
your
disk
array.
The
RAID
adapter
can
rebuild
the
data
that
you
need,
provided
that
certain
conditions
are
met.
Refer
to
the
information
provided
with
the
RAID
adapter
for
further
details.
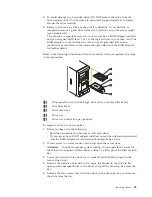
Refer
to
the
following
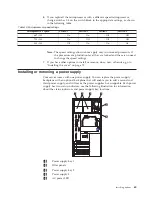
illustration
of
the
tower
model
while
you
perform
the
steps
in
this
procedure.
1
Filler
panel
for
use
with
half-high
drives
(tray
and
slim
filler
bezel)
2
Slim
filler
bezel
3
Hard
disk
drive
4
Drive
tray
5
Drive
tray
handle
(in
open
position)
To
replace
a
drive
in
a
hot-swap
bay:
1.
Before
you
begin,
do
the
following:
v
Read
the
documentation
that
comes
with
your
drive.
v
If
your
server
has
a
RAID
adapter
installed,
review
the
information
provided
with
the
RAID
adapter
for
information
about
replacing
a
drive.
2.
If
your
server
is
a
tower
model,
unlock
and
open
the
server
door.
Attention:
To
maintain
proper
system
cooling,
do
not
operate
the
server
for
more
than
two
minutes
without
either
a
drive
or
a
filler
panel
installed
for
each
bay.
3.
Locate
the
defective
drive
(look
for
an
amber
Hard
Disk
Status
light
on
the
front
of
the
drive).
4.
Remove
the
defective
hard
disk
drive:
move
the
handle
on
the
drive
to
the
open
position
(perpendicular
to
the
drive)
and
pull
the
hot-swap
tray
from
the
bay.
5.
Remove
the
four
screws
that
attach
the
drive
to
the
hot-swap
tray,
and
remove
the
drive
from
the
tray.
Installing
options
59
Summary of Contents for xSeries 230 6RY
Page 1: ...Hardware Maintenance Manual xSeries 230 Models 6RY 61Y...
Page 2: ......
Page 3: ...Hardware Maintenance Manual xSeries 230 Models 6RY 61Y...
Page 20: ...12 Hardware Maintenance Manual xSeries 230 Models 6RY 61Y...
Page 38: ...30 Hardware Maintenance Manual xSeries 230 Models 6RY 61Y...
Page 48: ...40 Hardware Maintenance Manual xSeries 230 Models 6RY 61Y...
Page 126: ...118 Hardware Maintenance Manual xSeries 230 Models 6RY 61Y...
Page 132: ...124 Hardware Maintenance Manual xSeries 230 Models 6RY 61Y...
Page 167: ...Related service information 159...
Page 168: ...160 Hardware Maintenance Manual xSeries 230 Models 6RY 61Y...
Page 169: ...Related service information 161...
Page 170: ...162 Hardware Maintenance Manual xSeries 230 Models 6RY 61Y...
Page 171: ...Related service information 163...
Page 172: ...164 Hardware Maintenance Manual xSeries 230 Models 6RY 61Y...
Page 173: ...Related service information 165...
Page 174: ...166 Hardware Maintenance Manual xSeries 230 Models 6RY 61Y...
Page 184: ...176 Hardware Maintenance Manual xSeries 230 Models 6RY 61Y...
Page 185: ...Related service information 177...
Page 186: ...178 Hardware Maintenance Manual xSeries 230 Models 6RY 61Y...
Page 193: ......
Page 194: ...Part Number 19K6112 Printed in USA 1P P N 19K6112...


