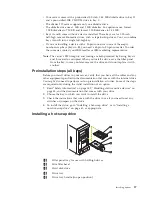
Before
you
begin
Before
you
begin
to
install
options
in
your
server,
read
the
following
information:
v
Become
familiar
with
the
safety
and
handling
guidelines
specified
under
“Working
inside
a
server
with
power
on,”
“Handling
static
sensitive
devices”
on
page
48,
and
read
“Safety
information”
on
page
149.
These
guidelines
will
help
you
work
safely
while
working
with
your
server
or
options.
v
You
do
not
need
to
turn
off
the
server
to
install
or
replace
hot-swap
power
supplies,
or
hot-swap
drives.
v
The
orange
color
on
components
and
labels
in
your
server
indicates
hot-swap
components.
This
means
that
you
can
install
or
remove
the
component
while
the
system
is
running,
provided
that
your
system
is
configured
to
support
this
function.
For
complete
details
about
installing
or
removing
a
hot-swap
component,
see
the
information
provided
in
this
chapter.
v
The
blue
color
on
components
and
labels
identifies
touch
points
where
a
component
can
be
gripped,
a
latch
moved,
and
so
on.
v
Make
sure
that
you
have
an
adequate
number
of
properly
grounded
electrical
outlets
for
your
server,
monitor,
and
any
other
options
that
you
intend
to
install.
v
Back
up
all
important
data
before
you
make
changes
to
disk
drives.
v
Have
a
small,
flat-blade
screwdriver
available.
v
For
a
list
of
supported
options
for
your
server,
refer
to
http://www.ibm.com/pc/us/compat
on
the
World
Wide
Web.
System
reliability
considerations
To
help
ensure
proper
cooling
and
system
reliability,
make
sure:
v
Each
of
the
drive
bays
has
either
a
drive
or
a
filler
panel
installed.
v
Each
of
the
power
supply
bays
has
either
a
power
supply
or
a
filler
panel
installed.
v
The
cover
is
in
place
during
normal
operations,
or
is
removed
for
no
longer
than
30
minutes
while
the
server
is
operating.
Note:
The
front
door
(tower
model)
can
be
removed
permanently
without
affecting
system
reliability.
v
There
is
space
around
the
server
to
allow
the
server
cooling
system
to
work
properly.
–
On
a
tower
model,
leave
about
127
mm
(5
in.)
of
space
around
the
front
and
rear
of
the
server.
–
On
a
rack
model,
refer
to
the
documentation
that
comes
with
the
rack.
v
A
removed
hot-swap
drive
is
replaced
within
two
minutes
of
removal.
v
Cables
for
optional
adapters
are
routed
according
to
the
instructions
provided
with
the
adapters.
v
A
failed
fan
is
replaced
within
48
hours.
Working
inside
a
server
with
power
on
Your
server
is
designed
to
operate
safely
while
turned
on
with
the
cover
removed,
such
as
when
you
are
following
the
light
path
diagnostics
(see
“Light
path
diagnostics”
on
page
14).
Follow
these
guidelines
when
you
work
inside
a
server
that
is
turned
on:
Installing
options
47
Summary of Contents for xSeries 230 6RY
Page 1: ...Hardware Maintenance Manual xSeries 230 Models 6RY 61Y...
Page 2: ......
Page 3: ...Hardware Maintenance Manual xSeries 230 Models 6RY 61Y...
Page 20: ...12 Hardware Maintenance Manual xSeries 230 Models 6RY 61Y...
Page 38: ...30 Hardware Maintenance Manual xSeries 230 Models 6RY 61Y...
Page 48: ...40 Hardware Maintenance Manual xSeries 230 Models 6RY 61Y...
Page 126: ...118 Hardware Maintenance Manual xSeries 230 Models 6RY 61Y...
Page 132: ...124 Hardware Maintenance Manual xSeries 230 Models 6RY 61Y...
Page 167: ...Related service information 159...
Page 168: ...160 Hardware Maintenance Manual xSeries 230 Models 6RY 61Y...
Page 169: ...Related service information 161...
Page 170: ...162 Hardware Maintenance Manual xSeries 230 Models 6RY 61Y...
Page 171: ...Related service information 163...
Page 172: ...164 Hardware Maintenance Manual xSeries 230 Models 6RY 61Y...
Page 173: ...Related service information 165...
Page 174: ...166 Hardware Maintenance Manual xSeries 230 Models 6RY 61Y...
Page 184: ...176 Hardware Maintenance Manual xSeries 230 Models 6RY 61Y...
Page 185: ...Related service information 177...
Page 186: ...178 Hardware Maintenance Manual xSeries 230 Models 6RY 61Y...
Page 193: ......
Page 194: ...Part Number 19K6112 Printed in USA 1P P N 19K6112...


