


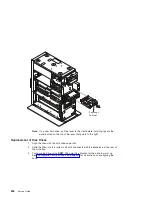


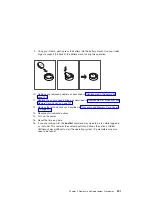


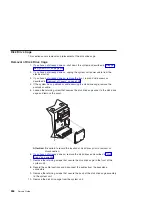

9. Using your thumb, gently press the battery into the battery mount. Use your index
finger to support the back of the battery mount during this operation.
10. Replace any removed adapters as described in “Replacement of Adapters” on
11. Replace the cover support bridge as described in “Replacement of Processor and
Memory Card Cover” on page 231.
12. Replace the left-side cover as described in “Processor and Memory Card Cover”
13. Reconnect all removed cables.
14. Turn on the power.
15. Reset the time and date.
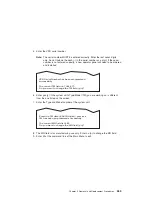
16. If you are running AIX, the
bootlist
command may need to be run while logged in
as root user. This restores the custom bootlist and allows the option of
Select
Software
under multiboot to start the operating system. IP parameters may also
need to be rebuilt.
Chapter 9. Removal and Replacement Procedures
251
Summary of Contents for RS/6000 44P Series 270
Page 1: ...RS 6000 44P Series Model 270 Service Guide SA38 0572 02 ...
Page 10: ...x Service Guide ...
Page 14: ...xiv Service Guide ...
Page 16: ...xvi Service Guide ...
Page 20: ...Rear View 1 2 3 4 5 6 7 8 9 11 12 13 14 15 16 10 17 18 19 2 Service Guide ...
Page 44: ...26 Service Guide ...
Page 164: ...146 Service Guide ...
Page 204: ...186 Service Guide ...
Page 247: ...b Slide the covers to the rear and remove Chapter 9 Removal and Replacement Procedures 229 ...
Page 288: ...270 Service Guide ...
Page 290: ...1 2 3 4 5 6 7 8 9 10 11 12 13 14 15 16 17 18 19 21 20 22 23 24 25 272 Service Guide ...
Page 294: ...Keyboards and Mouse 276 Service Guide ...
Page 296: ...Keyboards and Mouse Black 278 Service Guide ...
Page 298: ...Power Cables 1 2 3 4 5 6 7 8 9 10 11 280 Service Guide ...
Page 300: ...282 Service Guide ...
Page 302: ...284 Service Guide ...
Page 304: ...286 Service Guide ...
Page 310: ...292 Service Guide ...
Page 338: ...320 Service Guide ...
Page 345: ......
Page 346: ... Printed in U S A September 2001 SA38 0572 02 ...