


Set Password and Unattended Start Mode
Entering this selection permits access to the following options.
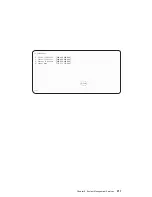
Password Utilities
1 Set Power-On Access Password
2 Remove Power-On Access Password
3 Unattended Start Mode <OFF>
4 Set Privileged-Access Password
5 Remove Privileged-Access Password
.------.
|X=Exit|
`------’
===>
Set Power-On Access Password
Setting a power-on access password helps protect information stored in your computer.
You can use any combination of up to eight characters (A-Z, a-z, and 0-9) for your
password. The password you type is not displayed on the screen. Press Enter when
you are finished; you must type the password again for verification. Passwords are not
case-sensitive upon entry.
If you previously had set a power-on access password and want to remove it, select
Remove Power-On Access Password
.
Note:
If you forget the power-on access password, the battery must be removed for
longer than 30 seconds to reset the NVRAM. The system unit power cable must
be disconnected before removing the battery.
A password becomes effective only after the system is turned off and back on again.
Unattended Start Mode:
Note:
Unlike other systems, unattended start mode is not automatically disabled when
the power-on access password is removed.
Use this option to instruct the service processor to immediately power-on the server
after a power failure, bypassing power-on password verification. Unattended start mode
can also be set using system management services menus. Unattended start mode can
be used on servers that require automatic power-on after a power failure.
Set Privileged-Access Password
The privileged-access password protects against the unauthorized starting of the
system programs.
Attention:
If the privileged-access password has been enabled, you are asked for the
privileged-access password at startup every time you boot your system.
Chapter 8. System Management Services
215
Summary of Contents for RS/6000 44P Series 270
Page 1: ...RS 6000 44P Series Model 270 Service Guide SA38 0572 02 ...
Page 10: ...x Service Guide ...
Page 14: ...xiv Service Guide ...
Page 16: ...xvi Service Guide ...
Page 20: ...Rear View 1 2 3 4 5 6 7 8 9 11 12 13 14 15 16 10 17 18 19 2 Service Guide ...
Page 44: ...26 Service Guide ...
Page 164: ...146 Service Guide ...
Page 204: ...186 Service Guide ...
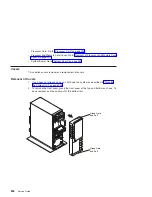
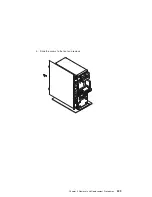
Page 247: ...b Slide the covers to the rear and remove Chapter 9 Removal and Replacement Procedures 229 ...
Page 288: ...270 Service Guide ...
Page 290: ...1 2 3 4 5 6 7 8 9 10 11 12 13 14 15 16 17 18 19 21 20 22 23 24 25 272 Service Guide ...
Page 294: ...Keyboards and Mouse 276 Service Guide ...
Page 296: ...Keyboards and Mouse Black 278 Service Guide ...
Page 298: ...Power Cables 1 2 3 4 5 6 7 8 9 10 11 280 Service Guide ...
Page 300: ...282 Service Guide ...
Page 302: ...284 Service Guide ...
Page 304: ...286 Service Guide ...
Page 310: ...292 Service Guide ...
Page 338: ...320 Service Guide ...
Page 345: ......
Page 346: ... Printed in U S A September 2001 SA38 0572 02 ...