background image

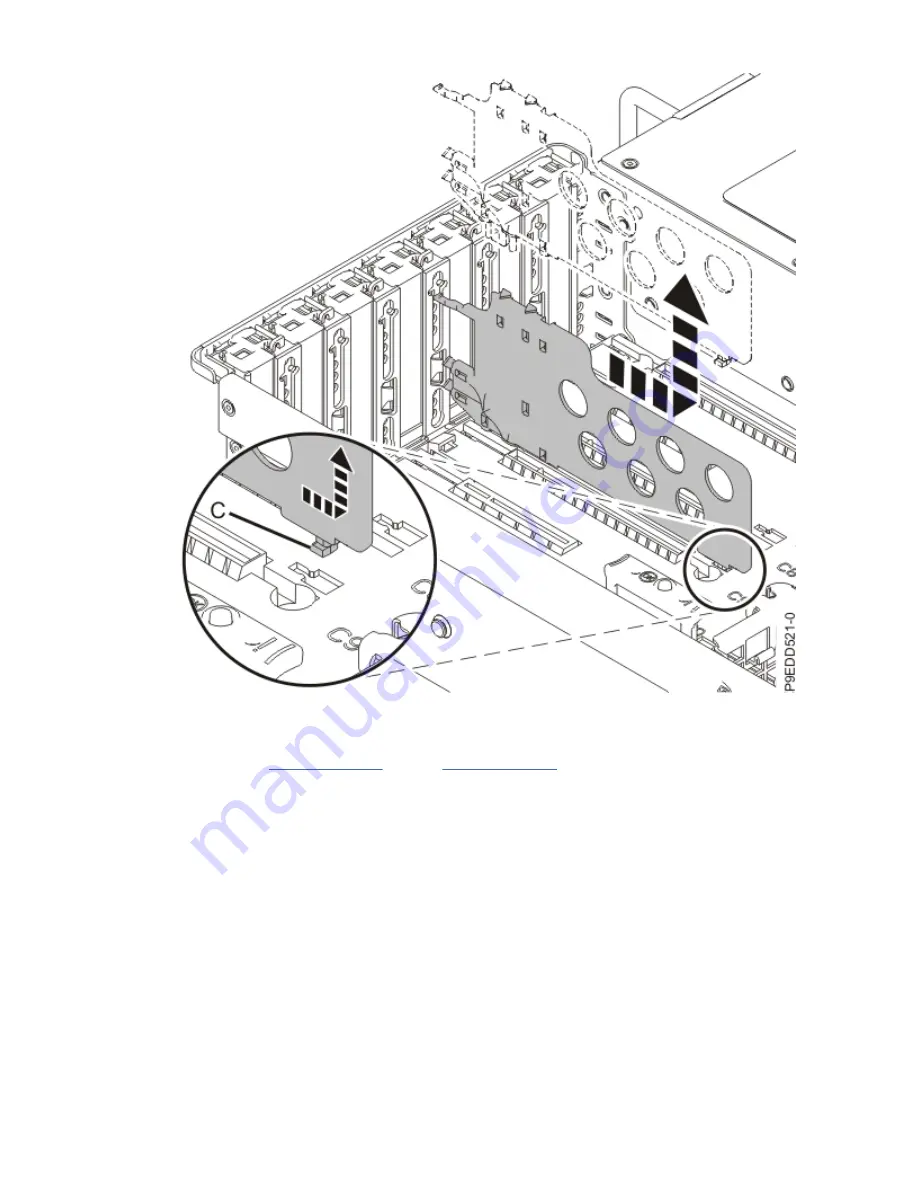
Figure 19. Sliding the PCIe divider out of the system

d) Place the adapter divider in a clean area.

e) Repeat steps “8.a” on page 20 through “8.d” on page 22 for all of the PCIe adapter dividers.

9. Remove the RAID adapter or adapters, if present. Otherwise, continue with the next step.

a) Locate the RAID adapter you want to remove.

Note: If only one RAID adapter is present, remove the plastic air dividers between slots P1-C49

and P1-C50.

b) If a rear SAS cable is attached to the SAS RAID adapter, label and disconnect the rear SAS cable

from the SAS RAID adapter by pressing the connector latch and unplugging the cable. See the

following figure.

22  Power Systems: System backplane

Summary of Contents for Power Systems 9223-22S

Page 1: ...Power Systems System backplane for the 5105 22E 9008 22L 9009 22A 9009 22G 9223 22H or 9223 22S IBM...

Page 2: ...G229 9054 and the IBM Environmental Notices and User Guide Z125 5823 This edition applies to IBM Power Systems servers that contain the POWER9 processor and to all associated models Copyright Interna...

Page 3: ...ing the system backplane 12 Replacing the system backplane 67 Preparing the system for operation 115 Notices 125 Accessibility features for IBM Power Systems servers 126 Privacy policy considerations...

Page 4: ...iv...

Page 5: ...00 300 8751 German safety information Das Produkt ist nicht f r den Einsatz an Bildschirmarbeitspl tzen im Sinne 2 der Bildschirmarbeitsverordnung geeignet Laser safety information IBM servers can use...

Page 6: ...To Disconnect 1 Turn off everything unless instructed otherwise 2 For AC power remove the power cords from the outlets 3 For racks with a DC power distribution panel PDP turn off the circuit breakers...

Page 7: ...n a different rack cabinet An electrical outlet that is not correctly wired could place hazardous voltage on the metal parts of the system or the devices that attach to the system It is the responsibi...

Page 8: ...d before the cabinet is relocated Inspect the route that you plan to take to eliminate potential hazards Verify that the route that you choose can support the weight of the loaded rack cabinet Refer t...

Page 9: ...position for example when working from a ladder Stability hazard The rack may tip over causing serious personal injury Before extending the rack to the installation position read the installation ins...

Page 10: ...roduct might be equipped with multiple AC power cords or multiple DC power cables To remove all hazardous voltages disconnect all power cords and power cables L003 L007 CAUTION A hot surface nearby L0...

Page 11: ...ing into the other end of a disconnected optical fiber to verify the continuity of optic fibers may not injure the eye this procedure is potentially dangerous Therefore verifying the continuity of opt...

Page 12: ...de on off smooth platforms without appreciable force so take care not to push or lean Keep riser tilt adjustable angling platform option flat at all times except for final minor angle adjustment when...

Page 13: ...itable for connection to intrabuilding or unexposed wiring or cabling only The intrabuilding ports of this equipment must not be metallically connected to the interfaces that connect to the OSP outsid...

Page 14: ...xiv Power Systems System backplane...

Page 15: ...ervice provider The authority levels are described in ASMI authority levels Procedure 1 Identify the part and the system that you are working on For instructions see Identifying a part www ibm com sup...

Page 16: ...service process you move away from the system it is important to again discharge yourself by touching an unpainted metal surface for at least 5 seconds before you continue with the service process 7...

Page 17: ...g and replacing procedures require the system power to be turned off ensure that all the power sources to the system are disconnected The power cord B is fastened to the system with hook and loop fast...

Page 18: ...or or or or 4 Power Systems System backplane...

Page 19: ...connector is disengaged 10 Label disconnect and set aside all remaining rear cables that connect to the system 11 Close the cable management arm by completing the following steps a Swing the cable man...

Page 20: ...squeezing the inner and outer cable management arms together Then secure the inner cable management arm to the outer cable management arm with a hook and loop fastener You should secure the inner and...

Page 21: ...t arm parts 13 Hold the indentations A on the front cover and pull it away from the system See Figure 5 on page 8 Removing and replacing the system backplane in the 5105 22E 9008 22L 9009 22A 9009 22G...

Page 22: ...old the system unit securely Ensure that the screws inside the latches are not secured to the rack Do not pull out or install any drawer or feature if the rack stabilizer brackets are not attached to...

Page 23: ...he front of the service access cover clears the upper frame ledge lift the cover up and off the system unit Attention Operating the system without the service access cover on for more than 10 minutes...

Page 24: ...sh button A on the trusted platform module card as shown in the following figure Verify that the LED B is lit which indicates that sufficient power exists for the identify LED If the LED B is not lit...

Page 25: ...tivating the identify LED 18 Look for the amber LED of the system backplane See Figure 9 on page 12 Removing and replacing the system backplane in the 5105 22E 9008 22L 9009 22A 9009 22G 9223 22H or 9...

Page 26: ...ice procedure Procedure 1 Ensure that you have the electrostatic discharge ESD wrist strap on and that the ESD clip is plugged into a ground jack or connected to an unpainted metal surface If not do s...

Page 27: ...d disconnect all external cables that are attached to the adapters b Record the slot number and location of each adapter being removed See the following figure Removing and replacing the system backpl...

Page 28: ...he direction that is shown in the following figure L007 CAUTION A hot surface nearby L007 d Carefully grasp the adapter B by its top edge or tailstock and remove the adapter from the slot as shown in...

Page 29: ...the PCIe adapters 4 Remove the rear USB cable a While pressing the latch release on the connector unplug the rear USB cable A from the system backplane as shown in the following figure The connector o...

Page 30: ...Figure 13 Removing the rear USB cable b At the rear of the system open the adapter latch B and lift the USB cable housing C as shown in the following figure 16 Power Systems System backplane...

Page 31: ...shown in the following figure The USB connector on the system backplane has the USB port symbol with an arrow pointing to the front of the system b Unfasten the cable from the hook and loop fasteners...

Page 32: ...e of the system 6 Remove the vital product data VPD card a Grasp the VPD card by the plastic housing as shown in the following figure b Pull the VPD card out of its slot in location P1 C13 on the syst...

Page 33: ...adapter retainer A for the service processor card See A in the following figure b Pull the service processor card straight up from the slot by holding the card bracket B and the tailstock c Place the...

Page 34: ...t P1 C1 8 Remove PCIe adapter dividers a Place your finger on the top edge of the PCIe adapter divider A to hold the divider steady as shown in the following figure Figure 18 Preparing to remove the P...

Page 35: ...away from the system chassis and towards the inside of the system When the tab on the divider C clears the groove in the system backplane lift the divider to remove it from the system See the followi...

Page 36: ...ent Otherwise continue with the next step a Locate the RAID adapter you want to remove Note If only one RAID adapter is present remove the plastic air dividers between slots P1 C49 and P1 C50 b If a r...

Page 37: ...or the corresponding PCI adapter slot at the rear of the system Then lift and remove the rear SAS cable adapter B See the following figure Ensure that the rear SAS cable does not catch on any componen...

Page 38: ...re the cable or cables attach to the disk drive backplane and the SAS RAID internal adapter Note Depending on which SAS RAID adapter is installed in your system one or two front SAS cables are connect...

Page 39: ...SAS RAID adapter and the front SAS cable or cables out of the slot Ensure that the front SAS cable does not catch on any components while you are lifting the SAS RAID adapter out of the slot See the f...

Page 40: ...is present repeat steps 9 a on page 22 through 9 h on page 26 10 Remove the NVMe M 2 carrier cards if present Otherwise continue with the next step a Twist the screws A counterclockwise to release the...

Page 41: ...esent Otherwise continue with the next step a Label the NVMe cables and how they connect between the NVMe drive backplane and the NVMe U 2 pass thru cards Record how the plugs and jacks are connected...

Page 42: ...m the NVMe drive backplane b Twist the screws A counterclockwise to release the NVMe U 2 pass thru card Lift both the NVMe U 2 pass thru card and the NVMe cable out of the slot as shown in the followi...

Page 43: ...where the backup power module BPM cable connects to the NVDIMM and to the BPM b To unlock the NVDIMM from its connector simultaneously push both of the locking tabs away from the module in the direct...

Page 44: ...oving a NVDIMM c Hold the NVDIMM by the edges and pull it out of the system d Press latch A and disconnect the BPM cable from its connector on the NVDIMM See the following figure 30 Power Systems Syst...

Page 45: ...ith the next step Note The BPM BPM is mounted in a standard drive carrier The BPM is handled as a drive in this procedure a If your system has more than one BPM record the location of both BPMs and de...

Page 46: ...Figure 29 Pulling the BPM cable forward c Disconnect the drive backplane power cable See the following figure 32 Power Systems System backplane...

Page 47: ...isconnecting the drive backplane power cable d Open the BPM holder lever A See the following figure Removing and replacing the system backplane in the 5105 22E 9008 22L 9009 22A 9009 22G 9223 22H or 9...

Page 48: ...g the BPM holder lever e Unlock the BPM handle B by pressing the handle release latch A in the direction that is shown and pulling out the handle toward you See the following figure 34 Power Systems S...

Page 49: ...ive backplane See the following figure Figure 33 Sliding the BPM forward g Refer to Figure 34 on page 36 Rotate the BPM on its longer axis to expose the cable connectors at the bottom of the BPM Remov...

Page 50: ...Figure 34 Rotating the BPM h Label BPM cables Press the release latch A on both BPM cables and disconnect both cables from the BPM See the following figure 36 Power Systems System backplane...

Page 51: ...Figure 35 Disconnecting the BPM cables i Remove the BPM See the following figure Removing and replacing the system backplane in the 5105 22E 9008 22L 9009 22A 9009 22G 9223 22H or 9223 22S 37...

Page 52: ...Place the BPM on an appropriate ESD surface k Carefully remove the BPM cable from the cutout A in the opening below the BPM tray and through the cutout B in the bulkhead See the following figure 38 Po...

Page 53: ...the BPM you just removed n If you have a second BPM repeat steps 13 b on page 31 through 13 l on page 39 for the other BPM and BPM cables 14 Remove the internal drives if present Otherwise continue wi...

Page 54: ...e 38 Opening the drive holder lever c Unlock the drive handle B by pressing the handle release latch A in the direction that is shown and pulling out the handle toward you 40 Power Systems System back...

Page 55: ...le d Using the drive handle pull the drive about 1 in 2 5 cm from the disk drive backplane e Lift the drive from the system Removing and replacing the system backplane in the 5105 22E 9008 22L 9009 22...

Page 56: ...ce g Close the drive holder lever h Repeat steps 14 b on page 39 through 14 g on page 42 to remove the other internal drive Note The internal slots do not have fillers 15 Remove the drive trays A if p...

Page 57: ...steps 15 a on page 43 through 15 d on page 43 for the other drive tray 16 Remove the front drives enough to prevent them from interfering with the removal of the drive backplane a Unplug but do not re...

Page 58: ...44 If you have a NVMe drive backplane continue with step 19 on page 46 18 Remove the base function disk drive backplane a Label and disconnect the signal cable A and the power cable B from the disk d...

Page 59: ...c Carefully unscrew the three captive thumbscrews A of the disk drive backplane B as shown in the following figure until fully loose If needed use a Phillips screwdriver to loosen the screws Removing...

Page 60: ...ckplane a Label and disconnect the signal cable A and the power cable B from the NVMe drive backplane as shown in the following figure Note If your system has a BPM you disconnected the power cable fr...

Page 61: ...drive backplane can be easily lifted and removed c Unscrew the three captive thumbscrews A of the NVMe drive backplane B as shown in the following figure until fully loose If needed use a Phillips scr...

Page 62: ...lowing figure and put your index finger against the rear of the latch b Push against the latch with your thumb and pull out with your index finger This action releases the latch c Rotate the handle in...

Page 63: ...cable from the system backplane as shown in the following figure As you face the chassis the connector is in the left front corner You can pull the cable from the system backplane by using the cable...

Page 64: ...the system and out of the way to provide clearance for removing the backplane See the following figure 22 Disconnect the control panel display cable from the system backplane a Unplug the control pane...

Page 65: ...removing the backplane See the following figure 23 Remove the heat sink from the system processor module a Loosen the heat sink actuation screw by turning the supplied hex key counterclockwise A Loos...

Page 66: ...interface material TIM from the system processor module or modules a If the system uses the gray colored TIM Using the tweezers remove the gray colored TIM from the top of the processor and place it...

Page 67: ...ver and set it aside Place the system processor module tray on a solid surface b Using the supplied removal tool align the tool over the system processor module on the system backplane as shown in the...

Page 68: ...the tool over the system processor module by ensuring the two guide pins A are inserted into the alignment holes B on each side of the tool Ensure that the chamfered edge on the tool aligns with the...

Page 69: ...snap outward and the jaws engage with the system processor module as shown in the following figure Make sure that both of the tool jaws are locked onto the system processor module by pushing down on...

Page 70: ...ully engaged with the system processor module Ensure that the system processor module does not disengage and fall back into the socket of the system processor module If the system processor module fal...

Page 71: ...at the pin catches on the openings in the blue tabs and that the blue tabs are locked in a fixed position See the following figure Note To prevent the system processor module from falling pull up on t...

Page 72: ...essor module 26 Place the socket dust covers in the system processor module sockets on the system backplane a Lower the socket dust cover over the sockets on the system backplane and ensure that the h...

Page 73: ...cket dust cover 27 Remove the system backplane a Using a Phillips screwdriver unscrew and remove the four black screws A that mount the backplane to the chassis See the following figure Notes You migh...

Page 74: ...backplane to the sides of the system chassis See the following figure d After removing the screws place your fingers in positions A and B and slide the system backplane slightly toward the front of th...

Page 75: ...tabs C on the power supply cage See the following figure Figure 60 Grasping the system backplane and disengaging the pins f Tilt the system backplane so that the front end is high and the back end is...

Page 76: ...er the memory modules and fillers to the new system backplane a Unlock a memory module or filler from its connector by simultaneously pushing both of the locking tabs away from the module in the direc...

Page 77: ...em Note the location from which you are removing the memory module c Identify the corresponding location on the new system backplane and ensure that the locking tabs are open See the following figure...

Page 78: ...place See the previous figure e Repeat 29 a on page 62 through 29 d on page 64 for the remaining memory modules and fillers 30 Install the vital product data card on the new system backplane a Align...

Page 79: ...the trusted platform module card to the new system backplane a Grasp the TPM card by the plastic housing as shown in the following figure b Pull the TPM card out of its slot in location P1 C14 on the...

Page 80: ...Figure 65 Removing the TPM card c Insert the TPM card into its slot in location P1 C14 on the new system backplane as shown in the following figure 66 Power Systems System backplane...

Page 81: ...wrist strap on and that the ESD clip is plugged into a ground jack or connected to an unpainted metal surface If not do so now 2 Install the replacement system backplane a Grasp the replacement syste...

Page 82: ...ne so that the front end is high and the back end is low as you continue to lower the backplane into the chassis When the backplane catches on the tabs A on the power supply cage lower the front end e...

Page 83: ...itions A and B and slide the system backplane slightly toward the rear of the system as shown in the following figure Note Slide the system backplane carefully There is just enough space for the power...

Page 84: ...lace and screw in the six screws C that attach the backplane to the sides of the system chassis See the following figure Notes You might find it helpful to use a magnetic screwdriver Do not remove the...

Page 85: ...over aside Figure 71 Removing the socket dust covers c If your system has a second system processor repeat steps 3 a on page 71 through 3 b on page 71 to remove the other socket dust cover 4 Place the...

Page 86: ...n the beveled corner of the tool with the beveled corner on the socket Align the guide pins A with the alignment holes B on each side of the tool Use care to lower the tool evenly without tilting the...

Page 87: ...that hold the system processor module in the supplied removal tool A as shown in the following figure Push down on the ring B while pressing in on the tabs C Removing and replacing the system backplan...

Page 88: ...ystem processor module 6 Replace the thermal interface material TIM and heat sinks a Using the tweezers move the old processor s TIM from the clean dry surface and center it onto the new system proces...

Page 89: ...the TIM onto the system processor module b Place the heat sink on the TIM as shown in the following figure Removing and replacing the system backplane in the 5105 22E 9008 22L 9009 22A 9009 22G 9223 2...

Page 90: ...he following figure d Tighten the center load screw clockwise by using the supplied hex key as shown by B in the following figure until a firm stop is reached If the heat sink moves noticeably the loa...

Page 91: ...odule repeat steps 6 a on page 74 through 6 d on page 76 to replace the other TIM and heat sink 7 Reconnect the control panel display cable to the system backplane as shown in the following figure Rem...

Page 92: ...gure 78 Connecting the control panel display cable to the system backplane 8 Reconnect the control panel cable to the system backplane as shown in the following figure 78 Power Systems System backplan...

Page 93: ...de the fan into the system See the following figure b Rotate the fan handle A in the direction shown and then press the handle until the latch locks in place See the following figure c Repeat 9 a on p...

Page 94: ...ve a NVMe drive backplane continue with step 12 on page 82 11 Replace the base function disk drive backplane a The chassis has four alignment pins B to secure the disk drive backplane A Insert the dis...

Page 95: ...he power cable B to the disk drive backplane and system backplane as shown in the following figure Note If your system has a BPM do not reconnect the disk drive power cable to the disk drive backplane...

Page 96: ...VMe drive backplane a The chassis has four alignment pins B to secure the NVMe drive backplane A Insert the NVMe drive backplane as shown in the following figure Ensure that the alignment pins fit thr...

Page 97: ...le A and the power cable B to the NVMe drive backplane as shown in the following figure Note If your system has a BPM do not reconnect the disk drive power cable to the disk drive backplane until dire...

Page 98: ...cable and the power cable 13 Replace the front drives a Support the drive by the top and bottom edge as you slide the drive all the way into the system b Push the drive bay handle A in until it locks...

Page 99: ...for the other front drives 14 Replace the internal drive trays if present a Lower the drive tray into the system The bottoms of the trays have a hook that slides into a support Ensure that hook slide...

Page 100: ...power module cables if present Otherwise continue with the next step Note The BPM is mounted in a standard drive carrier The BPM is handled as a drive in this procedure a If your system has more than...

Page 101: ...for the other BPM cable d Unlock the BPM handle B by pressing the handle release latch A in the direction that is shown and pulling out the handle toward you See the following figure Removing and repl...

Page 102: ...Figure 88 Unlocking the BPM handle e Lower the BPM into the drive tray as shown in the following figure 88 Power Systems System backplane...

Page 103: ...rs at the bottom of the BPM g Using your cable labels connect both BPM cables to the BPM as shown in the following image The cables are routed through the cutout in the BPM Push the BPM cables in unti...

Page 104: ...he BPM cable h Rotate the BPM back down into the BPM tray i Slide the BPM forward by using the drive handle j Push BPM handle A until the BPM handle locks as shown in the following figure 90 Power Sys...

Page 105: ...Figure 91 Locking the BPM handle k Close the BPM holder lever A over the BPM Removing and replacing the system backplane in the 5105 22E 9008 22L 9009 22A 9009 22G 9223 22H or 9223 22S 91...

Page 106: ...Figure 92 Closing the BPM holder lever l Reconnect the drive backplane power cable by pushing the cable in until the latch clicks See the following figure 92 Power Systems System backplane...

Page 107: ...ve backplane power cable m Remove excess slack by pulling the BPM cable in the direction shown See the following figure Removing and replacing the system backplane in the 5105 22E 9008 22L 9009 22A 90...

Page 108: ...page 93 for the other BPM and BPM cable 16 Using your labels replace the internal drives into their trays if present Otherwise continue with the next step a Unlock the drive handle B by pressing the...

Page 109: ...Figure 95 Unlatching the drive handle b Lower the drive into the drive tray Removing and replacing the system backplane in the 5105 22E 9008 22L 9009 22A 9009 22G 9223 22H or 9223 22S 95...

Page 110: ...into the drive tray c Slide the drive forward by using the drive handle until it contacts the disk drive backplane d Push drive handle A until the drive is fully seated and the drive handle locks 96 P...

Page 111: ...Figure 97 Locking the drive handle e Close the drive holder lever A over the drive Removing and replacing the system backplane in the 5105 22E 9008 22L 9009 22A 9009 22G 9223 22H or 9223 22S 97...

Page 112: ...with the next step a Grasp the NVDIMM along its edges and align it with the slot Attention NVDIMMs are keyed to prevent an NVDIMM from being installed incorrectly Note the location of the key tab wit...

Page 113: ...g tabs of the NVDIMM connector are open Slowly press the NVDIMM straight down firmly into the slot until the locking tabs lock into place See the following figure Removing and replacing the system bac...

Page 114: ...99 for any additional NVDIMMs 18 Replace the NVMe U 2 pass thru card if present Otherwise continue with the next step a Route the NVMe cable into position while you lower the NVMe U 2 pass thru card i...

Page 115: ...NVMe cable into the NVMe drive backplane If you have one NVMe U 2 pass thru card it is installed in slot P1 C49 and a filler is in slot P1 C50 The NVMe cable connects from port J1 on the NVMe drive ba...

Page 116: ...talled in slot P1 C49 and the other one is installed in slot P1 C50 One NVMe cable connects from port J1 on the NVMe drive backplane to port J1 on the NVMe U 2 pass thru card in slot P1 C49 One NVMe c...

Page 117: ...two NVMe U 2 pass thru cards in slot P1 C49 and slot P1 C50 e Push the connector in until the connector latch clicks See the following figure Removing and replacing the system backplane in the 5105 2...

Page 118: ...eps 18 a on page 100 through 18 d on page 101 19 Replace the NVMe carrier card if present Otherwise continue with the next step a Lower the NVMe M 2 carrier card down into the slot b Push in and twist...

Page 119: ...ront SAS cables into position while you lower the SAS RAID adapter into its slot Push the SAS RAID adapter down to seat the adapter Push in and twist the screws A clockwise to fully seat the adapter S...

Page 120: ...the SAS RAID adapter b If a rear SAS cable was attached to the SAS RAID adapter reconnect the rear SAS cable A to the SAS RAID adapter rear connector B as shown in the following figure 106 Power Syst...

Page 121: ...the front SAS cable or cables A to the connector port on the disk drive backplane Push the connector in until the connector latch clicks See the following figure Removing and replacing the system back...

Page 122: ...age 107 21 Replace the PCIe adapter divider if present Otherwise continue with the next step a Carefully grasp the adapter divider by its edge or tailstock and slide the divider towards the system cha...

Page 123: ...taining latch at the back edge of the divider C as shown in the following figure Figure 110 Locking the retaining latch on the PCIe divider Removing and replacing the system backplane in the 5105 22E...

Page 124: ...essor card a Align the service processor card A into PCIe location and slide the card into the slot as shown in the following figure b Close the PCI adapter retainer latch B to secure the card 110 Pow...

Page 125: ...23 Attach the rear USB cable a Insert the rear USB cable housing A into the PCI adapter slot at the rear of the system as shown in the following figure Removing and replacing the system backplane in...

Page 126: ...e system backplane d Using your labels replace any cables that you removed from the USB port 24 Attach the front USB cable a Plug the USB cable A into the connector on the system backplane as shown in...

Page 127: ...rget slot on the system is not already in the open position pull the latch into the open position by rotating the latch outwards from its clip on the back of the system See the following figure for th...

Page 128: ...22E 9008 22L 9009 22A 9009 22G 9223 22H or 9223 22S e Using your labels reconnect all cables and transceivers that are attached to the adapter f Repeat steps 25 a on page 113 through 25 e on page 114...

Page 129: ...Procedure 1 Ensure that you have the electrostatic discharge ESD wrist strap on and that the ESD clip is plugged into a ground jack or connected to an unpainted metal surface If not do so now 2 Slide...

Page 130: ...as shown in Figure 117 on page 117 by pushing them inward Carefully push the system unit until it is 2 5 5 cm 1 2 in away from the rack Note To allow enough room to attach the cable management arm do...

Page 131: ...cure the inner cable management arm to the outer cable management arm The fastener is attached at the narrowest spot G between the basket and the side of the arm See Figure 118 on page 118 Removing an...

Page 132: ...r and outer arm 7 Continue to push the system unit all the way into the rack until both release latches lock the system into the operation position 8 Gently push the cover A in until the cover snaps i...

Page 133: ...gement arm tab is on the right side of the system CAUTION To avoid causing damage to the arm open the cable management arm just long enough to complete these repairs a Release the mounting bracket fro...

Page 134: ...0 Slide each of the power supplies into the system until the latch locks each one in place 11 Using your labels reconnect the power cords A to the system unit Fasten the power cords to the system usin...

Page 135: ...ting the following steps a Swing the cable management arm towards the server b Insert the inner cable management arm tab A into the outer mounting bracket B until it clicks into place as shown The inn...

Page 136: ...ASMI For instructions see Accessing the ASMI without an HMC www ibm com support knowledgecenter POWER9 p9hby connect_asmi htm 18 Verify that the Enclosure serial number and Feature Code Sequence Numb...

Page 137: ...es indicate the value for XXXX YYY is 78D3 001 you should specify 78D3 001 in the Feature Code Sequence Number field f Click Save settings to update and save the Enclosure serial number and Feature Co...

Page 138: ...124 Power Systems System backplane...

Page 139: ...ct s and or the program s described in this publication at any time without notice Any references in this information to non IBM websites are provided for convenience only and do not in any manner ser...

Page 140: ...vision to use information technology content successfully Overview The IBM Power Systems servers include the following major accessibility features Keyboard only operation Operations that use a scree...

Page 141: ...personally identifiable information If the configurations deployed for this Software Offering provide you as the customer the ability to collect personally identifiable information from end users via...

Page 142: ...iteren d rfen auch nur von der IBM empfohlene Kabel angeschlossen werden IBM bernimmt keine Verantwortung f r die Einhaltung der Schutzanforderungen wenn das Produkt ohne Zustimmung von IBM ver ndert...

Page 143: ...Technology Industries Association JEITA Notice This statement applies to products less than or equal to 20 A per phase This statement applies to products greater than 20 A single phase This statement...

Page 144: ...likely to cause harmful interference in which case the user will be required to correct the interference at his own expense Properly shielded and grounded cables and connectors must be used in order t...

Page 145: ...romagnetische Vertr glichkeit in den EU Mitgliedsstaatenund h lt die Grenzwerte der EN 55022 EN 55032 Klasse B ein Um dieses sicherzustellen sind die Ger te wie in den Handb chern beschrieben zu insta...

Page 146: ...d Information Technology Industries Association JEITA Notice This statement applies to products less than or equal to 20 A per phase This statement applies to products greater than 20 A single phase T...

Page 147: ...r modifications to this equipment Unauthorized changes or modifications could void the user s authority to operate the equipment This device complies with Part 15 of the FCC rules Operation is subject...

Page 148: ...export this information except in full compliance with all applicable laws and regulations including all United States export laws and regulations IBM MAKES NO GUARANTEE ABOUT THE CONTENT OF THESE PU...

Page 149: ......

Page 150: ...IBM...

Reviews: