System board assembly
This section describes how to replace the system board assembly. When replacing
the system board, you will replace the system board and blade base as one
assembly. After replacement, you must either update the system with the latest
firmware or restore the pre-existing firmware that the customer provides on a
diskette or CD image.
Note:
See “System-board layouts” on page 7 for more information on the locations
of the connectors, jumpers and LEDs on the system board.
To remove the system board assembly, complete the following steps:
1. Read the safety information that begins on page v, the “Installation guidelines”
on page 59 and “Handling static-sensitive devices” on page 60.
2. Shut down the operating system and turn off the blade server (see “Turning off
the blade server” on page 6).
3. Remove the blade server from the BladeCenter (see “Removing and installing
the blade server in a BladeCenter unit” on page 61).
4. Remove the blade server cover (see “Operating the blade server cover” on
page 64).
5. Remove the blade server bezel assembly (see “Removing and replacing the
bezel assembly” on page 66).
6. Remove any of the installed components listed below from the system board
assembly; then, place them on a non-conductive surface or install them on the
new system board assembly.
v
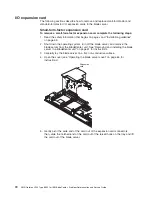
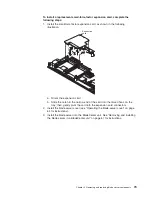
I/O expansion card. See “I/O expansion card” on page 72.
v
Hard disk drives. See “SCSI hard disk drive” on page 67.
v
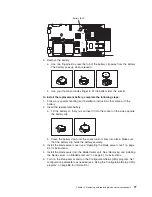
Microprocessors and heat sinks. See “Microprocessor” on page 78.
v
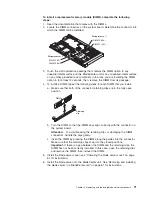
DIMMs. See “Memory modules (DIMMs)” on page 69.
v
Battery. See “Battery” on page 76.
To replace the system board assembly, complete the following steps:
1. Install any of the components listed below that were removed from the old
system board assembly.
v
I/O expansion card. See “I/O expansion card” on page 72.
v
Hard disk drives. See “SCSI hard disk drive” on page 67.
v
Microprocessors and heat sinks. See “Microprocessor” on page 78.
v
DIMMs. See “Memory modules (DIMMs)” on page 69.
v
Battery. See “Battery” on page 76.
2. Install the bezel assembly (see “Removing and replacing the bezel assembly”
on page 66 for instructions).
3. Install the blade server cover (see “Operating the blade server cover” on page
64 for instructions).
4. Install the blade server into the BladeCenter unit. See “Removing and installing
the blade server in a BladeCenter unit” on page 61 for instructions.
84
AMD Opteron LS20 Type 8850 for IBM BladeCenter: Problem Determination and Service Guide
Summary of Contents for LS20 - BladeCenter - 8850
Page 1: ...AMD Opteron LS20 Type 8850 for IBM BladeCenter Problem Determination and Service Guide...
Page 2: ......
Page 3: ...AMD Opteron LS20 Type 8850 for IBM BladeCenter Problem Determination and Service Guide...
Page 14: ...xii AMD Opteron LS20 Type 8850 for IBM BladeCenter Problem Determination and Service Guide...
Page 72: ...58 AMD Opteron LS20 Type 8850 for IBM BladeCenter Problem Determination and Service Guide...
Page 104: ...90 AMD Opteron LS20 Type 8850 for IBM BladeCenter Problem Determination and Service Guide...
Page 114: ...100 AMD Opteron LS20 Type 8850 for IBM BladeCenter Problem Determination and Service Guide...
Page 115: ......
Page 116: ...Part Number 49Y0167 Printed in USA 1P P N 49Y0167...


