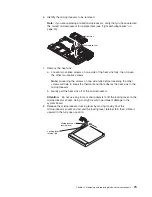
2. Touch the static-protective package that contains the replacement
microprocessor to any
unpainted
metal surface on the blade server or any
unpainted
metal surface on any other grounded rack component in the rack you
are installing the microprocessor in for at least 2 seconds; then, remove the
microprocessor from the package.
Attention:
Do not use excessive force when pressing the microprocessor into
the socket.
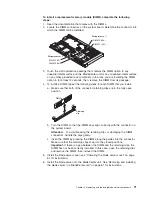
3. Center the microprocessor over the microprocessor socket. Align the triangle on
the corner of the microprocessor with the triangle on the corner of the socket
and make sure that the pin patterns of the microprocessor and microprocessor
socket match; then, carefully press the microprocessor into the socket.
Microprocessor
orientation indicator
Microprocessor-
locking lever
Microprocessor
socket
Microprocessor
Attention:
Make sure that the microprocessor is oriented and aligned correctly
in the socket before you try to close the lever.
4. Carefully close the lever to secure the microprocessor in the socket.
Note:
A new microprocessor comes in a kit with a heat sink.
82
AMD Opteron LS20 Type 8850 for IBM BladeCenter: Problem Determination and Service Guide
Summary of Contents for LS20 - BladeCenter - 8850
Page 1: ...AMD Opteron LS20 Type 8850 for IBM BladeCenter Problem Determination and Service Guide...
Page 2: ......
Page 3: ...AMD Opteron LS20 Type 8850 for IBM BladeCenter Problem Determination and Service Guide...
Page 14: ...xii AMD Opteron LS20 Type 8850 for IBM BladeCenter Problem Determination and Service Guide...
Page 72: ...58 AMD Opteron LS20 Type 8850 for IBM BladeCenter Problem Determination and Service Guide...
Page 104: ...90 AMD Opteron LS20 Type 8850 for IBM BladeCenter Problem Determination and Service Guide...
Page 114: ...100 AMD Opteron LS20 Type 8850 for IBM BladeCenter Problem Determination and Service Guide...
Page 115: ......
Page 116: ...Part Number 49Y0167 Printed in USA 1P P N 49Y0167...


