Attention:
Do
not
touch
the
thermal
material
on
the
bottom
of
the
heat
sink.
Touching
the
thermal
material
will
contaminate
it.
If
the
thermal
material
on
the
microprocessor
or
heat
sink
becomes
contaminated,
you
must
replace
the
heat
sink.
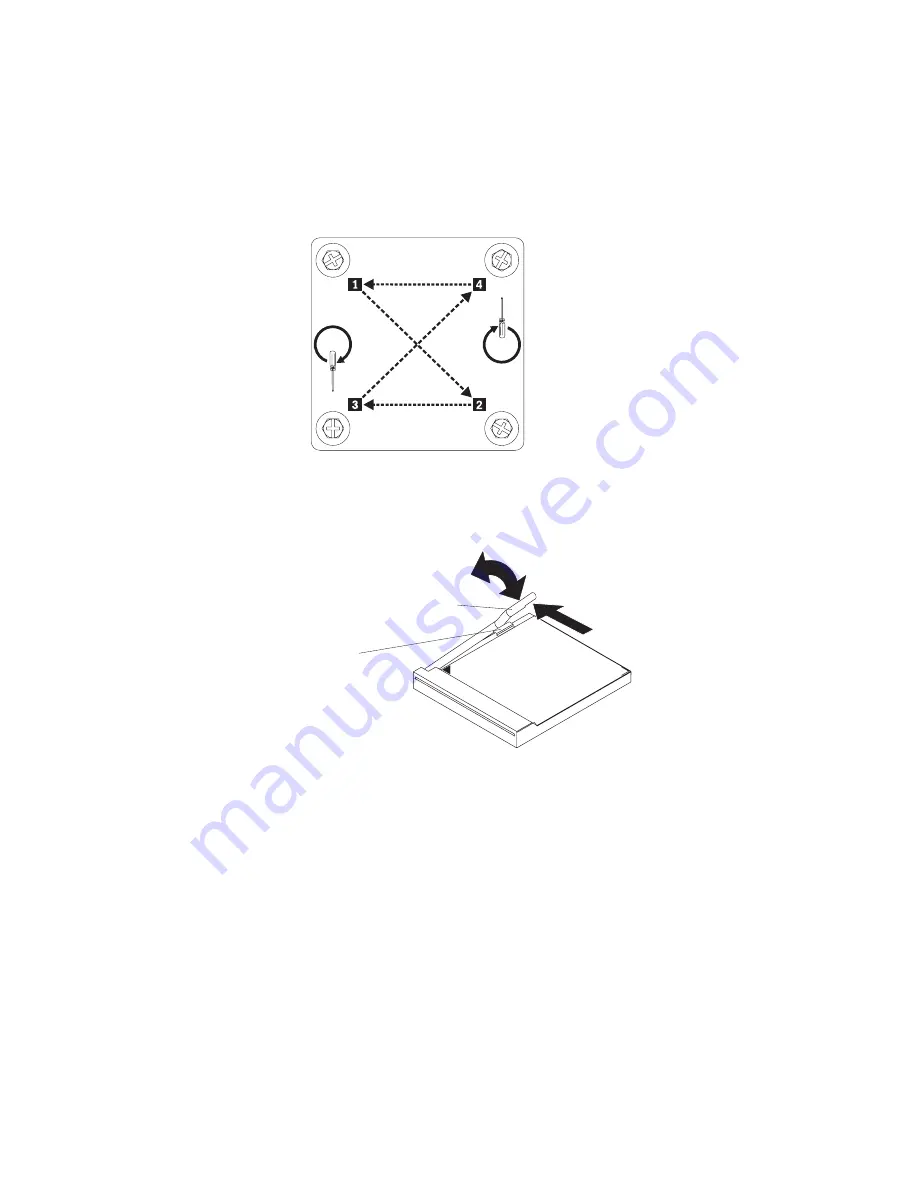
a.
Press
firmly
on
the
captive
screws
and
loosen
them
with
a
screwdriver.
Follow
the
pattern
that
is
shown
on
the
following
label.
Rotate
each
screw
two
full
turns
each
time.
Repeat
the
sequence
until
the
screws
are
loose.
REPEAT SEQUENCE
UNTIL TIGHT.
720°
720°
b.
Use
your
fingers
to
gently
pull
the
heat
sink
from
the
processor.
7.
Use
your
fingers
to
release
the
microprocessor
locking
lever
by
moving
it
away
from
the
microprocessor
socket
and
around
the
locking
lever
retainer,
tab
then,
rotate
it
upward
to
the
fully
open
position
(approximately
90°
angle).
Microprocessor-
locking lever
Locking lever
retainer tab
Attention:
Make
sure
that
the
locking
lever
on
the
microprocessor
socket
is
in
the
fully
open
position
before
you
remove
the
microprocessor
from
or
insert
the
microprocessor
into
the
socket.
Failure
to
do
so
might
result
in
permanent
damage
to
the
microprocessor,
microprocessor
socket,
and
system
board.
Chapter
4.
Removing
and
replacing
blade
server
components
73
Summary of Contents for eServer BladeCenter HS20 Type 8832
Page 1: ...BladeCenter HS20 Type 7981 and 1884 Problem Determination and Service Guide ...
Page 2: ......
Page 3: ...BladeCenter HS20 Type 7981 and 1884 Problem Determination and Service Guide ...
Page 8: ...vi BladeCenter HS20 Type 7981 and 1884 Problem Determination and Service Guide ...
Page 16: ...xiv BladeCenter HS20 Type 7981 and 1884 Problem Determination and Service Guide ...
Page 68: ...52 BladeCenter HS20 Type 7981 and 1884 Problem Determination and Service Guide ...
Page 98: ...82 BladeCenter HS20 Type 7981 and 1884 Problem Determination and Service Guide ...
Page 110: ...94 BladeCenter HS20 Type 7981 and 1884 Problem Determination and Service Guide ...
Page 111: ......
Page 112: ... Part Number 31R1716 Printed in USA 1P P N 31R1716 ...


