background image

Chapter 3.  Operating and caring for your computer


17

Using the IBM ScrollPoint II mouse

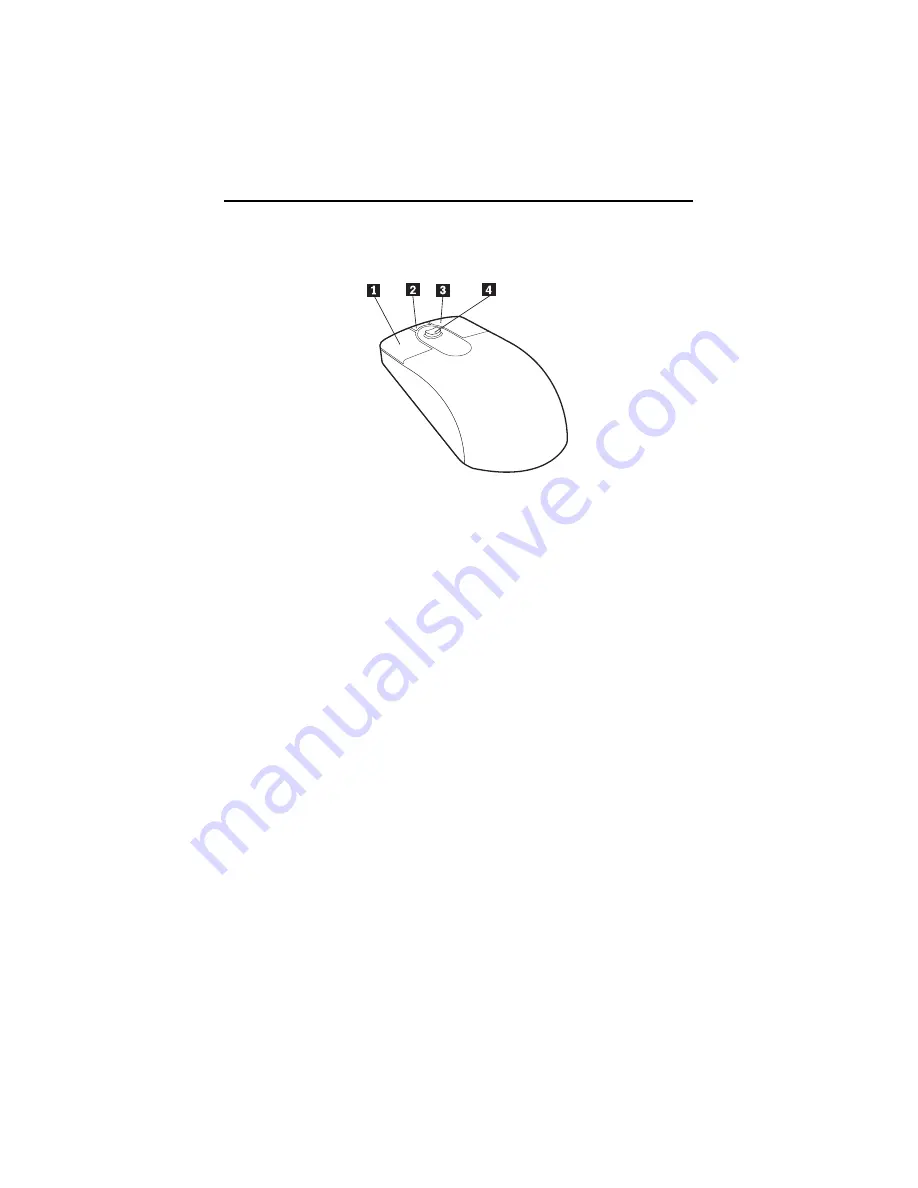
 The ScrollPoint II mouse has the following controls.

Þ

1

Ý

Primary mouse button:

 Use this button to select or start a program or menu 

item.

Þ

2

Ý

Quick/auto scroll button:

 Use this button to put the mouse into auto-scroll 

mode. When the mouse is in auto-scroll mode, the movement of the mouse 
controls the scrolling direction and speed. To exit from the auto-scroll mode, click 
any of the mouse buttons.

Þ

3

Ý

Context menu button:

 Use this button to display a menu for the active 

program, icon, or object.

Þ

3

Ý

Context menu button:

 Use this button to display a menu for the active 

program, icon, or object.

Þ

4

Ý

Scroll stick:

 Use this stick to control the scrolling action of the mouse. This 

stick is pressure sensitive. The direction in which you apply pressure controls the 
direction of the scrolling action. The amount of pressure you apply controls the 
scrolling speed.

Note:

 The Scroll stick works only when the mouse pointer is located over a 
scrollable area, such as a long document.

Summary of Contents for 6643

Page 1: ...IBM User Guide NetVista X40 Type 6643...

Page 2: ...IBM User Guide NetVista X40 Type 6643...

Page 3: ...ranty and notices on page 87 Note First Edition March 2000 COPYRIGHT INTERNATIONAL BUSINESS MACHINES CORPORATION 2000 All rights reserved Note to U S Government Users Documentation related to restrict...

Page 4: ...IBM...

Page 5: ...use features 3 Expansion capability 3 Power 3 Security features 3 Supported operating systems 3 Software 4 IBM preinstalled software 4 Additional software 4 Access IBM 4 Chapter 2 Setting up your comp...

Page 6: ...26 Locking the cover 26 Locking the keyboard 26 Taking care of your computer 27 Basics 27 Cleaning your computer and keyboard 27 Monitor and screen 27 Mouse 28 Moving your computer 29 Chapter 4 Using...

Page 7: ...69 Universal Serial Bus USB problems 69 IBM Enhanced Diagnostics 69 Creating an IBM Enhanced Diagnostics diskette 70 Running the IBM Enhanced Diagnostics program 70 Replacing the battery 71 Chapter 7...

Page 8: ...ico and Canada Part 1 General Terms 87 IBM Statement of Warranty Worldwide except Canada Puerto Rico Turkey United States Part 1 General Terms 90 Part 2 Worldwide Country Unique Terms 94 Notices 98 Pr...

Page 9: ...guration procedures Connect and disconnect cables as described in the following table when installing moving or opening covers on this product or attached devices DANGER Le courant lectrique passant d...

Page 10: ...Number 33F8354 or an equivalent type battery recommended by the manufacturer The battery contains lithium and can explode if not properly used handled or disposed of Do not Throw or immerse into wate...

Page 11: ...rtant de respecter les consignes ci apr s afin de r duire les risques d incendie d lectrocution et d autres blessures N installez jamais de cordons t l phoniques durant un orage Les prises t l phoniqu...

Page 12: ...is l unit de CD ROM DVD ROM est certifi e conforme aux normes indiqu es dans le sous chapitre J du DHHS 21 CFR relatif aux produits laser de classe 1 Dans les autres pays elle est certifi e tre un pro...

Page 13: ...Purpose DANGER A DANGER notice is used to call attention to a situation that is potentially lethal or extremely hazardous to people CAUTION A CAUTION notice is used to call attention to a situation th...

Page 14: ...ftware Hardware Maintenance Manual This publication for trained service technicians can also be ordered from IBM To purchase a copy refer to Chapter 7 Getting help service and information on page 75 T...

Page 15: ...r features and preinstalled software Identifying your computer In most instances the best way to identify your computer is by the machine type model number The machine type model number indicates the...

Page 16: ...ockets 133 MHz synchronous dynamic random access memory SDRAM 64 and 128 MB non parity non ECC DIMMs standard 256 MB non parity non ECC DIMMs optional 512 MB maximum SDRAM supported Flash memory for s...

Page 17: ...profile PCI adapter expansion slots Five USB connectors Two DIMM sockets Power 110 watts Manual switch between ranges 90 137 or 180 265 V ac Automatic switching 57 63 or 47 53 Hz input frequency range...

Page 18: ...er Access IBM The Access IBM program is preinstalled on your computer and is accessible from the Windows desktop It provides the following For more information about Access IBM see the About Your Soft...

Page 19: ...t your place of purchase Selecting a location for your computer Make sure you have an adequate number of properly grounded electrical outlets for the computer and any other attached devices Select a l...

Page 20: ...ould have a curved front to relieve pressure on the thighs Adjust the seat so that your thighs are parallel to the floor and your feet are either flat on the floor or on a footrest When using the keyb...

Page 21: ...ociated with glare Remember to clean your monitor screen periodically using a soft cloth moistened with a nonabrasive liquid glass cleaner Air circulation Your computer and monitor produce heat The co...

Page 22: ...trical outlet Keep power cords and cables neatly routed away from walkways and other areas where they might be accidentally dislodged Connecting cables Read the following before connecting cables Conn...

Page 23: ...mouse printer or scanner can be connected to any one of the available USB connectors These cables can be relocated to other USB connectors at a later time if desired The two USB connectors on the Rap...

Page 24: ...ers serial and type model at the right side of your computer and record this information See Appendix A Computer records on page 85 See Related information on page xiv for sources of other information...

Page 25: ...tarted in the About Your Software publication to continue with the software setup of your computer For information about how to turn on your computer see Chapter 3 Operating and caring for your comput...

Page 26: ...12 User Guide...

Page 27: ...function such as turning on the computer The lights are status indicators that tell you when a certain device such as the diskette drive is in use 1 Hard disk drive in use indicator 2 Power standby in...

Page 28: ...button Press this button to lower the device bay for access to the diskette drive and the CD ROM or DVD ROM drive To close it push upward on the CD ROM or DVD ROM drive until it latches in the closed...

Page 29: ...upport important multimedia functions on your computer Mute Volume and CD ROM or DVD ROM controls these cannot be changed There are eight color coded Rapid Access buttons positioned across the top of...

Page 30: ...Rapid Access The Rapid Access Keyboard Customization program starts 4 Follow the instructions on the screen To learn more about the Rapid Access keyboard click Help 1 Standby button 2 Standby LED 3 Nu...

Page 31: ...from the auto scroll mode click any of the mouse buttons 3 Context menu button Use this button to display a menu for the active program icon or object 3 Context menu button Use this button to display...

Page 32: ...drive of your computer Data is stored on the magnetic surface of the diskette This surface is protected by a plastic cover Handling and storing diskettes Inside the protective diskette case is a flexi...

Page 33: ...notes to your computer Do not store diskettes at extremely high or low temperatures or in direct sunlight Temperatures ranging from 4 to 53 degrees C 39 to 127 degrees F are acceptable for 3 5 inch d...

Page 34: ...change the data Most 3 5 inch diskettes have a write protect switch that can be used to prevent data from being written to or erased from the diskette If a 3 5 inch diskette does not have a write prot...

Page 35: ...urface Direct sunlight Do not insert any object other than a CD or DVD into the drive Before moving the computer remove the CD or DVD from the drive Handling a CD or DVD disc When handling a CD or DVD...

Page 36: ...the tray by gently pushing the tray closed When the tray is closed the indicator light on the front of the drive will activate to indicate that the drive is in use To remove a disc 1 With the compute...

Page 37: ...ions for installing the device drivers are provided on the Product Recovery CD that comes with your computer If your computer has IBM preinstalled software video device drivers have already been insta...

Page 38: ...te If you experience interference or speaker feedback while recording try reducing the microphone recording volume gain Using power management features Your computer supports the Standby feature This...

Page 39: ...ton With Windows you can set your power button to one of two modes Shutdown or Standby When the power button is set for Standby the computer goes into Standby mode if you press the button for less tha...

Page 40: ...tions 5 After making the changes click OK After the computer hard disk drive or monitor has entered Standby mode any use of the keyboard or mouse or an incoming modem ring brings the computer monitor...

Page 41: ...rinks away from all parts of your computer Food particles and spills might make the keyboard and mouse sticky and unusable Do not get the power buttons or other controls wet Moisture can damage these...

Page 42: ...ating it in the direction of the arrow Note Some mice have lock and unlock symbols to indicate how far you need to rotate the retainer 4 Place your hand over the retainer and turn the mouse right side...

Page 43: ...etwork cables from the phone line or network first and then disconnect the other ends of cables from the computer 5 Disconnect all cables connecting external devices such as a keyboard mouse printer s...

Page 44: ...30 User Guide...

Page 45: ...en you start this procedure you must shut down the operating system turn off the computer wait a few seconds until all in use lights go off and restart the computer Pressing F1 after Ctrl Alt Del will...

Page 46: ...available A change to that item has been made in the system configuration or the Configuration Setup Utility program has detected an error and attempted to correct it Also an additional menu might fo...

Page 47: ...e saved Using passwords You can use passwords to provide security for your computer and data There are two kinds of passwords a power on password and an administrator password Use these arrow keys to...

Page 48: ...type the wrong password three times you must turn the computer off and start again If both the power on and administrator passwords are set you can type either password However to change any configura...

Page 49: ...settings To set Security Profile by Device do the following 1 Start the Configuration Setup Utility program see Starting and using the Configuration Setup Utility program on page 31 2 From the Config...

Page 50: ...ss Esc until you return to the Configuration Setup utility program menu 5 Select Save Settings from the Configuration Setup utility menu and press Enter then press Esc and follow the instructions on t...

Page 51: ...Setup Utility program 37 9 When prompted press Enter to exit from the Configuration Setup Utility program For more information about the Pentium III microprocessor visit http www intel com pentiumiii...

Page 52: ...38 User Guide...

Page 53: ...ontaining the option until you are instructed to do so When you handle options and other computer components take these precautions to avoid static electricity damage Limit your movement Movement can...

Page 54: ...initial settings ConfigSafe is a part of the preinstalled software in your computer For more information use the ConfigSafe help system Available options For the latest information about available opt...

Page 55: ...the system board System board 1 Fan connector 2 Microprocessor 3 DIMM sockets SDRAM 4 Power connector 5 CD ROM or DVD ROM drive connector 6 Diskette drive connector 7 Hard disk drive connector 8 CMOS...

Page 56: ...ithout all covers in place To remove the rear cover do the following 1 Disconnect all cables attached to your computer See Disconnecting cables 2 Place the computer on a padded surface in the position...

Page 57: ...Chapter 5 Installing options 43...

Page 58: ...ove the rear computer cover See Removing the rear cover on page 42 2 To release the hard disk drive use a flat blade screwdriver or coin and pry up on the latch as shown in the following illustration...

Page 59: ...ng 1 Remove the rear cover See Removing the rear cover on page 42 2 Remove the hard disk drive See Removing the hard disk drive on page 44 3 Remove the four thumbscrews holding the system board cover...

Page 60: ...46 User Guide Note You can leave the fan cable connected to the system board or disconnect it if necessary For the location of the fan cable connector see System board on page 41...

Page 61: ...ust contain the same amount of memory To install a DIMM do the following 1 Remove the rear computer cover See Removing the rear cover on page 42 2 Remove the hard disk drive See Removing the hard disk...

Page 62: ...aking sure that the notches in the DIMM are aligned with the tabs on the socket Push the DIMM straight down into the connector until the retaining clips close 7 Replace the system board cover 8 Replac...

Page 63: ...ength and 5 15 cm 2 04 inches in height To install an adapter do the following 1 Remove the rear cover See Removing the rear cover on page 42 2 Remove the hard disk drive See Removing the hard disk dr...

Page 64: ...50 User Guide...

Page 65: ...not identify a hardware problem and have not made a user error you might have a software problem If you suspect that you have a software problem and your computer comes with IBM preinstalled software...

Page 66: ...isplayed Is an error message displayed No Continue at step 3 Yes Refer to POST error codes on page 53 and look for the error message then return here Is the error message in this table No The message...

Page 67: ...ms with or changes to the hardware configuration during startup POST error messages are 3 4 5 8 or 12 character alphanumeric messages and include brief explanations POST error codes The computer might...

Page 68: ...ed 167 Clock not updating Have the computer serviced 168 Alert on LAN is not working correctly 1 Go to Starting and using the Configuration Setup Utility program on page 31 and follow the instructions...

Page 69: ...2 If the problem persists have the computer serviced 605 Diskette unlocked problem Have the computer serviced 662 Diskette drive configuration error 1 Go to Starting and using the Configuration Setup...

Page 70: ...page 31 and follow the instructions to reconfigure the PCI devices 1962 No startup device found 1 Go to Starting and using the Configuration Setup Utility program on page 31 and follow the instructio...

Page 71: ...o problems Audio problems on page 58 CD ROM or DVD ROM drive CD ROM or DVD ROM drive problems on page 59 Diskette drive Diskette drive problems on page 61 Display monitor Display monitor problems on p...

Page 72: ...If these actions do not correct the problem run the diagnostic programs see Running the IBM Enhanced Diagnostics program on page 70 If you need technical assistance see Chapter 7 Getting help service...

Page 73: ...ical assistance see Chapter 7 Getting help service and information on page 75 A CD or DVD does not work Verify that the disc is inserted correctly with its label up Make sure that the disc you are usi...

Page 74: ...ce is clean and not scratched 3 Check all cable connections to and from the speakers 4 Select a different audio track If you need technical assistance see Chapter 7 Getting help service and informatio...

Page 75: ...6 That there is no problem with your software program see Software problems on page 69 If you cannot correct the problem have the computer serviced Symptom Action General monitor problems 1 Make sure...

Page 76: ...operly installed If you cannot correct the problem have the computer serviced Symptom Action A problem occurs only occasionally and is difficult to repeat Verify that 1 All cables and cords are secure...

Page 77: ...with Rapid Access Buttons To access the program and start the help system a From the Windows desktop click Start b Select Settings and then click Control Panel c Double click Keyboard Rapid Access The...

Page 78: ...ee Installing memory on page 47 2 The DIMMs are properly installed and securely connected 3 If you added or removed memory you saved the new configuration before exiting from the Configuration Setup U...

Page 79: ...modem such as an asymmetric digital subscriber line ADSL adapter or home networking adapter refer to the documentation for those devices to ensure the cords are properly connected 2 Make sure no one i...

Page 80: ...ke sure you are calling the correct number and that you are using the correct communications settings For additional help refer to the documentation for your communications software 4 Make sure no one...

Page 81: ...ou select a modem type of Other you must include the proper modem initialization string For most programs the initialization string AT F will work Baud rate 115200 Kbps or the maximum setting offered...

Page 82: ...the documentation for any other installed adapters to determine the resources required for each adapter 6 You updated the configuration information in the Configuration Setup Utility program if neces...

Page 83: ...t work as expected To determine if problems are caused by installed software verify that 1 Your computer has the minimum memory requirements needed to use the software See the information supplied wit...

Page 84: ...iskette into the diskette drive A 7 Type the following and press Enter filename a where filename is the name of the file you downloaded from the Web The self extracting downloaded file is copied to th...

Page 85: ...select Run Diagnostics The IBM Enhanced Diagnostics program starts 16 When you finish running the diagnostic program remove the CD from the CD ROM or DVD ROM drive and turn off the computer If you ch...

Page 86: ...keting representative To change the battery do the following 1 Turn off the computer and all attached devices 2 Remove the rear cover See Removing the rear cover on page 42 3 Remove the hard disk driv...

Page 87: ...time after battery replacement an error message might be displayed This is normal after the battery is replaced 8 Turn on the computer and all attached devices 9 Use the Configuration Setup Utility p...

Page 88: ...74 User Guide...

Page 89: ...tion Workstations U S http www ibm com pc us accessories Options by IBM U S http www ibm com pc us netfinity IBM Netfinity Servers U S You can select a country specific Web site from these pages Help...

Page 90: ...d mouse are required for many service activities Before you have the computer serviced be sure to have these components attached to your computer either directly or through a console switch The follow...

Page 91: ...he World Wide Web the IBM Personal Computing Web site has up to date information about IBM Personal Computer products and support The address for the IBM Personal Computing home page is http www ibm c...

Page 92: ...the U S and Canada you can receive by fax marketing and technical information on many topics including hardware operating systems and local area networks LANs You can call the IBM Automated Fax System...

Page 93: ...erating system Installing and configuring interface cards Installing and configuring network adapters Please have the following information ready when you call Machine Type and Model Serial numbers of...

Page 94: ...ountries contact your IBM reseller or IBM marketing representative Purchasing additional services During and after the warranty period you can purchase additional services such as support for IBM and...

Page 95: ...es 900 number operating system and hardware support line In the U S if you prefer to obtain technical support on a pay as you go basis you can use the 900 number support line The 900 number support li...

Page 96: ...rranty period Warranty upgrades in the U S include Carry in service to on site service If your warranty provides carry in repair service you can upgrade to on site repair service either standard or pr...

Page 97: ...publications Additional publications are available for purchase from IBM For a list of publications available in your country In the U S Canada and Puerto Rico call 1 800 879 2755 In other countries...

Page 98: ...84 User Guide...

Page 99: ...he computer and also on a label on the front of the computer The registration number is required for service or support You can register your computer by telephone when you call for service or support...

Page 100: ...86 User Guide...

Page 101: ...IBM in this Statement of Warranty apply only to Machines you purchase for your use and not for resale from IBM or your reseller The term Machine means an IBM machine its features conversions upgrades...

Page 102: ...from misuse accident modification unsuitable physical or operating environment improper maintenance by you or failure caused by a product for which IBM is not responsible The warranty is voided by re...

Page 103: ...nversion or upgrade Many features conversions or upgrades involve the removal of parts and their return to IBM A part that replaces a removed part will assume the warranty service status of the remove...

Page 104: ...ES OTHER THAN THOSE UNDER THE FIRST ITEM LISTED ABOVE 2 LOSS OF OR DAMAGE TO YOUR RECORDS OR DATA OR 3 SPECIAL INCIDENTAL OR INDIRECT DAMAGES OR FOR ANY ECONOMIC CONSEQUENTIAL DAMAGES INCLUDING LOST P...

Page 105: ...ine resulting from misuse accident modification unsuitable physical or operating environment improper maintenance by you or failure caused by a product for which IBM is not responsible The warranty is...

Page 106: ...ay repair the failing Machine or exchange it at its discretion When warranty service involves the exchange of a Machine or part the item IBM or your reseller replaces becomes its property and the repl...

Page 107: ...where because of a default on IBM s part or other liability you are entitled to recover damages from IBM In each such instance regardless of the basis on which you are entitled to claim damages from I...

Page 108: ...on then none of the limitations in this paragraph apply PEOPLE S REPUBLIC OF CHINA Governing Law The following is added to this Statement The laws of the State of New York govern this Statement INDIA...

Page 109: ...rvice or 2 from IBM The applicable laws Country unique terms and competent court for this Statement are those of the country in which the warranty service is being provided However the laws of Austria...

Page 110: ...olation of essential contractual terms in cases of ordinary negligence IRELAND Extent of Warranty The following is added to this Section Except as expressly provided in these terms and conditions all...

Page 111: ...customer orders for IBM Machines as newly manufactured in accordance with IBM s production standards UNITED KINGDOM Limitation of Liability The following replaces items 1 and 2 of the first paragraph...

Page 112: ...t apply to the United Kingdom or any country where such provisions are inconsistent with local law INTERNATIONAL BUSINESS MACHINES CORPORATION PROVIDES THIS PUBLICATION AS IS WITHOUT WARRANTY OF ANY K...

Page 113: ...Year 2000 Readiness Disclosure Trademarks The following terms are trademarks of the IBM Corporation in the United States or other countries or both Alert on LAN IBM NetVista ScrollPoint Wake on LAN In...

Page 114: ...omplies with Part 15 of the FCC Rules Operation is subject to the following two conditions 1 this device may not cause harmful interference and 2 this device must accept any interference received incl...

Page 115: ...be certain of the number of devices you may connect to your line as determined by the REN you should call your local telephone company to determine the maximum REN for your calling area 3 If the devic...

Page 116: ...lic water pipe system if present are connected together This precaution may be particularly important in rural areas Caution Users should not attempt to make such connections themselves but should con...

Page 117: ...indices d quivalence de la sonnerie de tous les dispositifs n exc de pas 5 Power cord notice For your safety IBM provides a power cord with a grounded attachment plug to use with this IBM product To a...

Page 118: ...n Republic Ecuador El Salvador Guatemala Haiti Honduras Mexico Nicaragua Panama Paraguay Peru Taiwan United States of America Uruguay Venezuela 13F0036 Australia New Zealand 34G0228 Japan 13F9975 Finl...

Page 119: ...ette 69 disconnecting cables 42 diskette drive 18 diskette drive problems 61 display monitor prob lems 61 DVD ROM drive 60 E electrical outlets and cable lengths 8 electronic support 78 Ethernet conne...

Page 120: ...security features 3 secutity profile by device 34 selecting a location 5 server startup support 79 server support 79 service summary 75 services fee 80 setting startup sequence 36 setting up your com...

Page 121: ...IBM Part Number 19K6553 Printed in the United States of America on recycled paper containing 10 recovered post consumer fiber 19K6553...

Page 122: ...IBM...

Reviews: