


you can now enjoy the ultra-compact size of a real PDA with essential Windows-compatible applications, including a
Calendar, Contacts Manager, word processor, DAISY books reader,
Vocal Note Taker, Media Player, and Email
. Maestro allows you to easily transfer files between your PDA and your PC and synchronize your appointments, contact information, e-mails,
tasks, books, music files and documents. Furthermore, Maestro can also become an enhanced GPS orientation aid by adding the Trekker option.
1.2
Introduction to Trekker
Trekker is HumanWare's revolutionary orientation aid. It uses the Global Positioning System (GPS), and digital maps to help blind and visually impaired people find their way in urban and
rural areas. Trekker users can pinpoint exactly where they are, and be made aware of points of interest in the area. It complements existing mobility aids (white canes and guide dogs). It
does not replace them.
Sleek and discreet, Trekker provides information in the most natural way possible and allows users to record both vocal and written notes. A wide variety of maps covering North
American and European countries are available. For a list of available coverage, please consult our website. Maps can be bought from HumanWare's website. They will be delivered on
CD or online. User-friendly Trekker employs off-the-shelf hardware for GPS input.
You can purchase Trekker as a standalone system (Trekker solo) or add it as an option to the Maestro suite of applications.
1.3
Before You Begin
Before you begin, we strongly recommend that you take the time to examine the contents of your PDA package and review the enclosed documentation. These steps will ensure that the
setup and operation of your PDA will be smooth and enjoyable.
NOTE:
If you are already familiar with Windows Commands and want to learn how to use the system immediately, please proceed directly to section 4.
1.4
Contents of the Package
Basic components:
HP iPAQ 4150 or Dell Axim X50 PDA
Tactile Keyboard
Desktop Cradle and USB Connector Cable
Power Supply Adapter
Carrying Case
Keyboard stencil (for sighted users)
Tactile description of the PDA
Standard PDA software and documentation package containing print documents and Companion CD
Trekker components:
GPS Receiver RoyalTek RBT 1000ST & Clip-on case
External Speaker with audio cable
Power Splitter (used to charge the GPS receiver, External Speaker or PDA at the same time)
Strap
Travel Bag
A GPS map on CD and a storage card
Trekker Getting Started Guide (Print and Braille)
Maestro components:
Bud type Earphones
Maestro Getting Started Guide (Print and Braille)
1.5
Sources of Information
Help for Maestro (or Trekker) is available from a number of sources such as:
Key Describer Mode
: is available anywhere in Maestro (or Trekker) and provides a description of any key pressed. This is a great way to learn about the Maestro or Trekker solo
interface.
General Help
: contains information about Maestro or Trekker software and is available on your PDA from the System Menu or from the Application menu of each Maestro application.
Contextual Help
: is available at the application level and contains specific help for the current dialog.
Maestro or Trekker Quick Reference Guide
: gives a complete listing of all key functions on the PDA. It is available from the System Menu, the Application menu of each Maestro
application, and the Maestro (or Trekker) Companion CD.
Maestro
& Trekker
User’s Guide
: contains in-depth information on Maestro & Trekker and is available on the Maestro (or Trekker) Companion CD.
Maestro or Trekker Getting Started Guide
: provides basic information and comes as a printed and Braille document in your package. It is also available on the Maestro (or Trekker)
Companion CD.
Standard PDA's User's Guide
: contains more in-depth information and is available on the PDA Companion CD.
Standard PDA’s Getting Started Guide
: contains basic information on the PDA and comes as a printed document in your PDA package.
Tutorial
: Explore the CD to find this helpful tutorial.
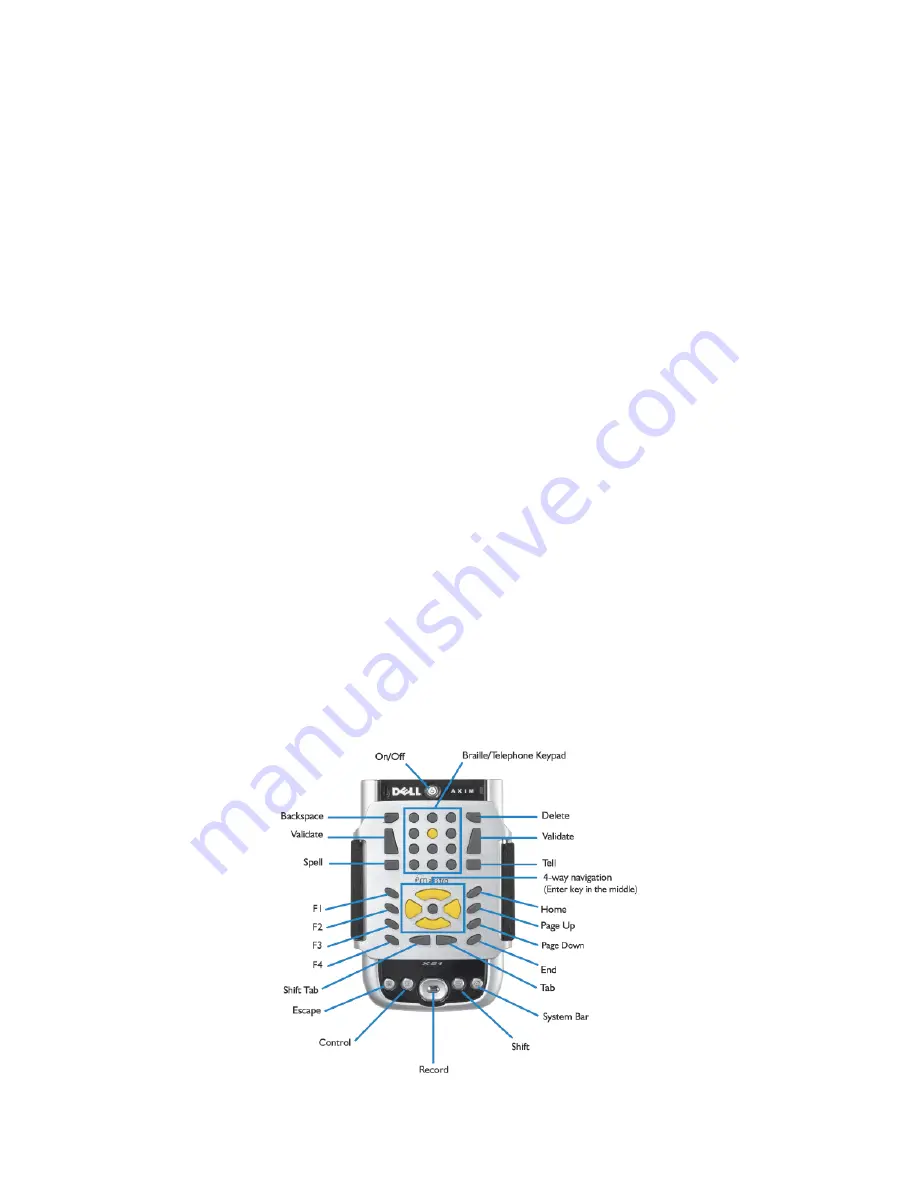
2.
Description of the PDA
2.1
Top Front
Power button
:
Located at the top on the front of the PDA. It is used to turn the unit On. When an application is running and the PDA is Off, use this button to turn the unit On. To turn
the unit Off, press and hold the
System Bar
key, located at the bottom right side of the PDA.


