


To charge the battery, connect the External Speaker to a power outlet using the AC/DC Adaptor and the Power Splitter. It takes about 4 hours to fully charge the battery.
14.2
GPS Receiver
Trekker is currently shipped with the RoyalTek RBT-1000 ST GPS. However, the Bluetooth GPS technology is advancing rapidly and so are the GPS receivers. Please visit our website
at
www.humanware.ca
to consult an updated list of compatible GPS devices.
On the right side of the RoyalTek GPS you will find a Power Switch and a rubber cover. Slide the Power Switch back and forth to power On/Off. When you open the rubber cover with
your fingernail, you will find a Power Jack, and an External Receiver Port.
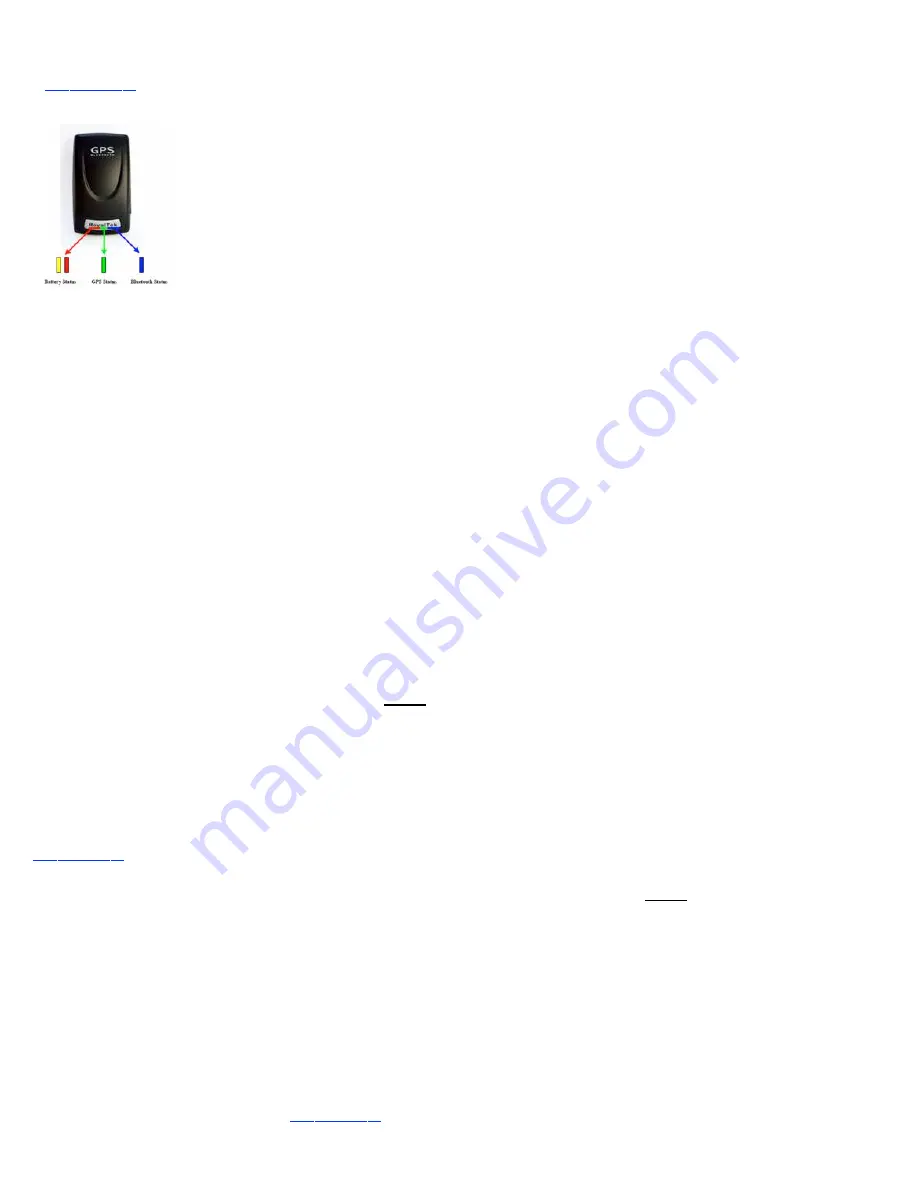
The LED Indicators are located on the face panel, underneath the
RoyalTek
label and described from left to right as follows:
The
Battery Status LED
(Roy):
Yellow - Red
A constant yellow light indicates that the GPS is connected to the power outlet and charging. A Blinking red light indicates the Battery level is low -
Charging immediately is required.
The
GPS Status LED
(al):
Green
A constant green light indicates that the GPS receiver is powered On but the GPS position is not fixed. A blinking Green light indicates the GPS position
is fixed.
The
Bluetooth Status LED
(Tek):
Blue
A Blinking Blue light indicates Bluetooth is in connection.
Make sure the battery is fully charged before using the Bluetooth GPS. When charging, connect the AC/DC adapter (with the Power Splitter) to the GPS
power jack, and plug into an electrical outlet. As the device is charging, the Battery Status LED will show a yellow light. It takes about 4 hours to fully
charge the battery. When the battery is fully charged, the Battery Status LED will turn Off. Unplug the device and remove the AC/DC adapter. For more
information visit the RoyalTek Website at http://www.RoyalTek.com.
14.2.1
Setting Up the Bluetooth GPS
The Bluetooth GPS Set up operation allows the PDA to identify and establish a one-to-one relationship with the GPS and should be done and required only on first connection.
From the
Configuration
menu
or the
System Bar
choose the
Bluetooth
option, and press
Enter
.
Press the
Turn Bluetooth On
button, a blue light will flash to indicate the PDA Bluetooth Radio
is On. Note that the
Turn Bluetooth On
button
will
switch to
Turn
Bluetooth Off
when the
Bluetooth is turned On
.
Press
Tab
to go to the
Bluetooth device type list
and select the GPS RoyalTek 1000ST.
Press
Tab
to go to the
Enable Bluetooth device button
and press
Enter
.
Maestro
(or Trekker) announces, "We are enabling your device, please wait... ".
CAUTION:
The Enabling Bluetooth device operation is required only on the first connection. Do not enable a Bluetooth device that is already set. Do not attempt to disable or enable
unless you have to replace this device with a new one, or after performing a PDA hard reset or reinstalling the Maestro
(or Trekker)
application..
14.2.2
Using the Bluetooth GPS
Power On the GPS receiver and start Trekker. Make sure the Bluetooth Radio is On (
Turn Bluetooth On).
Trekker will then try to connect to the GPS. Wait for the Audio connection
feedback. The GPS is ready to use.
When starting Trekker, if the GPS receiver is powered On and if the Bluetooth keyboard is not in use, Trekker will automatically connect with the GPS receiver.
If the Bluetooth keyboard is in use, Trekker will announce that the GPS is not accessible. In this case, go to
Trekker Application Menu
–
Settings
-
Set GPS On
(or press and hold
F2
) to
connect the GPS device and disconnect the Keyboard.
If the GPS receiver is powered Off when starting Trekker turn your GPS receiver On, then go to the
Trekker Application Menu
–
Settings
-
Set GPS On
(or press and hold
F2
) to connect
the Bluetooth GPS.
After using the GPS receiver, if you want to use the
Bluetooth Keyboard,
power Off the receiver or press and hold
F2
to set the GPS Off and power On the keyboard Trekker will
automatically connect to your keyboard.
14.2.3
GPS Troubleshooting
If the GPS does not work verify the following:
The GPS is Off?
Turn On your GPS. Go to the
Trekker
menu
– Settings – Set GPS On
(or press and hold
F2
).
The GPS’s battery is dead?
Verify and charge the battery if necessary.
The Bluetooth Radio is turned Off?
Verify the Bluetooth Radio status in the System Bar or go to Configuration – Bluetooth dialog. If it is Off press the “Turn Bluetooth On” button.
The GPS is disabled?
Go to Configuration – Bluetooth dialog – Device Type. Verify if your GPS type is disabled. Press the Enable Bluetooth Device button.
The Keyboard is currently connected?
The Bluetooth Keyboard and the GPS can only be connected alternatively to the PDA, because they both use the same communication port. If the keyboard is currently connected, go to
the Trekker menu – Settings – Set GPS On (or press and hold
F2
) to connect the GPS device. This will disconnect the Keyboard.
None of above
Simply go to the
Configuration Panel
or from the
System Bar
– select the
Bluetooth
option and turn Off the Bluetooth Radio then turn it back On.
14.3
Infrared Keyboard
Maestro (or Trekker) supports two infrared keyboards, the Belkin and the Pocketop and gives you full access and control of your PDA. You can alternatively use the tactile keyboard or
the enabled external infrared keyboard without having to quit the active Maestro (or Trekker) application. For an updated list of supported external keyboards, visit our website at
www.humanware.ca
.
14.3.1
Software configuration
Maestro (or Trekker) includes the drivers for the Belkin and Pocketop infrared keyboards as well as the appropriate settings. Use the Keyboard dialog box from the Configuration Panel to
enable and configure your external keyboard. Do not use the CD included with your keyboard to install the factory driver.
The Belkin external keyboard is enabled by default.
14.3.2
Infrared (IR) Transmittal
Your infrared keyboard communicates with your PDA using Dual-beam infrared (IR) technology. This technology allows you to input data to your PDA without physically attaching it to the
Keyboard. To function properly, the two infrared ports need to face each other.
Infrared refers to light waves of a lower frequency than human eyes can receive and interpret. Infrared is used in most television remote control systems, and with a standard called irDA
(Infrared Data Association). It is used to communicate computers with peripheral devices. In most cases, infrared is used in a digital mode, the signal is pulsed On or Off very quickly to
send data from one point to another. The one-to-one nature of infrared communications is useful in that you can make sure a message only reaches the intended recipient, even in a
room full of infrared receivers.
14.3.3
Connect your Infrared external keyboard
On the HP iPAQ 4150, the Infrared (IR) port is located on the bottom edge of the PDA, to the left of the Charging/Communications Port. On the Dell Axim X50, the Infrared (IR) port is
located on the top edge of the PDA, above the SD slot.
To use Maestro (or Trekker) with your external keyboard, turn your PDA On and make sure that a Maestro (or Trekker) application is running. The keyboard should be positioned
approximately 4-6 inches from the Infrared port of the PDA. As communication is by line of sight, you may need to position the PDA slightly left of center of the keyboard. Your external
keyboard should connect automatically with your PDA. If it does not, be sure to align the IR ports properly. The Belkin keyboard is activated by default. The status of the external
keyboard is accessible on the
System Bar
of your PDA. To activate another external keyboard, refer to the Keyboard section for details. To get information on how to use your external
keyboard with Maestro (or Trekker), visit our website at:
www.humanware.ca
.


