background image

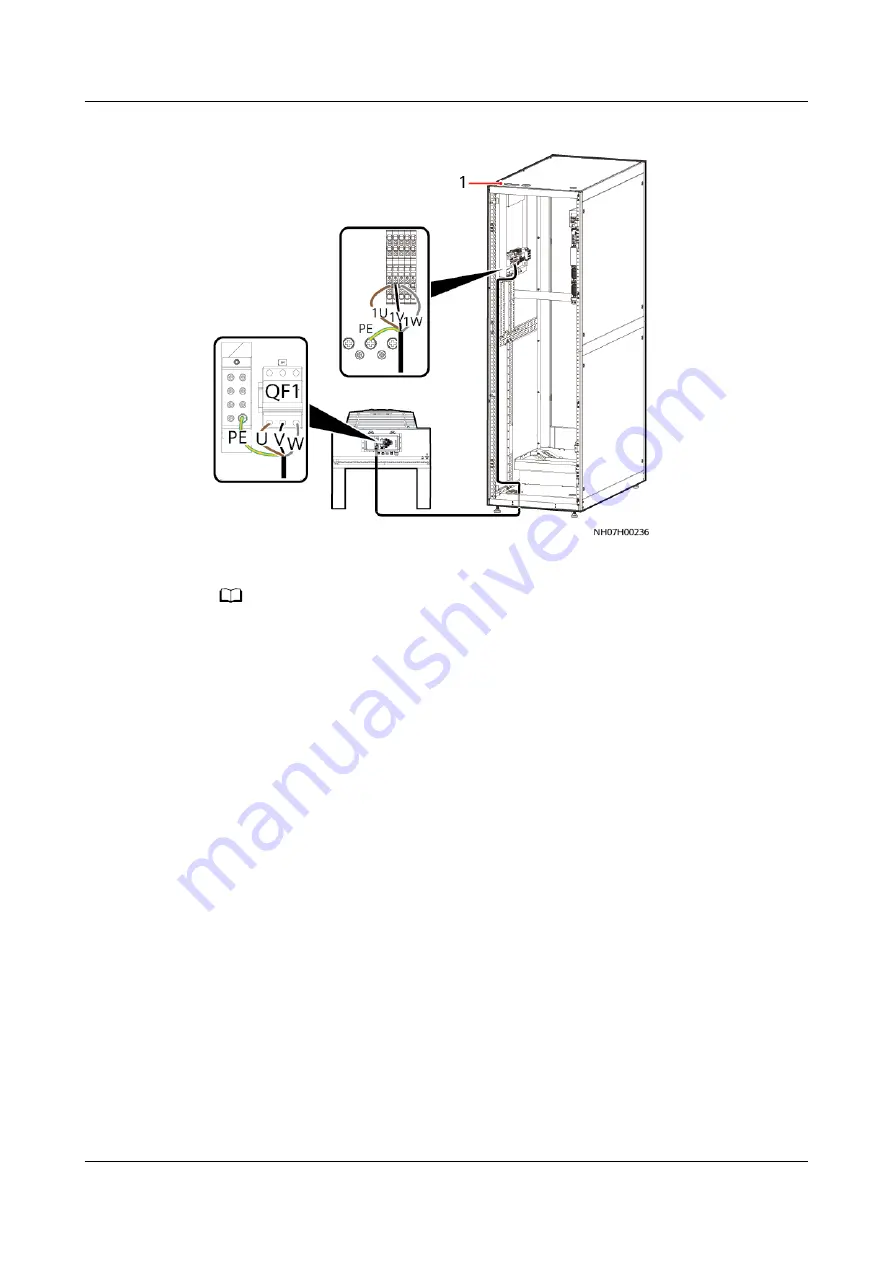
Figure 4-83 Connecting a power cable for the outdoor unit

(1) Top cable hole

NO TE

● The preceding figure takes the power cable installation of an outdoor unit with the

single power supply as an example, which is the same as that of an outdoor unit with

dual power supplies.

Step 2 Connect the PE cable to the PE terminal at the bottom of the outdoor unit, as

shown in 

Figure 4-83

.

Step 3 Secure the cable on the post of the cabinet with cable ties.

----End

4.9.5 (Optional) Installing the Low-temperature Component

Power Cable

Step 1 Route the low-temperature component cable through the cable hole to the L and

N terminals of QF2 on the outdoor unit.

NetCol5000-A050 In-row Air Cooled Smart Cooling

Product

User Manual

4 Installation

Issue 08 (2021-09-17)

Copyright © Huawei Technologies Co., Ltd.

106

Summary of Contents for NetCol5000-A050

Page 1: ...NetCol5000 A050 In row Air Cooled Smart Cooling Product User Manual Issue 08 Date 2021 09 17 HUAWEI TECHNOLOGIES CO LTD ...

Page 2: ...cribed in this document may not be within the purchase scope or the usage scope Unless otherwise specified in the contract all statements information and recommendations in this document are provided AS IS without warranties guarantees or representations of any kind either express or implied The information in this document is subject to change without notice Every effort has been made in the prep...

Page 3: ...installation engineers Commissioning engineers Data configuration engineers Maintenance engineers Symbol Conventions The symbols that may be found in this document are defined as follows Symbol Description Indicates a hazard with a high level of risk which if not avoided will result in death or serious injury Indicates a hazard with a medium level of risk which if not avoided could result in death...

Page 4: ...arlier issues Issue 08 2021 09 17 Added equipotential cable specifications Updated Power Cable Filter for an Outdoor Unit Adjusted the document structure Updated the description about class A B C and D environments Updated 4 9 6 Installing the Outdoor Unit Signal Cable Issue 07 2020 12 10 Updated 11 2 Replacing an Indoor Fan Adjusted the document structure Issue 06 2020 10 22 Added the section Rep...

Page 5: ...f the outdoor unit Issue 02 2020 01 06 Updated the safety information Issue 01 2019 06 30 This issue is the first official release NetCol5000 A050 In row Air Cooled Smart Cooling Product User Manual About This Document Issue 08 2021 09 17 Copyright Huawei Technologies Co Ltd iv ...

Page 6: ...25 2 2 6 Physical Ports 25 3 Technical Specifications 27 4 Installation 33 4 1 Installation Requirements 33 4 1 1 Layout Principles 33 4 1 2 Indoor Unit Installation Requirements 34 4 1 3 Outdoor Unit Installation Requirements 37 4 1 4 Installation Requirements for the Water Cooling Module 46 4 2 Installation Preparations 48 4 2 1 Tools 48 4 2 2 Preparing Materials 51 4 2 2 1 R410A Refrigerant 52 ...

Page 7: ...rogen Pressure 83 4 7 2 Removing the Pallet 84 4 7 3 Securing a Water Cooling Module 84 4 8 Installing Pipes 85 4 8 1 Notices for Laying Pipes 86 4 8 2 Welding Indoor Unit Pipes 88 4 8 3 Welding Outdoor Unit Pipes 91 4 8 4 Optional Welding Pipes for the Low Temperature Component 91 4 8 5 Welding the Water Cooling Module 92 4 8 6 Installing Cooling Water pipes for the Water Cooling Module 93 4 8 7 ...

Page 8: ...g 122 6 1 3 Precharging Refrigerant 124 6 2 Power On Preparations 127 6 3 Power On 127 6 4 Home Screen 137 6 5 Setting Parameters 139 6 5 1 Setting T H Sensors Parameters 139 6 5 2 Optional Setting Differential Pressure Control Parameters 141 6 5 3 Optional Setting Teamwork Control Parameters 142 6 5 4 Setting Communications Parameters 150 6 5 4 1 Setting Communications Parameters Modbus RTU Proto...

Page 9: ...ter Dryer Welded 272 11 10 Replacing a Liquid Level Detector 276 11 11 Replacing a Condensate Pump 279 11 12 Replacing a Wet Film Humidifier 282 11 13 Replacing a Controller Panel 283 11 14 Replacing a Main Control Module or PSU 286 11 15 Replacing an Electric Heater 288 12 FAQ 292 12 1 How Do I Issue a Start Shutdown Command 292 12 2 How Do I Query the Setting of a Parameter Before Change 294 12 ...

Page 10: ... 1 Electric Control Box Layout for the Indoor Unit 315 C 2 NetCol500 A060 Electric Control Box Layout 319 C 3 NetCol500 A080 Electric Control Box Layout 321 C 4 NetCol500 A120 Electric Control Box Layout 322 D Base Drawing 323 D 1 Indoor Unit Base Drawing 323 D 2 Outdoor Unit Base Drawings 324 D 2 1 NetCol500 A060 325 D 2 2 NetCol500 A080 332 D 2 3 NetCol500 A120 337 E Electrical Conceptual Diagra...

Page 11: ...y Follow local laws and regulations when installing operating or maintaining the equipment The safety instructions in this document are only supplements to local laws and regulations Huawei will not be liable for any consequences of the following circumstances Operation beyond the conditions specified in this document Installation or use in environments which are not specified in relevant internat...

Page 12: ...allation operation and maintenance Before handling a conductor surface or terminal measure the contact point voltage and ensure that there is no risk of electric shock After installing the equipment remove idle packing materials such as cartons foam plastics and cable ties from the equipment area In the case of a fire immediately leave the building or the equipment area and turn on the fire alarm ...

Page 13: ...used during equipment transportation or installation in a timely manner Equipment with scratches cannot be exposed to an outdoor environment for a long period of time Before operations ensure that the equipment is firmly secured to the floor or other solid objects such as a wall or an installation rack Do not use water to clean electrical components inside or outside of a cabinet Do not change the...

Page 14: ...rofessionals personnel who are trained or experienced in equipment operations and are clear of the sources and degree of various potential hazards in equipment installation operation maintenance Trained personnel personnel who are technically trained have required experience are aware of possible hazards on themselves in certain operations and are able to take protective measures to minimize the h...

Page 15: ... facilities must be performed by qualified personnel Cabling When routing cables ensure that a distance of at least 30 mm exists between the cables and heat generating components or areas This prevents damage to the insulation layer of the cables Do not route cables behind the air intake and exhaust vents of the equipment Ensure that cables meet the VW 1 or ZB flame spread rating requirements or h...

Page 16: ... packaging materials before storing or transporting them Figure 1 1 Wearing an ESD wrist strap Neutral Ground Voltage It is recommended that the three phase loads be equalized and the neutral ground voltage be kept at less than 2 V to meet power distribution requirements 1 4 Installation Environment Requirements To prevent fire due to high temperature ensure that the ventilation vents or heat diss...

Page 17: ...ights Wear personal protective equipment such as the safety helmet and safety belt or waist rope and fasten it to a solid structure Do not mount it on an insecure moveable object or metal object with sharp edges Make sure that the hooks will not slide off Set a restricted area and eye catching signs for working at heights to warn away irrelevant personnel Carry the operation machinery and tools pr...

Page 18: ...fiberglass ladders when you need to perform live working at heights When a step ladder is used ensure that the pull ropes are secured and the ladder is held firm Before using a ladder check that it is intact and confirm its load bearing capacity Do not overload it Ensure that the ladder is securely positioned The recommended angle for a ladder against the floor is 75 degrees as shown in the follow...

Page 19: ...ables inside Metal shavings from drilling may short circuit boards inside the equipment Obtain consent from the customer and contractor before drilling holes Wear goggles and protective gloves when drilling holes When drilling holes protect the equipment from shavings After drilling clean up any shavings that have accumulated inside or outside the equipment Moving Heavy Objects DANGER When pulling...

Page 20: ... Safety Welding At least two persons are required on a welding site A welder must have a work permit A welding site must be free from inflammables Ensure that a fire extinguisher wet wiper and water container are available A burning welding torch must not be placed on a component or on the floor and must not be placed in a metal container with acetylene and oxygen Otherwise the gas may leak and ca...

Page 21: ...with other wastes that have a shell in European Union EU areas To avoid environment pollution and harm to human health wastes must be classified and recycled This also promotes resource reuse When recycling a device fill in the device information in the recycling collection system or contact your dealer for help The dealer can help you recycle devices in a safe and environment friendly way 1 7 Oth...

Page 22: ...50HRWE2 NetCol5000 A050H4WE0 NetCol5000 A050H40E0 Figure 2 1 NetCol5000 model number Table 2 1 NetCol5000 model number No Meaning Description 1 Data center smart cooling product NetCol Data center smart cooling product 2 Model series 5000 In row smart cooling 3 Cooling mode A air cooled NetCol5000 A050 In row Air Cooled Smart Cooling Product User Manual 2 Product Description Issue 08 2021 09 17 Co...

Page 23: ...l power supplies Outdoor Unit Model Number Description This document involves the following product models NetCol500 A060MC1D0 NetCol500 A060MS1E0 NetCol500 A080MC1D0 NetCol500 A120MC1D0 NetCol500 W0556C4E0 Figure 2 2 NetCol500 model number Table 2 2 NetCol500 model number No Meaning Description 1 Data center smart cooling product NetCol data center smart cooling 2 Model series 500 outdoor unit 3 ...

Page 24: ...type C common non corrosive environment S common harsh environment class C 7 Fan type 1 AC fan 4 none 8 Packaging type D package for Chinese markets E package for international markets 9 Special identifier for orders 0 none 2 2 Components NetCol5000 A050 In row Air Cooled Smart Cooling Product User Manual 2 Product Description Issue 08 2021 09 17 Copyright Huawei Technologies Co Ltd 14 ...

Page 25: ...Side panel 7 Rear door 8 Anchor Table 2 3 Dimensions Cabinet Dimensions H x W x D mm Expansion Method Standard dimensions 2000 x 600 x 1200 Expanded dimensions 2200 x 600 x 1200 Install a top frame NetCol5000 A050 In row Air Cooled Smart Cooling Product User Manual 2 Product Description Issue 08 2021 09 17 Copyright Huawei Technologies Co Ltd 15 ...

Page 26: ...as pipe hole Φ60 mm at the bottom 11 Drainpipe hole Φ60 mm at the bottom 12 Refrigerant liquid pipe hole Φ60 mm at the bottom 13 Signal cable hole Φ28 mm at the bottom Interior Components The NetCol5000 A mainly consists of a DC variable frequency compressor EC fan evaporator electronic expansion valve EEV oil separator sight glass filter dryer air filter electric heater optional wet film humidifi...

Page 27: ... energy efficiency The high precision drive automatically adapts to the system pressure fluctuations The drive conducts precision self check Compressor and drive faults can be stored in separate zones EC fan The energy efficient EC fan that supports stepless speed adjustment is used to reduce the energy efficiency of the fan There are ten EC fans in total The smart cooling product will not shut do...

Page 28: ...mally Oil separator It is an oil gas separator which separates the lubricant brought out due to exhaustion of the compressor and brings back the separated lubricant to the compressor Sight glass It allows you to observe the refrigerant flow and gas content for easy maintenance and optimization Filter dryer It absorbs water from the refrigerant pipes and filters the foreign matter which reduces com...

Page 29: ...t NTC temperature sensor and the return air T H sensor 2 2 2 Display Panel Appearance The 7 inch display panel with the true color touchscreen provides user interfaces for query setting monitoring and maintenance The indicator on the panel displays operating status of the precision smart cooling product Figure 2 6 shows the location of the indicator Table 2 4 lists the relationship of the alarm st...

Page 30: ...n only one smart cooling product is running the display panel provides logic control of components in the smart cooling product to adjust the indoor temperature and humidity Display and operations The 7 inch display panel with the true color touchscreen allows you to set parameters for the smart cooling product and query its status Four remote functions Telemetry supply air temperature return air ...

Page 31: ...t 1500 historical alarms can be stored Access logs can be traced back At least 1000 historical login and setting records can be stored The display panel can display 30 days temperature and humidity in colored curves O M personnel can view the smart cooling product operating status onsite A comprehensive power monitoring function is provided Faults such as power open phase overvoltage undervoltage ...

Page 32: ...ble and visible alarm signal is sent automatically 2 2 3 Main Control Module Appearance Figure 2 7 Main control module 1 Running indicator 2 Alarm indicator 3 FE_1 port 4 CAN_IN port 5 RS485 12V port 6 USB port 7 SW button 8 FE_2 port 9 CAN_OUT port 10 COM FE port 11 DP port Indicators Indicator Status Description Running indicator RUN Off The unit is shut down Blinking green The unit is started A...

Page 33: ... RS485 HT RS485 PIN6 FE RX FE RX PIN7 CANH PIN8 CANL GND USB port connects a WiFi module or USB flash drive Appearance USB Port Connects the WiFi module to the unit over the Service Expert app Obtain the initial startup password during deployment View or obtain running information about the unit during inspection The user must be an authorized service engineer To ensure security remove the WiFi mo...

Page 34: ...ariable frequency drive axial fan and the distinctive sickle blades adopt the owl inspired fan blade design to implement big air volume low noise and high efficiency The outdoor unit has excellent waterproof performance and meets IPX5 requirements The outdoor unit adopts the variable frequency drive The outdoor fan speed is adjustable from 10 to 100 The minimum operating frequency of the fan is no...

Page 35: ...ing water side needle valve 8 Gas pipe 9 Refrigerant side needle valve 10 Safety valve Features The water valve is pre integrated to save onsite installation time The water cooling module can be installed in stack mode to maximize the installation space and reduce the footprint The water cooling module uses cooling water for heat exchange to improve the heat exchange efficiency and improve the ene...

Page 36: ... 8 inch 15 88 mm welding Refrigerant gas pipe Outer diameter of 7 8 inch 22 22 mm welding Optional Low temperature component Port for the indoor unit liquid pipe Outer diameter of 5 8 inch 15 88 mm welding Port for the indoor unit gas pipe Outer diameter of 7 8 inch 22 22 mm welding Port for the outdoor unit liquid pipe Outer diameter of 5 8 inch 15 88 mm welding Port for the outdoor unit gas pipe...

Page 37: ...x W x D 2000 mm x 600 mm x 1200 mm cabinet dimensions 2200 mm x 600 mm x 1200 mm including a top frame Protection level IP20 a Tested under rated working conditions indoor dry bulb temperature 37 C relative humidity 20 outdoor temperature 35 C NetCol5000 A050 In row Air Cooled Smart Cooling Product User Manual 3 Technical Specifications Issue 08 2021 09 17 Copyright Huawei Technologies Co Ltd 27 ...

Page 38: ... 50 60 Hz 3 Ph N PE Tolerance 10 to 10 of rated voltage rated frequency 3 Hz Power supply mode Dual power supplies Single power supply Pipe routing Top and bottom pipe routing Bottom pipe routing Maximum current 46 A 36 A 46 A Condensate pump Yes No Water pump lift 4 m Heating function Yes No Yes No Yes Yes No Humidificat ion function Yes No Yes No Yes Yes No Humidifier water inlet hose No No Yes ...

Page 39: ...318 kg 346 kg 323 kg 340 kg 305 kg 333 kg 309 kg 337 kg 314 5 kg 331 5 kg Figure 3 1 Appearance and dimensions Table 3 3 Technical specifications of outdoor units Item NetCol500 A060 NetCol500 A080 NetCol500 A120 BOM number NetCol500 A060MC1D0 52273539 52273539 005 NetCol500 A060MS1E0 52273539 006 NetCol500 A080MC1D0 52273541 52273541 005 NetCol500 A120MC1D0 52273755 002 Power supply mode Powered ...

Page 40: ...52273541 005 1107 655 x 2186 2047 x 1094 BOM number 52273755 002 1107 655 x 1356 1217 x 2188 Net weight 52273539 122 kg 52273539 005 121 kg 52273539 006 154 kg 52273541 200 5 kg 52273541 005 200 kg 52273755 002 234 kg Storage temperature 40 C to 70 C Storage humidity 5 95 RH non condensing IP rating IPX5 Altitude 0 4000 m If the altitude exceeds 1000 m the cooling performance is derated For detail...

Page 41: ...e unit can be properly installed Pollution sources in Class C environments refer to the following areas Areas within 3 7 km away from saline water areas such as the ocean and saline lakes Areas within 3 km away from serious pollution sources such as metallurgic plants coal mines and heat and power plants Areas within 2 km away from medium pollution sources such as chemical factories rubber plants ...

Page 42: ...4000 m derated when the altitude is greater than 1000 m Environment Enclosed indoor environment in which the temperature and humidity can be controlled within the ranges of 4 C to 45 C and 5 RH to 90 RH respectively If the indoor installation position is ventilated it should be more than 3 7 km away from the sea or pollution sources such as salt lakes chemical plants mineral plants thermal power p...

Page 43: ...m should be less than or equal to 8 m NOTICE When calculating the height difference the compressor base is regarded as the baseline for the indoor unit and the condenser top is regarded as the baseline for the outdoor unit The inverted trap should be higher than the top copper pipe of the condenser In the figure is a sign of a tilt indicating that the scale of the pipe tilting is at least 1 200 Th...

Page 44: ...h smart cooling product is less than 10 of rated cooling capacity or the equipment room is not properly sealed the humidity in the equipment room may be too high which is not a product quality issue and should be dealt with by adding a dehumidifier Do not install the smart cooling product near a noise sensitive place such as an office or a conference room NetCol5000 A050 In row Air Cooled Smart Co...

Page 45: ... the cabinet installation floor should not exceed 4 meters Power distributio n Leakage circuit breakers are not recommended for the primary route If a leakage circuit breaker is required by the customer or by local regulations use the residual current circuit breaker RCCB that is not sensitive to the single phase DC pulses and transient current pulses Space Requirements Before installation verify ...

Page 46: ... mentioned in this document is equivalent When selecting the refrigerant pipes note the following Avoid elbows and ensure that the connection between the indoor and outdoor units is the shortest After determining the best pipe route between the indoor and outdoor units calculate the number of the components that cause local resistance loss for example elbows and convert them into the equivalent le...

Page 47: ... unit in clean areas that are away from residential areas Wrap thermal insulation layers for pipes connecting the indoor unit and outdoor unit Do not hold the copper pipe or electric control box to transport the outdoor unit and keep the fins intact Route in pipes from the top and out from the bottom when connecting condenser pipes The horizontal or vertical error should not be more than 5 when th...

Page 48: ...ct outdoor unit installation requirements NOTE The shaded parts in the figures are obstacles The distances marked are the minimum distances required between an outdoor unit and obstacles The horizontal installation and vertical installation take NetCol500 A080 and NetCol500 A060 as examples Horizontal and vertical installation scenarios Figure 4 5 Space requirements for horizontal installation uni...

Page 49: ...alled the outdoor unit can be 1 5 m higher than the low temperature component at most and cannot be lower than the low temperature component Compact installation scenario NOTE If the space does not meet the requirements of the recommended layout you can use any of the following layouts applicable only to NetCol500 A060 and NetCol500 A120 However the cooling capacity of indoor units will be reduced...

Page 50: ... wall height is 0 mm the base height is 0 mm If the wall height is 1000 mm or lower the base height is 500 mm or higher When the quantity is more than 12 if the wall height is 0 mm the base height is 500 mm or higher If the wall height is 1000 mm or lower the base height is 1000 mm or higher Figure 4 10 Top view of compact installation if the quantity is 6 NetCol500 A120 NetCol5000 A050 In row Air...

Page 51: ...s 1000 mm or lower the base height is 1000 mm or higher Concrete Platform Requirements The required concrete platform dimensions are different when the concrete platform is installed horizontally and vertically The construction requirements are as follows The concrete platforms are installed horizontally or with a slope of 5 degrees at most Water can drain away after heavy rainfall The strength of...

Page 52: ...NetCol500 A080 W1 250 D1 250 150 250 924 1877 NetCol500 A120 W1 250 D1 250 150 250 2018 1047 Figure 4 13 shows the mounting holes between the outdoor unit and the concrete floor The mounting holes are long round holes and must be secured using eight M8x80 stainless expansion bolts NetCol5000 A050 In row Air Cooled Smart Cooling Product User Manual 4 Installation Issue 08 2021 09 17 Copyright Huawe...

Page 53: ...rm Requirements for Vertical Installation For details about how to make concrete platforms to vertically install an outdoor unit see Figure 4 14 An outdoor unit must be fixed to a concrete platform or a base using four M8x80 stainless expansion bolts and bracket angles NetCol5000 A050 In row Air Cooled Smart Cooling Product User Manual 4 Installation Issue 08 2021 09 17 Copyright Huawei Technologi...

Page 54: ...ol500 A080 W1 250 D 500 150 250 1744 5 NetCol500 A120a W1 250 D 500 150 250 2011 a A base is required for securing For details about securing during vertical installation see 4 5 3 3 Vertical Installation Scenario NetCol500 A120 Figure 4 15 and Figure 4 16 show the mounting hole for outdoor unit vertical installation NetCol5000 A050 In row Air Cooled Smart Cooling Product User Manual 4 Installatio...

Page 55: ...14 NetCol500 A080 2090 1744 5 387 Φ12 NetCol500 A120 1257 1036 5 387 Φ12 Optional Space Dimensions for a Low temperature Component Low temperature components can only be installed horizontally Before installing prepare concrete platforms and drill holes by referring to the instructions in Figure 4 17 NetCol5000 A050 In row Air Cooled Smart Cooling Product User Manual 4 Installation Issue 08 2021 0...

Page 56: ...hould be more than 3 7 km away from the sea or pollution sources such as salt lakes chemical plants mineral plants thermal power plants and coal mines Take antifreezing measures for cooling water pipes if the water cooling module is installed in low temperature environments 4 C To prevent glycol solution from corroding pipes corrosion inhibitor should be mixed into the glycol solution For details ...

Page 57: ...e base dimensions unit mm 1 Mounting hole 4 x M12 The following figure shows the operation area requirements for water cooling modules Figure 4 20 Operation area requirements for water cooling modules unit mm NetCol5000 A050 In row Air Cooled Smart Cooling Product User Manual 4 Installation Issue 08 2021 09 17 Copyright Huawei Technologies Co Ltd 47 ...

Page 58: ...pearance Adjustable wrench Phillips screwdriver M4 M6 and M8 Flat head screwdriver M3 and M4 Socket wrench 18 mm Torque wrench 28 mm Solid wrench 18 mm and 13 mm Electric screwdriver optional Diagonal pliers Combination pliers Needle nose pliers Sealant or seal tape for thermal insulation foam a Right angle Step ladder 2 m Torch Measuring tape Hammer drill NetCol5000 A050 In row Air Cooled Smart C...

Page 59: ...cations and Appearance Manual pallet truck Electrical pallet truck Lifting rope bearing at least 400 kg Lever bearing at least 400 kg Table 4 9 Pipe connection tools Tool Name Specifications and Appearance Cutter Thread sealant sealing tapea Welding torch Copper phosphorus brazing rod containing 5 silver NetCol5000 A050 In row Air Cooled Smart Cooling Product User Manual 4 Installation Issue 08 20...

Page 60: ...ant with the industry standard JB T7311 2008 Technical Specification for the Application of Anaerobic Glue in Engineering Machinery Table 4 10 Electrical connection tools Tool Name Specifications and Appearance ESD gloves Wire stripper Insulation tape Power cable crimping tool Table 4 11 Commissioning tools Tool Name Specifications and Appearance Pressure gauge 2 PCS a Rubber hose 5 PCS a Vacuum p...

Page 61: ... degree should be less than or equal to 60 Pa c Dry nitrogen d A reducing valve should be used on the nitrogen cylinder port The measuring range of the reducing valve should be at least 4 0 MPa 4 2 2 Preparing Materials Item Description Type Standard material This type of materials is provided by Huawei and you can find them in the fittings delivered with the equipment Materials in the packing lis...

Page 62: ... of the refrigerant tank outer surface and connect a pressure gauge to the pressure tank to measure the internal pressure Find the saturation pressure corresponding to the measured outer surface temperature from Table 4 12 If the deviation between the saturation pressure and the measured internal pressure is greater than 0 2 MPa the refrigerant does not meet the requirements and needs to be replac...

Page 63: ...2 9 12 1 05 31 1 84 50 2 97 13 1 09 32 1 89 51 3 04 14 1 12 33 1 94 52 3 11 15 1 16 34 1 99 53 3 19 16 1 19 35 2 04 54 3 26 17 1 23 36 2 1 55 3 34 18 1 27 37 2 15 4 2 2 2 Refrigerant Oil The recommended refrigerant oil is DIAMOND FREEZE MEL32 JX You can purchase it from Huawei or purchase it by yourself after being confirmed by Huawei NOTE Add refrigerant oil only if it leaks Contact Huawei to con...

Page 64: ...r of 7 8 inch thickness of 1 2 mm operating pressure 4 5 MPa Thermal insulation foam Thickness 9 2 mm Oil trap and inverted trap When the outdoor unit is installed at a position higher than the indoor unit install an oil trap every five to six meters in the vertical direction along the gas pipe and an inverted trap for the inlet and outlet of the outdoor unit to ensure system reliability Figure 4 ...

Page 65: ... 9 x 1 0 Inner diameters at the two expanded ends of the copper pipe 16 3 mm Note No dent or bulge is allowed on the surface after the trap is shaped 4 2 2 4 Humidifier Water Inlet Pipe The humidifier water inlet pipe can be connected using a hose or a rigid pipe Figure 4 23 Connecting a water inlet pipe 1 Internal thread connector G 1 2 inch internal thread connector delivered with the water inle...

Page 66: ...ed using a hose or a rigid pipe Figure 4 24 Connecting a drainpipe 1 Internal thread connector BSPP 1 2 inch internal thread connector delivered with the smart cooling product 2 Conversion adapter BSPT 1 2 inch connected to a rigid pipe with external threads 3 Rigid pipe made of PP R C PVC or other materials 4 Pagoda connector 5 Hose clamp 6 Hose inner diameter of 3 4 inch made of EPDM or other ma...

Page 67: ...e supports are subject to engineering procurement It is recommended that pipe supports and pipe clamps be made of 304 stainless steel Install a support every 1500 mm for the straight sections of pipes and 500 mm away from each bending point in turning sections 4 2 2 7 Cables Table 4 15 Recommended cables Item NetCol5000 A050 Active standby power cable for the indoor unit Recommended circuit breake...

Page 68: ...ded outdoor cable Electrical power cable 300 V SJTW 3 x 16 AWG black three cores black white and green 10 A shielded outdoor cable UL Equipotential ground cable Recommended cable 16 mm2 outdoor copper cable NOTE The cable flame spread rating must be at least VB When selecting connecting and routing cables follow local safety regulations and rules When the external conditions such as cable routing ...

Page 69: ...ttings against the packing list If fittings are missing or inconsistent with those in the packing list record the information and contact your local Huawei office immediately End 4 4 Installing the Indoor Unit 4 4 1 Checking the Nitrogen Pressure Procedure Step 1 Open the door lock using a key and open the cabinet rear door Step 2 Unfasten the rotating baffle plates and remove the air filters Figu...

Page 70: ...itrogen is exhausted the system is working properly If no nitrogen is exhausted contact Huawei technical support Figure 4 28 Positions of the needle valves 1 Low pressure needle valve 2 Exhaust pipe needle valve 3 Liquid pipe needle valve End 4 4 2 Removing the Pallet Procedure Step 1 Use a 10 socket wrench to remove the eight M6x16 screws securing the fasteners to the cabinet and use an 18 socket...

Page 71: ...ng the Transport Fasteners from the Compressor Procedure Step 1 Loosen the three bolts on the compressor transport fasteners using a 13 solid wrench NetCol5000 A050 In row Air Cooled Smart Cooling Product User Manual 4 Installation Issue 08 2021 09 17 Copyright Huawei Technologies Co Ltd 61 ...

Page 72: ...ing the cabinet Step 2 Drill a hole in each mounting hole position using a hammer drill Step 3 Move the cabinet over its castors to the installation position Step 4 Level the cabinet using an adjustable wrench as shown in Figure 4 31 Before leveling the cabinet use a measuring tape to check that the vertical distance between the top of the cabinet and the floor is 2000 mm 3 mm for a 2000 mm high c...

Page 73: ...between the two lines marked on the glass tube as shown in Figure 4 31 Shock absorption bars EPDM rubber 5 mm thick are need to install between the ground and the base Figure 4 31 Leveling a cabinet 1 Level Step 5 Optional Combine the cabinets as shown in Figure 4 32 1 Remove the M5 tapping screws that secure the connecting kit and then remove the connecting kit 2 Remove the M4 screw assembly from...

Page 74: ...tep 6 Secure the smart cooling product cabinet to the ground using the M12 expansion bolts NetCol5000 A050 In row Air Cooled Smart Cooling Product User Manual 4 Installation Issue 08 2021 09 17 Copyright Huawei Technologies Co Ltd 64 ...

Page 75: ...hased independently Figure 4 34 Installing sealing plates End 4 4 5 Optional Installing the Top Frame Bottom Pipe Routing Step 1 Remove the two M5x10 tapping screws that secure the front door sealing plate on the top of the cabinet as shown by 1 in Figure 4 35 NetCol5000 A050 In row Air Cooled Smart Cooling Product User Manual 4 Installation Issue 08 2021 09 17 Copyright Huawei Technologies Co Ltd...

Page 76: ...gure 4 35 End Overhead Pipe Routing Step 1 Remove the two M5x10 tapping screws that secure the front door sealing plate on the top of the cabinet as shown by 1 in Figure 4 36 Step 2 Remove the rear decorative plate for the top frame and then remove the four M5x10 tapping screws and the six M4x10 countersunk screws from the rear plate of the top frame as shown by 2 and 3 in Figure 4 36 Step 3 Place...

Page 77: ... assemblies to secure the top frame to the cabinet as shown by 3 and 4 in Figure 4 37 3 Install two M5x10 tapping screws at the front of the top frame to set up equipotential bonding between the cabinet and the top frame as shown by 5 in Figure 4 37 Figure 4 37 Securing the top frame End 4 5 Installing the Outdoor Unit NetCol5000 A050 In row Air Cooled Smart Cooling Product User Manual 4 Installat...

Page 78: ...nnect the other end of the hose to the outdoor unit needle valve as shown in Figure 4 38 Figure 4 38 Checking the nitrogen pressure of the outdoor unit If the pressure gauge reading is no less than 0 2 MPa the unit is airtight Then open the pressure gauge valve where the hose is connected to discharge nitrogen After the discharge is complete remove the hose and reinstall the valve bonnet If the pr...

Page 79: ...osition unpack it and take care to prevent scratches Keep the cabinet steady during unpacking Procedure Step 1 Remove the packing materials such as the carton stretch wrap foam condenser protection cardboard and plastic bags Step 2 Check the accessories against the accessory list Step 3 Remove the three bolts from each of the four corner fittings one bolt for connecting the corner fitting to the p...

Page 80: ...et angles from the side panels of the outdoor unit by removing the two M6x16 stainless bolts from each bracket angle as shown in Figure 4 40 Figure 4 40 Removing the bolts from the bracket angles Step 2 Install four legs on the four corners of the condenser by using twenty four stainless M6x16 bolts four stainless bolts for installing one leg as shown in Figure 4 41 NetCol5000 A050 In row Air Cool...

Page 81: ...form or base End 4 5 3 2 Vertical Installation Scenario NetCol500 A060 NetCol500 A080 The NetCol500 A080 is used as an example For details about NetCol500 A060 operations refer to this section Securing an Outdoor Unit to the Ground Step 1 Secure an outdoor unit to the ground through the four bracket angles by using M8x80 stainless steel expansion bolts on the side panel as shown in Figure 4 42 Net...

Page 82: ...d Step 3 Step 1 Secure the first layer base to the ground using six M12x60 stainless steel expansion anchor bolts as shown in Figure 4 43 Figure 4 43 Securing a base NOTE Only four bolts are required to secure the NetCol500 A060 double layer base to the ground Step 2 Secure the four columns NetCol5000 A050 In row Air Cooled Smart Cooling Product User Manual 4 Installation Issue 08 2021 09 17 Copyr...

Page 83: ...re 4 44 2 Secure the second layer base to the middles of the four columns using twelve M10x30 stainless steel bolts as shown by 2 in Figure 4 44 Step 3 Secure an outdoor unit onto the first layer base NetCol5000 A050 In row Air Cooled Smart Cooling Product User Manual 4 Installation Issue 08 2021 09 17 Copyright Huawei Technologies Co Ltd 73 ...

Page 84: ...on the side panel One M10x30 stainless steel bolt is used on the base side and two M6x16 stainless steel bolts are used on the outdoor unit side as shown in Figure 4 45 Step 4 Secure four slanting beams to the base using eight M10x30 stainless steel bolts as shown in Figure 4 46 NetCol5000 A050 In row Air Cooled Smart Cooling Product User Manual 4 Installation Issue 08 2021 09 17 Copyright Huawei ...

Page 85: ...cure the three beams on the top to the base using six M10x30 stainless steel bolts as shown in Figure 4 47 NetCol5000 A050 In row Air Cooled Smart Cooling Product User Manual 4 Installation Issue 08 2021 09 17 Copyright Huawei Technologies Co Ltd 75 ...

Page 86: ...nstalling beams Step 6 Secure an outdoor unit onto the second layer base NetCol5000 A050 In row Air Cooled Smart Cooling Product User Manual 4 Installation Issue 08 2021 09 17 Copyright Huawei Technologies Co Ltd 76 ...

Page 87: ...3 Secure the last beam on the top to the base using two M10x30 stainless steel bolts as shown by 4 in Figure 4 48 Step 7 Connect the beam to the wall by routing M10x30 stainless steel bolts through the reserved tapped holes on the left and right sides at the top of the base End 4 5 3 3 Vertical Installation Scenario NetCol500 A120 Step 1 Secure the base to the ground using four M12x60 stainless st...

Page 88: ...he base using twelve M10x30 stainless steel bolts Figure 4 50 Securing columns Step 3 Secure an outdoor unit onto the base NetCol5000 A050 In row Air Cooled Smart Cooling Product User Manual 4 Installation Issue 08 2021 09 17 Copyright Huawei Technologies Co Ltd 78 ...

Page 89: ...bolt is used on the base side and two M6x16 stainless steel bolts are used on the outdoor unit side as shown in Figure 4 51 Step 4 Secure the four beams on the top to the base using eight M10x30 stainless steel bolts and secure the top of outdoor unit to the base as shown in Figure 4 52 NetCol5000 A050 In row Air Cooled Smart Cooling Product User Manual 4 Installation Issue 08 2021 09 17 Copyright...

Page 90: ...oor unit Step 5 Secure four slanting beams to the base using eight M10x30 stainless steel bolts as shown in Figure 4 53 NetCol5000 A050 In row Air Cooled Smart Cooling Product User Manual 4 Installation Issue 08 2021 09 17 Copyright Huawei Technologies Co Ltd 80 ...

Page 91: ...ore delivery low temperature components are injected with nitrogen to 0 2 0 6 MPa Before connecting pipes the nitrogen inside pipes must be discharged CAUTION Nitrogen must be discharged otherwise air jets emitted during pipe welding may cause bodily injuries Procedure Step 1 Connect the rubber hose to the pressure gauge and tighten all pressure gauge valves NetCol5000 A050 In row Air Cooled Smart...

Page 92: ...ressure gauge valve where the hose is connected to discharge nitrogen After the discharge is complete remove the hose and reinstall the valve bonnet If the pressure gauge reading is less than 0 2 MPa pipes have leakage points and you need to contact Huawei technical support End 4 6 2 Removing the Pallet Remove the four screws securing the low temperature component to the pallet using an adjustable...

Page 93: ...ing four M12 x 60 stainless steel expansion bolts to a torque of 45 N m as shown in Figure 4 56 Figure 4 56 Securing a low temperature component 4 7 Installing the Water Cooling Module 4 7 1 Checking the Nitrogen Pressure Check whether any of the two needle valve bonnets is missing by turns If they do not exist contact Huawei technical support NetCol5000 A050 In row Air Cooled Smart Cooling Produc...

Page 94: ...it and take care to prevent scratches Keep the cabinet steady during unpacking Procedure Step 1 Remove the four bolts from the bracket angles connecting the water cooling module and the pallet and then remove the outdoor unit from the pallet as shown in following figure Figure 4 57 Removing the pallet Step 2 Remove the water cooling module from the pallet End 4 7 3 Securing a Water Cooling Module ...

Page 95: ... thermal insulation foam for refrigerant pipes and water pipes should be greater than or equal to 9 2 mm When procuring water pipes ensure that the water pipes covered with thermal insulation foam can be routed through holes of the bottom panel or top panel NetCol5000 A050 In row Air Cooled Smart Cooling Product User Manual 4 Installation Issue 08 2021 09 17 Copyright Huawei Technologies Co Ltd 85...

Page 96: ...er components will not be affected Wrap the refrigerant pipes with thermal insulation foam Avoid elbows and ensure that the connection between the indoor and outdoor units is the shortest When selecting the refrigerant pipes note the following 1 Avoid elbows and ensure that the connection between the indoor and outdoor units is the shortest 2 After determining the best pipe route between the indoo...

Page 97: ...tion refrigerant pipe supports should be installed as required by Figure 4 60 When the direction of the refrigerant pipe changes add a support at the position that is 500 mm away from the changing point If the refrigerant pipe is straight add a support every 1500 mm Figure 4 60 Routing the refrigerant pipe NOTE Onsite personnel are responsible for preparing the required materials and installing th...

Page 98: ...e and connect the pressure gauge leather hose to the needle valve Figure 4 61 Exhausting nitrogen 1 Low pressure needle valve 2 Exhaust pipe needle valve 3 Liquid pipe needle valve Step 2 Open the pressure gauge valve Loud noises of air flow are generated at first and then disappear gradually Step 3 After the airflow noise disappears remove the rubber hose and install the valve bonnet Step 4 Conti...

Page 99: ...gen at 0 03 0 05 MPa into the copper pipe to avoid internal oxidation as shown in Figure 4 63 When welding a gas pipe gently inject nitrogen into the pipe through the exhaust pipe needle valve When welding a liquid pipe gently inject nitrogen into the pipe through the liquid pipe needle valve Figure 4 63 Welding pipes Step 2 Cut a cross in the rubber ring using a utility knife and route the pipe w...

Page 100: ...op do not route the pipes over servers or other devices to prevent them from being affected by pipe leakage Step 1 Remove the plugs from the top refrigerant pipe using a welding torch Figure 4 64 Top pipe routing 1 Gas pipe 2 Liquid pipe Step 2 Connect the gas and liquid pipes to the gas and liquid pipes of the outdoor unit respectively Pipes should be wrapped with thermal insulation foam End NetC...

Page 101: ...oor unit respectively Step 3 Wrap the outdoor pipes with thermal insulation foam Figure 4 65 Welding outdoor unit pipes End 4 8 4 Optional Welding Pipes for the Low Temperature Component NOTICE Before welding pipes take measures to protect nearby cables and components from being burnt To install a low temperature component horizontally you are recommended to place the low temperature component on ...

Page 102: ... 3 Connecting to the outdoor unit gas pipe 7 8 inch 22 22 mm 4 Connecting to the indoor unit gas pipe 7 8 inch 22 22 mm Figure 4 67 Connecting the outdoor unit 1 Connecting to the indoor unit liquid pipe 2 Connecting to the indoor unit gas pipe 3 Connecting to the outdoor unit gas pipe 4 Connecting to the outdoor unit liquid pipe 4 8 5 Welding the Water Cooling Module 1 Use a welding torch to remo...

Page 103: ...odule 1 Liquid pipe 5 8 inch 2 Gas pipe 7 8 inch 4 8 6 Installing Cooling Water pipes for the Water Cooling Module Prerequisites Clean the water inlet engineering pipes to avoid impurities entering into the water cooling module Procedure Step 1 Remove the plugs from the water pipes Step 2 Apply thread sealant Step 3 Connect water pipes by using a wrench The connector is G1 1 2 inch with internal s...

Page 104: ...y 1 in Figure 4 70 Figure 4 70 Bottom pipe routing Step 2 Install the water pipe conversion adapter and seal it with sealant as shown by 2 in Figure 4 70 Step 3 Cut a cross in the rubber ring using a utility knife and route the pipe wrapped with the thermal insulation tube through the hole NetCol5000 A050 In row Air Cooled Smart Cooling Product User Manual 4 Installation Issue 08 2021 09 17 Copyri...

Page 105: ...he drainpipes must have gradients 1 100 and stagnant water is not allowed End Top Pipe Routing NOTICE When routing pipes from the top do not route the pipes over servers or other devices to protect them from being affected by pipe leaks Step 1 Remove the drainpipe plug as shown in Figure 4 71 Figure 4 71 Top pipe routing Step 2 Route the drainpipe from the top by referring to Step 2 Step 5 of the ...

Page 106: ...g pipes before connecting the water inlet pipe to the engineer pipe to avoid impurities entering into the humidifier Step 3 Connect the water inlet pipe to the engineering pipe and wrap the pipe with thermal insulation foam End Top Pipe Routing NOTICE When routing pipes from the top do not route the pipes over servers or other devices to protect them from being affected by pipe leaks Step 1 Straig...

Page 107: ...sulation foam End 4 8 8 2 Installing the Humidifier Water Inlet Pipe Without a Humidifier Hose Procedure Step 1 Melt the active connector with rigid pipe 1 and the elbow to form a water supply pipe assembly as shown by 1 and 2 in the following figure Step 2 Connect the water supply pipe assembly to the water inlet solenoid valve as shown by 3 in the following figure Step 3 Melt rigid pipe 2 and th...

Page 108: ...e to avoid impurities entering into the humidifier Step 5 Connect the water inlet pipe to the engineering pipe and wrap the pipe with thermal insulation foam Figure 4 75 Top routing of the water inlet pipe NetCol5000 A050 In row Air Cooled Smart Cooling Product User Manual 4 Installation Issue 08 2021 09 17 Copyright Huawei Technologies Co Ltd 98 ...

Page 109: ... do not remove the rubber hoses and pressure gauges otherwise nitrogen may leak When an air cooled outdoor unit or a water cooling module is connected to the outdoor side perform the same operations on the refrigerant side for nitrogen injection and pressure preservation Procedure Step 1 Connect the rubber hoses pressure gauges reducing valve and nitrogen cylinder to the device The pressure gauges...

Page 110: ...rging nitrogen to pipes with a low temperature component 1 Nitrogen cylinder 2 Reducing valve 3 Pressure gauge 1 4 Pressure gauge 2 5 Connection nut 6 Low pressure needle valve 7 Exhaust pipe needle valve 8 Liquid pipe needle valve Step 2 Open the pressure gauges and reducing valve Inject 3 0 MPa nitrogen and preserve the pressure for 24 hours The system pressure should stay constant under unchang...

Page 111: ... If a water cooling module is installed you need to do leakage test with water NOTICE Ensure that the indoor temperature is always above 0 C during the leakage test with water otherwise the pipes may experience frost cracks If the indoor temperature is below 0 C take anti freezing measures for the pipes Procedure Step 1 Manually open the chilled water valve 100 Figure 4 79 Opening the chilled wate...

Page 112: ...or unit has no reverse phase sequence or open phase Keep cables away from the compressor fan and copper pipe if unavoidable take protective measures and connect cables securely The device must be grounded as required by local electrical regulations Before connecting cables remove the power cable protective cover Cables must be routed in through the cable clips Power cables and ground cables are ro...

Page 113: ... power cable to the main power route Installing the Power Cable to an Indoor Unit Single Power Supply Step 1 Route the external power cable through the cabinet cable hole then to the L1 L2 L3 and N ports of the QF1 terminal on the indoor unit NOTICE When there is one power supply connect the power cable to the primary power switch QF1 NetCol5000 A050 In row Air Cooled Smart Cooling Product User Ma...

Page 114: ...Power Supplies Step 1 Route the external power cables through the cabinet cable hole then to the L1 L2 L3 and N ports of the switches QF1 and QF2 on the indoor unit NOTICE When there are two power supplies connect the power cables to the primary power switch QF1 first and then the standby power switch QF2 NetCol5000 A050 In row Air Cooled Smart Cooling Product User Manual 4 Installation Issue 08 2...

Page 115: ...outer insulation sheath should be retained when you route a cable through the waterproof connector Ensure that the phase sequence is correct when connecting cables Step 1 Route the outdoor unit power cable through the cabinet cable hole and connect the cable to the 1U 1V and 1W wiring terminals on the indoor unit NetCol5000 A050 In row Air Cooled Smart Cooling Product User Manual 4 Installation Is...

Page 116: ... cable to the PE terminal at the bottom of the outdoor unit as shown in Figure 4 83 Step 3 Secure the cable on the post of the cabinet with cable ties End 4 9 5 Optional Installing the Low temperature Component Power Cable Step 1 Route the low temperature component cable through the cable hole to the L and N terminals of QF2 on the outdoor unit NetCol5000 A050 In row Air Cooled Smart Cooling Produ...

Page 117: ...9 6 Installing the Outdoor Unit Signal Cable This operation is required only when the outdoor unit is equipped with a temperature control intelligent monitoring board Procedure Step 1 Route the cable through the cable hole on the top or at the bottom of the cabinet Step 2 Connect one end of the cable to points 1 2 and 3 on the external signal port X302 of indoor unit and the other end to ports 1 2...

Page 118: ... server cabinet based on onsite situation It is recommended that the T H sensors be deployed near heat sources in the hot aisle or near places that lack cooling capacity in the cold aisle The T H sensors outside the cabinet must be near the smart cooling product to sense the temperature of the outlet air and must be away from the air exhaust vents of other smart cooling products Procedure Step 1 C...

Page 119: ...directly in series Step 2 Set the DIP switches of T H sensors Table 4 18 shows how to set the DIP switches for T H sensors Figure 4 87 Position of the DIP switch on a T H sensor Table 4 18 DIP switch setting on a T H sensor Locati on Display Name Addr ess DIP Switch Sequence No 1 2 3 4 5 6 Air return side Return air 2 temp humid 1 ON OFF OFF OFF OFF OFF NetCol5000 A050 In row Air Cooled Smart Cool...

Page 120: ...ON OFF Hot aisle 2 temp humid 22 OFF ON ON OFF ON OFF Hot aisle 3 temp humid 23 ON ON ON OFF ON OFF Hot aisle 4 temp humid 24 OFF OFF OFF ON ON OFF Hot aisle 5 temp humid 25 ON OFF OFF ON ON OFF NOTICE After the addresses are set power on the device choose Settings System Settings T H Sensor on the home screen and set the sensors in the aisles corresponding to the addresses to Enable Otherwise the...

Page 121: ...ion must be less than or equal to 310 m Route cables in compliance with local standards Take appropriate shielding measures such as using a galvanized pipe or an ELV cable tray to reduce the impact of electromagnetic interference on teamwork communication Otherwise teamwork networking may fail 4 9 8 1 Preparing a Network Cable Step 1 Crimp a network cable Figure 4 88 Teamwork communications cable ...

Page 122: ...ork and monitoring communications cables Networking Teamwork Monitoring Protocol MAC_CAN Modbus TCP Figure 4 90 Connecting communications cables End 4 9 8 3 Independent Networking Scenario NOTE Select one of the following networking modes according to the actual situation 4 9 8 3 1 CAN Teamwork RS485 Monitoring NetCol5000 A050 In row Air Cooled Smart Cooling Product User Manual 4 Installation Issu...

Page 123: ...ements group the units If units are not grouped n 1 set RS485 monitoring grouping to Enable on the Modbus Settings screen for each unit If units are grouped n 1 recommended n 4 set RS485 monitoring grouping to Enable on the Modbus Settings screen for the unit with the COM FE port connected Retain the default setting Disable for other units NOTE Connect the COM FE port on the main control module of...

Page 124: ... SNMP Description One teamwork network supports a maximum of 32 units On the Teamwork Settings screen of the display modules of the first and last units set Enable teamwork CAN resistor to Yes NOTE Customers can purchase a switch and NetEco as the monitoring system NetCol5000 A050 In row Air Cooled Smart Cooling Product User Manual 4 Installation Issue 08 2021 09 17 Copyright Huawei Technologies C...

Page 125: ...Figure 4 92 Connecting communications cables End NetCol5000 A050 In row Air Cooled Smart Cooling Product User Manual 4 Installation Issue 08 2021 09 17 Copyright Huawei Technologies Co Ltd 115 ...

Page 126: ...sed Failed Fan The fan is secured Passed Failed The fan has no foreign matter inside Passed Failed The fan blades rotate properly Passed Failed Optional Wet film humidifier The water inlet solenoid valve is secured reliably and steadily Passed Failed The wet film is secured reliably and steadily Passed Failed Water inlet pipes are connected securely without leaks Passed Failed Compressor The sheet...

Page 127: ...d Air filter The air filter is correctly installed according to the air flow direction on the frame Passed Failed Table 5 2 Pipeline checklist Expected Result Actual Result Ports are connected correctly The pipes have oil traps inverted U shaped traps gradients of refrigerant pipes and pipe supports Passed Failed The hose clamps and cable ties of the condensate water pipe are reliably secured Pass...

Page 128: ...m Expected Result Actual Result Rack The rack is installed properly without any tilt Passed Failed The rack is secured to the ground or base Fans The fans are secured and the blades rotate without block Passed Failed Electrical control box The electrical control box is secured Passed Failed The screws on the cover of the electrical control box are tightened Cables are properly connected Waterproof...

Page 129: ... fan will rotate reversely Waterproof connectors are tightened Apply sealing putty when the waterproof connector on the outdoor unit side faces upward Low temperature component optional Cables are securely tightened and measures have been taken to prevent cables from sun exposure and water Passed Failed The low temperature component is secured using bolts 5 3 Checking the Water Cooling Module Tabl...

Page 130: ...es and signal cable are connected as required Passed Failed Cables are intact and not over bent Passed Failed NetCol5000 A050 In row Air Cooled Smart Cooling Product User Manual 5 Installation Verification Issue 08 2021 09 17 Copyright Huawei Technologies Co Ltd 120 ...

Page 131: ...olation 6 1 1 Refrigerant Charge Amount Table 6 1 Refrigerant charge amount Refrigera nt Charge Amount Length of the One Way Connecti on Pipe Between the Indoor and Outdoor Units L NetCol500 A060 NetCol500 A120 NetCol500 A060 with a Low Temperatur e Component NetCo l500 A080 NetCol500 W055 Standard charge amount kg 10 m 9 2 20 2 13 2 10 NetCol5000 A050 In row Air Cooled Smart Cooling Product User ...

Page 132: ...0 L 10 0 28 NOTE When the outdoor unit is NetCol500 A120 two indoor units can be connected 6 1 2 Vacuumizing Prerequisites NOTICE Before vacuumizing the cooling system ensure that the refrigerant pipes have passed the air tightness test and do not leak Before vacuumizing the cooling system ensure that all connectors are secured System high pressure may occur if the cooling system is not vacuumized...

Page 133: ... needle valve 4 Exhaust pipe needle valve If a low temperature component is installed on the outdoor side connect the pressure gauge and vacuum pump at the low pressure exhaust pipe and liquid pipe needle valves to vacuumize the system simultaneously as shown in Figure 6 2 Figure 6 2 Vacuumizing the system with a low temperature component 1 Vacuum pump 2 Pressure gauge 1 3 Pressure gauge 2 4 Low p...

Page 134: ...without disconnecting the pump and preserve the pressure for 10 minutes Ensure that the pressure of the cooling system does not exceed 90 Pa absolute pressure NOTE If the minimum reading of the pressure gauge is greater than 60 Pa absolute pressure ensure that the pointer stays at the smallest scale of the pressure gauge in vacuumizing and preserve the pressure for 1 hour Then check that the press...

Page 135: ...sure gauge 1 4 Pressure gauge 2 5 Connection nut 6 Low pressure needle valve 7 Exhaust pipe needle valve 8 Liquid pipe needle valve Step 2 Slightly open the refrigerant cylinder valve and loosen the connection nut of the pressure gauge Tighten the nut when cold air escapes out of the nut Step 3 Put the refrigerant cylinder upside down on the electronic scale Clear the reading on the balance NetCol...

Page 136: ...n charging refrigerant for a cooling system with a low temperature component open only the low pressure valve of gauge 1 and gauge 2 Charge 1 kg of refrigerant from the low pressure side and then close the low pressure valve of gauge 1 Then open the high pressure valves of gauge 1 and gauge 2 Charge the remaining refrigerant from the exhaust pipe needle valve and liquid pipe needle valve Step 5 Th...

Page 137: ...ooling product Otherwise the smart cooling product may be damaged beyond repair Step 5 If teamwork networking is required verify that the teamwork cable is correctly connected Step 6 If the cabinet is connected to the temperature and humidity sensor check that the cable connection and DIP switch settings are correct Step 7 If a humidifier is configured check that the upstream water inlet valve of ...

Page 138: ... be modified by user operator Otherwise Huawei will not be liable for any consequences of the modification performed by the user Only certified professionals are allowed to modify the advanced parameters Unauthorized modifications may lead to device malfunction or damage For system security purposes change the preset password after first login After login you are allowed to perform operations unti...

Page 139: ...ies the date display format for the controller Consistent with the date format on the UI Date settings Specifies the date displayed on the controller Consistent with the date on the UI Time zone Specifies the time zone displayed on the controller Consistent with the time zone on the UI Time Specifies the time displayed on the controller Consistent with the time on the UI NetCol5000 A050 In row Air...

Page 140: ... the onsite device heat distribution Networking mode Specifies the networking mode for teamwork control The networking mode selected on the screen must match the actual networking mode Otherwise the teamwork function is unavailable CAN network indicates teamwork control over a CAN bus MAC_CAN network indicates teamwork control over an FE port CAN network Settings Quick Settings System Optional Par...

Page 141: ...d If the outdoor unit is a water cooled module select Water cooled Temp control intelligent monitoring board The temperature control intelligent monitoring board is used to detect the outdoor ambient temperature Select this parameter based on the site requirements Check the cover of the outdoor unit control box If there is a temperature control intelligent monitoring board set this parameter to Ye...

Page 142: ...ertain range If this parameter is set to Disable the heating function is disabled If this parameter is set to Enabled when active power the device starts heating only when the primary power is used and the ambient temperature is lower than the temperature setpoint by a certain range Retain the default value Heating mode This parameter can be set to Dehumidifying heating Low temperature heating or ...

Page 143: ...ly when the primary power is supplied and the ambient humidity is lower than the humidity setpoint by a certain range Retain the default value Dehumidifyin g function If this parameter is set to Enable the device starts dehumidifying when the ambient humidity is higher than the humidity setpoint by a certain range If this parameter is set to Disable the dehumidifying function is disabled Retain th...

Page 144: ...arm 2 dry contact is closed Alarm startup status When an alarm of any severity is generated the common alarm 1 dry contact is open When the smart cooling product is started the common alarm 2 dry contact is closed When the smart cooling product shuts down the common alarm 2 dry contact is open No The common alarm 1 and 2 dry contacts are open and no alarms are reported Retain the default value Net...

Page 145: ...Hot aisle Return air and Supply air can be set as required Enable the corresponding sensors based on the control type When the application scenario is cold or hot aisle containment you are advised to choose Cold aisle if cold aisle T H sensors are configured Choose Supply air if no cold aisle T H sensors are configured When the application scenario is non aisle containment you are advised to choos...

Page 146: ...ehumidifying based on the settings Set this parameter as required 40 60 RH recommended Settings Quick Settings Comm Settings Modbus Comm address Enter the communications address of the smart cooling product as planned The NMS communicates with the smart cooling product using this address and the communications addresses of two smart cooling products connected to the same NMS must be different Set ...

Page 147: ...preheating time 6 4 Home Screen You can tap the menu items buttons or icons on the screen to enter related screens or perform operations such as Running Alarms and Settings The controller home screen is shown in Figure 6 9 NOTICE The information in the screenshots is for reference only The actual parameters may vary NetCol5000 A050 In row Air Cooled Smart Cooling Product User Manual 6 Power On Com...

Page 148: ...mode Tap the icon to exit from the diagnostic mode 4 Buzzer status The buzzer status can be set to On or Off The icon indicates that the buzzer is on When the buzzer is on it buzzes when an alarm is generated When the buzzer is buzzing you can tap anywhere on the screen to mute the buzzer After the buzzer is muted it still buzzes when a new alarm is generated indicates that the buzzer is disabled ...

Page 149: ...o log out 12 Teamwork control button indicates that there is no teamwork control at present indicates that there is teamwork control without alarms at present indicates that there is teamwork control with alarms at present 6 5 Setting Parameters 6 5 1 Setting T H Sensors Parameters Prerequisites The T H sensors outside the cabinet need to be enabled when they are installed otherwise skip Step 2 Th...

Page 150: ...erature and humidity set points correspond to the selected control type can be set When the application scenario is cold or hot aisle containment you are advised to choose Cold aisle if the cold aisle T H sensors are configured and choose Supply air if the cold aisle T H sensors are not configured When the application scenario is non aisle containment you are advised to choose Return air and choos...

Page 151: ...nd the temperature value under this type are set the device conducts cooling or heating based on the settings Set this parameter as required Return air temperature 26 35 C recommended Supply air temperature 18 24 C recommended Cold aisle temperature 18 24 C recommended Hot aisle temperature 26 35 C recommended Humidity setpoint After the Temperature and humidity control type and the humidity value...

Page 152: ...he air volume of the indoor fans is between 60 70 Air side difference pressure sensor type Specifies the measuring range for the air side differential pressure sensor There is no default value Set it to 0 50 Pa Min indoor fan speed Specifies the minimum speed for the indoor fan The default value is 30 You are advised not to change the value Max indoor fan speed Specifies the maximum speed for the ...

Page 153: ... product Only Teamwork group No System address Enable teamwork CAN resistor Teamwork function and Networking mode can be set on slave smart cooling products Other parameters of the slave units will be modified by the master unit synchronously Table 6 7 describes how to set the parameters Table 6 7 Teamwork settings Paramete r Description Setting Rule Default Value Teamwork group No The number of t...

Page 154: ...teamwork The networking mode set on the screen must be consistent with the actual networking mode Otherwise the teamwork control function will be unavailable If the networking mode changes select the corresponding networking mode on the screen Networked over CAN or MAC_CAN CAN network indicates teamwork control over a CAN bus MAC_CAN network indicates teamwork control over an FE port If the device...

Page 155: ...oling products to work as the standby device in turn maximizing their service life It is recommended that the function be enabled when the load is even Disable Rotation period Rotation days 1 30 7 by default 7 day s Rotation time 24 hours in a day 0 23 0 by default 0 Forced rotation Indicates whether to enable forced rotation regardless of the specified rotation time After a forced rotation the ro...

Page 156: ...her parameters to the slave units and all the smart cooling products in the group refer to the mode delivered by the master unit Anti competitive running is recommended for the following scenario In one teamwork group the temperature and humidity control type and temperature and humidity set points of units are the same and device heat loads are distributed evenly Disable Cascade function When req...

Page 157: ...ot aisle temperatu re and humidity sharing This function can be enabled only when at least one smart cooling product in the group is equipped with hot aisle T H sensors If this function is enabled the master unit in the teamwork group collects the hot aisle temperature and humidity values from all units equipped with hot aisle sensors and synchronizes the temperature and humidity values after logi...

Page 158: ...he master one is offline the online device with the smallest address is selected to be the new master 3 Active Standby Active properly responds to the requirement control Standby responds to the requirement control when active one is faulty critical alarms shutdown and offline or cannot meet cooling requirements 4 M S M indicates the master unit and S indicates a slave unit Blue indicates that the...

Page 159: ...go to 2 If no check the cable connection and the settings of teamwork control parameters 2 Check that the number of the running devices in the topology is the same as the actual number of devices If yes go to 3 If no check the cable connection and the settings of teamwork control parameters 3 Check that the number of standby devices in the topology is the same as the actual number of devices If ye...

Page 160: ...55 Set the communication address of the smart cooling product as planned The EMS communicates with the smart cooling product through this address and the communication addresses of two smart cooling products connecting to the same EMS must be unique RS485 monitoring grouping Enable Disable For CAN networking and no grouping scenario set the RS485 monitoring grouping of the last smart cooling produ...

Page 161: ...s Settings Set Link mode to Server and client or Server and set Server encryption to Enable Figure 6 15 Modbus Settings End Connecting to the NMS Step 1 On the home screen choose Settings Comm Settings IP Settings The IP assigning mode is set to Manual Set IP address Subnet mask Gateway according to the actual plan Figure 6 16 IP Settings NetCol5000 A050 In row Air Cooled Smart Cooling Product Use...

Page 162: ...re 6 17 Modbus Settings 1 Figure 6 18 Modbus Settings 2 Step 3 Enter the actual IP address of the NMS Step 4 When Client encryption is set to Enable set NMS port number to 32907 When Client encryption is set to Disable set NMS port number to 32906 NOTE The encryption mode must be the same as it on the NMS NetCol5000 A050 In row Air Cooled Smart Cooling Product User Manual 6 Power On Commissioning ...

Page 163: ...munication In addition the smart cooling product as a client can connect to a remote server and establish communication Client encryption Enable Disable This parameter is configurable when Link mode is set to Client Server encryption Enable Disable This parameter is configurable when Link mode is set to Server Encryption operation CBC Enable Disable Encryption operation CBC is enabled by default D...

Page 164: ...to 6 EMSs through SNMP Procedure Step 1 On the home screen choose Settings Comm Settings SNMP Settings Figure 6 20 is displayed Figure 6 20 Setting SNMP communications parameters Step 2 Set SNMP Version based on site requirements and then tap Submit If you set SNMP Version to ALL or SNMPv1 v2c you can set Read Community and Write Community by performing Step 3 If you set SNMP Version to ALL or SNM...

Page 165: ...ect values for Auth Protocol and Prop Protocol from drop down list boxes and tap as shown in Figure 6 23 MD5 and DES protocols are not secure It is recommended that you set Auth Protocol to SHA and set Prop Protocol to AES The following operations use the recommended settings as an example Figure 6 23 Setting the protocol type NetCol5000 A050 In row Air Cooled Smart Cooling Product User Manual 6 P...

Page 166: ...g containing duplicate sections such as 12a12a12a 3 Set SHA Password and Confirm Password as planned and tap as shown in Figure 6 24 Figure 6 24 Setting an SHA password 4 Set AES Password and Confirm Password as planned and tap as shown in Figure 6 25 Figure 6 25 Setting an AES password 5 Tap Submit Step 5 Tap the text box after SNMP Port as shown in Figure 6 26 Set SNMP Port to the actual port nu...

Page 167: ...et to SNMPv3 select a SNMPv3 user name and then tap as shown in Figure 6 27 Figure 6 27 Setting SNMP trap parameters 5 Tap Submit under SNMP Trap End Follow up Procedure After a USB flash drive has been inserted into the controller USB port and successfully identified tap Export File under MIB File to export the MIB file to the USB flash drive for the customer s use in accessing a third party EMS ...

Page 168: ... Table 6 11 Table 6 11 WiFi settings Parameter Setting Method WiFi SSID Set WiFi SSID based on the actual configuration WiFi SSID is the name used for the WiFi hotspot over which a mobile phone can connect to the smart cooling product WiFi Password Enter the WiFi password when you use a mobile phone to connect to the WiFi When you enable the WiFi function for the first time you need to set a passw...

Page 169: ...s started by default Starting a unit over the screen or NMS is valid only when the status of remote dry contacts or remote start shutdown signal is Start Procedure Step 1 Tap Start on the home screen of the controller If the screen shown in Figure 6 29 is displayed tap Yes Indicating initial startup perform Step 2 for initial startup verification Figure 6 29 Initial startup Figure 6 30 Password sc...

Page 170: ...StartUp on the home screen of the app and the screen shown in Figure 6 32 is displayed Figure 6 32 Offline activation Step 4 Tap Offline Activation and the screen shown in Figure 6 33 is displayed NetCol5000 A050 In row Air Cooled Smart Cooling Product User Manual 6 Power On Commissioning Issue 08 2021 09 17 Copyright Huawei Technologies Co Ltd 160 ...

Page 171: ...complete the wizard commissioning If the remaining refrigerant is not charged tap No on the Wizard Startup screen to exit the startup commissioning Complete refrigerant charging and then perform the wizard startup by choosing Maint Wizard Startup to enter the wizard startup screen End 6 7 Charging the Remaining Refrigerant Prerequisites Check that the outdoor unit switch is turned on before you st...

Page 172: ...onnection nut 5 Low pressure needle valve 6 Exhaust pipe needle valve If there is a low temperature component open the low pressure valves of pressure gauge 1 and pressure gauge 2 and charge the remaining refrigerant from the low pressure needle valves in small flow or intermittently Figure 6 35 Precharging refrigerant when a low temperature component is configured 1 Refrigerant cylinder 2 Electro...

Page 173: ... standard charge required If the refrigerant is overfilled the discharge pressure is high If the refrigerant is underfilled the suction and discharge pressures are low and the suction superheat degree is high 2 The air intake and exhaust vents of the outdoor unit are not blocked If the air intake vent and air exhaust vent are blocked the discharge pressure will be high Step 6 After charging refrig...

Page 174: ...t Wizard Startup as shown in Figure 6 36 Figure 6 36 Wizard Startup NOTE For the initial wizard startup Last Record is in gray indicating that operation is not allowed For a non initial wizard startup you can choose Last Record to view the last wizard startup report Step 2 Tap Yes The checking before startup screen is displayed as shown in Figure 6 37 NOTICE If the remaining refrigerant is not cha...

Page 175: ...bled you cannot select the electric heater and humidifier items All the items are selected by default if you first enter the screen where you select commissioning items Except that the indoor fan item is mandatory you can clear other commissioning items that are not required After the fan commissioning the electric heater commissioning screen is displayed Use a clamp meter to measure the currents ...

Page 176: ...urn off the standby switch QF2 when there is only one power supply Step 4 Optional If the power supply needs to be disconnected for maintenance or for a long period turn off the smart cooling product switch in the PDF End 6 10 Checking After Commissioning Table 6 13 lists the commissioning checklist Table 6 13 Commissioning checklist Check Item Actual Result No oil stain exists on the copper pipe ...

Page 177: ... is cleaned up Passed Failed The air filter is correctly installed according to the air flow direction on the frame Passed Failed NetCol5000 A050 In row Air Cooled Smart Cooling Product User Manual 6 Power On Commissioning Issue 08 2021 09 17 Copyright Huawei Technologies Co Ltd 167 ...

Page 178: ...ct IP address is 192 168 0 10 subnet mask is 255 255 255 0 and default gateway is 192 168 0 1 set the PC IP address to 192 168 0 11 subnet mask to 255 255 255 0 and default gateway to 192 168 0 1 Step 4 Set LAN parameters NOTE If the smart cooling product connects to a LAN and a proxy server has been selected perform Step 4 3 and Step 4 4 If the smart cooling product connects to the Internet and t...

Page 179: ...cooling product 1 Enter https IP address such as IP address https 192 168 0 10 in the address box of the browser and then press Enter to enter the WebUI login page NOTE If the security certificate is not installed an alarm will be displayed as Figure 7 3 and tap Continue to this website not recommended NetCol5000 A050 In row Air Cooled Smart Cooling Product User Manual 7 WebUI Introduction Issue 0...

Page 180: ...our first login An account is logged out due to a timeout if no operation is performed within 10 minutes after system login End 7 2 WebUI For data transmission security the smart cooling product supports WebUI access through SSL Figure 7 4 Home page NetCol5000 A050 In row Air Cooled Smart Cooling Product User Manual 7 WebUI Introduction Issue 08 2021 09 17 Copyright Huawei Technologies Co Ltd 170 ...

Page 181: ...g output fan output humidifying output and heating output View cooling capacity and air volume Active Alarms Query active alarms Figure 7 5 WebUI menu hierarchy NOTE The actual menu hierarchy may vary NetCol5000 A050 In row Air Cooled Smart Cooling Product User Manual 7 WebUI Introduction Issue 08 2021 09 17 Copyright Huawei Technologies Co Ltd 171 ...

Page 182: ...ngs Upload the network security certificate Set the time zone time and date Set the IP address Set the Modbus network parameters Set the SNMP network parameters Maintenance Supports online upgrade of the smart cooling product and its components Query the version and e labels Query and export fault information Manage users for example adding and deleting a user Import and export configuration files...

Page 183: ...setpoint Choose Common Functions Operating Information or tap Running System Summary Current temperature Current humidity Rated power voltage Measured power voltage Choose Running Device Details Compressor Discharge temperature Discharge pressure Suction pressure Tap Teamwork Teamwork function Choose Teamwork Teamwork Settings Number of systems in this group NetCol5000 A050 In row Air Cooled Smart...

Page 184: ...an and liquid level detector have no scale Clean up the scale from the condensate pan and liquid level detector Compr essor The compressor is secured Tighten screws if the compressor is not secured The compressor service valve has no oil stains Clean up the oil stains The operating compressor generates no metal friction noise or collision noise from inside Replace the compressor Wet film humidif i...

Page 185: ...rt No water exists under the water pipe or on the thermal insulation foam If drops of water are evenly distributed wipe off them with a dry cloth If there are large water marks close the water inlet sluice and process the leak points If the thermal insulation foam is damaged or missing lay out new thermal insulation foam The refrigerant pipe support is secure and intact Replace the refrigerant pip...

Page 186: ...umidifier and water pump from the monitoring system View the historical alarms generated in this quarter and select the most common five ones If no monitoring system is available skip this item Rectify the fault or contact Huawei technical support Wet film humidif ier Start the device choose Maint Diagnostic Mode Enter on the home screen and start the wet film humidifier If no water is supplied ch...

Page 187: ...ucts Table 8 4 Yearly maintenance checklist Compon ent Item on the Basis of Quarterly Maintenance Troubleshooting Sensor Use a precision T H sensor to calibrate the T H sensors inside and outside cabinets If the temperature deviation is greater than 1 C or humidity deviation is greater than 5 the T H sensor must be calibrated or replaced Evaporat or The evaporator fins are not pushed down Use a fi...

Page 188: ...shooting with the power off All refrigerant pipes are clean without leaking and eroding Drain the refrigerant and repair the leakage on the pipe Perform the troubleshooting with the power off The thermal insulator on the refrigerant pipe is not damaged Rewrap the thermal insulator Perform the troubleshooting with the power off Condenser The fins are not pushed down Restore the fins by using a wire...

Page 189: ...g with the power off Electric control system Cables are connected properly Secure the terminals Check and perform the troubleshooting with the power off The cable holes of the electrical control box are properly sealed Check whether the waterproof connector is aging if yes replace a new one Check and perform the troubleshooting with the power off Cables are not damaged or aged Replace the cables C...

Page 190: ...h the power off The pipe thermal insulation foam is intact Wrap the thermal insulation foam again Perform the troubleshooting with the power off Water pipe The pipes are not blocked Ask a professional cleaning organization to clean the pipes Perform the troubleshooting with the power off 8 3 2 Semi Annual Maintenance Table 8 8 Semi annual maintenance Item Expected Result Troubleshooting Remarks Ra...

Page 191: ...r off The electrical control box is free from water Clean up the water stains in the electric control box and locate the cause of water leakage Check and perform the troubleshooting with the power off NetCol5000 A050 In row Air Cooled Smart Cooling Product User Manual 8 Maintenance Issue 08 2021 09 17 Copyright Huawei Technologies Co Ltd 181 ...

Page 192: ...Supply air 1 temperature sensor fault MAJ OR 1 The cables to the temperature sensor are loose or damaged 2 The temperature sensor is faulty 1 Check the cables to the temperature sensor 2 Maintain or replace the temperature sensor A001 0 1 Supply air 2 temperature sensor fault MAJ OR 1 The cables to the temperature sensor are loose or damaged 2 The temperature sensor is faulty 1 Check the cables to...

Page 193: ...d in inappropriate positions 2 The thermal load power is high or the cooling capacity is insufficient 3 The ambient temperature exceeds the upper threshold 4 The high temperature alarm threshold is inappropriate 5 The value detected by the temperature sensor or temperature and humidity sensor is different from the actual value 1 Adjust the positions of the temperature sensors or temperature and hu...

Page 194: ...idity sensor is different from the actual value 6 The air filters are blocked 1 Adjust the positions of the temperature sensors or temperature and humidity sensors 2 Contact Huawei technical support 3 Measure the ambient temperature Check whether other causes exist if the alarm persists in a long time after startup 4 Adjust the low temperature alarm threshold 5 Calibrate or replace the temperature...

Page 195: ...idity sensor 4 Maintain or replace the main control board A007 0 1 Cold aisle 1 temp humid sensor comm failed MAJ OR 1 The cables to the temperature and humidity sensor are loose or damaged 2 The DIP switch of the temperature and humidity sensor is set incorrectly 3 The temperature and humidity sensor is faulty 4 The communications port of the main control board is faulty 1 Check the cables to the...

Page 196: ...idity sensor 4 Maintain or replace the main control board A007 0 1 Cold aisle 3 temp humid sensor comm failed MAJ OR 1 The cables to the temperature and humidity sensor are loose or damaged 2 The DIP switch of the temperature and humidity sensor is set incorrectly 3 The temperature and humidity sensor is faulty 4 The communications port of the main control board is faulty 1 Check the cables to the...

Page 197: ...idity sensor 4 Maintain or replace the main control board A007 0 1 Cold aisle 5 temp humid sensor comm failed MAJ OR 1 The cables to the temperature and humidity sensor are loose or damaged 2 The DIP switch of the temperature and humidity sensor is set incorrectly 3 The temperature and humidity sensor is faulty 4 The communications port of the main control board is faulty 1 Check the cables to the...

Page 198: ...idity sensor 4 Maintain or replace the main control board A007 0 1 Hot aisle 2 temp humid sensor comm failed MAJ OR 1 The cables to the temperature and humidity sensor are loose or damaged 2 The DIP switch of the temperature and humidity sensor is set incorrectly 3 The temperature and humidity sensor is faulty 4 The communications port of the main control board is faulty 1 Check the cables to the ...

Page 199: ...tly 7 The temperature and humidity sensor is faulty 8 The communications port of the main control board is faulty 1 Check the cables to the temperature and humidity sensor 2 Set the DIP switch of the temperature and humidity sensor correctly 3 Maintain or replace the temperature and humidity sensor 4 Maintain or replace the main control board 5 Check the cables to the temperature and humidity sens...

Page 200: ...idity sensor 4 Maintain or replace the main control board A007 0 1 Hot aisle 5 temp humid sensor comm failed MAJ OR 1 The cables to the temperature and humidity sensor are loose or damaged 2 The DIP switch of the temperature and humidity sensor is set incorrectly 3 The temperature and humidity sensor is faulty 4 The communications port of the main control board is faulty 1 Check the cables to the ...

Page 201: ...re switch 4 The pressure tube of the differential pressure switch is blocked or disconnected 5 The cables to the differential pressure switch are loose or damaged 1 Maintain or replace the air filters 2 Replace the differential pressure switch 3 Adjust the threshold set for the differential pressure switch 4 Dredge or replace the pressure tube 5 Check the cables to the differential pressure switch...

Page 202: ...oose or damaged 1 Check the input power cables of the PSU A042 0 1 Remote shutdown alarm CRITI CAL 1 The remote shutdown dry contact is triggered 2 The cables to the remote shutdown dry contact are loose or damaged 1 Check the status of the remote shutdown dry contact 2 Check the cables to the remote shutdown dry contact A044 0 1 Smoke sensor alarm CRITI CAL 1 Smoke is generated in the equipment r...

Page 203: ...s faulty 7 The ambient temperature is below the lower threshold 1 Identify and repair the leaking point and refill refrigerant after maintenance 2 Maintain or replace the solenoid valve coil or the solenoid valve 3 Calibrate or replace the pressure sensor 4 Maintain or replace the filter dryer 5 Maintain or replace the expansion valve or the coil and reconnect cables 6 Maintain or replace the indo...

Page 204: ... temperature sensor or temperature and humidity sensor is different from the actual value 1 Adjust the positions of the temperature sensors or temperature and humidity sensors 2 Add air conditioners or contact Huawei technical support 3 Measure the ambient temperature Check whether other causes exist if the alarm persists in a long time after startup 4 Adjust the high temperature alarm threshold 5...

Page 205: ...idity sensor is different from the actual value 6 The air filters are blocked 1 Adjust the positions of the temperature sensors or temperature and humidity sensors 2 Contact Huawei technical support 3 Measure the ambient temperature Check whether other causes exist if the alarm persists in a long time after startup 4 Adjust the low temperature alarm threshold 5 Calibrate or replace the temperature...

Page 206: ... temperature sensor or temperature and humidity sensor is different from the actual value 1 Adjust the positions of the temperature sensors or temperature and humidity sensors 2 Add air conditioners or contact Huawei technical support 3 Measure the ambient temperature Check whether other causes exist if the alarm persists in a long time after startup 4 Adjust the high temperature alarm threshold 5...

Page 207: ... actual value 1 Adjust the positions of the temperature sensors or temperature and humidity sensors 2 Add air conditioners or contact Huawei technical support 3 Measure the ambient temperature Check whether other causes exist if the alarm persists in a long time after startup 4 Adjust the high temperature alarm threshold 5 Calibrate or replace the temperature sensor or temperature and humidity sen...

Page 208: ...e communications cables of the PSU 2 Maintain or replace the PSU 3 Maintain or replace the main control board A055 0 1 Compressor discharge temperature sensor fault MAJ OR 1 The cables to the discharge temperature sensor are not connected properly 2 The discharge temperature sensor is faulty 1 Check cables to the discharge temperature sensor 2 Maintain or replace the discharge temperature sensor A...

Page 209: ...compressor is faulty 3 The compressor drive is faulty 1 Fill oil to the compressor 2 Maintain or replace the compressor 3 Maintain or replace the compressor drive A077 0 1 Indoor fan 1 fault MAJ OR 1 The power supply to the fan is abnormal 2 The cable to the fan is not connected properly 3 The fan is faulty 1 Check the power supply to the fan 2 Check the cable connection to the fan 3 Maintain or r...

Page 210: ...cable connection to the fan 3 Maintain or replace the fan A077 0 1 Indoor fan 5 fault MAJ OR 1 The power supply to the fan is abnormal 2 The cable to the fan is not connected properly 3 The fan is faulty 1 Check the power supply to the fan 2 Check the cable connection to the fan 3 Maintain or replace the fan A077 0 1 Indoor fan 6 fault MAJ OR 1 The power supply to the fan is abnormal 2 The cable t...

Page 211: ...nection to the fan 3 Maintain or replace the fan A077 4 0 Indoor fan 1 fault MAJ OR 1 The cable to the fan is not connected properly 2 The fan is faulty 1 Check the cable connection to the fan 2 Maintain or replace the fan A077 4 0 Indoor fan 2 fault MAJ OR 1 The cable to the fan is not connected properly 2 The fan is faulty 1 Check the cable connection to the fan 2 Maintain or replace the fan A07...

Page 212: ...or replace the fan A077 4 0 Indoor fan 7 fault MAJ OR 1 The cable to the fan is not connected properly 2 The fan is faulty 1 Check the cable connection to the fan 2 Maintain or replace the fan A077 4 0 Indoor fan 8 fault MAJ OR 1 The cable to the fan is not connected properly 2 The fan is faulty 1 Check the cable connection to the fan 2 Maintain or replace the fan A077 0 1 Indoor fan 9 fault MAJ O...

Page 213: ...he fan is not connected properly 2 The fan is faulty 1 Check the cable connection to the fan 2 Maintain or replace the fan A079 0 1 Drain abnormal alarm MAJ OR 1 The drainage filter is blocked 2 The drainpipe is blocked 3 The drain pump is faulty 4 The low liquid level sensor is faulty 1 Clear the foreign matter in the water pan and filter 2 Check that the drainpipe is not blocked or bent 3 Check ...

Page 214: ...The temperature and humidity sensor is not installed in a proper position 4 The high humidity alarm threshold is inappropriate 5 The value detected by the temperature and humidity sensor is different from the actual value 1 Contact Huawei technical support 2 Measure the ambient humidity 3 Adjust the position of the temperature and humidity sensor 4 Adjust the high humidity alarm threshold 5 Calibr...

Page 215: ...arm MAJ OR 1 Supply water temperature is higher than the high supply water temperature alarm threshold 2 The supply water high temperature alarm threshold is inappropriate 3 The supply and return water pipes are reversely installed 4 The cables of supply and return water sensors are reversely connected 5 The supply water temperature displayed is different from the actual temperature 1 Check the su...

Page 216: ...e cable to the fan is not connected properly 3 The power supply to the fan is abnormal 1 Maintain or replace the fan and clear the accumulated runtime 2 Check the cable connection to the fan 3 Check the power supply to the fan A118 0 1 Backup power failure alarm MAJ OR The power supply is faulty 1 Check the power supply A118 0 1 Primary power failure alarm MAJ OR The power supply is faulty 1 Check...

Page 217: ... failed MAJ OR 1 The communications cable between the indoor and outdoor units is not properly connected 2 The outdoor fan drive is faulty 3 The outdoor unit is not powered on 4 The communications port of the main control board is faulty 1 Check the communications cable between the indoor and outdoor units 2 Maintain or replace the outdoor fan drive 3 Power on the outdoor unit 4 Maintain or replac...

Page 218: ...ction to the temperature control intelligent monitoring board 2 Replace the temperature control intelligent monitoring board 3 Check the power cable connection to the temperature control intelligent monitoring board 4 Replace the main control module 5 If the fan is working properly add a baffle plate on the air return side of the outdoor unit 6 Replace the outdoor fan A146 0 1 Outdoor fan blocked ...

Page 219: ...G 1 A cable of the pressure sensor is loose 2 The pressure sensor is faulty 1 Secure the pressure sensor wiring terminals 2 Replace the pressure sensor A172 0 1 SPD and voltage detection board comm failed MAJ OR 1 The communications cable is not connected properly 2 The SPD and voltage detection board is faulty 3 The communications port of the main control board is faulty 1 Check the communication...

Page 220: ...threshold 1 Maintain or replace the wet film of the humidifier and clear the accumulated runtime A182 0 1 Humidifier water supply abnormal alarm MAJ OR 1 The humidifier water supply is insufficient 2 The float does not float because the humidifier float is faulty 3 The cable to the humidifier float is not connected properly 4 The cable to the humidifier water inlet solenoid valve is not connected ...

Page 221: ...o Off to stop preheating A185 0 1 Insufficient refrigerant alarm WAR NIN G 1 Refrigerant has leaked 2 Refrigerant is not charged as required in the user manual 3 The displayed values of the liquid pipe temperature sensor or the condensing pressure sensor on the LCD are different from the actual values 4 The expansion valve is blocked or stuck or the expansion valve coil and cable connections are f...

Page 222: ...ogress WAR NIN G Wizard startup is in progress 1 Wait until wizard startup is complete or clear the Wizard startup in progress alarm manually to exit wizard startup A222 0 1 Main control module power supply abnormal MAJ OR 1 The system is powered off 2 The main control module is in poor contact 3 The PSU is faulty 4 The PSU is in poor contact 5 The auxiliary power supply is faulty 6 The auxiliary ...

Page 223: ... air conditioner 1 Change the addresses of the system units 2 Upgrade the air conditioner software by referring to the section that describes the mapping between the software and the teamwork versions in the upgrade guide 3 Enable the sensor that corresponds to the temperature and humidity control type for the master unit on this air conditioner A272 0 2 Teamwork networking abnormal alarm MAJ OR 1...

Page 224: ...ulty 1 Check the cable to the water valve 2 Maintain or replace the water valve A27C 0 1 Return air 2 temp humid sensor fault MAJ OR 1 The cables to the temperature and humidity sensor are loose or damaged 2 The temperature and humidity sensor is faulty 1 Check the cables to the temperature and humidity sensor 2 Maintain or replace the temperature and humidity sensor A27C 0 2 Return air 2 temp hum...

Page 225: ...2 Maintain or replace the temperature and humidity sensor A27C 0 1 Cold aisle 3 temp humid sensor fault MAJ OR 1 The cables to the temperature and humidity sensor are loose or damaged 2 The temperature and humidity sensor is faulty 1 Check the cables to the temperature and humidity sensor 2 Maintain or replace the temperature and humidity sensor A27C 0 1 Cold aisle 4 temp humid sensor fault MAJ OR...

Page 226: ... 2 Maintain or replace the temperature and humidity sensor A27C 0 1 Hot aisle 2 temp humid sensor fault MAJ OR 1 The cables to the temperature and humidity sensor are loose or damaged 2 The temperature and humidity sensor is faulty 1 Check the cables to the temperature and humidity sensor 2 Maintain or replace the temperature and humidity sensor A27C 0 1 Hot aisle 3 temp humid sensor fault MAJ OR ...

Page 227: ...2 Maintain or replace the temperature and humidity sensor A27C 0 2 Cold aisle 3 temp humid sensor fault MAJ OR 1 The cables to the temperature and humidity sensor are loose or damaged 2 The temperature and humidity sensor is faulty 1 Check the cables to the temperature and humidity sensor 2 Maintain or replace the temperature and humidity sensor A27C 0 2 Cold aisle 4 temp humid sensor fault MAJ OR...

Page 228: ... 2 Maintain or replace the temperature and humidity sensor A27C 0 2 Hot aisle 2 temp humid sensor fault MAJ OR 1 The cables to the temperature and humidity sensor are loose or damaged 2 The temperature and humidity sensor is faulty 1 Check the cables to the temperature and humidity sensor 2 Maintain or replace the temperature and humidity sensor A27C 0 2 Hot aisle 3 temp humid sensor fault MAJ OR ...

Page 229: ... 1 The cables to the temperature and humidity sensor are loose or damaged 2 The temperature and humidity sensor is faulty 1 Check the cables to the temperature and humidity sensor 2 Maintain or replace the temperature and humidity sensor A27C 0 2 Hot aisle 5 temp humid sensor fault MAJ OR 1 The cables to the temperature and humidity sensor are loose or damaged 2 The temperature and humidity sensor...

Page 230: ...figured check its cable connections clear the foreign matter in it or replace it 5 While configuring the high liquid level sensor check its cable connections clear the obstacles or replace it A280 0 2 Power frequency abnormal MAJ OR 1 The power supply frequency exceeds the upper threshold 2 The SPD and voltage detection board is faulty 1 Check the power supply frequency and ensure that it is withi...

Page 231: ... power supply voltage exceeds the upper threshold 2 The SPD and voltage detection board is faulty 1 Check that the power supply voltage is within the operating range 2 Replace the SPD and voltage detection board A281 4 0 Power voltage abnormal MAJ OR 1 The power supply voltage exceeds the upper threshold 2 The SPD and voltage detection board is faulty 1 Check that the power supply voltage is withi...

Page 232: ...perating range 2 Check the cable connection to the SPD and voltage detection board 3 Replace the SPD and voltage detection board A281 1 0 Power voltage abnormal MAJ OR 1 The power supply voltage is below the lower threshold 2 The cables to the SPD and voltage detection board are loose or damaged 3 The SPD and voltage detection board is faulty 1 Check that the power supply voltage is within the ope...

Page 233: ... threshold 2 The cables to the SPD and voltage detection board are loose or damaged 3 The SPD and voltage detection board is faulty 1 Check that the power supply voltage is within the operating range 2 Check the cable connection to the SPD and voltage detection board 3 Replace the SPD and voltage detection board A281 0 8 Power voltage abnormal MAJ OR 1 The power supply voltage is below the lower t...

Page 234: ...d is faulty 1 Check that the power supply voltage is within the operating range 2 Replace the SPD and voltage detection board A281 4 0 Backup power voltage abnormal MAJ OR 1 The power supply voltage exceeds the upper threshold 2 The SPD and voltage detection board is faulty 1 Check that the power supply voltage is within the operating range 2 Replace the SPD and voltage detection board A281 8 0 Ba...

Page 235: ...he operating range 2 Check the cable connection to the SPD and voltage detection board 3 Replace the SPD and voltage detection board A281 1 0 Backup power voltage abnormal MAJ OR 1 The power supply voltage is below the lower threshold 2 The cables to the SPD and voltage detection board are loose or damaged 3 The SPD and voltage detection board is faulty 1 Check that the power supply voltage is wit...

Page 236: ... cable is faulty 1 Check the power grid 2 Rectify the fault of the phase B input cable A282 0 1 Power phase sequence abnormal MAJ OR 1 The power grid is unstable 2 The SPD and voltage detection board may be faulty if it is configured 1 Check the power grid 2 Maintain or replace the SPD and voltage detection board A282 0 2 Backup power phase sequence abnormal MAJ OR 1 The phase sequence of the powe...

Page 237: ...isplayed by the exhaust air temperature sensor is different from the actual temperature 5 The input power of the outdoor unit has an open phase incorrect phase sequence or is unavailable 6 Cables to the indoor or outdoor fan are not properly connected 7 The outdoor fan or its drive is faulty 8 The exhaust fan is faulty 1 Identify and repair the leaking point and refill refrigerant after maintenanc...

Page 238: ... Cables to the indoor and outdoor units are not properly connected 7 The outdoor fan or its drive is faulty 8 The exhaust fan is faulty 1 Identify and repair the leaking point and refill refrigerant after maintenance 2 Clean the condenser fins 3 Measure the ambient temperature 4 Calibrate or replace the temperature sensor 5 Check the input power of the outdoor unit 6 Check the cables to the indoor...

Page 239: ...ive is faulty 5 The high pressure switch is faulty 6 The refrigerant is overfilled 7 The exhaust fan is faulty 1 Check the input power of the outdoor unit 2 Check the cables to the indoor and outdoor fans 3 Clean the condenser fins 4 Maintain or replace the outdoor fan or its drive 5 Maintain or replace the high pressure switch 6 Decrease certain amount of refrigerant 7 Maintain or replace the exh...

Page 240: ...ive is faulty 5 The high pressure switch is faulty 6 The refrigerant is overfilled 7 The exhaust fan is faulty 1 Check the input power of the outdoor unit 2 Check the cables to the indoor and outdoor fans 3 Clean the condenser fins 4 Maintain or replace the outdoor fan or its drive 5 Maintain or replace the high pressure switch 6 Decrease certain amount of refrigerant 7 Maintain or replace the exh...

Page 241: ...ty 5 The pressure displayed is different from the actual pressure 6 The refrigerant is overfilled 7 The exhaust fan is faulty 1 Check the input power of the outdoor unit 2 Check the cables to the indoor and outdoor fans 3 Clean the condenser fins 4 Maintain or replace the outdoor fan or its drive 5 Calibrate or replace the pressure sensor 6 Decrease certain amount of refrigerant 7 Maintain or repl...

Page 242: ...ulty 5 The pressure displayed is different from the actual pressure 6 The refrigerant is overfilled 7 The exhaust fan is faulty 1 Check the input power of the outdoor unit 2 Check the cables to the indoor and outdoor fans 3 Clean the condenser fins 4 Maintain or replace the outdoor fan or its drive 5 Calibrate or replace the pressure sensor 6 Decrease certain amount of refrigerant 7 Maintain or re...

Page 243: ... faulty 7 The ambient temperature is below the lower threshold 1 Identify and repair the leaking point and refill refrigerant after maintenance 2 Maintain or replace the solenoid valve coil or the solenoid valve 3 Calibrate or replace the pressure sensor 4 Maintain or replace the filter dryer 5 Maintain or replace the expansion valve or the coil and reconnect cables 6 Maintain or replace the indoo...

Page 244: ...essure sensor 4 Maintain or replace the filter dryer 5 Maintain or replace the expansion valve or the coil and reconnect cables 6 Maintain or replace the indoor fan 7 Measure the ambient temperature A28E 0 1 Compressor drive alarm MAJ OR 1 The compressor drive is faulty 2 The compressor is faulty 1 Maintain or replace the compressor drive 2 Maintain or replace the compressor A28E 0 2 Compressor dr...

Page 245: ...cavity after power off 5 Replace the drive module A28F 0 2 Compressor drive power supply abnormal MAJ OR 1 The power supply voltage is high 2 The compressor drive is faulty 1 Check the power supply voltage 2 Maintain or replace the compressor drive A28F 0 1 Compressor drive power supply abnormal MAJ OR 1 The power supply voltage is low 2 The compressor drive is faulty 3 The primary power supply is...

Page 246: ... Compressor drive power supply abnormal MAJ OR 1 The cables to phase W of the compressor drive are loose or damaged 2 The compressor drive is faulty 1 Check the cables to the compressor drive 2 Maintain or replace the compressor drive A291 0 1 Compressor overcurrent alarm MAJ OR 1 The compressor lacks oil 2 The condenser fins are dirty or blocked 3 The outdoor fan is abnormal 4 The refrigerant is ...

Page 247: ... the output cable to the outdoor fan drive 2 Power off the system and check that the power grid input voltage meets the specifications 3 Replace the outdoor fan 4 Replace the outdoor fan drive A292 2 0 Outdoor fan drive alarm CRITI CAL EEPROM read write fails 1 Power off the system and power it on 10 seconds later If the alarm persists replace the outdoor fan drive A292 8 0 Outdoor fan drive alarm...

Page 248: ...cables to the outdoor fan are loose or damaged 2 The outdoor fan is faulty 3 The outdoor fan drive is faulty 1 Check the cables to the outdoor fan 2 Maintain or replace the outdoor fan 3 Maintain or replace the outdoor fan drive A293 0 2 Outdoor fan power supply abnormal MAJ OR The power grid voltage exceeds the upper threshold 1 Power off the system and check that the power grid input voltage mee...

Page 249: ... the system and verify that the input power supply frequency meets the specifications A294 0 2 Outdoor fan drive overcurrent alarm MAJ OR 1 The outdoor fan is faulty 2 The outdoor fan drive is faulty 1 Replace the outdoor fan 2 Replace the outdoor fan drive A294 0 4 Outdoor fan drive overcurrent alarm MAJ OR 1 The outdoor fan is faulty 2 The outdoor fan drive is faulty 1 Replace the outdoor fan 2 ...

Page 250: ...ectronic expansion valve coil are loose or damaged 4 The EEV is faulty 1 Reinstall the EEV coil 2 Replace the EEV coil 3 Check and maintain the cables to the EEV coil 4 Replace the EEV A296 0 2 EEV low superheat degree alarm CRITI CAL 1 The electronic expansion valve EEV coil is loose 2 The EEV coil is faulty 3 The EEV is faulty 4 The cables to the electronic expansion valve coil are loose or dama...

Page 251: ...rtificate is about to expire WAR NIN G 1 The corresponding certificate is about to expire 2 The system time is incorrectly set 1 Apply for a new certificate promptly and update the existing one 2 Calibrate the system time A30C 0 2 Certificate is about to expire WAR NIN G 1 The corresponding certificate is about to expire 2 The system time is incorrectly set 1 Apply for a new certificate promptly a...

Page 252: ...ew certificate promptly and update the existing one 2 Calibrate the system time A30E 0 2 Certificate has expired WAR NIN G 1 The corresponding certificate has expired 2 The system time is incorrectly set 1 Apply for a new certificate promptly and update the existing one 2 Calibrate the system time A30E 0 4 Certificate has expired WAR NIN G 1 The corresponding certificate has expired 2 The system t...

Page 253: ...olution The unit generates abnormal voice The compressor fan or pipes are loose Check the fixing structure and ensure that all components are securely installed The compressor does not work The high pressure switch reacts Check the high pressure switch status Circuit breakers fuses or cables are disconnected Check the main circuit breaker compressor circuit breakers fuses and cables A compressor m...

Page 254: ...rigerant is insufficient Increase the amount of refrigerant filled The compressor exhaust pressure is too low The outdoor fan speed controller fails Replace the speed controller Refrigerant is insufficient Increase the amount of refrigerant filled Refrigerant is leaking Check the pipeline for any leakage The exhaust pressure of the compressor is too high The refrigerant is overfilled Fill refriger...

Page 255: ...lectric heater switch An electric heater is burnt out Disconnect the power supply and check whether the electric heater is damaged by checking the electric heater resistance properties with an ohmmeter No water is supplied to the water inlet solenoid valve of the humidifier The upstream water supply is faulty or the water pressure is below the lower threshold Restore the water supply The water inl...

Page 256: ...oors windows floors and ceilings of the computer room are properly sealed If the outdoor humidity is too high shut down the fresh air system Open the aisle doors or control skylights of the smart module or open the filler panels of some server cabinets Power failures occur on the active and standby routes 1 The input power has an open phase 2 The contactor fuse in the active route is damaged 3 The...

Page 257: ...has blown 1 Replace the electric heating belt of the crankcase 2 Replace the fuse 3 Replace the electric heating belt of the crankcase and the fuse The electric heating belt of the crankcase does not stop heating The relay contacts of the electric heating belt of the crankcase are short circuited Replace the electric heating belt of the crankcase relay NOTE If the fault persists contact Huawei tec...

Page 258: ... of the same model is available and functional Context The air filters need to be maintained from the rear door Procedure Step 1 Open the rear door rotate the clips on the two sides of the upper air filter and draw out the air filter NetCol5000 A050 In row Air Cooled Smart Cooling Product User Manual 11 Parts Replacement Issue 08 2021 09 17 Copyright Huawei Technologies Co Ltd 248 ...

Page 259: ...Choose Maint Performance Maint on the home screen and clear the total runtime of the air filter End 11 2 Replacing an Indoor Fan Prerequisites An indoor fan needs to be replaced A spare indoor fan of the same model is available and functional Tools protective gloves Phillips screwdriver diagonal pliers cable tie Context The indoor fan can be maintained only from the front door Replacing fan 9 is u...

Page 260: ...rcuit breaker for the faulty fan 9 Step 3 Cut the cable ties that bind the cable connected to the faulty fan and remove the fan terminals Take out the faulty fan Figure 11 3 Taking out a faulty fan Step 4 Install a new fan and fan guard connect the terminals and secure the cable using cable ties NetCol5000 A050 In row Air Cooled Smart Cooling Product User Manual 11 Parts Replacement Issue 08 2021 ...

Page 261: ...nt and clear the indoor fan runtime Step 7 Tap Startup on the home screen and check that the smart cooling product is running properly and no alarm is generated NOTE If the indoor fans are maintained when the device is started manually clear the corresponding alarm End NetCol5000 A050 In row Air Cooled Smart Cooling Product User Manual 11 Parts Replacement Issue 08 2021 09 17 Copyright Huawei Tech...

Page 262: ...p 3 Remove the fan wiring box cover Torque 2 N m using a Phillips screwdriver as shown by 1 in Figure 11 6 and remove four cable terminals using a small flat head screwdriver Figure 11 6 Removing the fan and guard Step 4 Loosen the waterproof cable terminal as shown by 2 in Figure 11 6 and pull the cable out of the wiring box Step 5 Remove the four screws that secure the fan guard using a socket w...

Page 263: ...y and no alarm is raised Step 10 After confirmation set the outdoor unit speed to 0 and exit from the diagnostic mode End 11 4 Replacing a Differential Pressure Switch Prerequisites A differential pressure switch needs to be replaced A spare differential pressure switch of the same model is available and functional Tool Phillips screwdriver Context The differential pressure switch can be maintaine...

Page 264: ...crews using a Phillips screwdriver and remove the cables Step 6 Remove the four screws using a Phillips screwdriver and remove the differential pressure switch Step 7 Set the new differential pressure switch to 250 Pa Figure 11 8 Setting values for a differential pressure switch Step 8 Install the new differential pressure switch and the pressure tube and connect the cables NetCol5000 A050 In row ...

Page 265: ...tch of the same model is available and functional Tools gloves two adjustable wrenches thread sealant Context The high pressure switch can be maintained only from the rear NOTE The procedure for replacing a high or low pressure sensor is similar to that for replacing the high pressure switch Procedure Step 1 Tap Shutdown on the home screen of the controller and turn off the smart cooling product s...

Page 266: ... using an adjustable wrench and loosen the adjustable nut using another adjustable wrench until the high pressure switch is removed Figure 11 11 Removing a high pressure switch 1 Pipe nut 2 Adjustable nut WARNING Exercise caution when removing the high pressure switch because a small amount of refrigerant will be sprayed when you remove the switch NetCol5000 A050 In row Air Cooled Smart Cooling Pr...

Page 267: ...uses a frequency converter and generates different gas volumes as the frequency changes thereby increasing or reducing the cooling and heating capacity When the compressor operates at a high speed it generates a large heating or cooling capacity which enables the room temperature to quickly reach the preset temperature When the room temperature decreases to a value close to the preset temperature ...

Page 268: ... single power supply and drive switch QF3 Step 4 Recycle the refrigerant from the low pressure needle valve and exhaust pipe needle valve to ensure that there is no pressure in the system If a low temperature component is used recycle the refrigerant from the liquid pipe needle valve low pressure needle valve and exhaust pipe needle valve Step 5 Remove the electric heating belt Step 6 Remove the c...

Page 269: ...nd pipe nut on the suction side as shown by 1 in Figure 11 14 using two 30 adjustable wrenches respectively Then loosen the adjustable nut using a 36 adjustable wrench to separate the pipe from the angle valve After removing the valve seal the suction vent immediately NetCol5000 A050 In row Air Cooled Smart Cooling Product User Manual 11 Parts Replacement Issue 08 2021 09 17 Copyright Huawei Techn...

Page 270: ...e adjustable nut After removing the valve seal the suction vent immediately 3 Remove the two M8 screws below the compressor bracket as shown by 3 in Figure 11 14 using a 13 socket wrench or solid wrench and pull out the compressor and bracket NOTICE Do not move the compressor by moving its suction and discharge vents 4 Remove the four nut washers and spring washers that secure the compressor and t...

Page 271: ...e using sealant After the installation check that the input power cables of the compressor are in the same phase sequence as the wiring terminals Step 9 Secure the compressor bracket to the cabinet interior using a 13 socket wrench as shown by 1 in Figure 11 17 NetCol5000 A050 In row Air Cooled Smart Cooling Product User Manual 11 Parts Replacement Issue 08 2021 09 17 Copyright Huawei Technologies...

Page 272: ...e wrenches and tighten the adjustable nuts using a torque wrench NOTICE Tighten the suction angle valve to a torque of 180 N m and tighten the discharge angle valve to a torque of 120 N m Step 11 Install the electric heating belt remove the connection box cover and reinstall the cover after the compressor cables are connected NetCol5000 A050 In row Air Cooled Smart Cooling Product User Manual 11 P...

Page 273: ...efrigerant Step 14 Check that the phase sequences are correct before starting the system Then choose Maint Diagnostic Mode Enter to check the system pressure and temperature and ensure the refrigerant is charged with an optimal system status Refer to 4 7 Charging the Remaining Refrigerant Ensure that the system is running normally without alarms Step 15 Install the air filter and close the rear do...

Page 274: ... to prevent lubricant leakage Install a new compressor immediately after you remove the rubber plugs of suction and discharge vents to prevent the moisture intake Procedure Step 1 Tap Shutdown on the controller home screen NOTICE Exercise caution because the device is still energized after it is shut down on the controller home screen Step 2 Open the rear door and remove the air filter Step 3 Turn...

Page 275: ...for the suction and discharge pipes from the compressor After the separation seal the discharge vent immediately Figure 11 20 Remove the compressor NOTICE After removing the compressor block the suction and discharge vents immediately to ensure the system cleanness and prevent water from entering NetCol5000 A050 In row Air Cooled Smart Cooling Product User Manual 11 Parts Replacement Issue 08 2021...

Page 276: ...ut washers and spring washers that secure the compressor and bracket using a 13 socket wrench or solid wrench and remove the compressor Figure 11 21 Removing the compressor bracket Step 8 Secure the new compressor to the bracket again using a solid wrench NetCol5000 A050 In row Air Cooled Smart Cooling Product User Manual 11 Parts Replacement Issue 08 2021 09 17 Copyright Huawei Technologies Co Lt...

Page 277: ... as spreading wet cloth around the welding position Do not use face down bonding when welding After the installation check that the input power cables of the compressor are in the same phase sequence as the wiring terminals Step 9 Secure the compressor bracket to the cabinet interior using a 13 socket wrench as shown by 1 in Figure 11 23 Figure 11 23 Installing the compressor NetCol5000 A050 In ro...

Page 278: ... cooling product does not leak vacuumize the smart cooling product and charge refrigerant Refer to 4 1 Vacuumizing and Precharging Refrigerant Step 14 Check that the phase sequences are correct before starting the system Then choose Maint Diagnostic Mode Enter to check the system pressure and temperature and ensure the refrigerant is charged with an optimal system status Refer to 4 7 Charging the ...

Page 279: ...nd reclaim the refrigerant in the system Context NOTICE Reclaim or dispose of the refrigerant in accordance with local laws and regulations Do not vent the refrigerant to the atmosphere During the reclaim process the R410A refrigerant composition may change Therefore you are not advised to refill the reclaimed R410A refrigerant to the cooling system Figure 11 25 shows the position of the filter dr...

Page 280: ...and discharge pipe needle valve to ensure that there is no pressure in the system If a low temperature component is used recycle the refrigerant from the liquid pipe needle valve low pressure needle valve and discharge pipe needle valve Step 5 Remove the filter dryer as shown in Figure 11 26 NOTICE Filter dryer replacement requires the collaboration of two persons After removing the filter dryer i...

Page 281: ...es the collaboration of two persons The torque for tightening the adjustable nut is 70 N m Figure 11 27 Installing a filter dryer 1 Apply red glue to the third to second last thread circles of the outer screw thread counting from the pipe outlet inward Secure the filter dryer nut and pipe nut using two 27 adjustable wrenches respectively Then tighten the adjustable nut using a 36 adjustable wrench...

Page 282: ... rubber hose protective gloves Preparation Power off the indoor unit and reclaim the refrigerant in the system Context NOTICE Reclaim or dispose of the refrigerant in accordance with local laws and regulations The composition of the refrigerant R410A may change during the recycling process Therefore you are not advised to charge the refrigerant back to the cooling system Figure 11 28 shows the pos...

Page 283: ...t is used recycle the refrigerant from the liquid pipe needle valve low pressure needle valve and discharge pipe needle valve Step 3 Remove the filter dryer as shown in Figure 11 29 NOTICE During welding use a silver copper welding rod containing 5 silver Check that the welding joints are in good condition without poor soldering To avoid burning the internal components other pipes thermal insulati...

Page 284: ... 11 28 3 Weld to remove the assembly of the filter dryer from the above of the filter dryer as shown by 1 welding point A in Figure 11 28 and remove the filter dryer 4 Weld off the lower part of the removed filter dryer assembly Step 4 Install a new filter dryer as shown in Figure 11 30 NetCol5000 A050 In row Air Cooled Smart Cooling Product User Manual 11 Parts Replacement Issue 08 2021 09 17 Cop...

Page 285: ...down bonding when welding Figure 11 30 Installing the filter dryer 1 Remove the rubber plug from the port of the filter dryer 2 Weld the removed straight pipe Step 4 in Figure 11 29 to the new filter dryer to form a new filter dryer assembly Install the filter dryer in the smart cooling product NetCol5000 A050 In row Air Cooled Smart Cooling Product User Manual 11 Parts Replacement Issue 08 2021 0...

Page 286: ...tes A liquid level detector needs to be replaced A spare liquid level detector of the same model is available and functional Tool Phillips screwdriver Context The liquid level detector is maintained from the front door Figure 11 31 shows a liquid level detector Figure 11 31 Liquid level detector 1 High liquid level detector 2 Low liquid level detector Procedure Step 1 Tap Shutdown on the home scre...

Page 287: ...er Step 3 Cut the cable tie securing the liquid level detector and remove the terminal Step 4 Remove the two butterfly nuts on the liquid level detector fastener remove cables from the liquid level detector and remove the liquid level detector and its fastener as shown in Figure 11 33 NetCol5000 A050 In row Air Cooled Smart Cooling Product User Manual 11 Parts Replacement Issue 08 2021 09 17 Copyr...

Page 288: ...e high liquid level detector Loosen the nuts on the low liquid level detector and move the low liquid level detector upwards to remove it Figure 11 34 Removing a liquid level detector Step 6 Install the new liquid level detector and properly connect its terminals NetCol5000 A050 In row Air Cooled Smart Cooling Product User Manual 11 Parts Replacement Issue 08 2021 09 17 Copyright Huawei Technologi...

Page 289: ... and functional Tools Phillips screwdriver flat head screwdriver socket wrench NOTICE Before removing the condensate pump drain water from the water pan completely Context The condensate pump can be maintained only from the front door Procedure Step 1 Tap Shutdown on the home screen of the controller and turn off the active power switch QF1 and standby power switch QF2 For the model with a single ...

Page 290: ...er of the cabinet Figure 11 36 Disconnecting the power cable terminals Step 3 Remove the condensate pump assembly as shown in Figure 11 37 Figure 11 37 Removing a condensate pump assembly 1 Remove the hose clamps at the water pan drain outlet and check valve outlet and remove the hoses NetCol5000 A050 In row Air Cooled Smart Cooling Product User Manual 11 Parts Replacement Issue 08 2021 09 17 Copy...

Page 291: ...out the condensate pump as shown in Figure 11 38 Figure 11 38 Removing a condensate pump Step 5 Install the new condensate pump and reinstall the condensate pump assembly in the cabinet Connect the water pipe and secure it using hose clamps Connect the condensate pump power cable Figure 11 39 Installing a condensate pump NetCol5000 A050 In row Air Cooled Smart Cooling Product User Manual 11 Parts ...

Page 292: ...film humidifier can be maintained only from the rear door Procedure Step 1 Tap Shutdown on the controller home screen NOTICE Exercise caution because the device is still energized after it is shut down on the controller home screen Step 2 Open the rear door and remove the air filter Step 3 Turn off the active power switch QF1 standby power switch QF2 you do not need to turn off QF2 for the model w...

Page 293: ...ar door Step 7 Power on the device choose Maint Performance Maint on the home screen to access the performance maintenance screen and clear the runtime of the humidifier Figure 11 41 Performance maintenance Step 8 Tap Startup on the home screen Ensure that the smart cooling product is running normally without any alarms End 11 13 Replacing a Controller Panel Prerequisites A controller panel needs ...

Page 294: ...DU Do not forcibly pull the DP cable You are advised to power off the main control board or main control module before replacing the MDU If the main control board is not powered off you are advised to back up the configuration file of the product by referring to a or b 1 Open the front door with caution to prevent damaging the controller cables 2 Remove cables from the controller panel 3 Remove th...

Page 295: ...e is connected to the display module After the main control board is powered on the startup logo and self check progress bar are displayed on the LCD The main screen is displayed The whole restoration takes about 60s to 90s Step 3 Optional Import the configuration If the WebUI or ECC is not configured skip this step 1 Insert the USB flash drive into the main control board or main control module Go...

Page 296: ...uct may fail to work properly Before replacing a main control module disconnect the cables from the main control module After replacing it download the software and ACC Software Upgrade Guide from Huawei website and upgrade it on the LCD The module can be maintained only from the rear door Figure 11 43 Module 1 Main control module 2 Reserved 3 PSU 1 4 PSU 2 NetCol5000 A050 In row Air Cooled Smart ...

Page 297: ...lip on the module downwards as shown by 1 in Figure 11 44 Figure 11 44 Removing a module Step 5 Take out the handle and pull out the module from the subrack as shown by 2 in Figure 11 44 NOTICE When installing a new module ensure that the handle in the upper part of the power module and the HUAWEI logo is in the lower left of the module Step 6 Insert the spare module into the corresponding slot an...

Page 298: ...nal Tool Phillips screwdriver Procedure Step 1 Tap Shutdown on the home screen of the controller Turn off the active power switch QF1 standby power switch QF2 you do not need to turn off QF2 for the model with a single power supply and drive switch QF3 NOTICE Exercise caution because the device is still energized after it is shut down on the controller home screen Step 2 Open the front door discon...

Page 299: ...l and remove the terminals Step 4 Unscrew the four screws on the single electric heater as shown in Figure 11 47 Figure 11 47 Removing an electric heater NetCol5000 A050 In row Air Cooled Smart Cooling Product User Manual 11 Parts Replacement Issue 08 2021 09 17 Copyright Huawei Technologies Co Ltd 289 ...

Page 300: ...11 48 Installing a new electric heater Step 6 Install the fan support and connect the terminals Figure 11 49 Installing a fan support NetCol5000 A050 In row Air Cooled Smart Cooling Product User Manual 11 Parts Replacement Issue 08 2021 09 17 Copyright Huawei Technologies Co Ltd 290 ...

Page 301: ... from the diagnostic mode Step 8 Power on the device choose Maint Performance Maint on the home screen to access the performance maintenance screen and clear the runtime of the electric heater Figure 11 50 Performance maintenance Step 9 Tap Start on the home screen Ensure that the smart cooling product is running normally without any alarms End NetCol5000 A050 In row Air Cooled Smart Cooling Produ...

Page 302: ...t the start shutdown signal to shutdown on the smart cooling product LCD ECC WebUI or NetEco WebUI Shutdown Start Method 2 Connect the remote start shutdown dry contacts of the hardware port Start Shutdown If the equipment is shut down issue a start command to start the equipment 1 Check that the remote start shutdown signal status of the hardware port is start 2 Set the start shutdown control sig...

Page 303: ...ct LCD ECC WebUI and NetEco WebUI has the same priority If ON OFF via NMS is disabled on the smart cooling product LCD the device cannot be started or shut down over the ECC or NetEco Figure 12 1 Start Shutdown over the LCD Figure 12 2 Start Shutdown over the ECC WebUI Figure 12 3 Start Shutdown over the NetEco WebUI NetCol5000 A050 In row Air Cooled Smart Cooling Product User Manual 12 FAQ Issue ...

Page 304: ...2 3 Operations with a USB Flash Drive Context After connecting a USB flash drive to the USB port on the main control module you can export data import and export configuration files and import certificates and keys NOTICE You are advised to use the FAT32 USB flash drive with a capacity less than or equal to 64 GB For a non FAT32 USB flash drive format it to the FAT32 format using a computer Before...

Page 305: ...pted Figure 12 7 USB Operations Step 4 Tap Remove USB to remove the USB flash drive in safe mode Step 5 Remove the USB flash drive and set it aside End 12 3 1 How Do I Export Data Context With the one click mode you can export active alarms historical alarms run logs and so on Procedure Step 1 Choose Maint USB Operations Export to enter the Select Path screen NetCol5000 A050 In row Air Cooled Smar...

Page 306: ...en you need to set the same parameters for smart cooling product 2 import the configuration file to unit 2 Procedure Step 1 On the home screen of unit 1 choose Maint USB Operations Export Config The Select Path screen is displayed Figure 12 9 Select Path screen Step 2 On the Select Path screen specify the save path and tap Next In the displayed dialog box tap Yes Step 3 After the data is successfu...

Page 307: ...imported a failure message will be displayed Step 9 On the home screen choose Maint USB Operations Remove USB to remove the USB flash drive in safe mode End 12 3 3 How Do I Import a Certificate and Key Prerequisites The CA certificate file local certificate file and key file have been saved in a USB flash drive NOTICE Ensure that the key file has been encrypted using AES128 NetCol5000 A050 In row ...

Page 308: ...rted successfully a success message will be displayed If files fail to be imported a message indicating the cause for failure will be displayed Rectify the fault according to the message and import files again End 12 4 How Do I Query Temperature and Humidity Curves Context On the T H Curve screen the temperature and humidity curves show the recent temperature and humidify changes You can choose to...

Page 309: ... The midpoint temperature and humidity are the temperature and humidity setpoints after the ordinate range is zoomed in or out The temperature display range is from 3 C to 30 C of the temperature setpoint The humidity display range is from 5 to 50 of the humidity setpoint The displayed value varies according to smart cooling products The actual displayed value may vary End 12 5 Querying Logs Conte...

Page 310: ...oose Running Status Summary The Status Summary screen is displayed The following figure shows the screen displayed after choosing Running Status Summary View on Device Details The following describes how to view the status of a T H sensor On the home screen choose Running Device Details T H Sensor End 12 7 Querying System Parameters Procedure Choose Common Function Operating Info on the home scree...

Page 311: ... H boards of the cold or hot aisles are disabled T H Board on the About Version Info screen or T H Board on the About E label screen does not show the information of these T H boards End 12 9 How Do I Check Teamwork Control Information Procedure Step 1 On the home screen choose to display the teamwork information of the current group NOTE Master Slave indicates the information of the current unit ...

Page 312: ...played on the alarm bar one by one You can query an alarm on the alarm list in related user manual for smart cooling product based on the alarm ID to view causes of the alarm and methods used to clear the alarm Step 2 Click each alarm to open the Details page which contains Name Generated Severity Location Cause ID Code Possible Causes and Procedure for the alarm Figure 12 16 Details NetCol5000 A0...

Page 313: ...osis report Figure 12 17 Diagnosis report End Follow up Procedure To query historical alarms choose Common Function Query Hist Alarms or Alarms Query Hist Alarms on the home screen NOTE Historical alarms are displayed in chronological order The latest cleared alarm is displayed in the uppermost row 12 12 Deleting Historical Alarms Context To delete historical alarms log in as the admin user NOTICE...

Page 314: ...Procedure Step 1 On the home screen choose Maint Performance Maint Step 2 Tap Clear of a specific performance parameter to clear its runtime End 12 14 How to Calibrate a Sensor Context Calibrate a sensor if the displayed temperature or humidity on the sensor deviates from the actual value For example if the return air temperature measured by other temperature detection devices at the return air de...

Page 315: ...dmin user or operator user You can only change the password of the current user Procedure Step 1 On the home screen choose Settings User Settings to enter the User Settings screen as shown in Figure 12 19 Figure 12 19 User Settings Step 2 Tap Password to enter the password changing screen as shown in Figure 12 20 NOTE It is recommended that the password should contain at least two types of charact...

Page 316: ... Backup power underfrequency alarm threshold Backup power overfrequency alarm threshold Supply air high temperature alarm threshold 5 C Return air high temperature alarm threshold Supply air high temperature alarm threshold 5 C Hot aisle high temperature alarm threshold Cold aisle high temperature alarm threshold 5 C Hot aisle high temperature alarm threshold Cold aisle high temperature alarm thre...

Page 317: ...ser NOTICE Be careful when configuring alarms Only professional maintenance personnel can change alarm settings Procedure Step 1 Choose Settings Alarm Settings T H Sensor on the home screen Figure 12 21 is displayed Figure 12 21 Setting alarm parameter 1 Step 2 Tap Threshold following Supply air high temperature alarm Step 3 Set the value to 45 and tap as shown in Figure 12 22 Figure 12 22 Setting...

Page 318: ...on is tapped if the shortest running shutdown time is not met To exit the diagnostic mode tap on the status bar The system automatically exits diagnostic mode when it reaches the maximum diagnostic mode duration Step 2 Set Indoor fan to 50 NOTICE For safe system operation when smart cooling product components are turned on the following coupling relationships are presented When the electric heater...

Page 319: ...urely After factory settings are restored you need to use the app to obtain a verification code for startup Exercise caution when performing this operation Procedure Step 1 Check that the smart cooling product is shut down on the LCD Step 2 Hold down the SW key on the main control module for over 10s Step 3 The dialog box for restoring factory settings is displayed To continue restoring factory se...

Page 320: ...g parameters are displayed All parameters displayed on Settings System Settings All parameters displayed on Settings Alarm Settings All parameters displayed on Settings Comm Settings All parameters except for language and time settings displayed on Settings Quick Settings Date format and time zone settings displayed on Settings User Settings All parameters displayed on Maint Sensor Calibration NOT...

Page 321: ... to 1 and the communication between all devices and the NMS is disconnected The communication addresses must be reset to recover the communication NetCol5000 A050 In row Air Cooled Smart Cooling Product User Manual 12 FAQ Issue 08 2021 09 17 Copyright Huawei Technologies Co Ltd 311 ...

Page 322: ...the filter which is grounded nearby Table A 1 Filter component specifications Positi on No Name Specification s Devia tion Remarks L Common mode inductor 22 5 45 mH 10 kHz Ultra microcrystal inductor which can withstand 16 kHz switching frequency and does not generate heat due to saturation Cy Y capacitor 2 7 nF 10 kHz 10 Thin film feedthrough capacitor NetCol5000 A050 In row Air Cooled Smart Cool...

Page 323: ...nit 10 Inverted U shaped trap 11 Liquid pipe needle valve 12 Dryer filter 13 Sight glass 14 Liquid pipe temperature sensor 15 Electronic expansion valve 16 Low pressure needle valve 17 Evaporator 18 Indoor fan 19 Distributor 20 Low pressure sensor 21 Suction temperature sensor NetCol5000 A050 In row Air Cooled Smart Cooling Product User Manual B Indoor Unit Cooling Component Layout Issue 08 2021 0...

Page 324: ...or Unit Electric Control Box Layout NetCol5000 A050 In row Air Cooled Smart Cooling Product User Manual C Outdoor Unit Electric Control Box Layout Issue 08 2021 09 17 Copyright Huawei Technologies Co Ltd 314 ...

Page 325: ...tion A Side view of the electric box 1 SPD 2 FU1 3 FU2 4 Electric heater switch QF4 5 Active power switchover contactor KM1 6 Standby power switchover contactor KM2 NetCol5000 A050 In row Air Cooled Smart Cooling Product User Manual C Outdoor Unit Electric Control Box Layout Issue 08 2021 09 17 Copyright Huawei Technologies Co Ltd 315 ...

Page 326: ...e power PE 13 Standby power switch QF2 14 Standby power PE 15 Outdoor unit power PE 16 Reserved 17 Rectifier module switch QF16 18 Drive switch QF3 19 Crankcase heater fuse FU3 20 Crankcase heater contactor K1 21 Electric heater contactor KM4 NetCol5000 A050 In row Air Cooled Smart Cooling Product User Manual C Outdoor Unit Electric Control Box Layout Issue 08 2021 09 17 Copyright Huawei Technolog...

Page 327: ...e sensor Smoke sensor power supply 12 V DC 4 Smoke sensor feedback 5 Remote shutdown Remote shutdown 6 Remote shutdown 7 Water detector sensor Water leakage detection 8 Water leakage detection X302 1 Outdoor unit or water cooling RS485 SW NetCol5000 A050 In row Air Cooled Smart Cooling Product User Manual C Outdoor Unit Electric Control Box Layout Issue 08 2021 09 17 Copyright Huawei Technologies ...

Page 328: ...the teamwork CAN northbound RS485 port 4 FE_1 FE ring network input and output terminal 5 Fake panel 6 PSU 1 7 PSU 2 8 FE_2 FE ring network input and output terminal 9 CAN_OUT output port of the teamwork CAN northboun d RS485 port 10 COM north bound RS485 port 11 DP display port NetCol5000 A050 In row Air Cooled Smart Cooling Product User Manual C Outdoor Unit Electric Control Box Layout Issue 08 ...

Page 329: ... a temperature control intelligent monitoring board 1 PE bar 2 Fan switch QF1 3 Power switch for receiver heater QF2 4 Fan terminal NetCol5000 A050 In row Air Cooled Smart Cooling Product User Manual C Outdoor Unit Electric Control Box Layout Issue 08 2021 09 17 Copyright Huawei Technologies Co Ltd 319 ...

Page 330: ...ver heater Water cooling module QF2 5 Fan terminal 6 Temperature control intelligent monitoring board NOTE The temperature control intelligent monitoring board is located on the inner cover of the electric control box NetCol5000 A050 In row Air Cooled Smart Cooling Product User Manual C Outdoor Unit Electric Control Box Layout Issue 08 2021 09 17 Copyright Huawei Technologies Co Ltd 320 ...

Page 331: ...PE bar 2 Fan switch QF1 3 Receiver heater Water cooling module QF2 4 Fan terminal Figure C 6 NetCol500 A080 electric control box with a temperature control intelligent monitoring board NetCol5000 A050 In row Air Cooled Smart Cooling Product User Manual C Outdoor Unit Electric Control Box Layout Issue 08 2021 09 17 Copyright Huawei Technologies Co Ltd 321 ...

Page 332: ...trol box C 4 NetCol500 A120 Electric Control Box Layout Figure C 7 NetCol500 A120 electric control box without a temperature control intelligent monitoring board 1 Fan switch QF3 2 Receiver heater Water cooling module QF4 3 Fan terminal 2 4 PE bar 5 Fan switch QF1 6 Receiver heater Water cooling module QF2 7 Fan terminal 1 NetCol5000 A050 In row Air Cooled Smart Cooling Product User Manual C Outdo...

Page 333: ...awing D 1 Indoor Unit Base Drawing Figure D 1 Base drawing unit mm NetCol5000 A050 In row Air Cooled Smart Cooling Product User Manual D Base Drawing Issue 08 2021 09 17 Copyright Huawei Technologies Co Ltd 323 ...

Page 334: ...face is polished and the base is rust proof When preparing the base pay attention to the following points 1 Angle square or channel steel with a width of 45 60 mm and a thickness of 4 5 mm is recommended a If the angle steel width is less than or equal to 60 mm there is no need to consider measures for avoiding blockage b If the angle steel width is greater than 60 mm the base interferes with the ...

Page 335: ...060 Horizontal Installation Figure D 2 Concrete base for the NetCol500 A060 NetCol5000 A050 In row Air Cooled Smart Cooling Product User Manual D Base Drawing Issue 08 2021 09 17 Copyright Huawei Technologies Co Ltd 325 ...

Page 336: ...Figure D 3 Support base for the NetCol500 A060 NetCol5000 A050 In row Air Cooled Smart Cooling Product User Manual D Base Drawing Issue 08 2021 09 17 Copyright Huawei Technologies Co Ltd 326 ...

Page 337: ...gle Layer Installation Figure D 4 Concrete base for the NetCol500 A060 NetCol5000 A050 In row Air Cooled Smart Cooling Product User Manual D Base Drawing Issue 08 2021 09 17 Copyright Huawei Technologies Co Ltd 327 ...

Page 338: ...e layer support base for vertical installation of the NetCol500 A060MC1D0 NetCol5000 A050 In row Air Cooled Smart Cooling Product User Manual D Base Drawing Issue 08 2021 09 17 Copyright Huawei Technologies Co Ltd 328 ...

Page 339: ...e layer support base for vertical installation of the NetCol500 A060MS1E0 NetCol5000 A050 In row Air Cooled Smart Cooling Product User Manual D Base Drawing Issue 08 2021 09 17 Copyright Huawei Technologies Co Ltd 329 ...

Page 340: ...n Figure D 7 Double layer support base for vertical installation of the NetCol500 A060MC1D0 NetCol5000 A050 In row Air Cooled Smart Cooling Product User Manual D Base Drawing Issue 08 2021 09 17 Copyright Huawei Technologies Co Ltd 330 ...

Page 341: ...e layer support base for vertical installation of the NetCol500 A060MS1E0 NetCol5000 A050 In row Air Cooled Smart Cooling Product User Manual D Base Drawing Issue 08 2021 09 17 Copyright Huawei Technologies Co Ltd 331 ...

Page 342: ...080 Horizontal Installation Figure D 9 Concrete base for the NetCol500 A080 NetCol5000 A050 In row Air Cooled Smart Cooling Product User Manual D Base Drawing Issue 08 2021 09 17 Copyright Huawei Technologies Co Ltd 332 ...

Page 343: ...Figure D 10 Support base for the NetCol500 A080 NetCol5000 A050 In row Air Cooled Smart Cooling Product User Manual D Base Drawing Issue 08 2021 09 17 Copyright Huawei Technologies Co Ltd 333 ...

Page 344: ...tallation Figure D 11 Concrete base for vertical installation of the NetCol500 A080 NetCol5000 A050 In row Air Cooled Smart Cooling Product User Manual D Base Drawing Issue 08 2021 09 17 Copyright Huawei Technologies Co Ltd 334 ...

Page 345: ...ngle layer support base for vertical installation of the NetCol500 A080 NetCol5000 A050 In row Air Cooled Smart Cooling Product User Manual D Base Drawing Issue 08 2021 09 17 Copyright Huawei Technologies Co Ltd 335 ...

Page 346: ...ion Figure D 13 Double layer support base for vertical installation of the NetCol500 A080 NetCol5000 A050 In row Air Cooled Smart Cooling Product User Manual D Base Drawing Issue 08 2021 09 17 Copyright Huawei Technologies Co Ltd 336 ...

Page 347: ...20 Horizontal Installation Figure D 14 Concrete base for the NetCol500 A120 NetCol5000 A050 In row Air Cooled Smart Cooling Product User Manual D Base Drawing Issue 08 2021 09 17 Copyright Huawei Technologies Co Ltd 337 ...

Page 348: ...Figure D 15 Support base for the NetCol500 A120 NetCol5000 A050 In row Air Cooled Smart Cooling Product User Manual D Base Drawing Issue 08 2021 09 17 Copyright Huawei Technologies Co Ltd 338 ...

Page 349: ...tdoor Units Figure D 16 Single layer support base for vertical installation of the NetCol500 A120 NetCol5000 A050 In row Air Cooled Smart Cooling Product User Manual D Base Drawing Issue 08 2021 09 17 Copyright Huawei Technologies Co Ltd 339 ...

Page 350: ...EElectrical Conceptual Diagram NetCol5000 A050 In row Air Cooled Smart Cooling Product User Manual E Electrical Conceptual Diagram Issue 08 2021 09 17 Copyright Huawei Technologies Co Ltd 340 ...

Page 351: ...nceptual Diagram Figure E 1 NetCol5000 A050H4WE0 NetCol5000 A050H40E0 NetCol5000 A050 In row Air Cooled Smart Cooling Product User Manual E Electrical Conceptual Diagram Issue 08 2021 09 17 Copyright Huawei Technologies Co Ltd 341 ...

Page 352: ... E 2 NetCol5000 A050H4WE0 NetCol5000 A050H40E0 NetCol5000 A050 In row Air Cooled Smart Cooling Product User Manual E Electrical Conceptual Diagram Issue 08 2021 09 17 Copyright Huawei Technologies Co Ltd 342 ...

Page 353: ...l5000 A050H4WE2 NetCol5000 A050H4WD2 NetCol5000 A050H40E2 NetCol5000 A050 In row Air Cooled Smart Cooling Product User Manual E Electrical Conceptual Diagram Issue 08 2021 09 17 Copyright Huawei Technologies Co Ltd 343 ...

Page 354: ...l5000 A050H4WE2 NetCol5000 A050H4WD2 NetCol5000 A050H40E2 NetCol5000 A050 In row Air Cooled Smart Cooling Product User Manual E Electrical Conceptual Diagram Issue 08 2021 09 17 Copyright Huawei Technologies Co Ltd 344 ...

Page 355: ...ceptual Diagram Figure E 5 NetCol500 A060 electrical conceptual diagram NetCol5000 A050 In row Air Cooled Smart Cooling Product User Manual E Electrical Conceptual Diagram Issue 08 2021 09 17 Copyright Huawei Technologies Co Ltd 345 ...

Page 356: ...nceptual Diagram Figure E 6 NetCol500 A080 electrical conceptual diagram NetCol5000 A050 In row Air Cooled Smart Cooling Product User Manual E Electrical Conceptual Diagram Issue 08 2021 09 17 Copyright Huawei Technologies Co Ltd 346 ...

Page 357: ...nceptual Diagram Figure E 7 NetCol500 A120 electrical conceptual diagram NetCol5000 A050 In row Air Cooled Smart Cooling Product User Manual E Electrical Conceptual Diagram Issue 08 2021 09 17 Copyright Huawei Technologies Co Ltd 347 ...

Page 358: ...mputational fluid dynamics CAN controller area network D DC direct current E EC electronic commutation NMS network management system NetCol5000 A050 In row Air Cooled Smart Cooling Product User Manual F Acronyms and Abbreviations Issue 08 2021 09 17 Copyright Huawei Technologies Co Ltd 348 ...

Page 359: ...efficient P PC personal computer PTC positive temperature coefficient PUE power usage effectiveness R RCCB residual current circuit breaker T TFT thin film transistor U NetCol5000 A050 In row Air Cooled Smart Cooling Product User Manual F Acronyms and Abbreviations Issue 08 2021 09 17 Copyright Huawei Technologies Co Ltd 349 ...

Page 360: ...USB Universal Serial Bus NetCol5000 A050 In row Air Cooled Smart Cooling Product User Manual F Acronyms and Abbreviations Issue 08 2021 09 17 Copyright Huawei Technologies Co Ltd 350 ...

Reviews: