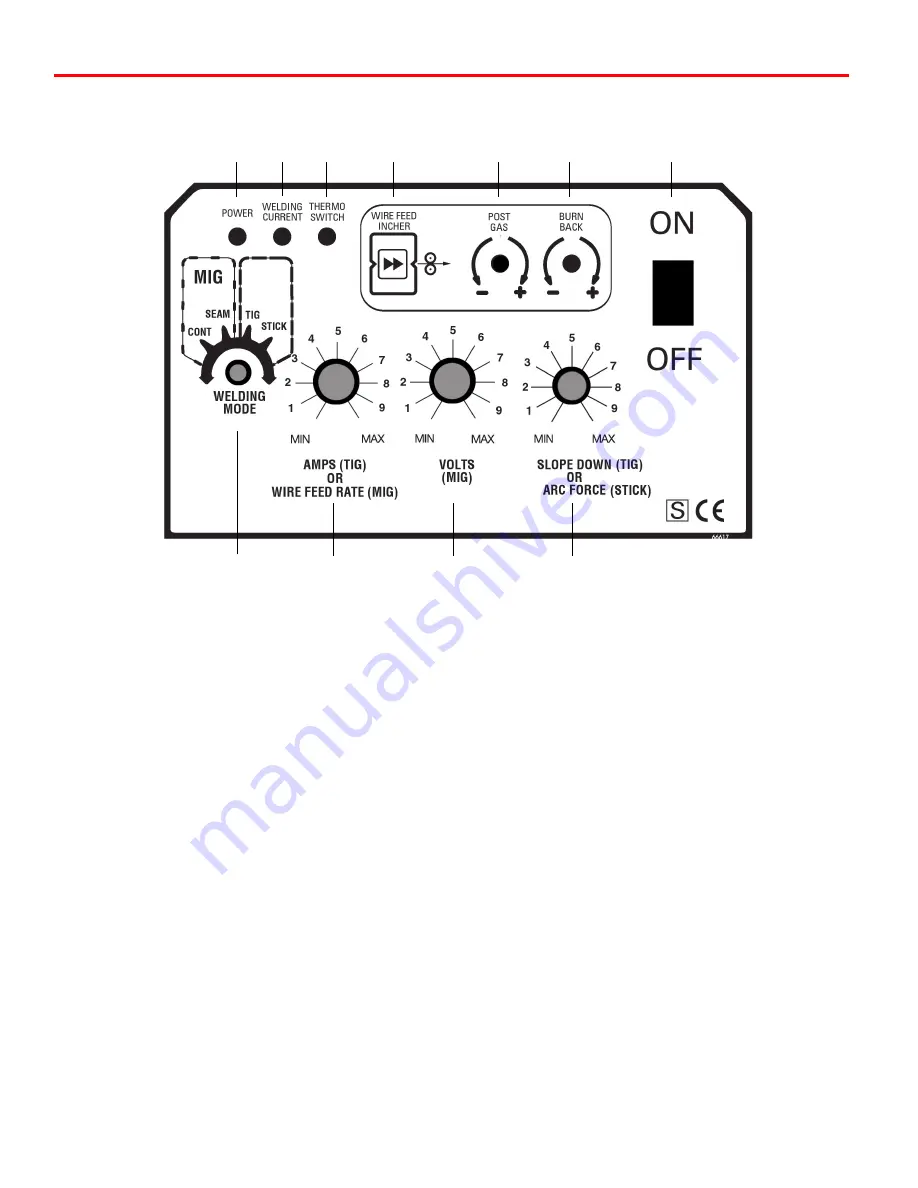
1) Power Indicator Lamp
This lamp is illuminated when the On-Off switch (#7) on the
front of your MTS 160 is turned to the on position and the
machine is connected properly to a 220-volt power supply.
2) Welding Current Indicator Lamp
When the trigger switch on either the TIG torch or the MIG gun
is depressed, welding current will be applied to the welding
torch and the Welding Current Indicator Lamp will be
illuminated.
If your MTS 160 is in the stick-welding mode, the welding
current indicator lamp will be illuminated all the time.
3) Thermoswitch Indicator Lamp
The thermoswitch indicator lamp will light up when the duty
cycle of your MTS 160 has been exceeded. When this lamp is
illuminated, the machine will no longer weld because the
machine has overheated. Leave the machine plugged in and
turned on so the cooling fans can cool the unit down. Allow the
machine to cool for 15 to 30 minutes, the thermoswitch should
reset automatically and your MTS 160 will be ready to weld.
4) Wire Feed Incher
The wire feed incher allows you to feed welding wire into the
welding gun with out wasting shield gas. Depressing the wire
feed incher will start the drive motor, feeding the welding wire.
Note the welding wire will only feed with the side panel closed.
5) Post Gas Flow
The post gas flow is adjustable from 1 sec to 4 sec. Post gas
flow is necessary during TIG welding, because after the arc is
extinguished if the gas stopped flowing immediately, there is
a possibility the molten weld puddle would come in contact
with the atmosphere, causing weld defects. Additionally it
prevents the tungsten from becoming contaminated by the
atmosphere. The gas flow should run long enough to allow
the orange color of the tungsten to disappear. It is important
to remember not to remove the TIG torch from the weld until
the post gas cycle has been completed. If you are welding at
higher amperages or on more critical alloys it may be
necessary to increase the post gas flow to a higher value.
6) Burn Back Time
When MIG welding, as soon as you release the trigger on the
welding gun, the wire feed motor stops turning immediately.
The Burnback Time is the amount of time your welder is still
applying welding current to the welding wire after the wire
feed motor has stopped feeding the welding wire. If the
current stopped at the same time the motor stopped turning,
there is a chance the welding wire would “freeze” in the
molten welding puddle as it solidified. If there is too much
Burnback Time, the wire will melt to the contact tip.
4
Front Panel Controls
1
2
3
4
5
6
7
8
9
10
11
Figure 1
Summary of Contents for MTS 160
Page 21: ...21 Wiring Diagram MTS 160...
Page 22: ...Parts Breakdown MTS 160 22...


