14
Depending on the thickness of the material, it may be desirable
to preheat the casting to ensure adequate penetration. When
welding a crack, it may be beneficial to “vee” out the crack. In
order to reduce the possibility of further propagation, drill
small holes at both ends of the crack. It is also a good idea to
make short welds to reduce the possibility of overheating the
cast iron around the weld area. Then immediately after
welding, lightly tap (peen) the weld with a ball-peen hammer to
stress relieve the weld area.
The more time spent in surface preparation of cast iron welds
(cleaning the surface, veeing out cracks, etc.) the better the
results and the stronger the weld will be.
TIG WELDING WITH YOUR MTS 160
In order to TIG weld, remove the MIG welding gun from the
MTS 160 and install the optional TIG welding torch (Part #
SR17-12.5MTS) on the machine. Generally speaking, except
for very rare instances, you will TIG weld DCEN, or DC
electrode negative. If you were MIG welding with shielding
gas, you will have to change the polarity from electrode positive
to electrode negative. (See page 6, Polarity Adjustment)
Plug the ground cable into the positive output receptacle.
Use 100% argon shielding gas.
Setting Up The Torch
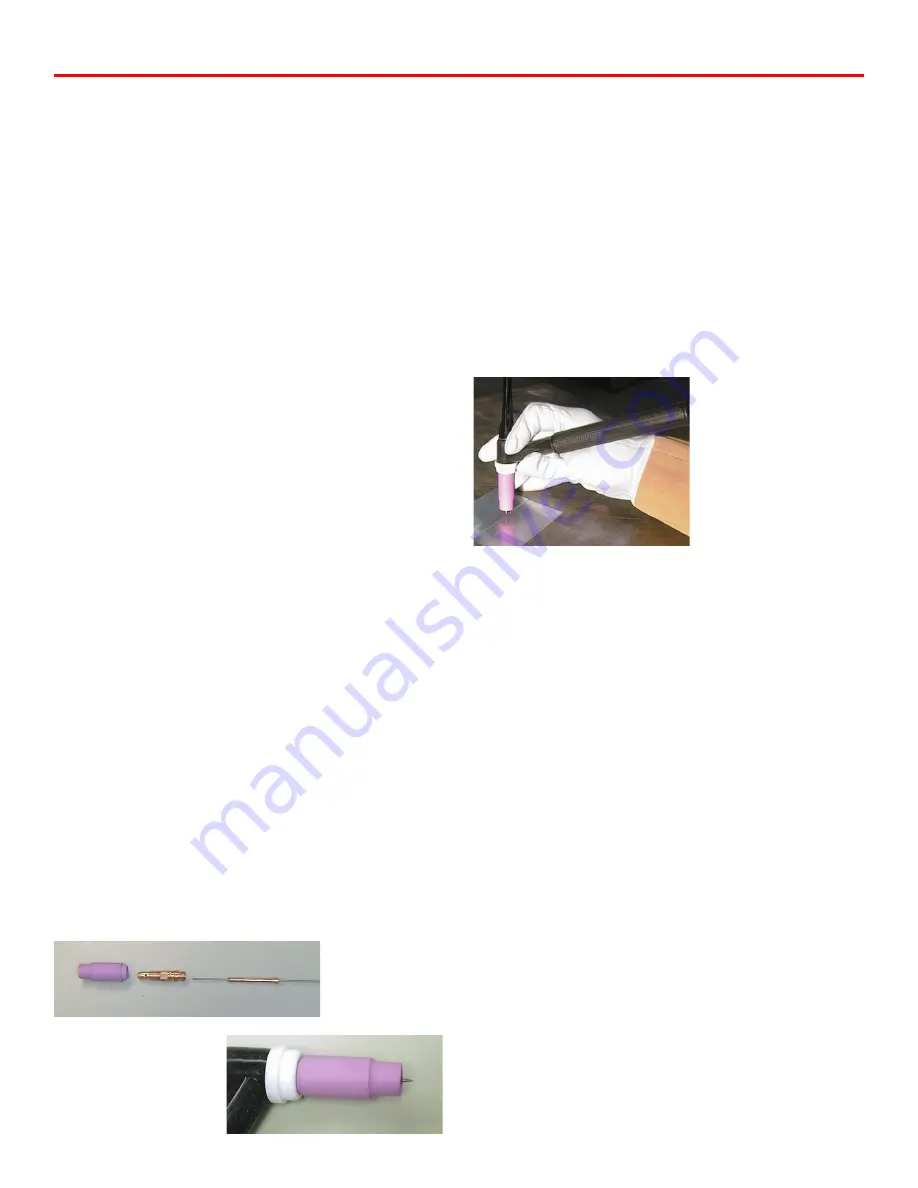
Lets assume we will be welding some .060" mild steel.
Selecting a 1/16" 2% Ceriated tungsten, we grind a point on the
end of the tungsten (remember always grind the tungsten
longitudinally, never radially). Select a 1/16" collet and insert
the tungsten so the pointed end of the tungsten comes out
through the slit in the collet. Next insert the collet/tungsten
assembly into the threaded end of the collet body, so the pointed
end of the tungsten comes out through the sized hole of the
collet body. (See Fig 8A) Thread the assembly into the torch
head and tighten the collet body snugly by hand. Install the
back cap, but do not tighten at this point. Install a #6 alumina
cup on the collet body and tighten snugly by hand. Have the
tungsten protruding from 2 to 3 times its diameter from the end
of the cup (in this instance 1/8" to 3/16" (See Fig 8B). Tighten
the back cap.
Holding The Torch
It is recommended that you use TIG welding gloves like our
BL25 gloves. These are thinner than standard welding gloves
and will give you a much better “feel” and make it easier to
work the filler rod. Grip the torch somewhat like a pencil, as
indicated in figure 8C. The torch must be positioned almost
perpendicular to the work and in such a manner that the
tungsten is kept 1/8" to _" off the work. The tungsten should
only contact the work when starting the arc. Once the arc is
started, the tungsten should never contact the work. Use the
edge of your hand and little finger to hold the torch steady.
Set the amperage to about 60 amps (#4 on the amperage
selector). Connect argon to the machine and set the flow rate to
about 20 cfh. Push the trigger switch to start the current flow.
Gently touch the tungsten electrode to the work and then lift it
off the work. HTP’s touch start circuitry will start the arc.
Initially, just practice moving the tungsten in a straight line, at a
constant speed, and keeping it a constant distance off the work
piece. Remember that Rome wasn’t built in a day, so don’t
expect to master TIG welding in 15 minutes. PRACTICE,
PRACTICE, PRACTICE.
Once you have mastered just running a bead in a straight line
without adding any filler metal, the next step is to do the same
thing but to add filler metal. Dip the filler metal into the molten
puddle (do not try to melt the filler metal into the work) and
NEVER allow the filler metal to touch the tungsten. If the filler
metal comes in contact with the tungsten, or if the tungsten
contacts the work, you must stop and sharpen the tungsten.
Remember, practice, practice, and practice.
To make my life easier, and so I am not always stopping to
sharpen tungsten, I keep a package of 10 tungsten of each
diameter sharpened in the box. That way, when I need a new
tungsten, I can just take a sharp one and put the contaminated
one in the box. When I have used them all, I will sharpen them
all at once.
Now, once you have practiced laying a bead and adding filler
metal, then you can practice welding two pieces of metal
together. Start with a butt weld, as this is the easiest. Master
this technique before you continue to other joints. Compared to
MIG welding, TIG welding is much harder and will require a lot
of practice to become proficient.
Figure 8C
Figure 8B
Figure 8A
Summary of Contents for MTS 160
Page 21: ...21 Wiring Diagram MTS 160...
Page 22: ...Parts Breakdown MTS 160 22...


