


Chapter 1
1-13
Setting up the Jukebox
Moving or Shipping the Optical Jukebox
Ch
ap
ter
1
: Setti
ng
up
the Disk Driv
e
S
ettin
g u
p
th
e
Ju
kebo
x
Shipping the Jukebox
1. Unmount any optical disk surfaces in the jukebox if necessary.
See your computer operating system, or software application documentation for
instruction on how to unmount optical disks.
2. Eject all disks from the jukebox.
If you will be replacing the disks into this jukebox after shipment, it is
recommended that you label the disks at this time to at least show their slot
location inside the jukebox. This will aid the setup at the new location.
Refer to your jukebox application software documentation for instructions on
how to eject disks from the jukebox. If you will be manually ejecting disks, refer
to “Ejecting an Optical Disk from the Jukebox” on page 3-13. To label disks so
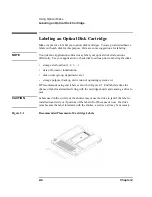
that the labeling will not cause problems in the jukebox, refer to “Labeling an
Optical Disk Cartridge on page 2-4 in Chapter 2.
CAUTION
Failure to eject a disk from the optical drive prior to moving the jukebox could result
in damage to the optical drive mechanism.
Failure to remove all disks from the storage slots in the jukebox could result in
damage to the jukebox.
CAUTION
Do not turn off power to the jukebox until you are sure the SCSI bus is inactive.
Removing power from a SCSI peripheral when the bus is active can result in data
loss and/or indeterminate bus states. Check your host system manuals for
information about checking the SCSI bus status. If your computer is connected to a
LAN, be sure to check with your system administrator before turning off power to
the jukebox.
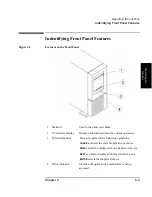
3. Switch jukebox power OFF (see “3” on Figure 1-1). The power switch is OFF
when it is out.
The disk transport mechanism will lower to the chassis when power is turned
off. The position at the bottom of the chassis is correct for insertion of the
shipping screw.
4. Remove the power cord and the SCSI cable from the jukebox rear panel (see “1”
and “4” or “5” on Figure 1-1).
5. Secure the mailslot by inserting the mailslot shipping bracket. Refer to page 1-6
for a description of this bracket.
The slides into the mailslot easily, but will not latch. Place a piece of tape across
the bracket to keep it in place.
Summary of Contents for Surestore 80ex - Optical Jukebox
Page 10: ...x Figures ...
Page 12: ...xii Tables ...
Page 13: ...1 Setting up the Jukebox ...
Page 27: ...Using Optical Disks 2 Using Optical Disks ...
Page 33: ...Operating the Jukebox 3 Operating the Jukebox ...
Page 57: ...Supplies and Customer Support A Supplies and Customer Support ...
Page 72: ...A 16 AppendixA Supplies and Customer Support Warranty ...
Page 73: ...Operation on a SCSI Bus B Operating This Jukebox on a SCSI Bus ...
Page 82: ...B 10 AppendixB Operating This Jukebox on a SCSI Bus The SCSI Bus and This Jukebox ...
Page 83: ...Safety and Regulatory Information C Safety and Regulatory Information ...
Page 92: ...C 10 Safety and Regulatory Information Japanese VCCI Statement ...


