background image

1-6

Chapter 1


Setting up the Jukebox

Removing the Mailslot Shipping Bracket and Shipping Screw

Removing the Mailslot Shipping Bracket and 
Shipping Screw

The jukebox is shipped with a plastic bracket inserted into the mailslot. In addition 
to protecting the mailslot during shipment, the bracket also holds a warning decal 
reminding you to remove the shipping screw on the bottom of the jukebox.

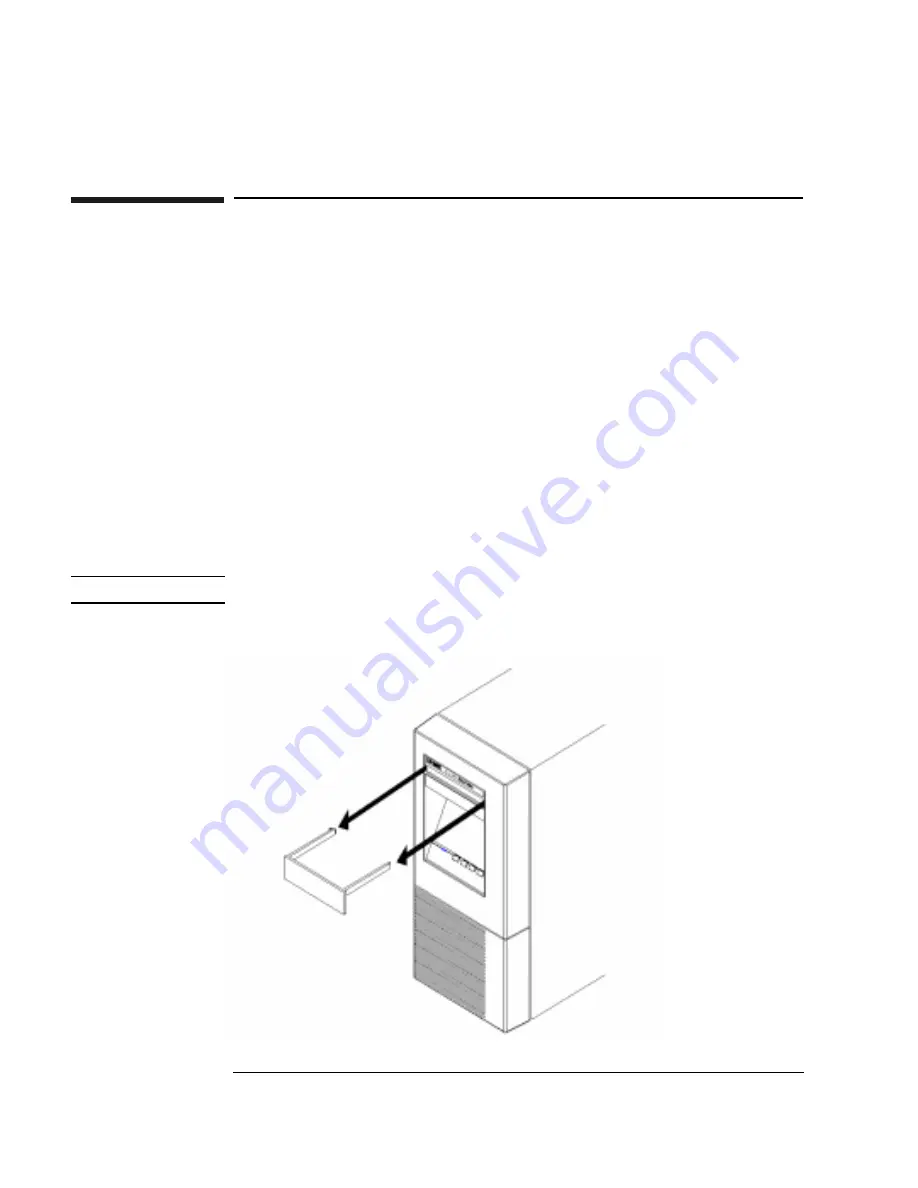
To remove the mailslot bracket and shipping screw, refer to Figures 1-2 and 1-3 and 
do the following:

1. Grasp both sides of the bracket and at the same time hook your fingers 

underneath its lower edge. 

2. Gently bend the bottom of the bracket out slightly and while jiggling the bracket, 

pull it out from the mailslot. 

3. Lay the jukebox on its side and unscrew the shipping screw. The screw has a 

knurled top so removing the screw can be done by hand.

NOTE

The jukebox will not be harmed by laying it on its side.

Figure 1-2

The Mailslot Shipping Bracket

Summary of Contents for Surestore 80ex - Optical Jukebox

Page 1: ...HP SureStore 80ex Optical Jukebox User s Guide Edition 1 HP Part No C1100 90015 Printed in Greeley CO USA Copyright February 1998 ...

Page 2: ...to the implied warranties of merchantability and fitness for a particular purpose Hewlett Packard shall not be liable for errors contained herein or for incidental or consequential damages in connection with the furnishing performance or use of this material Copyright February 1998 Printing History New editions of this manual incorporate all material updated since the previous edition The manual p...

Page 3: ...s call attention to a procedure or practice that could result in personal injury if not correctly performed Do not proceed until you fully understand an meet the required conditions CAUTION Cautions call attention to an operating procedure or practice that could damage the product if not correctly performed Do not proceed until understanding and meeting these required conditions NOTE Notes provide...

Page 4: ...al jukebox Chapter 2 information about choosing and using optical disks Chapter 3 features description operating instructions and troubleshooting information Appendix A supplies and customer support Appendix B operating this jukebox on a SCSI bus Appendix C safety and regulatory information Glossary of Terms Index ...

Page 5: ...pheral 1 9 Connecting the Jukebox with Other SCSI Peripherals 1 10 Connecting Power 1 11 Moving or Shipping the Optical Jukebox 1 12 Moving the Jukebox a Short Distance 1 12 Shipping the Jukebox 1 13 2 Using Optical Disks Overview of This Chapter 2 2 Using Optical Disks 2 2 Choosing an Optical Disk Type 2 3 Labeling an Optical Disk Cartridge 2 4 Write Protecting an Optical Disk 2 5 Caring for Opti...

Page 6: ...Setting Non Security Configurations 3 13 Retrieving Information Logged by the Jukebox 3 16 Running and Internal Test 3 17 Changing SCSI IDs 3 18 Changing the Jukebox Controller ID 3 18 Changing an Optical Drive ID 3 19 Troubleshooting 3 20 A Supplies and Customer Support Overview of This Appendix A 2 Supplies and Accessories A 3 Shipping Screw Specifications A 6 Hewlett Packard Customer Support A ...

Page 7: ...A 13 Additional Telephone Support A 13 HP Reseller Locator Numbers A 13 Warranty A 14 B Operating This Jukebox on a SCSI Bus A Brief Overview of SCSI B 2 General B 2 The SCSI Bus B 2 Initiators and Targets B 2 LUN Addressing B 3 Transfer Rates on the Bus B 3 Termination B 4 Single ended and Differential Interfaces B 4 Connectors B 5 The SCSI Bus and This Jukebox B 6 Mixing Wide and Narrow Devices ...

Page 8: ...4 C 4 EC Declaration of Conformity C 5 Herstellerbescheinigung C 6 English Translation of German Sound Emission Directive C 6 Turvallisuusyhteenveto C 7 Laserturvallisuus C 7 Huolto C 7 English Translation of Finland Regulatory Information C 8 Japanese VCCI Statement C 9 Glossary Index ...

Page 9: ...on of the Shipping Screw 1 7 Figure 1 4 Connecting the Jukebox as the Only Peripheral 1 9 Figure 2 1 Recommended Placement of Cartridge Labels 2 4 Figure 2 2 Write Protect Button Location 2 5 Figure 3 1 Features on the Front Panel 3 3 Figure 3 2 Jukebox Display Menu Tree 3 4 Figure 3 3 Loading a Cartridge 3 9 ...

Page 10: ...x Figures ...

Page 11: ...Tables xi Table 3 1 Configurations 3 14 Table 3 2 Information Logs 3 16 Table 3 3 Troubleshooting 3 21 Table A 1 Basic Supplies and Accessories A 3 ...

Page 12: ...xii Tables ...

Page 13: ...1 Setting up the Jukebox ...

Page 14: ...hapter This chapter gives information on the following topics choosing a proper environment for the jukebox identifying parts on the rear panel connecting the jukebox to your computer connecting power moving and shipping the jukebox What you need for setting up the jukebox power cord included SCSI terminator included 50 pin low density SCSI cable single ended SCSI host adapter with at least one av...

Page 15: ...d on the following recommendations temperature range between 65 75º F 18 24º C away from sources of particulate contamination such as printers scanners frequently used doors and walkways supplies that collect dust and smoke filled rooms 2 3 inches in front and back of the jukebox to allow air circulation availability of AC power with voltage ranges of 90 127 V 115 V nominal or 198 250 V 230 V nomi...

Page 16: ...1 Setting up the Jukebox Identifying Rear Panel Features Identifying Rear Panel Features Refer to Figure 1 1 and the text on the next page to identify parts and learn their functions Figure 1 1 Rear Panel Features ...

Page 17: ...liary power port Used for auxiliary power connections Do not use for connections requiring over 3 amperes of power 3 Power switch Switches power on and off to the jukebox 4 5 SCSI ports Two 50 pin low density connectors Centronics type that allow connection to a SCSI bus and for daisy chaining to other devices A terminator must be plugged into one of these connectors when the jukebox is the last p...

Page 18: ...e bottom of the jukebox To remove the mailslot bracket and shipping screw refer to Figures 1 2 and 1 3 and do the following 1 Grasp both sides of the bracket and at the same time hook your fingers underneath its lower edge 2 Gently bend the bottom of the bracket out slightly and while jiggling the bracket pull it out from the mailslot 3 Lay the jukebox on its side and unscrew the shipping screw Th...

Page 19: ...Chapter 1 1 7 Setting up the Jukebox Removing the Mailslot Shipping Bracket and Shipping Screw Chapter 1 Setting up the Disk Drive Setting up the Jukebox Figure 1 3 Location of the Shipping Screw ...

Page 20: ...in Centronics type The drives are fast SCSI so you have a maximum of 3 meters 9 8 feet available for the SCSI bus The jukebox uses 1 5 meters 4 9 feet of of this bus internally This leaves 1 5 meters 4 9 feet for the remainder of the bus Your jukebox can be connected to your host computer in two ways as the only SCSI peripheral on a bus as one of multiple SCSI peripherals on a bus not recommended ...

Page 21: ...ping bracket and the shipping screw are removed 2 Ensure that your host computer and your jukebox are OFF The jukebox power switch is OFF when the switch is raised out 3 Connect a SCSI cable between one of the SCSI ports on the jukebox with a SCSI port on your host computer see 4 or 5 on Figure 1 1 4 Plug a terminator into the unused SCSI port on the jukebox Because this configuration makes the ju...

Page 22: ...ected to the bus without a loss of performance There are many issues that must be considered when connecting another devices on the same bus with this jukebox such as the following How the jukebox is used archiving backup near line storage What performance must be maintained How the additional peripheral will be used How much demand will it place on the bus Bus length available If you would like a...

Page 23: ...x see 1 on Figure 1 1 Use the power cord supplied with the jukebox 4 Plug the other end of the power cord into an electrical outlet 5 Press the power switch see 3 on Figure 1 1 6 Initially TESTING appears in the display window on the front of the jukebox Once the poweron test completes approximately 1 5 minutes READY displays See Understanding Display Window Messages in Chapter 3 for additional in...

Page 24: ...on page 3 10 CAUTION Failure to eject a disk from the optical drive prior to moving the jukebox could result in damage to the optical drive mechanism CAUTION Do not turn off power to the jukebox until you are sure the SCSI bus is inactive Removing power from a SCSI peripheral when the bus is active can result in data loss and or indeterminate bus states Check your host system manuals for informati...

Page 25: ...optical drive prior to moving the jukebox could result in damage to the optical drive mechanism Failure to remove all disks from the storage slots in the jukebox could result in damage to the jukebox CAUTION Do not turn off power to the jukebox until you are sure the SCSI bus is inactive Removing power from a SCSI peripheral when the bus is active can result in data loss and or indeterminate bus s...

Page 26: ...shipping screw that was removed when the jukebox was unpacked This screw is 6 32 UNC 2B cap screw 1 3 4 inches long Re install in the position shown in Figure 1 3 7 Repack the jukebox in its original shipping carton An alternative method of shipping is careful packaging and padded van shipping ...

Page 27: ...Using Optical Disks 2 Using Optical Disks ...

Page 28: ...cal components Consistent quality of opto magnetic media ensures correct writes and reads The quality and fit of the mechanical components of the cartridge affect accurate smooth handling of the cartridge by jukebox robotics A failure of the mechanical components of a cartridge could damage the mechanism of an optical drive CAUTION Use only HP qualified media cartridges in this jukebox Use of non ...

Page 29: ...e data cannot be altered or erased If you have a need for data security and audit trails write once disks may be a good disk choice Both rewritable and write once disks come in three sector sizes 2 048 bytes sector 1 024 bytes sector and 512 bytes sector The sector size you choose depends upon what type of operating system you have in your host computer and which software package you use to manage...

Page 30: ...torage slot location 1 2 3 date of format or initialization disk owner group department etc storage purpose backup old version of operating system etc HP recommends using end labels as shown in Figure 2 1 End labels reduce the chance of label material interfering with the cartridge shutter and causing a drive to jam CAUTION Labels used in the vicinity of the shutter may cause the drive to jam if t...

Page 31: ...cartridge see Figure 2 2 With rewritable optical disks write protecting the disk prevents overwriting existing files and prevents any additional file being written to the disk With write once optical disks existing files cannot be altered or erased regardless of whether or not the write protect button has been set However setting the button to write protect prevents writing additional files to the...

Page 32: ...tridge near the shutter rather than on the end of the cartridge Store disks in a clean safe place when they are not in use Cleaning Disks Normally an optical disk does not require cleaning when used in a computer room or clean office environment If you are in an extremely dusty environment and are experiencing difficulties reading and or writing to a particular disk you may want to clean the disk ...

Page 33: ...Operating the Jukebox 3 Operating the Jukebox ...

Page 34: ...w to do the following identify front panel features use selection buttons interpret displayed messages load optical disks into the jukebox eject optical disks from the jukebox set a security code change configurations retrieve internal jukebox performance information run tests for service use only set SCSI IDs ...

Page 35: ...ct disks 2 9 Character display Displays information about the current operation 3 Selection buttons Pressed to perform the following operations CANCEL cancels the current operation or choice PREV scrolls the displayed choice backward by one NEXT scrolls the displayed choice forward by one ENTER selects the displayed choice 4 Drive indicator Lit when the optical drive mechanism is being accessed ...

Page 36: ...Menu Tree READY INFO CONFIG SCSI IDS PREV NEXT TEST LOAD EJECT NEXT ENTER ENTER SLOT SLOT 1 153 Service 0 32 Table 3 1 0 39 Table 3 2 ENTER ENTER ENTER ENTER AC ID DRV 1 ID DRV 2 ID AC ID DRV 1 ID DRV 2 ID PREV NEXT PREV NEXT SET SET SET ENTER ENTER ENTER ENTER ENTER ENTER PREV NEXT PREV NEXT only ...

Page 37: ...ext section for a list of messages Each time you push the NEXT or PREV button a task option appears If you see an as part of the message it indicates there is a menu beneath that option which you can access by pressing the ENTER key To display additional options press the NEXT or PREV Key If you hold the NEXT or PREV buttons down the display scrolls faster NOTE You can get back to READY at any tim...

Page 38: ... of each operation is given below Instructions for using and setting operations are given in the following sections See the note below READY the jukebox is ready for operation LOAD select to load disks through the mailslot EJECT select to eject disks through the mailslot TEST select to run internal jukebox tests tests are for service only CONF select to customize the way the jukebox functions CONF...

Page 39: ...s Some disk operations initiated by the host computer will cause messages to be displayed The following are examples of these messages LOAD 15 the host computer selected the disk in slot 15 for insertion into a drive MOVING the disk transport mechanism is moving a disk STORE 1 the host computer selected slot 1 to store a disk ...

Page 40: ... using the selection buttons on the control panel Tasks included in this section are loading a disk into the jukebox ejecting a disk from the jukebox setting a security code changing a configuration option retrieving performance information running internal jukebox tests at request of service changing the jukebox controller SCSI ID changing a drive SCSI ID troubleshooting ...

Page 41: ...ng a software package to manage files in the jukebox check the software documentation before proceeding with these steps Start with READY in the display 1 Insert a cartridge into the mailslot shutter end of the cartridge first Side A facing up see Figure 3 3 Push the cartridge in firmly but gently until it is fully inserted into the mailslot SLOT displays is the number of an available storage slot...

Page 42: ... code is used when accessing and setting jukebox configurations Consider changing the security code so that only authorized persons can change the configurations NOTE Don t forget your security code If you forget it only your service representative can reset the security code to the factory setting so you can set a new code Start with READY in the display 1 Press NEXT until CONF displays 2 Press E...

Page 43: ...ER SET 17 displays briefly 18 Press CANCEL to return to READY CAUTION The next step is to turn off the jukebox Do not turn off power to the jukebox until you are sure the SCSI bus is inactive Removing power from a SCSI peripheral when the bus is active can result in data loss and or indeterminate bus states Check your host system manuals for information about checking the SCSI bus status If your c...

Page 44: ...splays The 0 is flashing 3 Press NEXT until the number of the option you want to change displays 4 Press ENTER CODE 1 and a flashing 0 displays 5 Press NEXT or PREV until the first number of your security code displays 6 Press ENTER CODE 2 and a flashing 0 displays 7 Press NEXT or PREV until the second number of your security code displays 8 Press ENTER CODE 3 and a flashing 0 are displayed 9 Pres...

Page 45: ...ays if you choose an invalid number 4 Press ENTER The current default setting displays It may be any one of these settings OFF or ON a number 5 Select the option you want by pressing NEXT or PREV 6 Press ENTER SET displays 7 Press CANCEL to exit CAUTION The next step is to turn off the jukebox Do not turn off power to the jukebox until you are sure the SCSI bus is inactive Removing power from a SC...

Page 46: ...entering the current security code 18 Used by service personnel only Changing this configuration may result in an inoperable jukebox 20 Set disk security operation after a power failure Off On maintains the status of config 15 upon power cycle or power failure Off config 15 is not maintained through a power cycle or power failure Requires entering the current security code 21 26 Used by service pe...

Page 47: ... the mailslot will rotate and allow a disk to be ejected when the jukebox receives an EJECT command from the host computer Requires entering the current security code 32 39 Not used 40 Used by service personnel only Changing these configurations may result in an inoperable jukebox 41 Forces the optical drive to execute a verify after every write ON ON Write verify is forced OFF The drive may write...

Page 48: ...u are in logs 4 or 16 DRIVE 1 displays and you can press ENTER for Drive 1 information If your jukebox has two optical drives you can press NEXT DRIVE 2 displays and ENTER to access Drive 2 information 5 Press ENTER to stop the INFO display 6 Press ENTER then NEXT to choose another log 7 Press CANCEL to return to READY Table 3 2 Information Logs NOTE Additional log numbers not listed in Table 3 2 ...

Page 49: ...agnostic purposes You may be asked to run some tests by the service representative prior to coming to your site Results of the tests can provide service with important information that can help service to more quickly resolve the problem in your jukebox CAUTION Some internal tests can corrupt your file system Unless directed by an authorized service representative do not run jukebox internal tests...

Page 50: ...ctions to change either the jukebox controller or a drive ID Changing the Jukebox Controller ID Start with READY in the display 1 Press NEXT until SCSI ID displays 2 Press ENTER AC ID displays AC is the jukebox controller 3 Press ENTER AC ID 3 displays 4 Press NEXT or PREV until the ID you want displays 5 Press ENTER SET is a number from 0 7 displays briefly and then AC ID displays again The ID yo...

Page 51: ...ive you selected in step 3 and is the ID to which your selected drive is currently set 5 Press NEXT until the ID you want displays 6 Press ENTER SET is a number from 0 7 displays briefly and then DRV ID displays again The ID you chose is now set 7 Press CANCEL two times to return to the READY state NOTE CONFLICT displays if you attempt to set the jukebox controller and a drive to the same ID Repea...

Page 52: ...heck the HP web site at www hp com isgsupport optical index html and the other support services listed in Appendix A NOTE If a service call is necessary gather the following information before calling model of your jukebox serial number brand and model of your host computer brand and model of your host computer SCSI adapter jukebox application software you are using and its version any jukebox dri...

Page 53: ... Power cycle the jukebox See the note at the bottom of this page If jukebox continues to fail poweron selftest press ENTER and record the error codes Call your service representative Power to the jukebox failed while a disk was in the drive and did not return to READY after the power came back on Power cycle the jukebox See the note below If the poweron test is unsuccessful place the power switch ...

Page 54: ...a SCSI bus Refer to the HP web site at www hp com isgsupport optical index html Call your service representative Changed a drive or jukebox ID but the jukebox rejected the ID You are trying to set an ID that is already in use by either the jukebox or by the other drive in two drive models Select another ID Forgot your security code Enter the default password 0 0 0 If the default password is not ac...

Page 55: ...lot Select EJECT select the slot you want the disk ejected from again and eject the disk Disk eject attempted but MISLOAD displays If there is no disk in the mailslot press CANCEL and attempt another eject If MISLOAD continues to display check the HP web site at www hp com isgsupport optical index html If no solution is found call your service representative Disk eject attempted but RESERVED displ...

Page 56: ...ebox does not come up READY call your service representative Can t write to the disk Check the host computer or network file system access permissions Check your host computer messages and host system documentation for interpretation of the error messages Refer to the HP web site at www hp com isgsupport optical index html Call your service representative Before turning power OFF ensure that the S...

Page 57: ...Supplies and Customer Support A Supplies and Customer Support ...

Page 58: ...Supplies and Customer Support Overview of This Appendix Overview of This Appendix This appendix provides information on the following topics supplies and accessories shipping screw specifications HP customer support ...

Page 59: ...resses and phone numbers of HP sales offices To phone HP Direct call 1 800 538 8787 To write to HP Direct use the following address HP Direct Hewlett Packard P O Box 58195 Santa Clara California 95052 USA See Table A 1 for a list of basic supplies and accessories Table A 1 Basic Supplies and Accessories Item HP Part Number 5 2 and 4 7 Gbyte Optical Disks Rewritable optical disk 2 048 bytes sector ...

Page 60: ...gle disk 92280F Rewritable optical disk 1 024 bytes sector 2 6 Gbytes 8 pack C2589F Write once optical disk 1 024 bytes sector 2 6 Gbytes single disk 92290F Write once optical disk 1 024 bytes sector 2 6 Gbytes 8 pack C2591F Rewritable optical disk 512 bytes sector 2 3 Gbytes single disk 92279F Rewritable optical disk 512 bytes sector 2 3 Gbytes 8 pack C2588F Write once optical disk 512 bytes sect...

Page 61: ...w K2283 50 Pin Low Density to 50 Pin High Density 1 0 m 3 3 ft bail to thumb screw K2296 1 5 m 4 9 ft bail to thumb screw K2297 68 Pin High Density to 50 Pin Low Density 1 0 3 3 ft bail to thumb screw C2915A SCSI Terminators 50 pin active low density non molded K2291 50 pin active low density molded K2290 Disk Cleaners RA 2 Manual Disk Cleaner ProDisk Corporation US Tel 612 439 6202 Fax 612 439 59...

Page 62: ...pplies and Customer Support Shipping Screw Specifications Shipping Screw Specifications If you have misplaced the shipping screw you can use a cap screw with these specifications 6 32 UNC 2B cap screw 1 3 4 inches long ...

Page 63: ...tor NOTE Before calling please record the following information and have it ready when you contact your service representative model number of your jukebox serial number brand and model of your host computer brand and model of your host computer SCSI adapter jukebox application software you are using and its version any jukebox driver you may be using that is separate from your jukebox application...

Page 64: ...h tone telephone or Group 3 facsimile machine and follow the voice prompts that guide you to select an index of available support an product documents Asia Pacific Australia 03 9272 2627 China 8610 6505 5280 Hong Kong 2506 2422 India 91 11 682 6041 Indonesia 21 352 2044 Japan 3 3335 8622 Korea 02 769 0543 Malaysia 03 290 2478 Netherlands 0800 22 2420 New Zealand 09 356 6642 Singapore 65 291 7951 T...

Page 65: ...ve and America Online Compuserve and America Online are not operated by Hewlett Packard Denmark 800 10453 Finland 0800 13134 France 05 905900 Germany 0130 810 061 Italy 1678 59020 Netherlands 06 022 2420 Norway 800 11319 Spain 900 993123 Sweden 020 795743 Switzerland German 0800 55 1526 French 0800 55 1527 United Kingdom 0800 960271 Other locations in Europe toll line 31 20 681 5792 North and Sout...

Page 66: ... below NOTE Before calling please record the following information and have it ready when you contact your support center representative model number of your jukebox serial number brand and model of your host computer brand and model of your host computer SCSI adapter jukebox application software you are using and its version any jukebox driver you may be using that is separate from your jukebox a...

Page 67: ...8806 Norway 22 11 6299 French 02 626 8807 Portugal 01 441 7199 Denmark 3929 4099 Spain 902 321 123 Finland 0203 47288 Sweden 08 619 2170 France 04 50 43 9853 Switzerland 0848 80 11 11 Ireland 01 622 5525 United Kingdom 0171 512 5202 Italy 02 26410350 Australia 8 30 17 30 Mon Fri 03 9272 8000 China 8 30 17 30 Mon Fri 8610 62625666 x5602 5609 5611 5612 8610 62 61 4174 8610 62 61 4175 8610 62 61 4176...

Page 68: ...er you may be using that is separate from your jukebox application software and the version of this driver North and South America and Canada Using your VISA MasterCard or American Express call 800 810 0130 Per incident fee of 25 00 charged to your credit card 900 555 1800 2 50 per minute up to a maximum of 25 00 per incident You must be 18 years of age or have parental permission to call this num...

Page 69: ...upport Elsewhere in the World Contact your authorized HP dealer distributor or the nearest HP sales and service office Additional Telephone Support HP Reseller Locator Numbers Singapore Customer Care Line for End Users 65 272 5300 US 800 752 0900 Canada 800 387 3867 Mexico and South America 305 267 4220 ...

Page 70: ...e to repair or replace any product to a condition as warranted customer will be entitled to a refund of the purchase price upon prompt return of the product 4 HP products may contain remanufactured parts equivalent to new in performance or may have been subject to incidental use 5 The warranty period begins on the date of delivery or on the date of installation if installed by HP If customer sched...

Page 71: ...eath to the extent that all such damages are determined by a court of competent jurisdiction to have been directly caused by a defective HP product 9 TO THE EXTENT ALLOWED BY LOCAL LAW THE REMEDIES IN THIS WARRANTY STATEMENT ARE CUSTOMER S SOLE AND EXCLUSIVE REMEDIES EXCEPT AS INDICATED ABOVE IN NO EVENT WILL HP OR ITS SUPPLIERS BE LIABLE FOR LOSS OF DATA OR FOR DIRECT SPECIAL INCIDENTAL CONSEQUEN...

Page 72: ...A 16 AppendixA Supplies and Customer Support Warranty ...

Page 73: ...Operation on a SCSI Bus B Operating This Jukebox on a SCSI Bus ...

Page 74: ...target usually a peripheral device fulfills the request Initiators and targets identify themselves on the bus by a SCSI ID The ID is designated by the user and is set electronically or manually depending on the device In addition to identifying a device on the bus the ID also determines the priority of the device during contention among the devices for use of the bus The narrow SCSI bus with its e...

Page 75: ...simple narrow bus with the host adapter set at a SCSI ID of 7 The device ID does not determine where the device is physically placed on the bus LUN Addressing This jukebox does not support logical unit numbering LUN addressing Transfer Rates on the Bus Initially the SCSI specification defined a 5 MB s synchronous data transfer rate on the narrow bus SCSI now also defines Fast which is 10 MB s on a...

Page 76: ...al ends of the bus Single ended and Differential Interfaces The SCSI bus is electrically implemented in two ways single ended and differential These terms come from the way the signals are asserted on the bus Single ended buses use a 5 volt signal that is referenced to ground This method makes the bus somewhat susceptible to noise and loss of signal quality over distance The maximum allowable leng...

Page 77: ...e connector but smaller and with smaller pin holes placed closer together 50 pin low density ribbon usually internal to the host Wide devices 68 pin use the following connectors 68 pin high density Micro D connector external This connector is similar to a D type connector but longer and slimmer and with smaller pin holes placed closer together This connector is becoming the most common 68 pin high...

Page 78: ...r the quantity of data that the bus will have to carry the frequency of data transfer and the priority of this data transfer in your business If you are using the jukebox as a backup or archive device the demands on the jukebox will be different than if the jukebox is used for near online storage where requests are more random in both frequency and data size If you expect to be using the jukebox i...

Page 79: ... lower eight data lines transfer commands and messages allowing all devices regardless of size to co exist on the bus However data transfers and device addressing occur on the higher bits Since a narrow device can t see the upper 8 data bits that translates to it not being able to see wide devices with a SCSI ID above 8 Remember the host adapter is a device so if you re mixing wide and narrow devi...

Page 80: ...entation that comes with your particular adapter to see how to apply termination Use active terminators to reduce noise sensitivity Never terminate the bus at any place except the physical ends Terminating the bus in the middle will probably cause the bus to become inoperable or operate in a state that could cause data loss If devices are on both sides of the host computer adapter such as hard dri...

Page 81: ...peration on a SCSI Bus General Do not connect a single ended bus to a differential bus Damage can occur NOTE For current information on issues relating to installation operation and support of jukeboxes you may want to go to HP Optical Storage www hp com isgsupport optical index html ...

Page 82: ...B 10 AppendixB Operating This Jukebox on a SCSI Bus The SCSI Bus and This Jukebox ...

Page 83: ...Safety and Regulatory Information C Safety and Regulatory Information ...

Page 84: ...atory Information Overview of this Appendix Overview of this Appendix This appendix contains important safety and regulatory information for the United States Finland Sweden Germany United Kingdom European Union and Japan ...

Page 85: ...pliance is mandatory for products marketed in the United States The labels and artwork shown below indicate compliance with CDRH regulations and must be attached to laser products marketed in the United States WARNING Use of controls adjustments or performing procedures other than those specified in this manual may result in hazardous laser radiation exposure NOTE Complies with 21 CFR Chapter 1 Su...

Page 86: ...om Telecommunications Act 1984 United Kingdom Telecommunications Act 1984 The HP SureStore Optical 80ex jukeboxe is approved under Approval Number NS G 1234 J 100003 for indirect connection to Public Telecommunication Systems within the United Kingdom ...

Page 87: ...C 5 Safety and Regulatory Information EC Declaration of Conformity Safety and Regulatory Information EC Declaration of Conformity ...

Page 88: ...uar 1991 Schalldruckpegel Lp 70 dB A am arbeitsplatz normaler betrieb nach ISO 7779 1988 EN 27779 1991 Typprüfung English Translation of German Sound Emission Directive This statement is provided to comply with the requirements of the German Sound Emission Directive from 18 January 1991 Sound pressure Lp 70 dB A at operator position normal operation according to ISO 7779 1988 EN 27779 1991 type te...

Page 89: ...visning specificerats kan användaren utsättas för laserstrålning som överskrider gränsen för laserklass 1 Huolto HP SureStore Optical 80ex levymuistiasemien sisällä ei ole käyttäjän huollettavissa olevia kohteita Laitteen saa avata ja huoltaa ainoastaan sen huoltamiseen koulutettu henkilö Levymuistiaseman sisälle asennettujen luku kirjoitusyksiköiden suojakoteloa ei tule avata huoltotoimenpiteiden...

Page 90: ... the standard EN 60825 WARNING The use of the product otherwise than specified in the user s manual may expose the user to laser radiation exceeding safety class 1 The same warning in Swedish SERVICE There are no user serviceable parts inside the jukebox The jukebox products can be serviced only by qualified service personnel The optical drive mechanism s installed inside the library system shall ...

Page 91: ...ment is in the Class B category information technology equipment based on the rules of Voluntary Control Council For Interference by Information Technology Equipment VCCI Although aimed for residential area operation radio interference may be caused when used near a radio or TV receiver Read the instructions for correct operation ...

Page 92: ...C 10 Safety and Regulatory Information Japanese VCCI Statement ...

Page 93: ... system similar to the way a musical jukebox finds a record and moves it to the turntable when a song is requested jukebox controller The part of the jukebox that controls the sending and receiving of SCSI commands and controls the disk transport mechanism LAN Local area network A group of computers and peripherals physically connected so users can share hardware and software resources M O magneto...

Page 94: ...ot An are of the autochanger that holds cartridges when the cartridges are not in a drive or not being ejected through the mailslot terminator A resistor array device used for electrically terminating a SCSI bus A SCSI bus must be terminated at its two physical ends A peripheral device uses a terminator only if it is at the end of the bus W write once An additional operating mode available with mu...

Page 95: ...3 18 L log information retrieving 3 16 M mailslot shipping bracket removing 1 6 messages during host operations 3 7 during operator selection 3 6 moving the jukebox 1 12 N non security configurations changing 3 13 O optical disks care of 2 6 types 2 3 using 2 2 optical drive ID changing 3 19 P power connecting 1 11 power receptacle location 1 5 power switch location 1 5 R rear panel connectors 1 5...

Page 96: ...Index 2 Index T terminator when last device 1 5 tests running 3 17 troubleshooting 3 20 type styles in this book iii U using optical disks 2 2 V voltages 1 3 W warranty A 14 ...

Reviews:

Related manuals for Surestore 80ex - Optical Jukebox