background image

Connecting to a Display

11

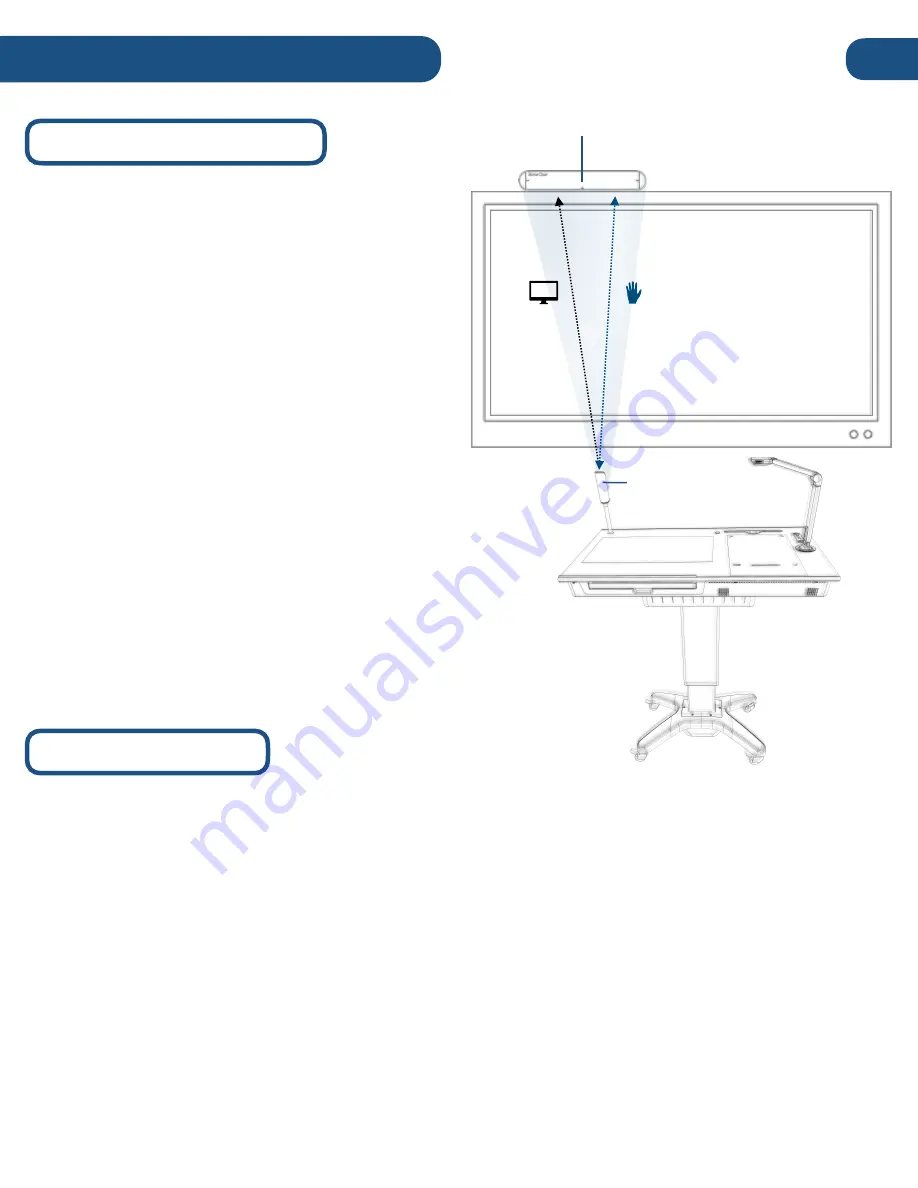
Wireless via HoverCast

The Pilot comes equipped with a wireless HDMI 

transceiver system 

called 

HoverCast

. Composed 

of a 

transmitter

 and 

receiver

 pair: The 

Transmitter


(built onto the Pilot) sends the Pilot's computer 
image and on-screen annotations to the HoverCast 

Receiver 

connected to the display, which serves as 

a large screen monitor for the Pilot. When used in 
combination with an

 interactive flat panel, the 

HoverCast 

also 

sends 

annotations made on the 

Panel back to 

the

 Pilot

The HoverCast transceivers are 

factory-paired

, so it is possible 

for multiple

 Pilot and 

HoverCast 

enabled displays to operate in 

close proxiimity without interference.


The Pilot's

 HoverCast 

does not require a WiFi signal to function, wireless HDMI 
operation does not affect internet bandwidth. The ideal tested 
range between the HoverCast transceivers is 30 feet.

HoverCast Set-Up

1)

Mount

 the 

Receiver

:


Place

 the 

HoverCast 

receiver 

on 

the top or side of


the display

 and secure it

in place using the thumbscrew on the back side of the unit.

 The receiver can also be placed next to a


projector or wherever 

the optimum location is deemed to be

. The receiver must be within

 transmission 

range

.

2) Connect HDMI and USB:

 Using the supplied cables, make HDMI and USB connections between the

HoverCast receiver and Display. Some IFP's may have multiple touch USB inputs, be sure to connect
to the one associated with the HDMI input you are using.

3) Connect Power

: Connect the HoverCast power adapter and plug into an available power outlet.

4) Power the HoverCast Reciever:

 Press the power button on back of the HoverCast receiver to

power on.

Touch  
Signal

HDMI  

Signal

Reciever

Transmitter

Summary of Contents for Pilot 3

Page 1: ...Pilot 3 User s Manual...

Page 2: ...Third Party Accessories Connecting to a Display 11 Wireless via HoverCast Wired via HDMI HoverCast Set Up Display Mode Audio 14 Built In Speakers Auxiliary Output Display Speakers Bluetooth HDMI Audi...

Page 3: ...t to any display via HoverCast Wirelessly cast bi directional annotations between Pilot and Interactive Flat Panel Capture stunning visuals with included 4K Solo 8Plus document camera Record and uploa...

Page 4: ...PAGE INTENTIONALLY LEFT BLANK...

Page 5: ...ctable Power Cable Lockable Wheels Tilt Adjustable Deck HoverCast Wireless Transceiver 40 Tempered Glass Surface Solo 8Plus Document Camera 21 Multitouch Display Document Positioning Mat Podium Contro...

Page 6: ...put Selection Sound and Audio Indicator Lights Height Controls Zoom In Zoom Out Rotate Image Focus Lock AutoFocus Audio out Mic in USB 3 0 Type A HDMI In Reset Button Power Button RJ45 Ethernet Port H...

Page 7: ...utton on located on right side of the device until the Pilot beeps signaling the start of the boot up process Boot up typically takes around minute but can vary across models and usage Power Save Slee...

Page 8: ...el i7 processor with the Pilot Plus a 500GB HDD and an additional 128GB SSD with the Pilot Plus WiFi and bluetooth connectivity and other standard PC features No additional computer is required to ope...

Page 9: ...ling the Side Tray For added convenience the Pilot includes a laptop tray that attaches the side of the podium The tray is large enough to accommodate most laptops and also functions as a cup holder I...

Page 10: ...d Trackpad Pull Out Keyboard and Trackpad Built In Touchscreen The Pilot s primary means of navigation is the built in touchscreen The touchscreen can accommodate up to 10 points of simultaneous touch...

Page 11: ...into one of the USB ports located on the right side of the pilot For help connecting bluetooth enabled devices visit the Windows 10 guide at www windows10 guide com Digital Keyboard Windows 10 feature...

Page 12: ...on wireless HDMI operation does not affect internet bandwidth The ideal tested range between the HoverCast transceivers is 30 feet HoverCast Set Up 1 Mount the Receiver Place the HoverCast receiver on...

Page 13: ...with the output device Short Flash Long O The HoverCast is paired but cannot detect the known PC signal The known PC is likely o or has Bluetooth disabled Turn on Bluetooth to successfully connect the...

Page 14: ...o the right left top or bottom of the Pilot s main display area You can easily switch to Mirrored Display mode in which the external display will show the exact mirror image of what appears on the Pil...

Page 15: ...speakers In the Windows playback device list the HoverCast s audio output should be listed as MStar Demo If MStar Demo does not appear in the list of Playback Devices unplug the HoverCast receiver fr...

Page 16: ...sult the Windows 10 manual to learn more about connecting and configuring Bluetooth audio devices www windows10 guide com Audio In Set Up The Pilot features a built in Solo 8Plus Document Camera with...

Page 17: ...ctor 2 program This is a solution for mobile devices or web enabled devices without an HDMI out First connect your device to the Pilot via an HDMI cable into one of the two HDMI In ports on the right...

Page 18: ...r detailed HDMI Viewer instructions refer to the Flex 11 Manual HDMI Viewer utilizes the same interface and functionality as Flex 11 INSERT FLEX 11 MANUAL Reflector Wireless Interfacing with other Dev...

Page 19: ...otation Wheel Camera Head Adjusting the Camera The Solo 8Plus document camera features several convenient features such as orientation zoom and focus controls as well as integrated LED lighting Operat...

Page 20: ...ter Classroom Management Software The Pilot also features a comprehensive classroom management software suite that contains features such as Lesson Recorder Record your lessons and upload in real time...

Page 21: ...ive use the reset button which may lead to computer data corruption Pilot Drivers If the internal computer becomes corrupted or when the device is imaged the necessary drivers will need to be reinstal...

Page 22: ...d on and ready to pair On the HoverCast press the Touch button The blue touch light will start blinking 5 To pair click tap Add Bluetooth and Other Device icon 6 The Add a Device Window will appear Se...

Page 23: ...will provide a 9 digit access code to sync the HoverCam Pilot unit with Support and enable screen sharing Support staff will then be able to better diagnose and troubleshoot Support assembly set up an...

Reviews: