3 Descriptions of Mechanisms
Removing the Cam
PC-P430
40
3 - 8 Removing the Cam
3 - 8 - 1 Procedure to Remove the Cam
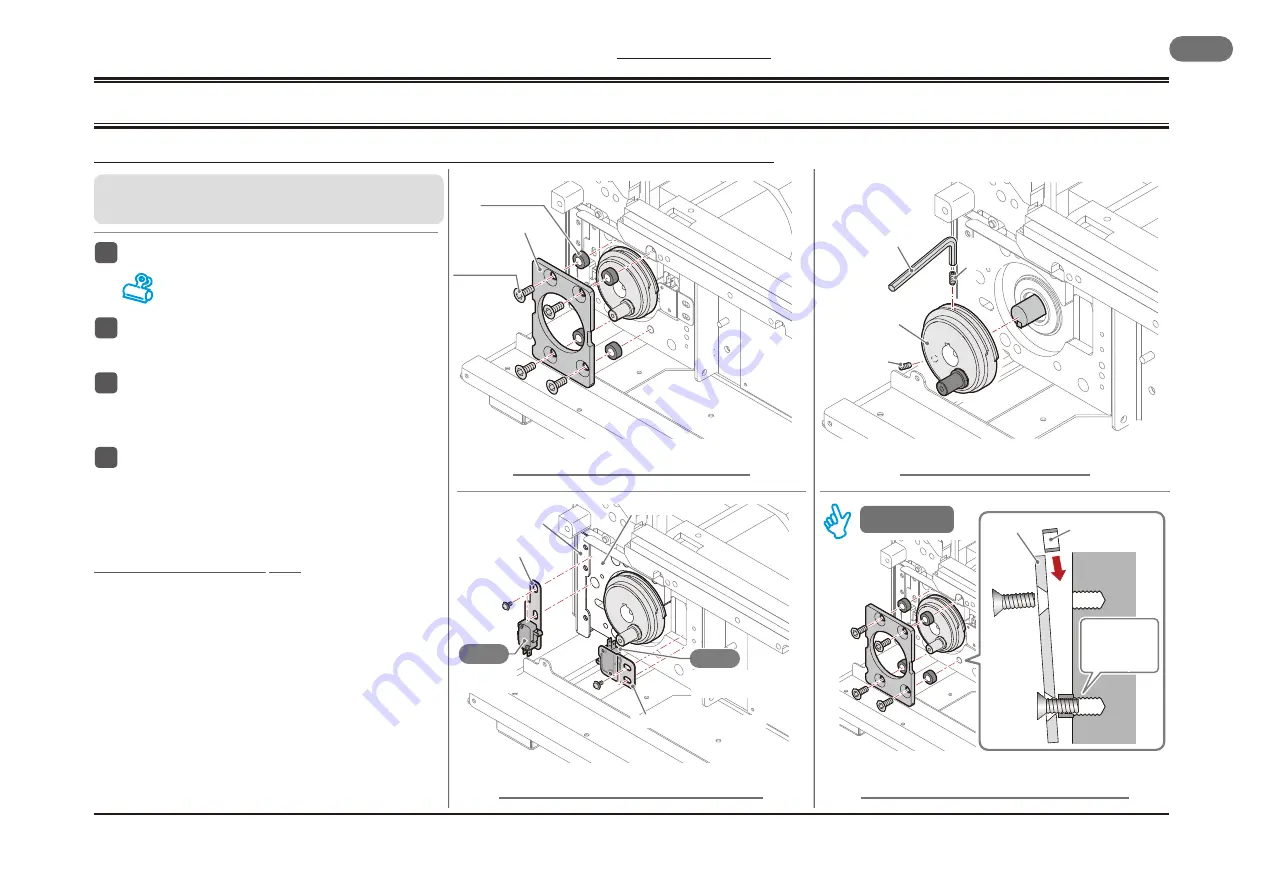
Fig.2 Removing the cam switches
Fig.1 Removing the front plate
Fig.4 How to mount the front plate
Fig.3 Removing the cam
404018
3_8_1A
404018
3_8_1C
404018
3_8_1B
1
2
1
1
2
2
404013
3_8_1D
■
Go through the following steps after removing the
knife holder.
1
Remove the front plate.
(Fig.1)
There are four collars behind the front plate. Be care-
ful not to lose them.
2
Remove the brackets for the cam switches
A and B.
(Fig.2)
3
Remove the rear plate.
(Fig.2)
•
Remove the screws for the side frame. Open the side
frame slightly and remove the rear plate.
4
Remove the cam.
(Fig.3)
•
Loosen the two set screws (SS5-20) using a 2.5 mm
Allen wrench.
•
When you cannot pull out the cam, use a tool to pull out
a pulley.
How to mount the front plate
(Fig.4)
1
. Mount the collars on the lower two screws, and turn each
screw until the first thread groove goes into the rear plate.
2
. Insert the upper two screws, and mount the collars.
Front Plate
Turn the screw so
that only the first
thread groove is
in the rear plate.
Cam
Switch A
S03
S04
Cam
Switch B
Four
Collars
Bracket for Cam Switch A
Bracket for Cam Switch B
Allen Wrench
Cam
SS5-20
SS5-20
Collar
Front Plate
Four Flat Head
screws
Mounting
Side Frame
Rear plate
Summary of Contents for PC-P430
Page 6: ...This page is intentionally left blank ...
Page 7: ...General 1 PC P430 7 1 General PC P430 ...
Page 12: ...1 General PC P430 12 This page is intentionally left blank ...
Page 13: ...General 1 PC P430 13 This page is intentionally left blank ...
Page 14: ...1 General PC P430 14 This page is intentionally left blank ...
Page 15: ...Troubleshooting 2 PC P430 15 2 Troubleshooting PC P430 ...
Page 18: ...2 Troubleshooting PC P430 18 This page is intentionally left blank ...
Page 28: ...2 Troubleshooting PC P430 28 This page is intentionally left blank ...
Page 29: ...Troubleshooting 2 PC P430 29 This page is intentionally left blank ...
Page 30: ...2 Troubleshooting PC P430 30 This page is intentionally left blank ...
Page 31: ...Descriptions of Mechanisms 3 PC P430 31 3 Descriptions of Mechanisms PC P430 ...
Page 47: ...Descriptions of Mechanisms 3 PC P430 47 This page is intentionally left blank ...
Page 48: ...3 Descriptions of Mechanisms PC P430 48 This page is intentionally left blank ...
Page 49: ...Descriptions of Mechanisms 3 PC P430 49 This page is intentionally left blank ...
Page 50: ...3 Descriptions of Mechanisms PC P430 50 This page is intentionally left blank ...
Page 51: ...Electrical Parts Location 4 PC P430 51 4 Electrical Parts Location PC P430 ...
Page 53: ...Electrical Parts Location 4 PC P430 53 This page is intentionally left blank ...
Page 56: ...4 Electrical Parts Location PC P430 56 This page is intentionally left blank ...
Page 57: ...Electrical Parts Location 4 PC P430 57 This page is intentionally left blank ...
Page 58: ...4 Electrical Parts Location PC P430 58 This page is intentionally left blank ...
Page 59: ...Circuit Boards 5 PC P430 59 5 Circuit Boards PC P430 ...
Page 66: ...5 Circuit Boards PC P430 66 This page is intentionally left blank ...
Page 67: ...Circuit Boards 5 PC P430 67 This page is intentionally left blank ...
Page 68: ...5 Circuit Boards PC P430 68 This page is intentionally left blank ...
Page 69: ...Electrical Circuits 6 PC P430 69 6 Electrical Circuits PC P430 ...
Page 72: ...6 Electrical Circuits PC P430 72 This page is intentionally left blank ...
Page 73: ...Electrical Circuits 6 PC P430 73 This page is intentionally left blank ...
Page 74: ...You can download the latest manual http hip horizon co jp Anytime and Anywhere END SHEET ...


